OBD2 tools on OBD2shop.co.uk https://blog.dnevnik.hr/obd2shop
petak, 28.11.2025.
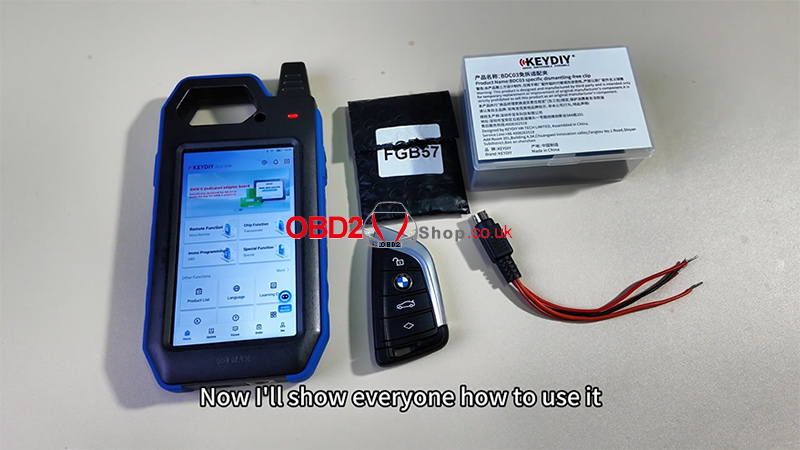
BMW G/U FGB Key Adding with KD-MAX & BDC03 Clip
Using the Keydiy KD-MAX with the BDC03 specific dismantling-free clip makes BMW G/U chassis key programming much more convenient and efficient. This guide walks you through the complete process of adding an FGB key to a BMW BDC3 module.
Required Tools:
Keydiy KD-MAX
BDC03 Specific Dismantling-Free Clip
Cable Series – Specific Cable for BDC03 Clip
KD FGB57 PCB Board
Original Key
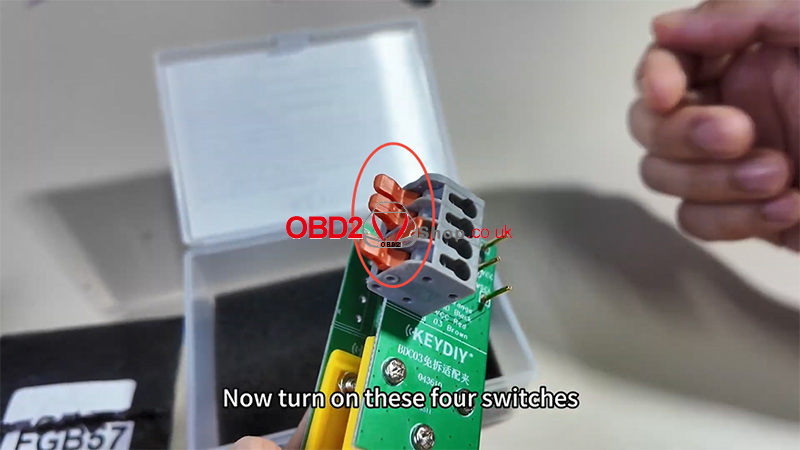
Step 1: Prepare the BDC03 Clip
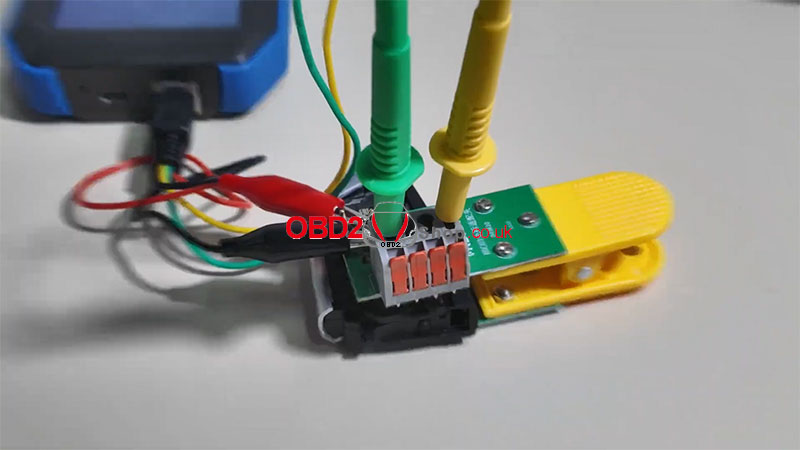
Remove the BDC03 dismantling-free clip from the package.
Turn on the four switches on the clip.
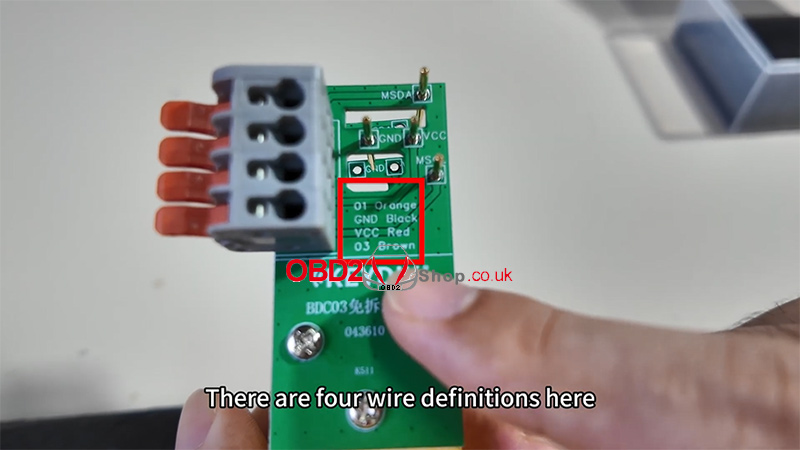
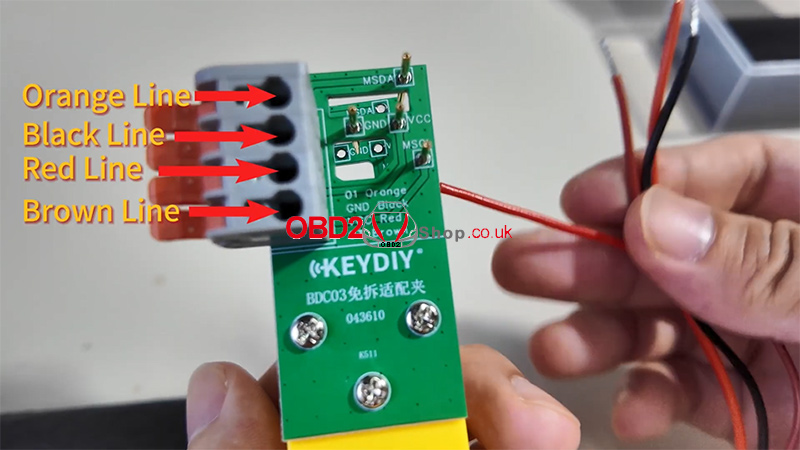
Note the four wire definitions and connect the wires in sequence.
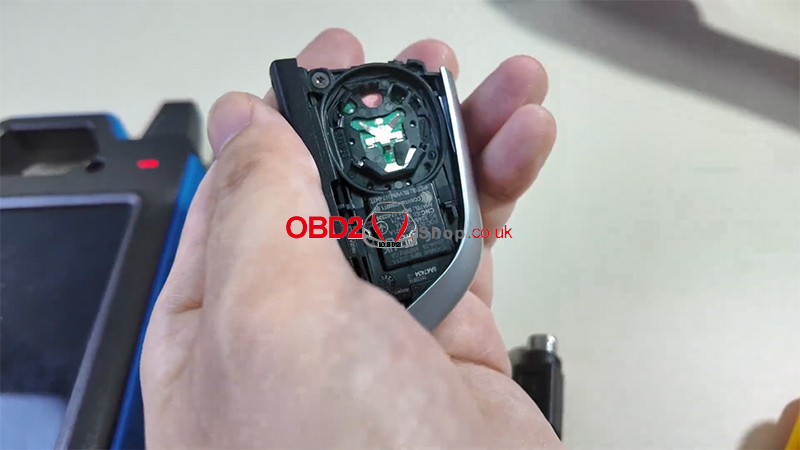
Step 2: Connect to the Original Key
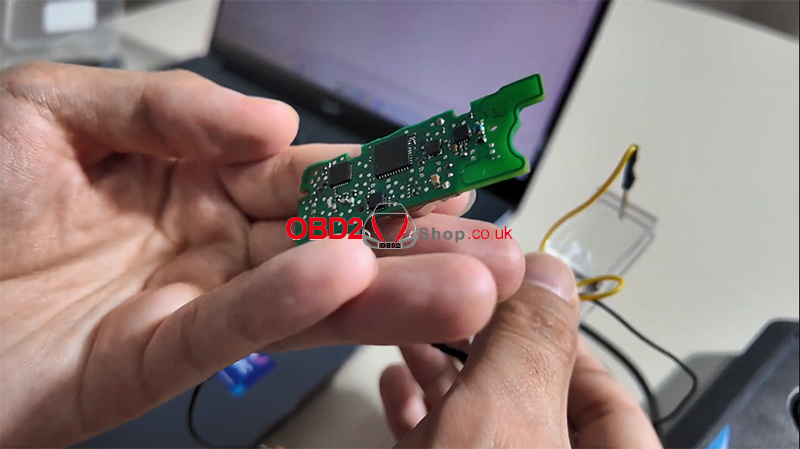
Remove the back cover of the original BMW key.
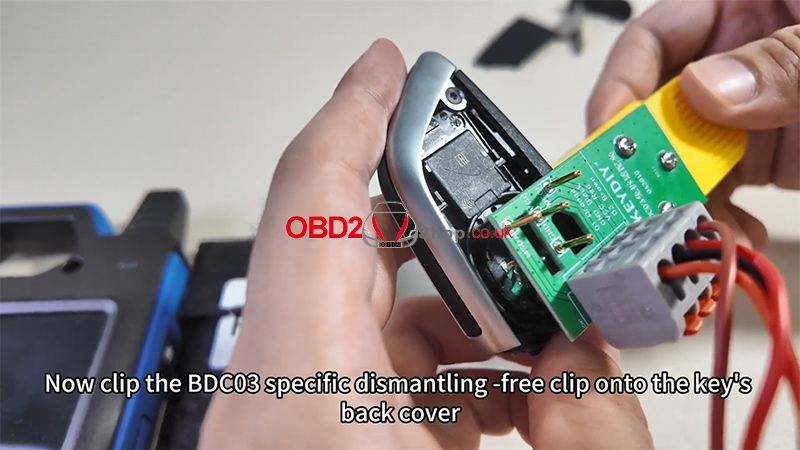
Attach the BDC03 dismantling-free clip to the back of the key.
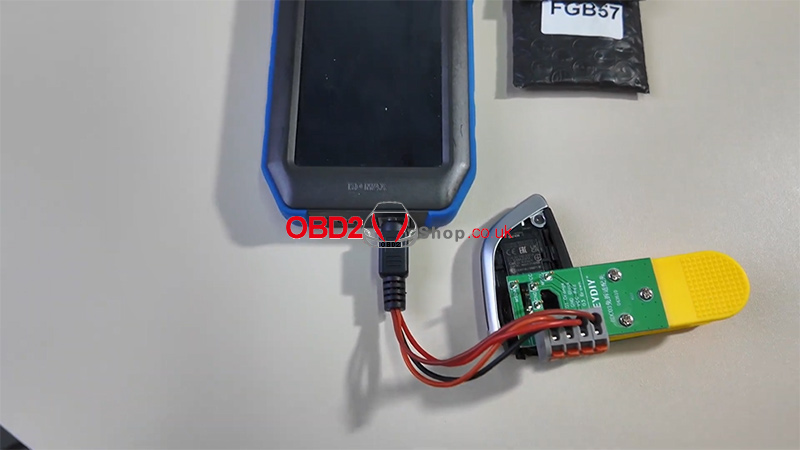
Connect the Cable Series BDC03-specific cable to KD-MAX, then plug it into the KD-MAX device.
Step 3: Read the Chip Data with KD-MAX
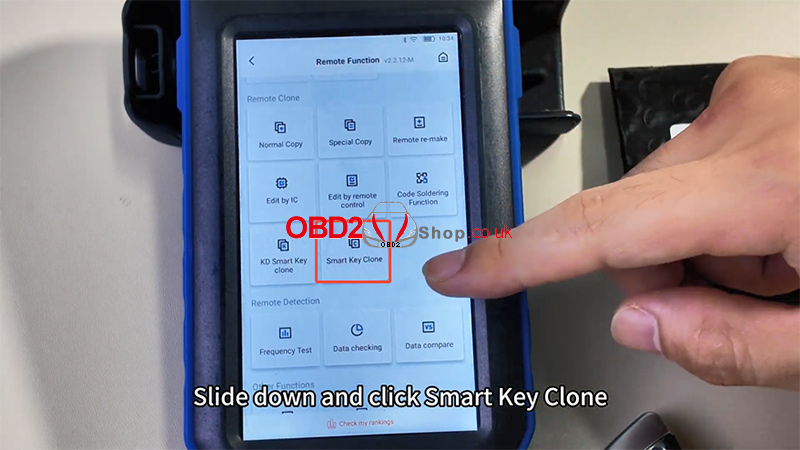
On the KD-MAX, select [Remote Function].
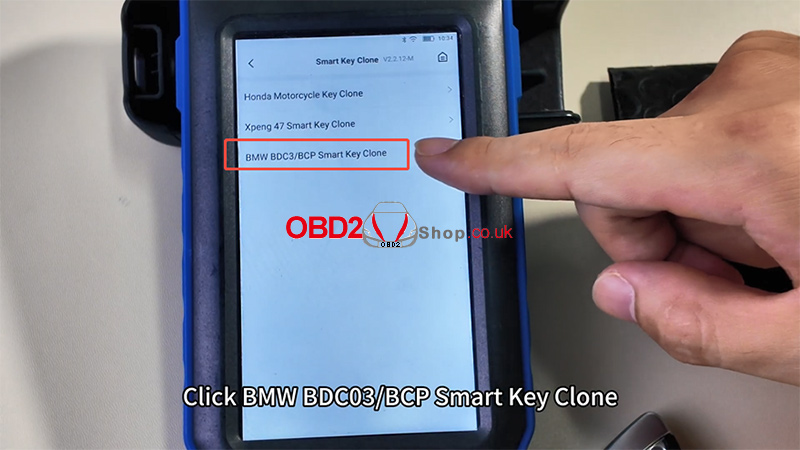
Scroll down and choose [Smart Key Clone].
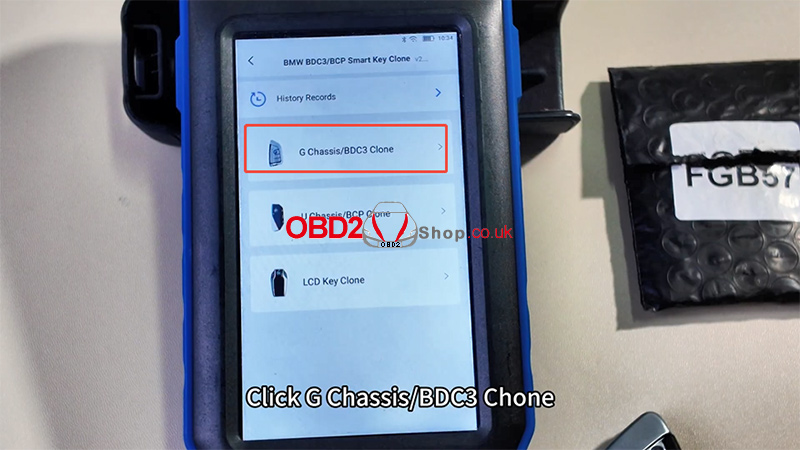
Select [BMW BDC03/BCP Smart Key Clone] ’ [G Chassis/BDC3 Clone].
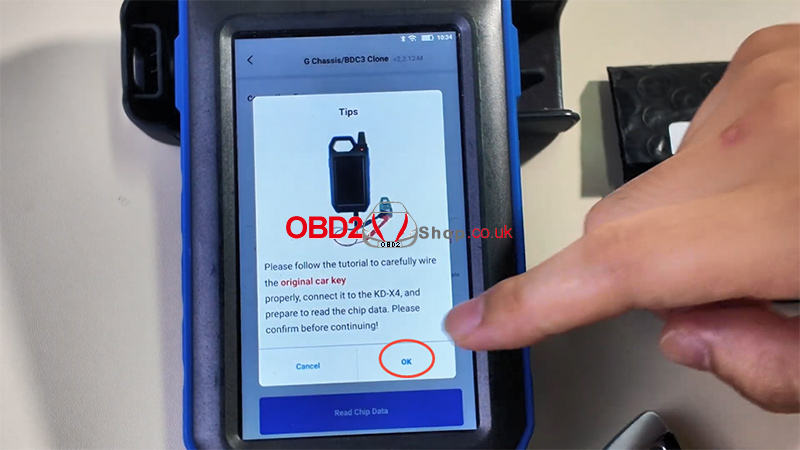
Tap [Read Chip Data], then confirm with OK.
Wait for the data to be read.
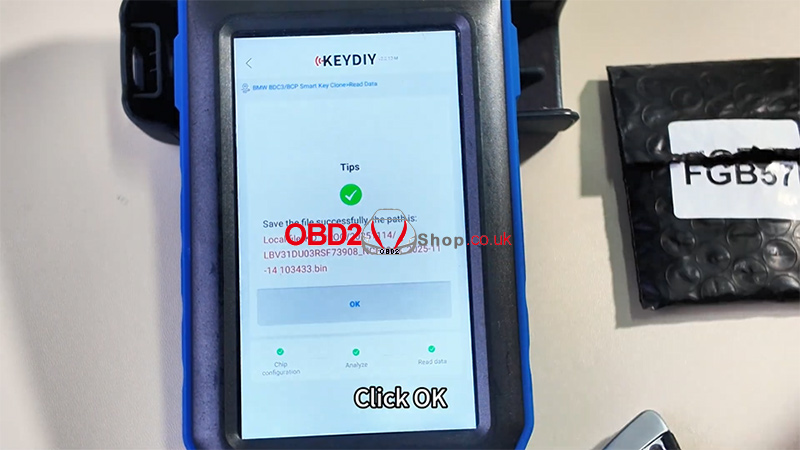
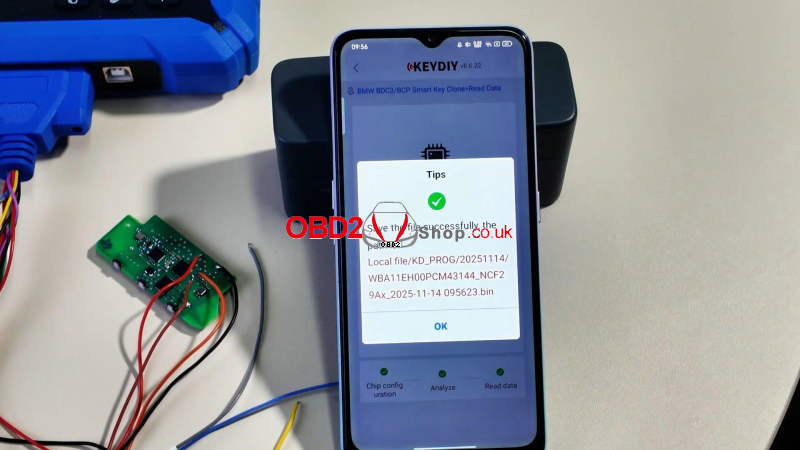
Once complete, save the file when prompted.
Step 4: Generate the New FGB Key
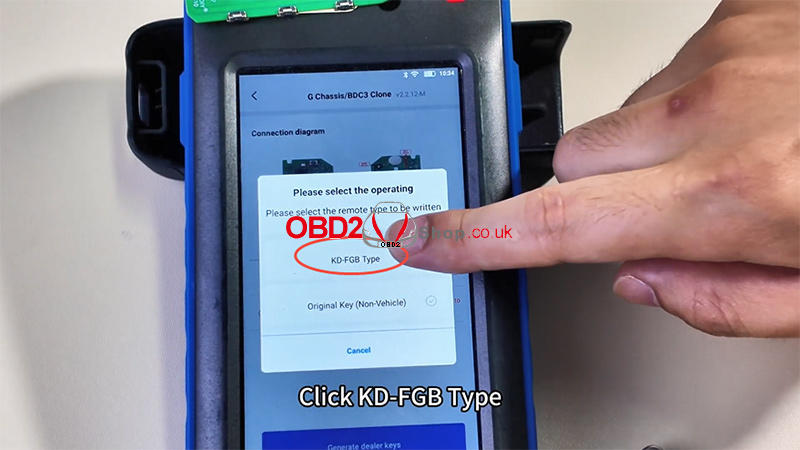
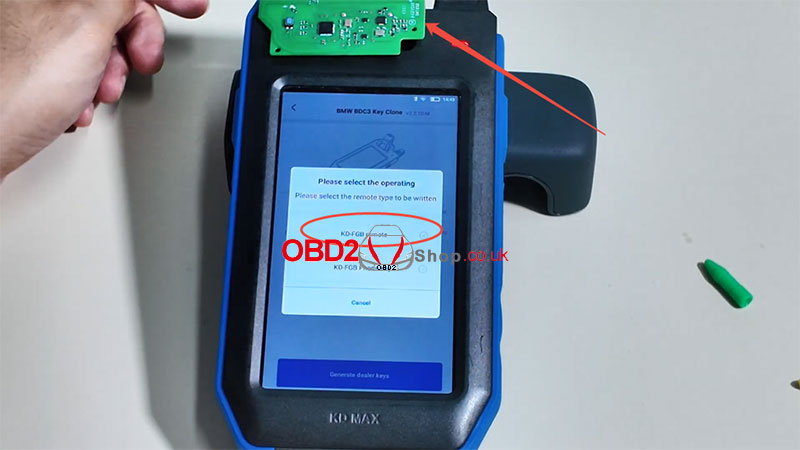
Place the FGB57 PCB in the KD-MAX induction area.
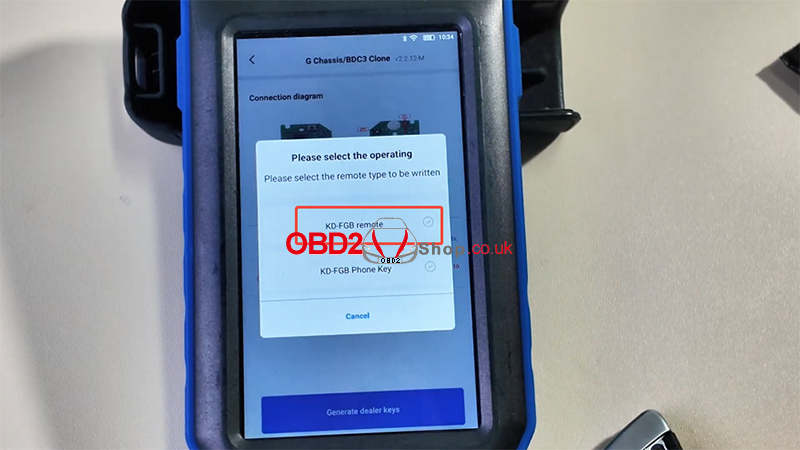
Select [KD-FGB Type] ’ [KD-FGB Remote].
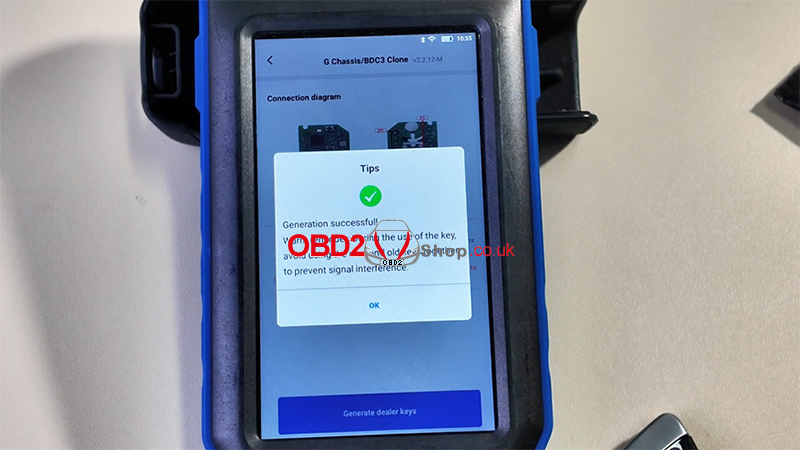
Generate the key—once successful, you can install the PCB into the key shell and use it normally.
For a full demonstration, watch the video tutorial:
https://youtu.be/js42LdCMSWM
www.obd2shop.co.uk
Oznake: keydiy kd max
četvrtak, 27.11.2025.
A Guide to the Keydiy KD-MP Soldering-Free Clip
In this guide, we’ll walk you through how to use the KD-MP specific soldering-free clip, using the Touareg PCB as an example.
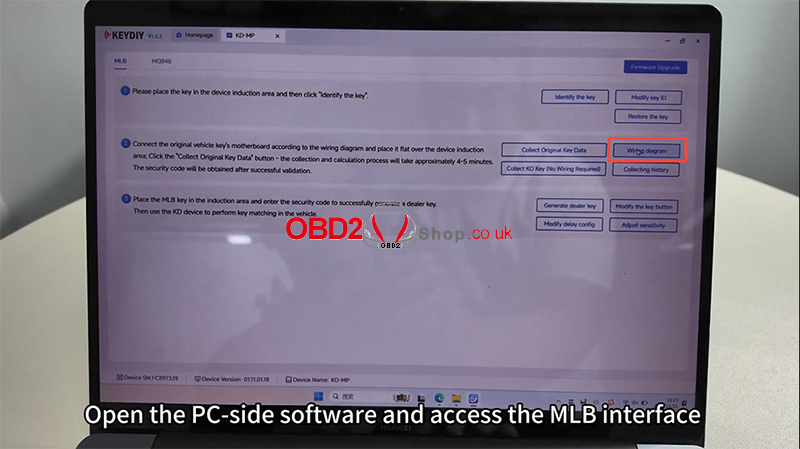
Step 1: Access the Wiring Diagram
Open the PC-side software and navigate to the MLB interface.
Click on the [Wiring diagram] option to find the corresponding wiring diagram for your target PCB.
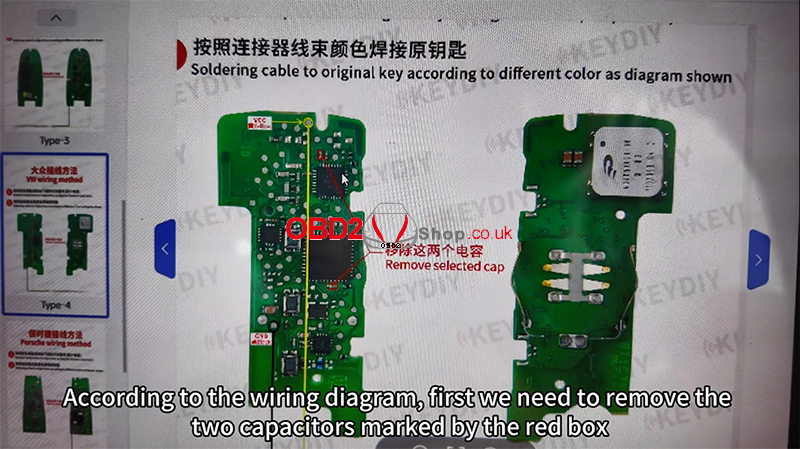
Step 2: Prepare the PCB
According to the wiring diagram, locate and remove the two capacitors marked in the red box.
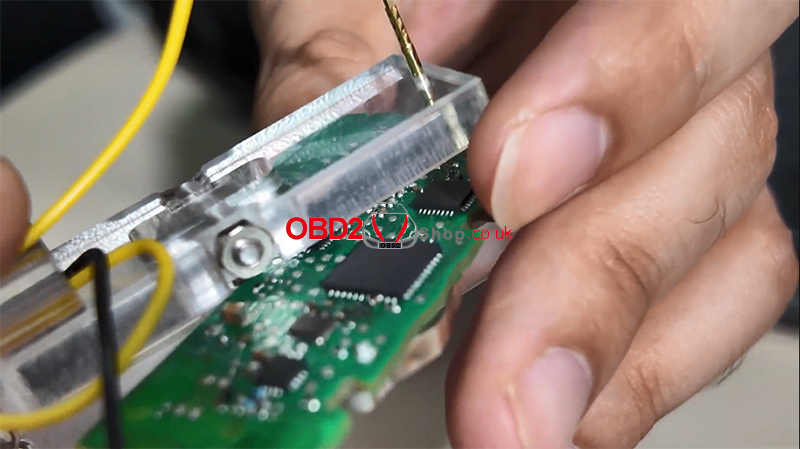
Step 3: Attach the Clip
Clip the red pin onto the VCC position (marked by the yellow circle).
Clip the black pin onto the GND position (marked by the black circle).
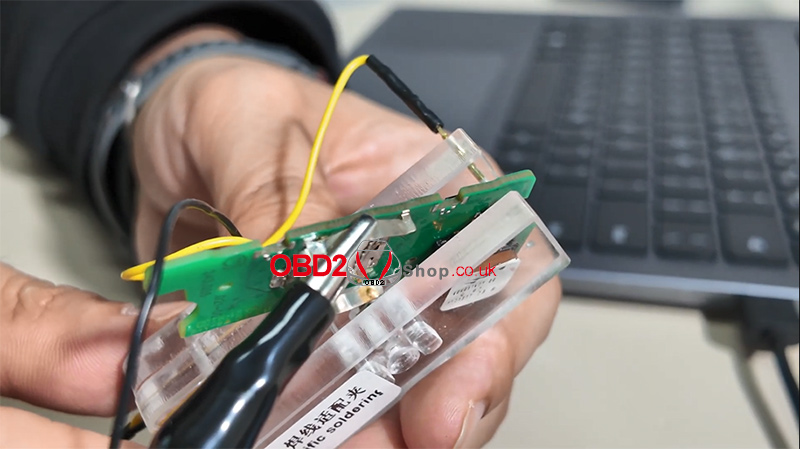
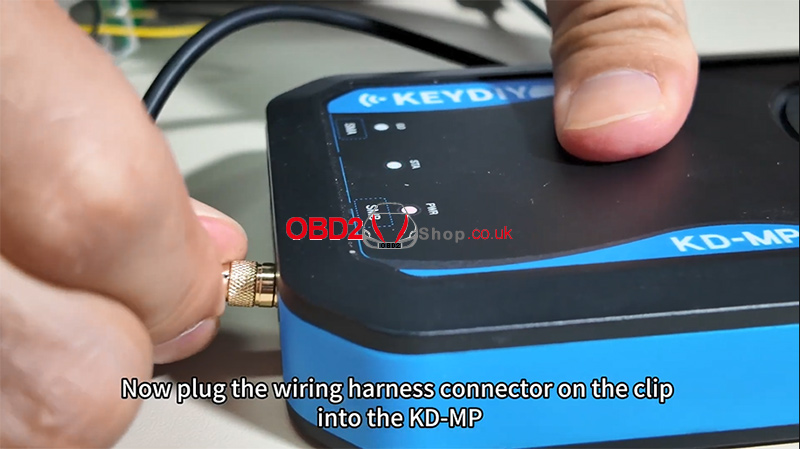
Step 4: Connect the Harness to KD-MP
Plug the wiring harness connector from the clip into the KD-MP device.
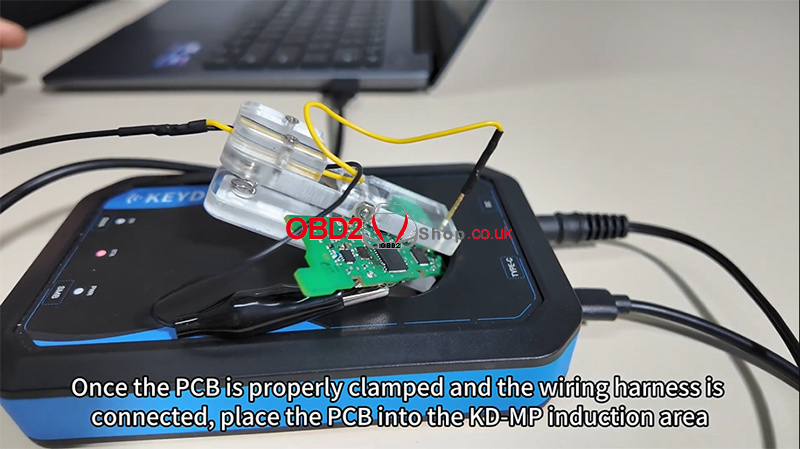
Step 5: Position the PCB and Collect Data
Once the PCB is securely clamped and the harness is connected, place the PCB into the KD-MP induction area.
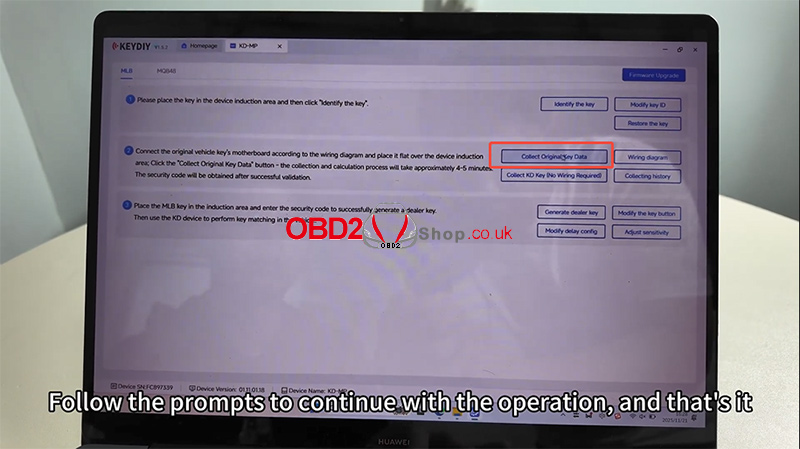
Turn off any interfering images or displays, then click [Collect Original Key Data] in the software.
Follow the on-screen prompts to complete the operation.
Video Guide
For a visual walkthrough, check out our video tutorial:
https://youtu.be/zZFOFFLGDvg
Final Notes
With the Keydiy KD-MP soldering-free clip, programming keys becomes a straightforward and solder-free process. Always ensure proper connections and follow software instructions carefully for optimal results.
For more tools and accessories, visit:
www.obd2shop.co.uk
Oznake: keydiy kd-mp soldering-free clip
srijeda, 26.11.2025.
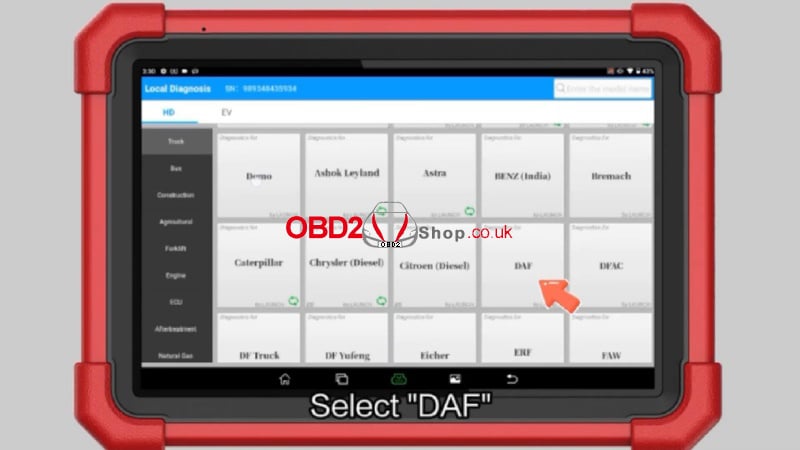
Launch X431 PAD 5 Guide: DAF XG+530 Cylinder Compression Test
This guide provides clear, step-by-step instructions on how to perform a cylinder compression test on a 2021 DAF XG+530 truck with the LAUNCH X431 PAD 5 Elite. This procedure helps you quickly assess engine health without mechanical tools.
Follow these steps to perform the test:
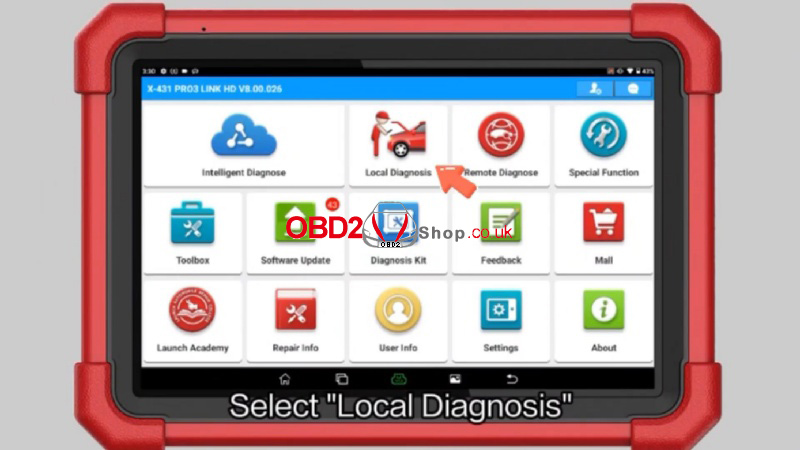
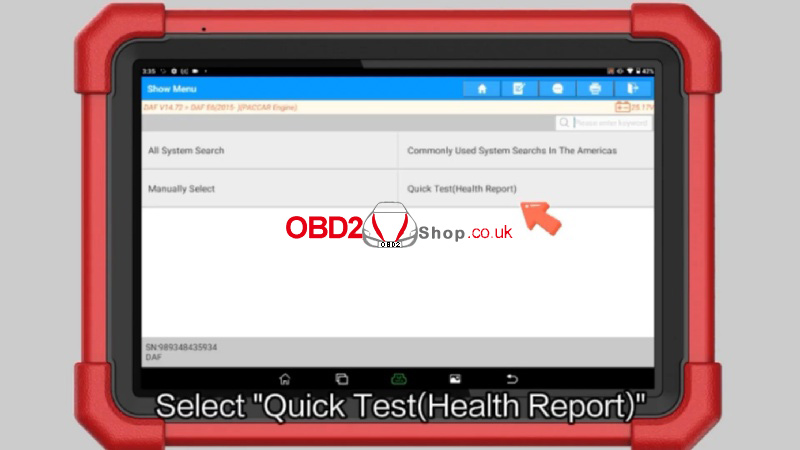
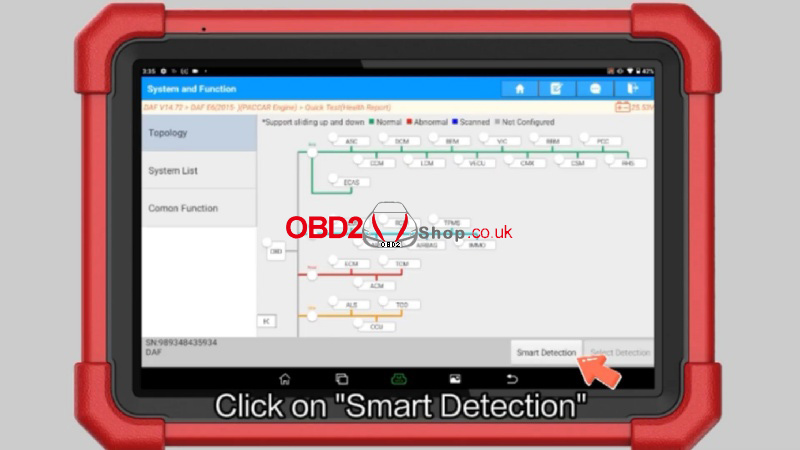
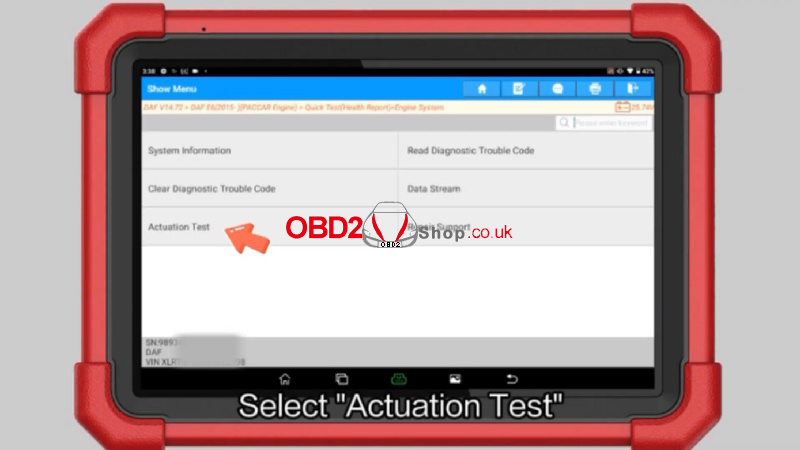
1. Navigate to: Local Diagnosis >> DAF >> OK >> DAF E6(2015-)(PACCAR Engine) >> Quick Test(Health Report) >> Smart Detection >> ECM >> ENTER

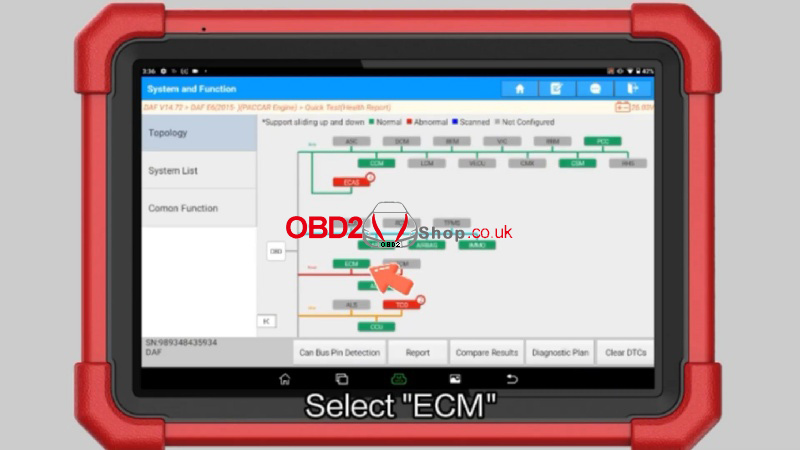
2. Confirm the vehicle info displayed on your Launch X431 device is correct.
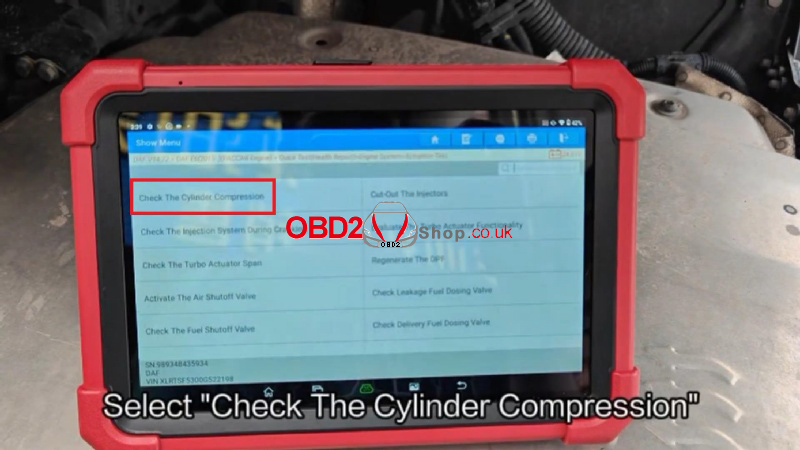
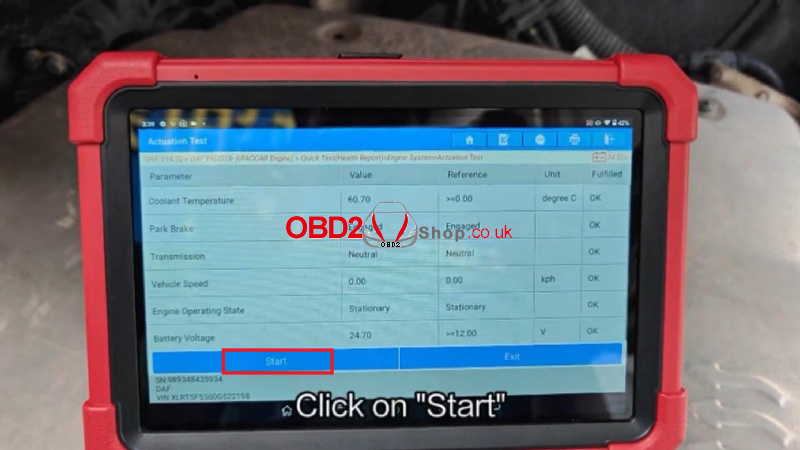
3. Select: Actuation Test >> Check The Cylinder Compression >> Start
4. Start the vehicle's engine and let the diagnostic program run until it completes automatically.
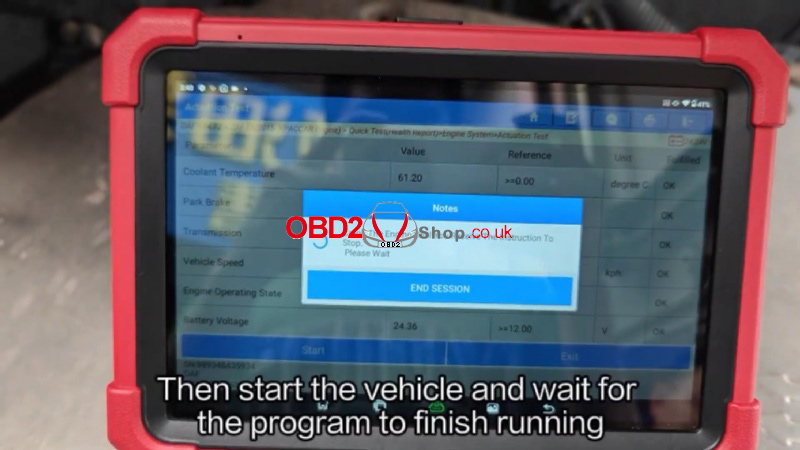
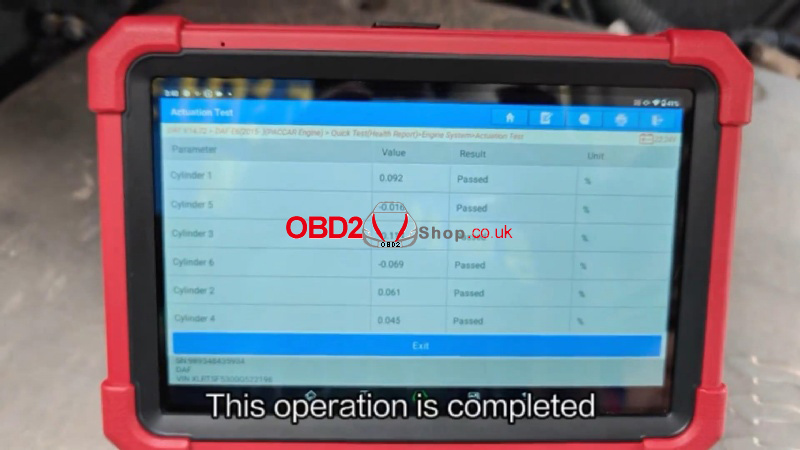
The test is finished when the tool displays a completion message. This efficient process allows for a reliable assessment of your engine's mechanical condition with X431 PAD V Elite.
www.obd2shop.co.uk
Oznake: launch x431 pad 5 elite
How to Change the Language on Your OBDSTAR ODO Master
The OBDSTAR ODO Master supports multiple languages, giving users worldwide a more comfortable and efficient operating experience. Supported languages include English, Italian, Russian, German, Spanish, French, Polish, and Portuguese.
If you want to switch the device to your preferred language, just follow the simple steps below.
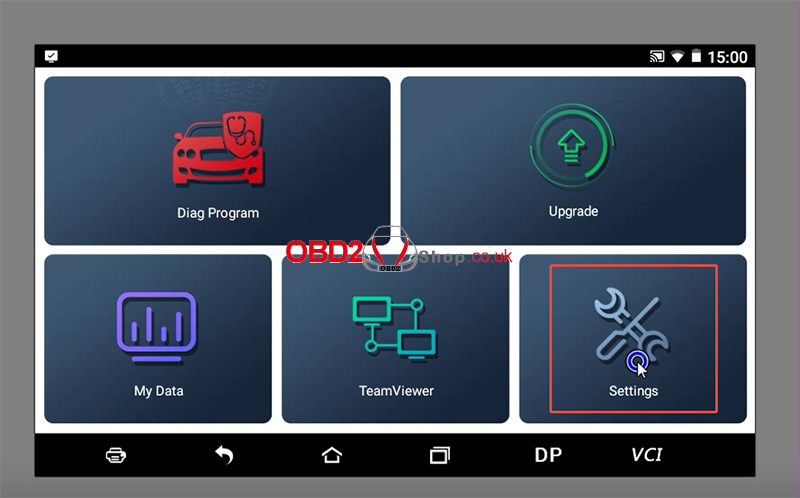
Step 1: Access the Language Menu
On your ODO Master Tablet, navigate to the main menu and select [Settings], then choose [Language].
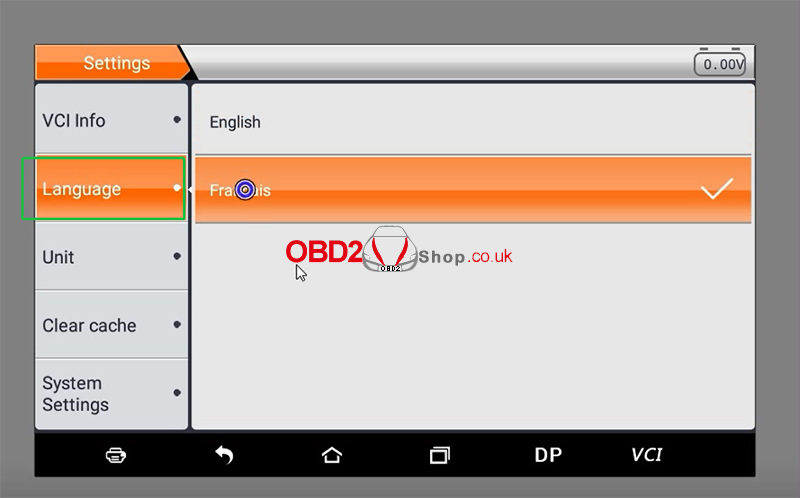
Step 2: Select Your Preferred Language
You will now see a list of all available languages. Simply tap on the one you wish to use.
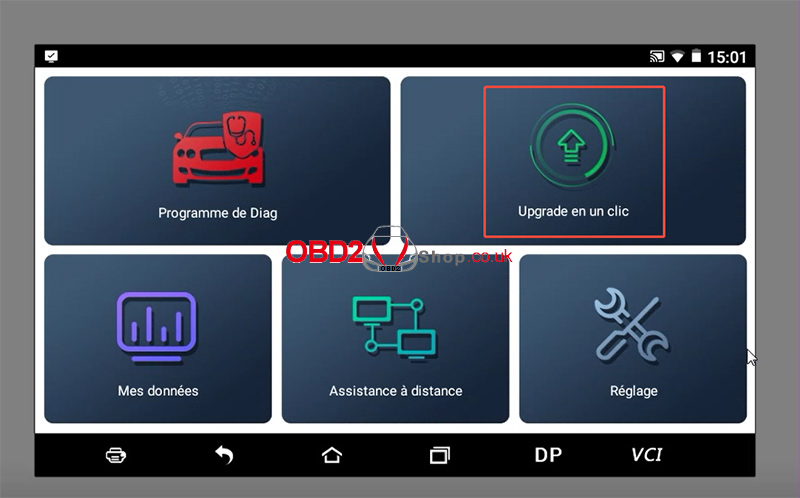
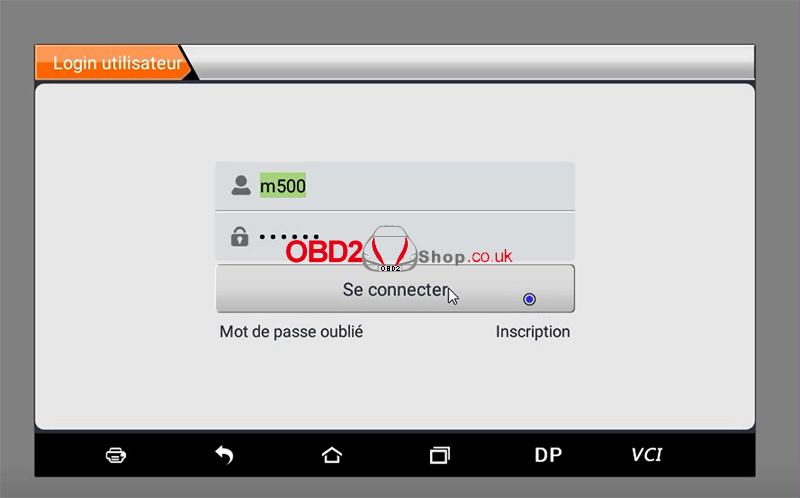
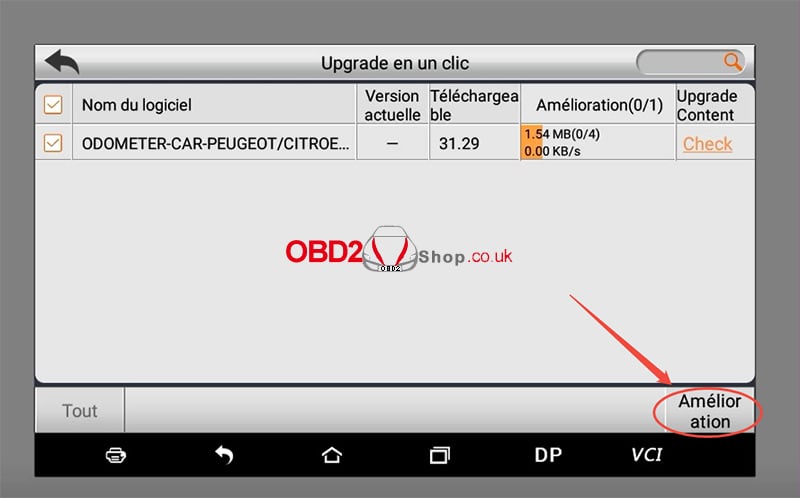
Step 3: Update the Software (Recommended)
After the language has been successfully changed, it is highly recommended to go back to the main menu, select [Upgrade], and then log in to update the software. This ensures all menu items and resources are fully translated for your new language setting.
And that's it! Your OBDSTAR ODO Master is now set up in your preferred language, making your diagnostics work smoother and more intuitive.
If the language won't switch, try restarting the device. If the problem persists, our support team is here to help.
www.obd2shop.co.uk
Oznake: obdstar odomaster
utorak, 25.11.2025.
2021 Harley-Davidson Key Programming with OBDSTAR MOTOMASTER
This guide walks you through the process of programming a new key for a 2021 Harley-Davidson motorcycle using the OBDSTAR MOTOMASTER diagnostic tool. Follow the steps below to complete the procedure smoothly and successfully.
Required Tools:
MOTOMASTER
Main Cable
M041 Cable
New Key
Step 1: Connect the Motorcycle
Locate the diagnostic port on your Harley-Davidson and connect it to the MOTOMASTER using the main cable and M041 cable.
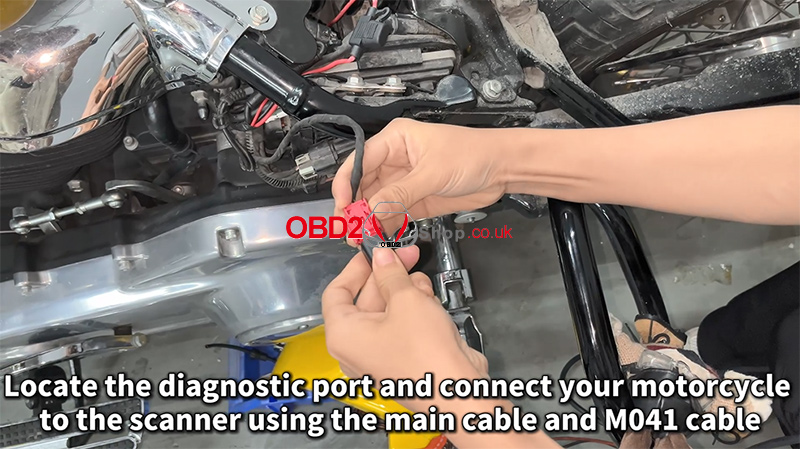
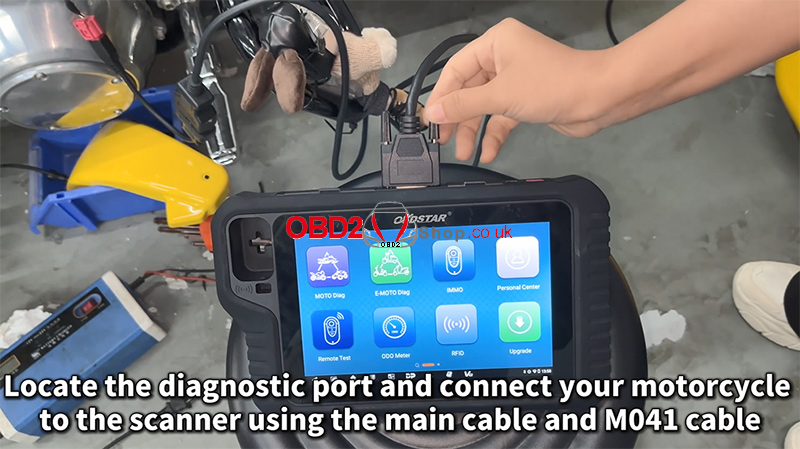
Turn on the ignition to power the system.
Step 2: Select the Vehicle Model
On the MOTOMASTER:
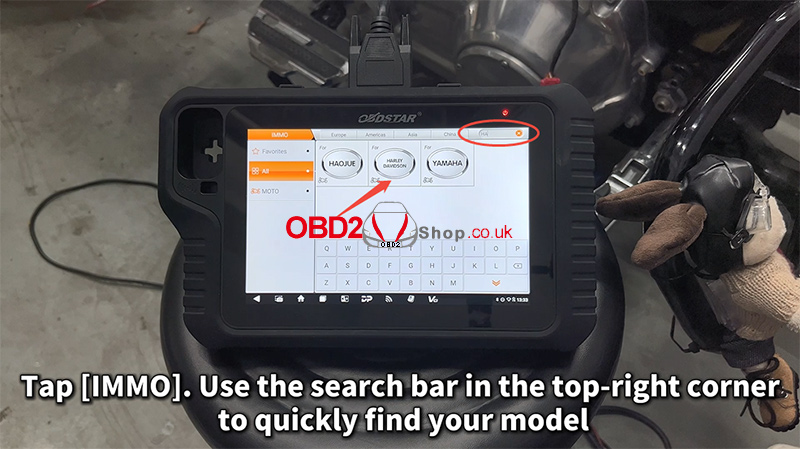
Tap IMMO.
Use the search bar in the top-right corner to quickly locate your model.
Navigate to:
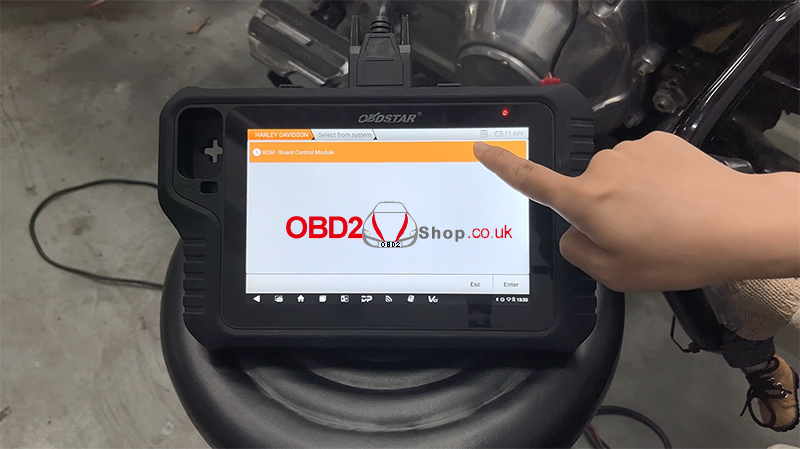
[HARLEY DAVIDSON] ’ [HARLEY DAVIDSON V40.32] ’ [BCM – Board Control Module]
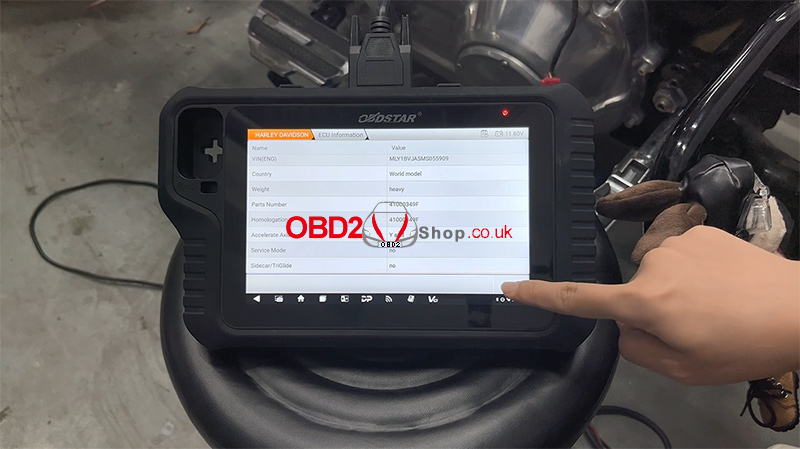
Tap [ECU Information] to view and verify module details.
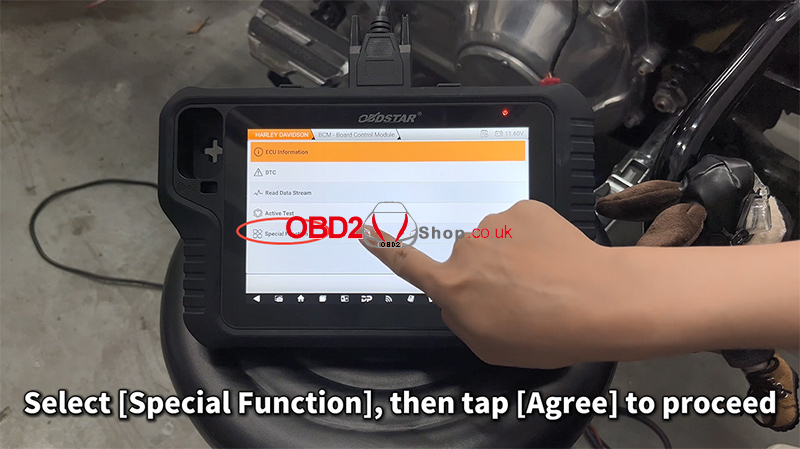
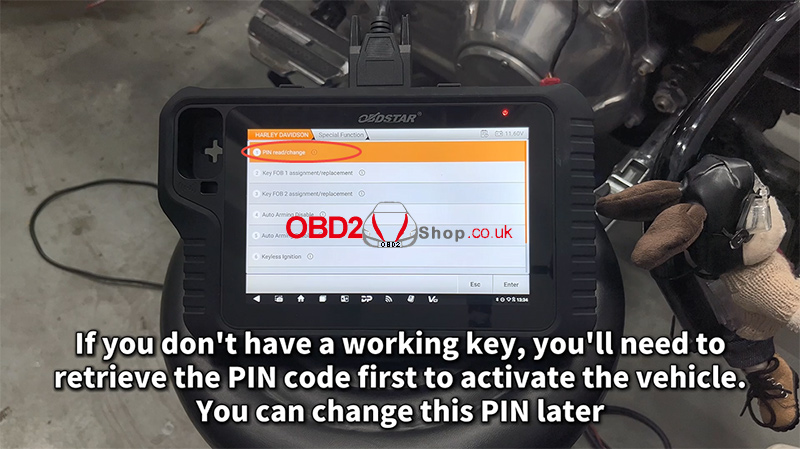
Step 3: Access Special Functions
Select [Special Function], then tap [Agree] to continue.
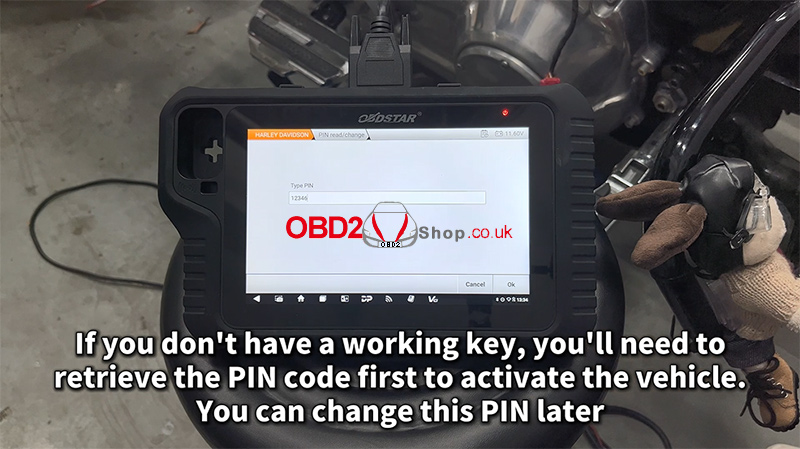
If you don’t have a working key, you must retrieve the PIN code first to activate the vehicle.
Choose [PIN read/change] if you wish to modify the PIN later.
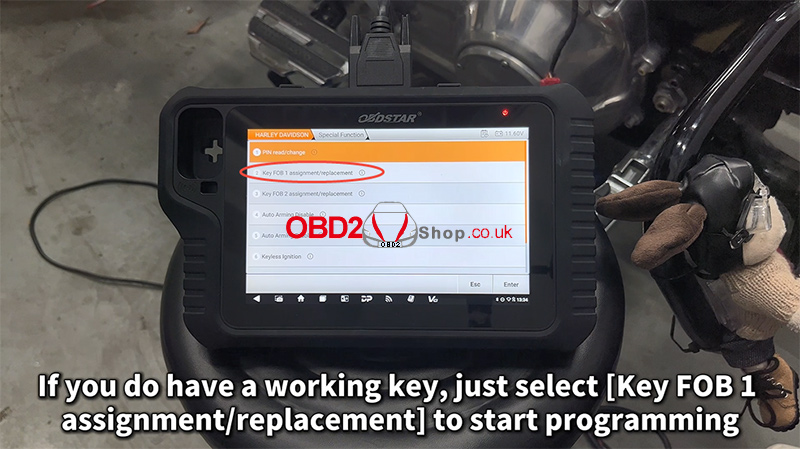
Step 4: Program the New Key
If you already have an available working key, choose [Key FOB 1 assignment/replacement] to begin programming.
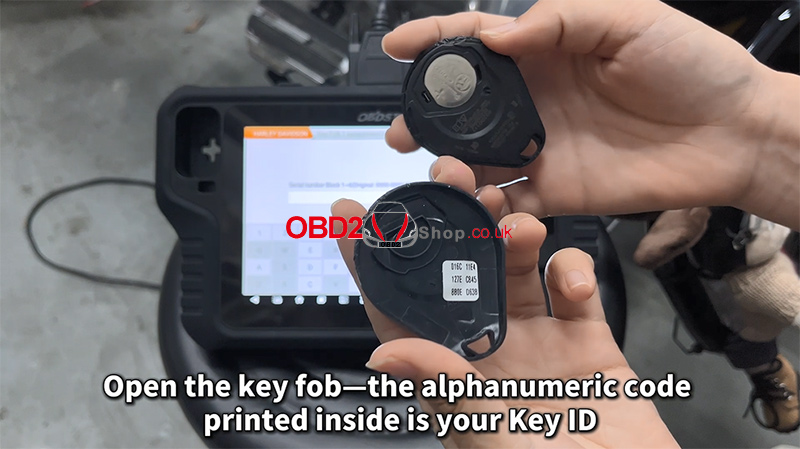
The device will prompt you to enter the Key ID.
Open your new key fob—inside, you will find an alphanumeric code. This is your Key ID.
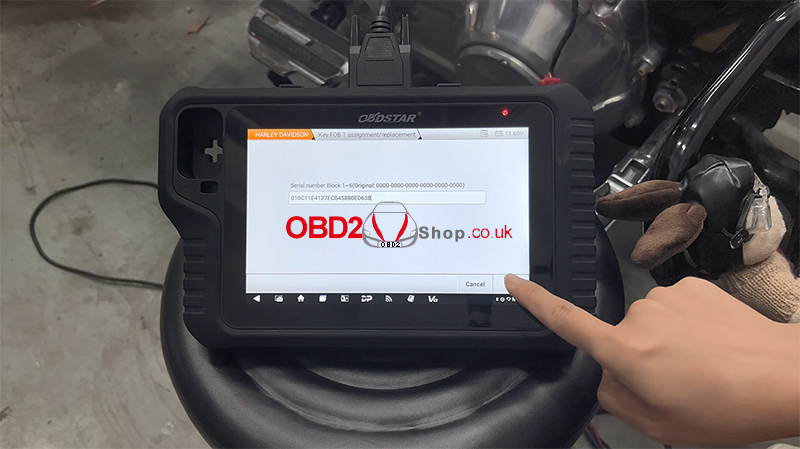
Step 5: Finalize Programming
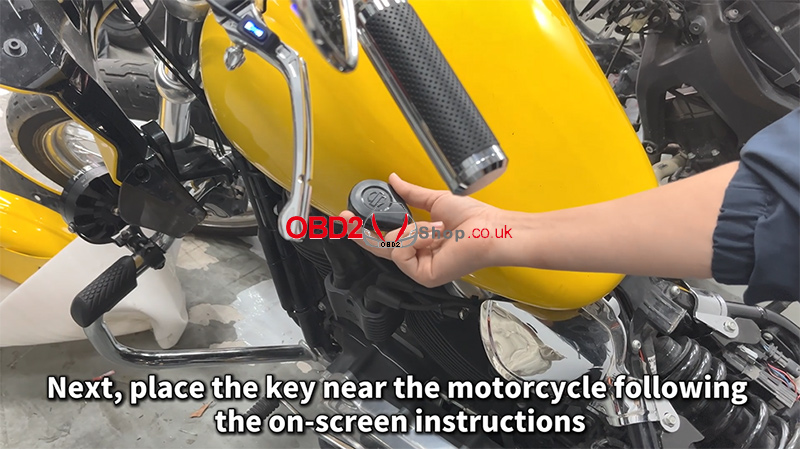
Follow the on-screen instructions and place the key near the motorcycle as required.
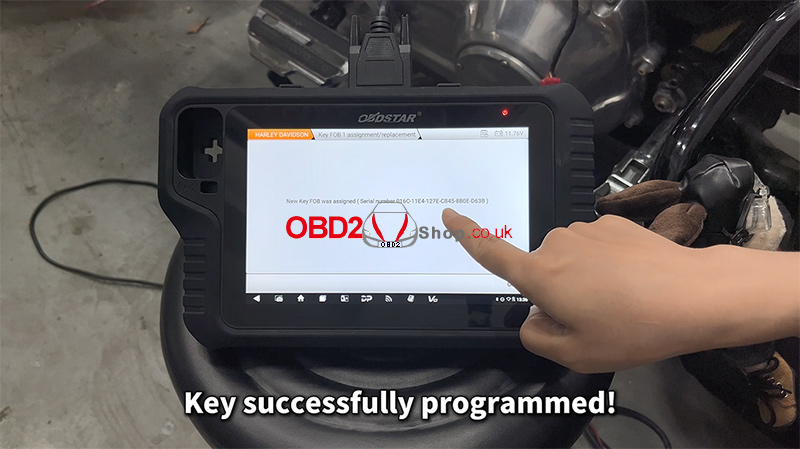
Once the device confirms the key has been successfully programmed, tap OK.
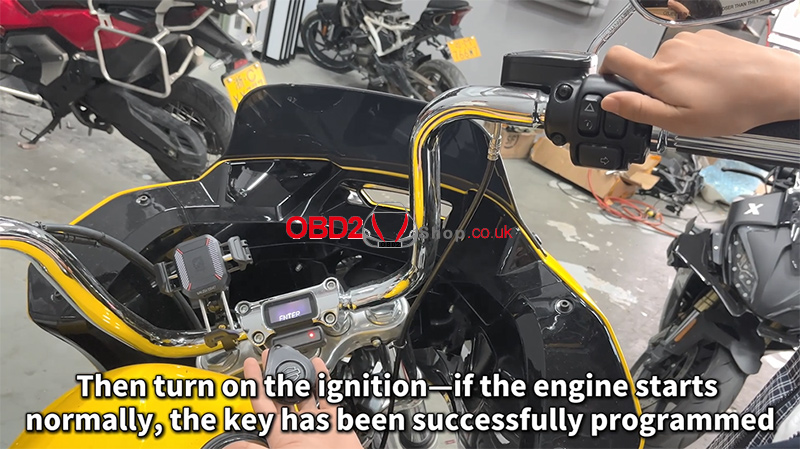
Turn on the ignition. If the engine starts normally, the new key has been successfully programmed.
Watch the full demonstration here:
https://youtu.be/e7bj68C3AXg
More tools available at:
www.obd2shop.co.uk
Oznake: obdstar motomaster
petak, 21.11.2025.
OBDSTAR New Arrival: C4-08 (MB-VGS4-500-NAG2) Adapter Kit
The OBDSTAR C4-08 (MB-VGS4-500-NAG2) Adapter Kit is an advanced, solder-free solution designed for safe and efficient TCM data operations on Mercedes-Benz vehicles equipped with the VGS4-500-NAG2 transmission control unit. Featuring precision engineering, this kit greatly simplifies TCM virginizing, data reading/writing, and module personalization for both professional technicians and beginners.
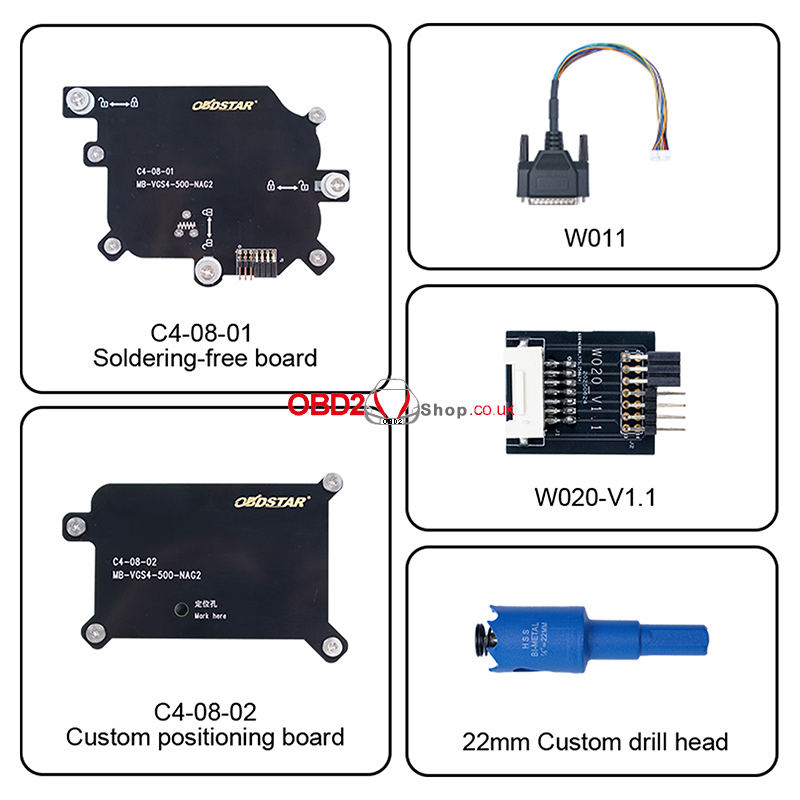
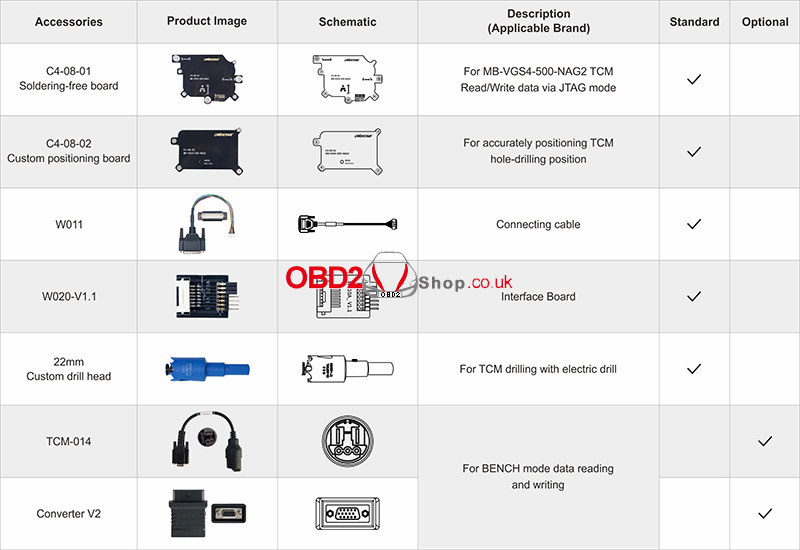
What’s Included in the Kit?
The C4-08 kit provides all essential components needed for accurate drilling, secure positioning, and reliable data communication:
1. C4-08-01 Solder-free Board – Enables MB-VGS4-500-NAG2 TCM read/write operations via JTAG mode without soldering.
2. C4-08-02 Custom Positioning Board – Ensures precise, repeatable TCM hole-drilling alignment.
3. W011 Connecting Cable – Provides stable data transfer connections.
4. W020-V1.1 Interface Board – Interfaces the TCM with the programmer during data operations.
5. 22mm Custom Drill Head – Designed for clean and controlled TCM drilling using an electric drill.
6. Optional: TCM-014 + Converter V2 – Required for BENCH mode reading/writing (if already owned, no need to repurchase).
Support Functions:
1. Compatible with all Mercedes-Benz vehicles using the VGS4-500-NAG2 FBS4 TCU.
2. Enables solder-free virginizing of used TCMs via JTAG mode—reducing technical complexity and operation risks.
3. Supports data personalization (transfer) via BENCH or OBD mode, achieving results equivalent to a full TCM clone.
Advanced Features:
1. Custom positioning board ensures accurate drilling alignment, enabling smoother and more efficient operations.
2. No soldering skills required—even non-experts can perform professional TCM repairs safely and easily.
3. When paired with the included drill head and a handheld drill, the TCM can be opened with minimal exterior damage.
4. High-precision custom board supports safe, solder-free read/write operations, providing dependable data access and enhanced operational safety.
Compatible Tools:
The C4-08 Adapter Kit works seamlessly with the OBDSTAR MP001 multifunctional programmer, and supports devices such as KeyMaster G3 and DC706, enabling full functionality for TCM data processing.
www.obd2shop.co.uk
Oznake: obdstar adapter
četvrtak, 20.11.2025.
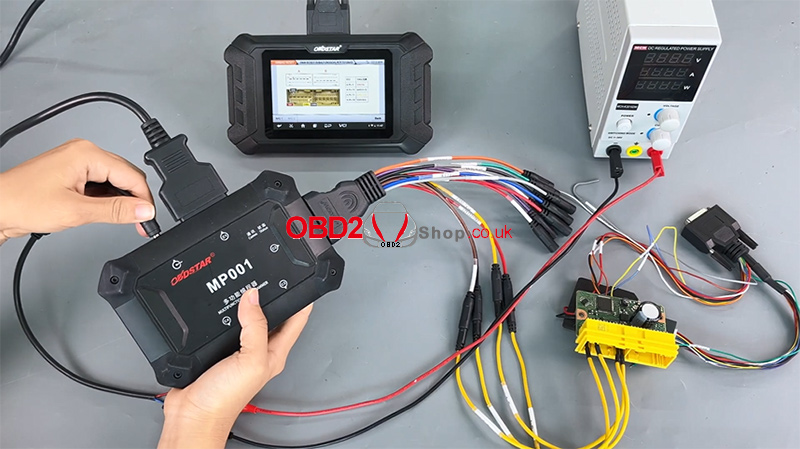
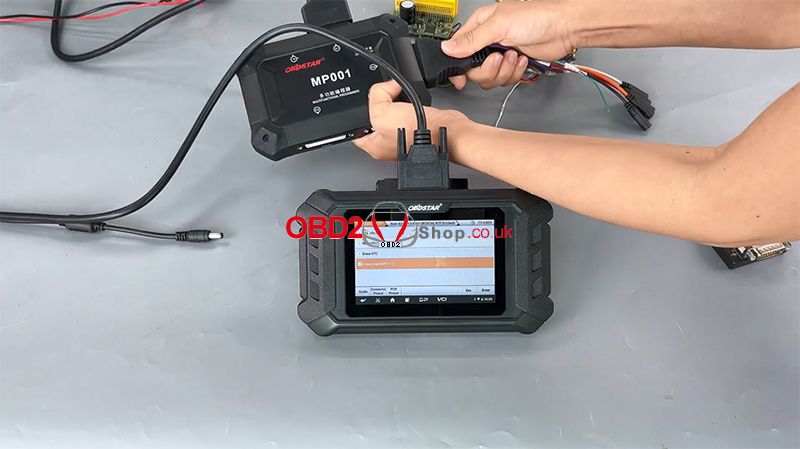
FAW R7F7010643 Airbag ECU Repair Guide with OBDSTAR P50
This guide walks you through the complete process of repairing and clearing crash data from the encrypted FAW airbag control module with part number R7F7010643. The procedure uses the OBDSTAR P50 along with the MP001 and RH850/V850 adapter kits.
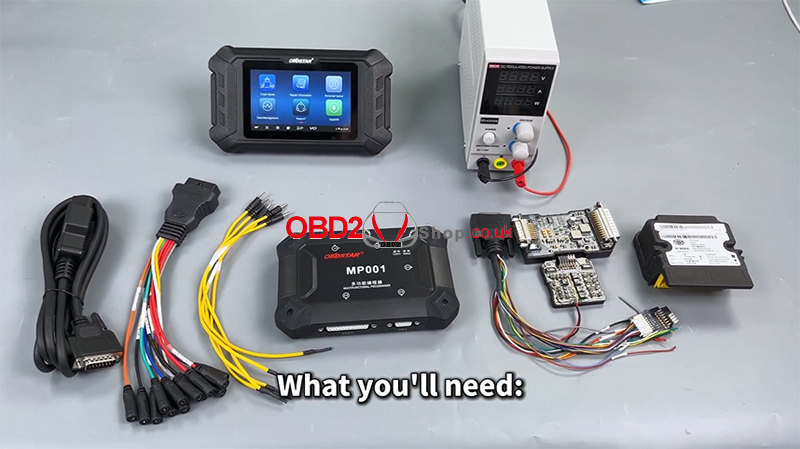
What You Will Need:
OBDSTAR P50 (or KeyMaster G3)
High-power DC regulated power supply
Main cable
Jumper wires
MP001 Multifunctional Programmer
RH850/V850 Adapter Kit
FAW R7F7010643 Airbag ECU
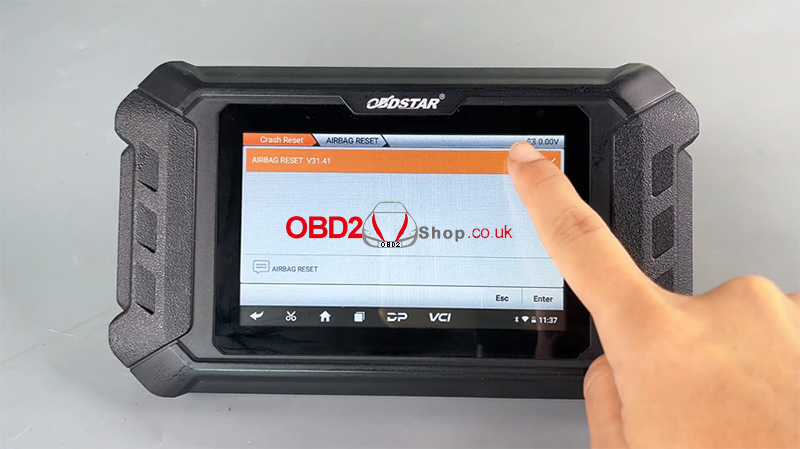
Step 1 — Update Software and Enter Crash Reset Menu
Before starting, ensure that the OBDSTAR P50 software is fully updated.
Navigate to:
[Crash Reset] ’ [AIRBAG RESET]
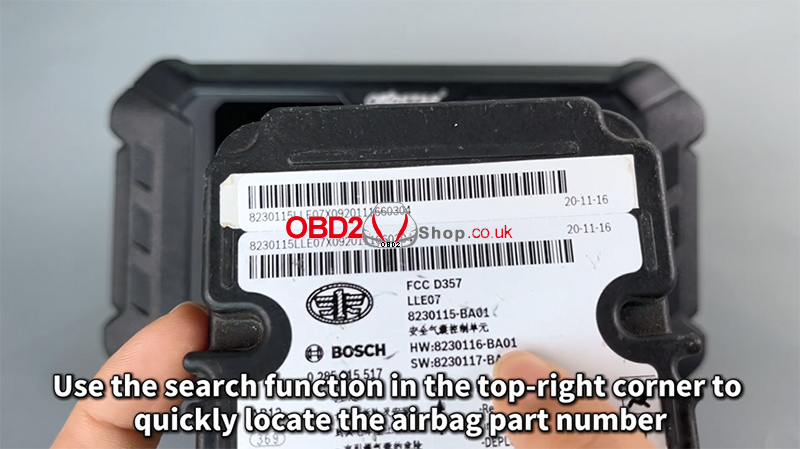
Use the search icon (top-right) to quickly locate the correct airbag control module number.
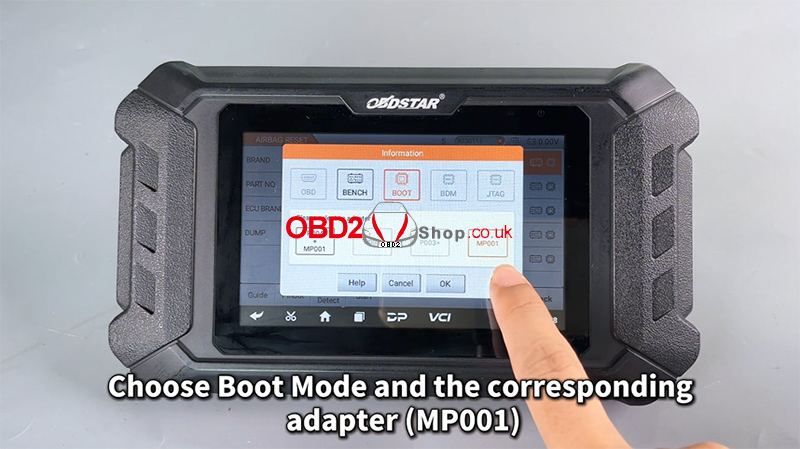
Step 2 — Select Boot Mode and Check Wiring Guide
Tap Start, then choose Boot Mode and the correct adapter (MP001).
This function requires an online server connection—make sure your internet is stable.
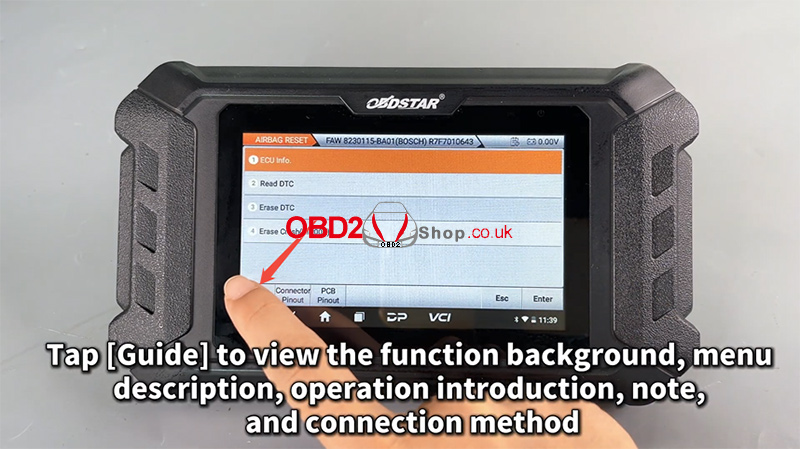
Tap [Guide] to view detailed information about the function background, menu descriptions, operation introduction, notes, and connection methods.
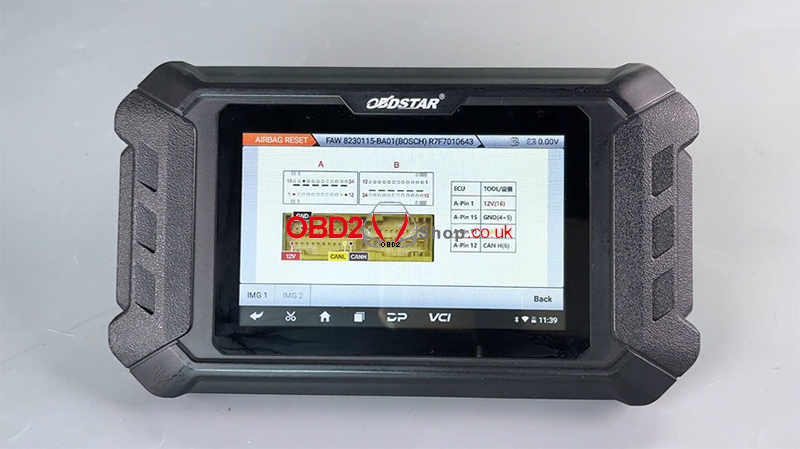
Next, open [Connector Pinout] and follow the wiring diagram to make the proper cable connections.
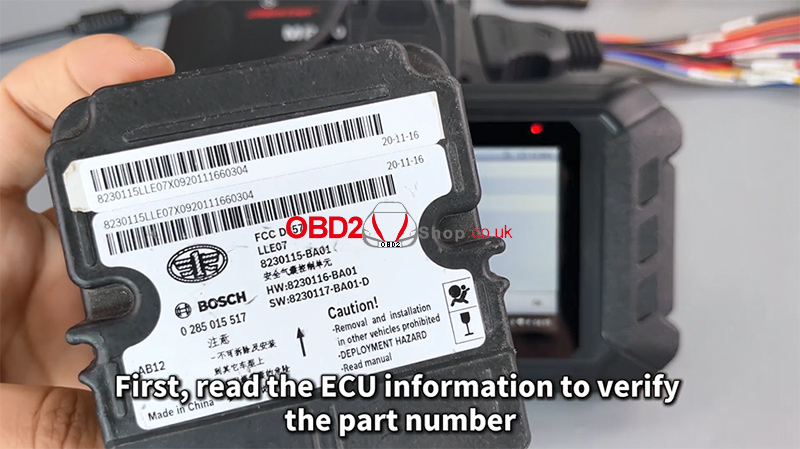
Step 3 — Read ECU Info and DTCs
Click [ECU Info] to confirm the airbag ECU part number.
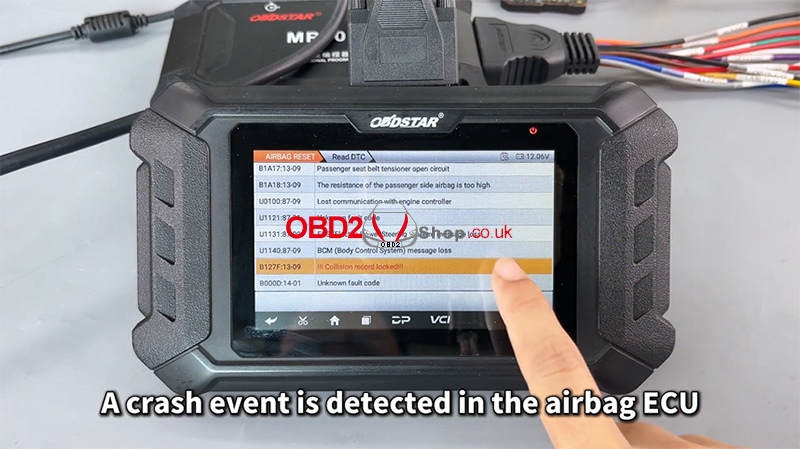
Then select [Read DTC] to check the fault codes.
A crash event will be detected.
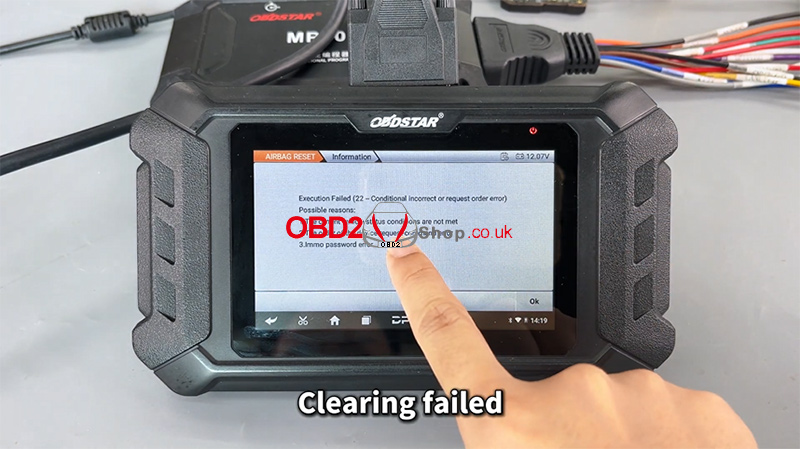
Attempting to erase DTC will fail because crash data is stored.
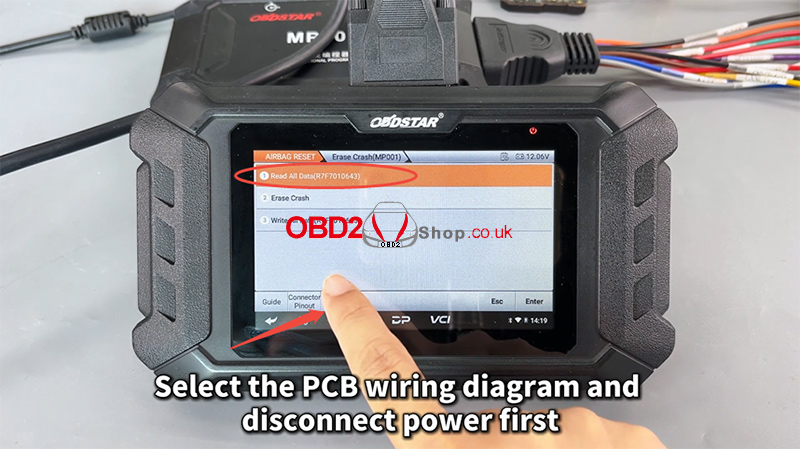
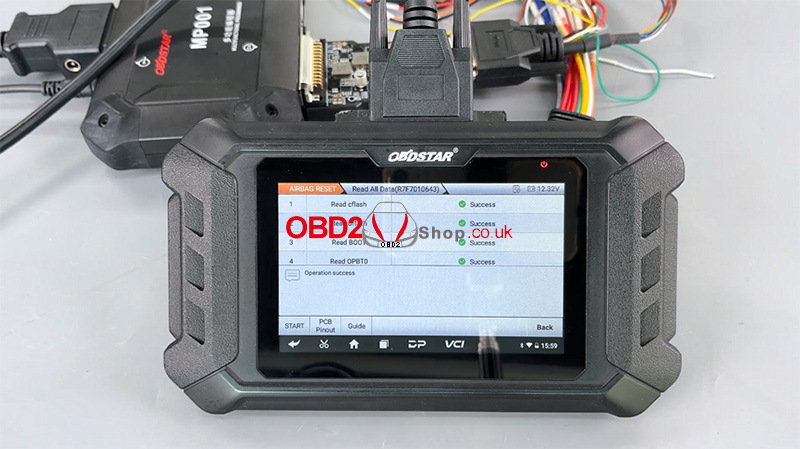
Step 4 — Read All Data (Crash Records)
Since crash data cannot be cleared directly, you must first read all module data.
Go to: [Erase Crash (MP001)] ’ [Read All Data (R7F7010643)]
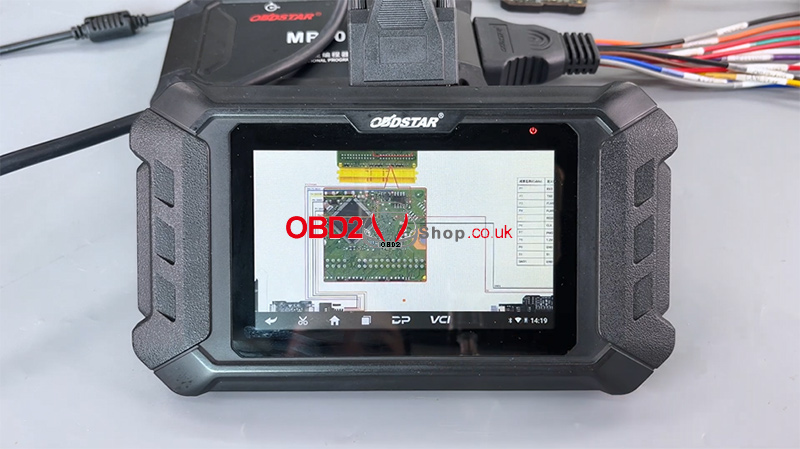
Select the PCB wiring diagram and disconnect the power before changing the adapter.
Replace the MP001 with the RH850/V850 Adapter.
Open the airbag module casing and solder the wires according to the PCB diagram.
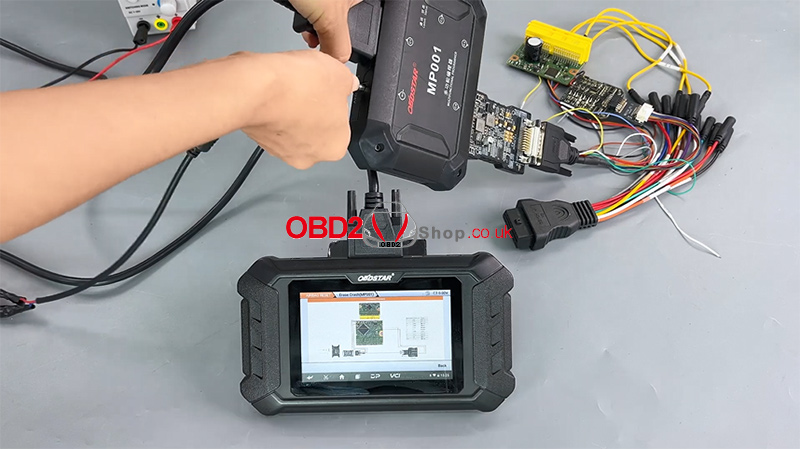
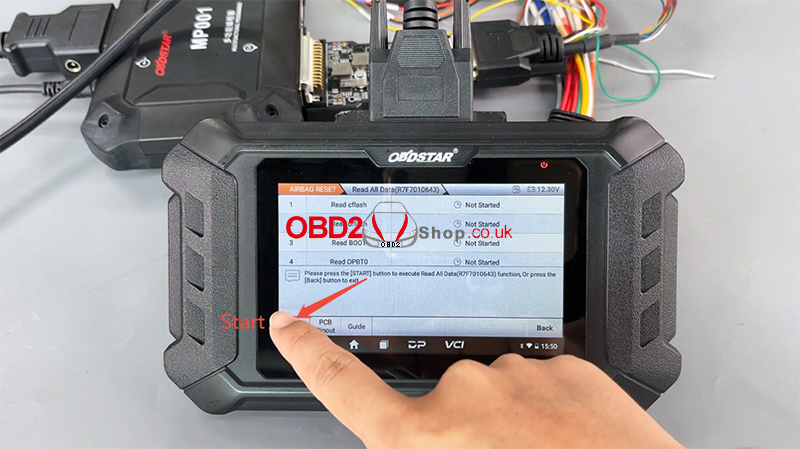
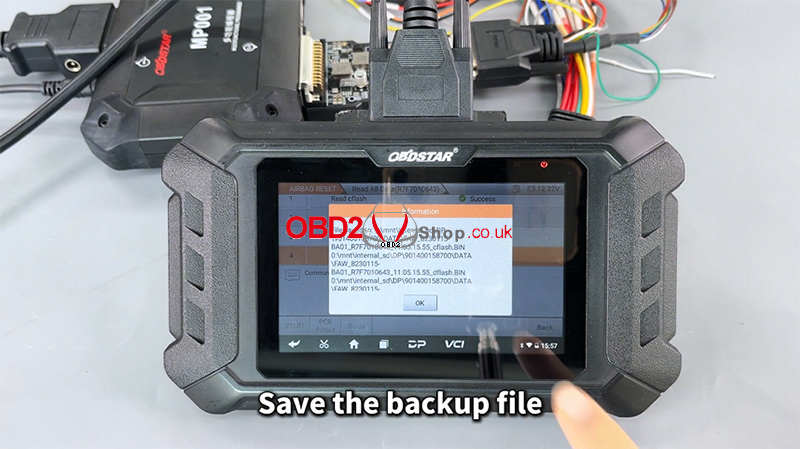
Tap [Read All Data (R7F7010643)] ’ [Start]
Wait for communication to complete, then save the backup file.
Operation successful.
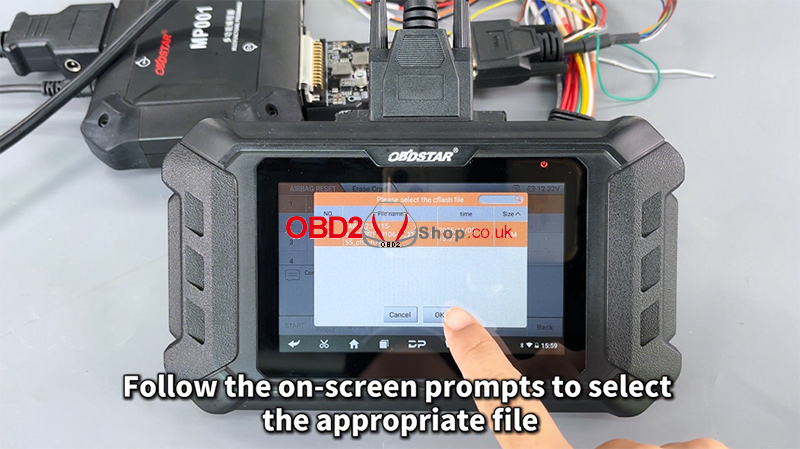
Step 5 — Erase Crash Data
Choose [Erase Crash], then follow the prompts to select the correct data file.
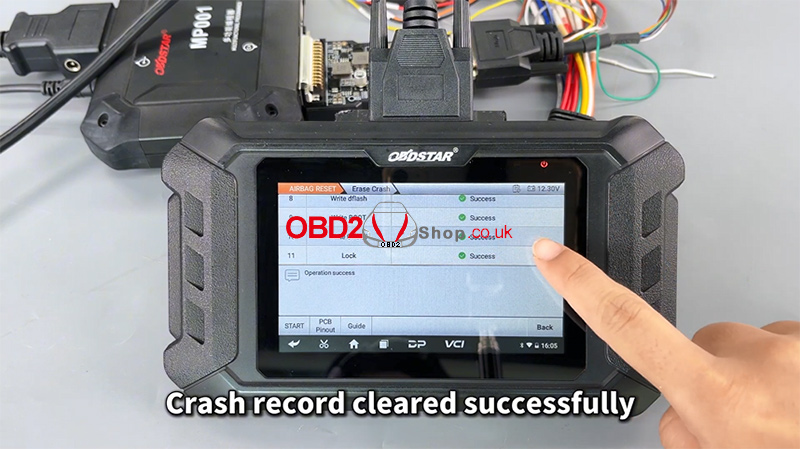
The tool will erase crash information from the file.
Crash record cleared successfully.
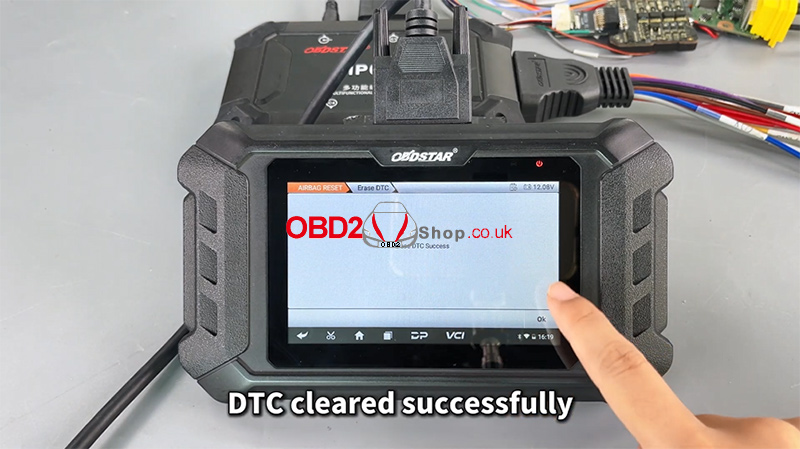
Step 6 — Reassemble and Clear DTCs
Reconnect everything and switch the device back to Diagnostic Mode.
Select [Erase DTC] again.
This time, the DTC clears successfully.
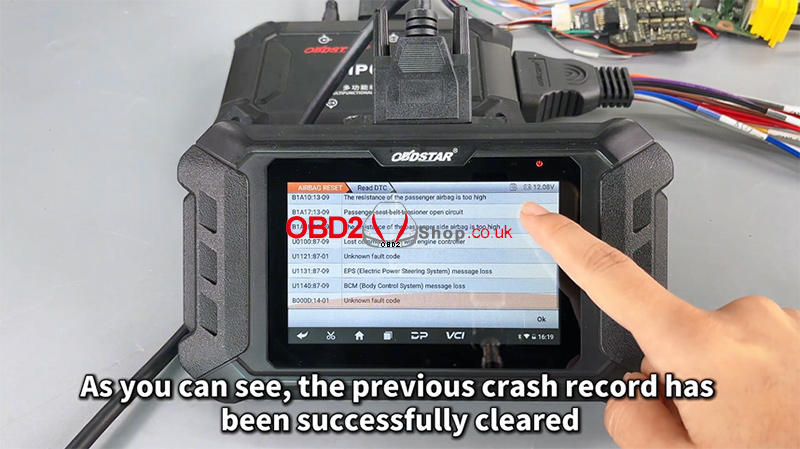
A final [Read DTC] confirms that the previous crash record is gone.
Full video tutorial:
https://youtu.be/WUlJv23JpqM
For more tools and guides, visit:
www.obd2shop.co.uk
Oznake: obdstar p50
srijeda, 19.11.2025.
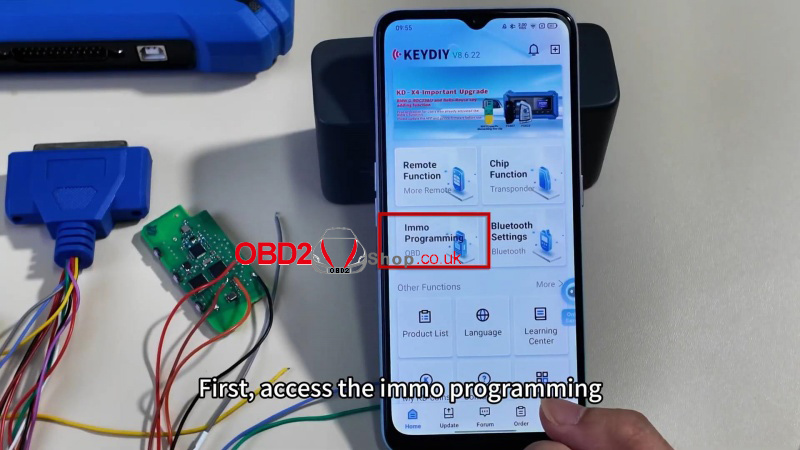
How to Add BMW U Chassis/BCP Original Key with KEYDIY KD-X4?
This guide explains how to use the KEYDIY KD-X4 Key Programmer to add a new BMW U chassis BCP original key. The process is simple and quick in 2 minutes.
Notes
Ensure all connections are secure before starting.
This method works for BMW U chassis keys with side buttons.
Step-by-Step Instructions
1. Connect the Harnesses
` Solder the wires correctly according to the wiring diagram.
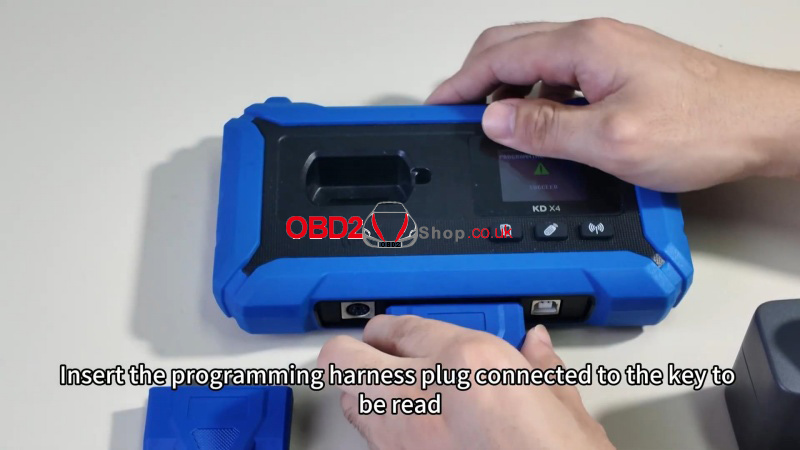
a Plug the programming harness into KEYDIY KD-X4.
2. Read the Original Key Data
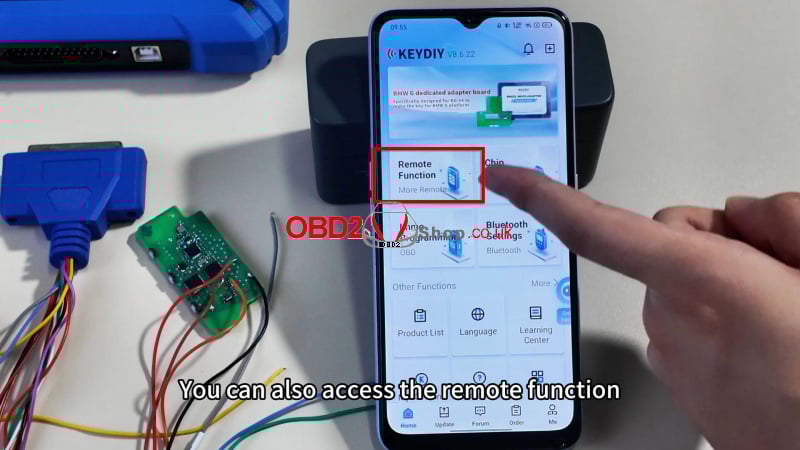
` Go to Immo Programming or Remote Function.
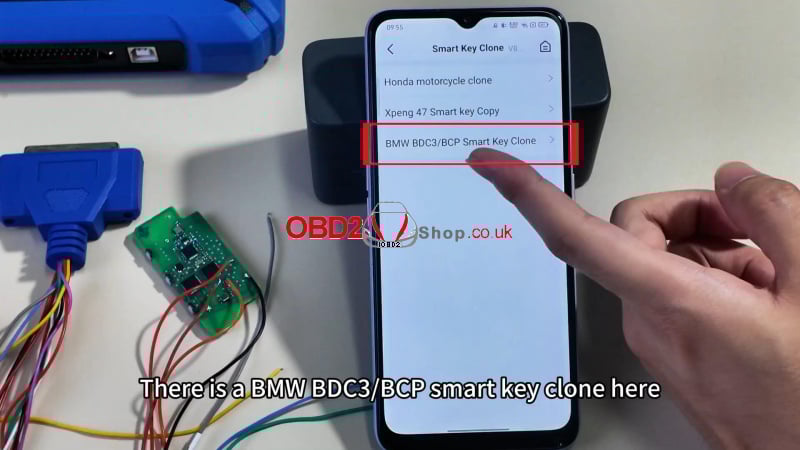
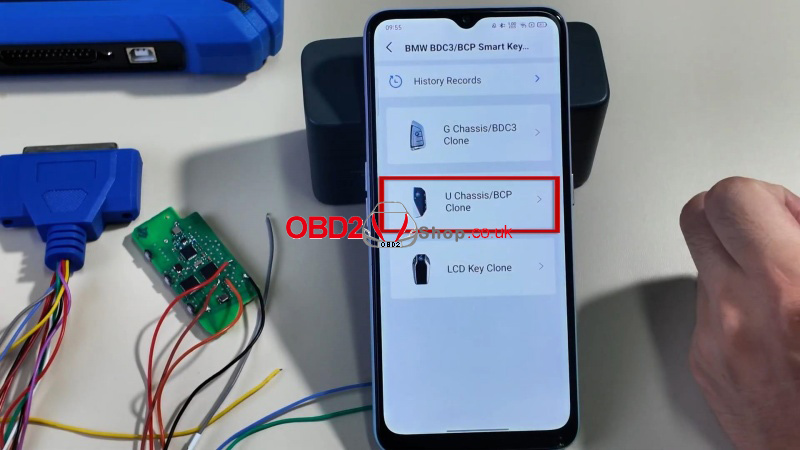
a Select Smart Key Clone ’ BMW BDC3/BCP Smart Key Clone’ U Chassis/BCP Clone
b Click Read Chip Data and save the data file.


3. Write to the New OEM Key
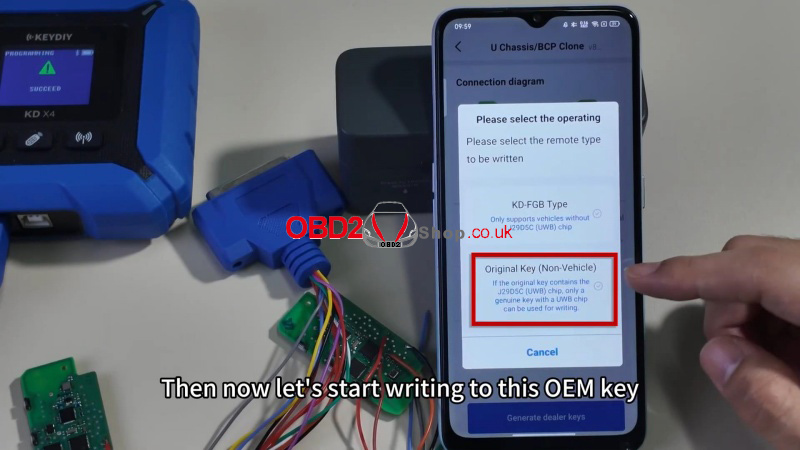
` Remove the original key and insert the new OEM key.
a Please select the remote type to be written: Original Key(Non-Vehicle)’ OK ’ This will deduct KD-coins: 180 ’ Confirm
Generation successful!
4. Completion
Once writing is complete, the new key is ready for normal use.

For more help, visit the KEYDIY support page or refer to your device manual.
www.obd2shop.co.uk
Oznake: keydiy kd x4
utorak, 18.11.2025.
How to Copy BMW BDC3 ICP Keys with YANHUA Mini ACDP?
Learn how to copy BMW BDC3 ICP keys easily with the YANHUA Mini ACDP or Mini ACDP-2. This guide walks you through the process step by step.
Before You Begin - Check Your Software Version
Make sure your software is up to date before starting:
ACDP: Version 1.0.64 or higher
ACDP-2: Version 2.0.8 or higher
Android APP: Version 3.0.141 or higher
IOS APP: Version 3.6.4 or higher
You'll also need:
ACDP Module 38
BMW BDC3/BCP Key Copying Interface Board Kit
Check Operation Video:
https://www.youtube.com/watch?v=JyI6Zwwz6Fg
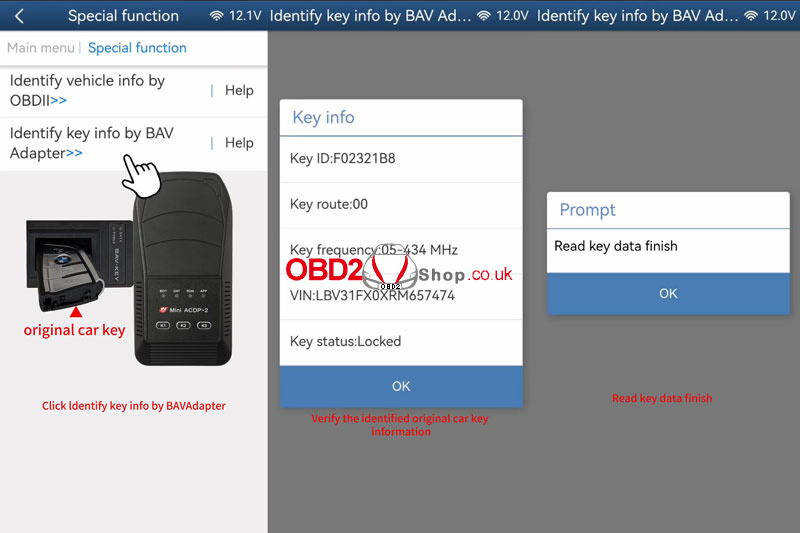
Step 1: Identify the Key
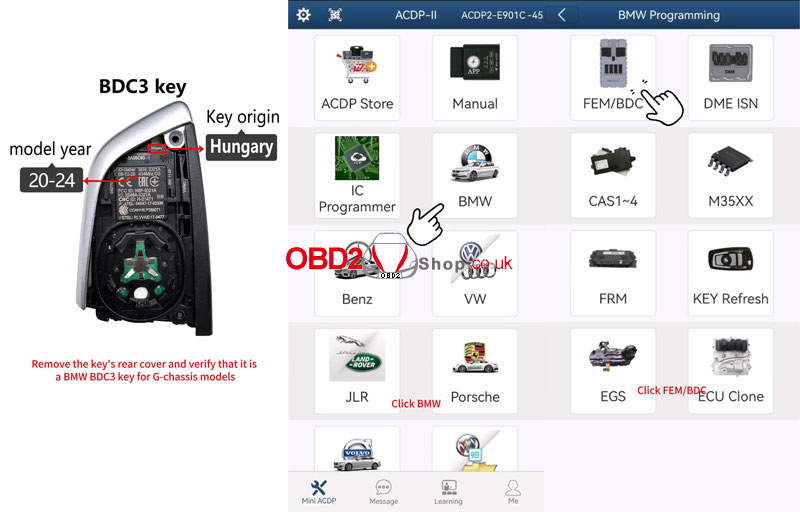
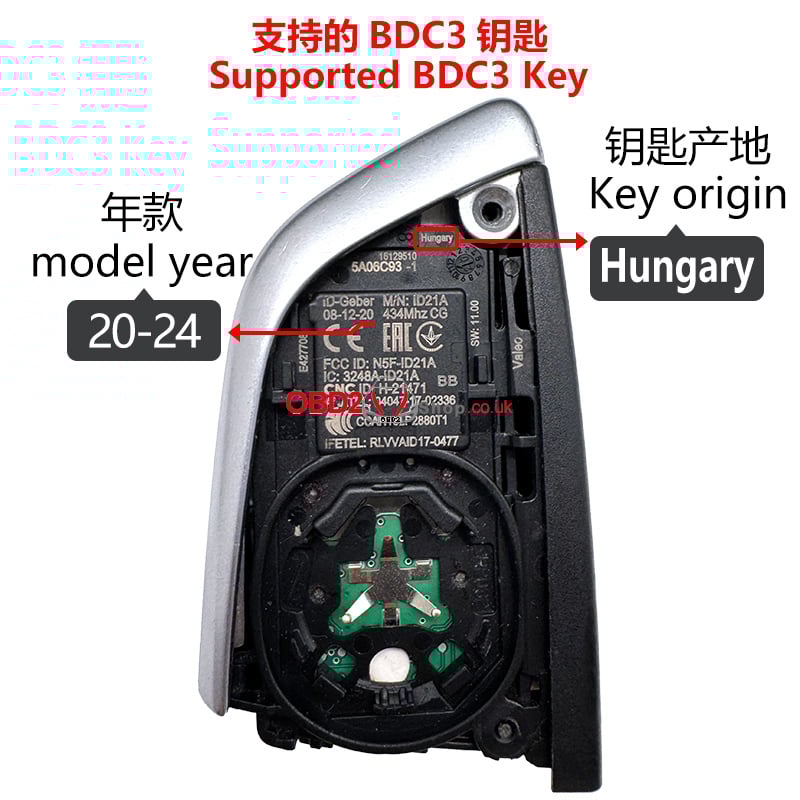
Remove the rear cover of the key and confirm it is a BMW BDC3 key used in G-chassis models made in Hungary between 2020 and 2024.
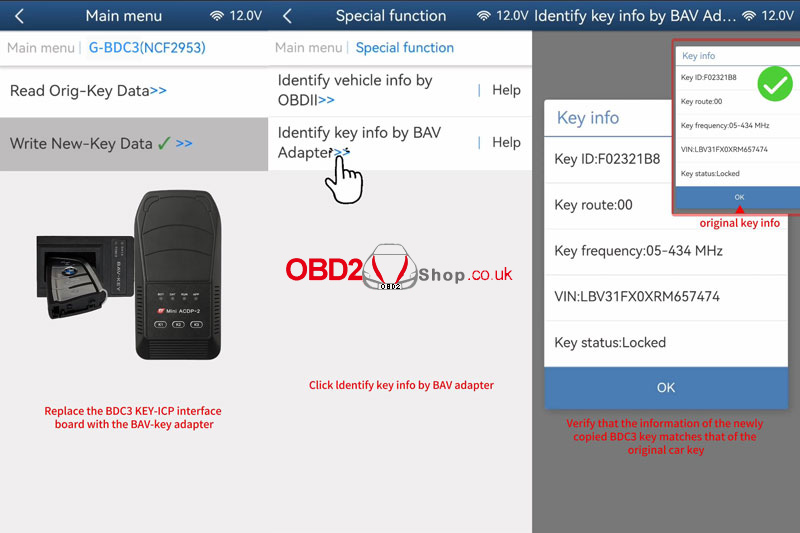
Step 2: Read the Original Key Data
1. Connect the ACDP to the BAV-key adapter and place the original car key into the adapter.
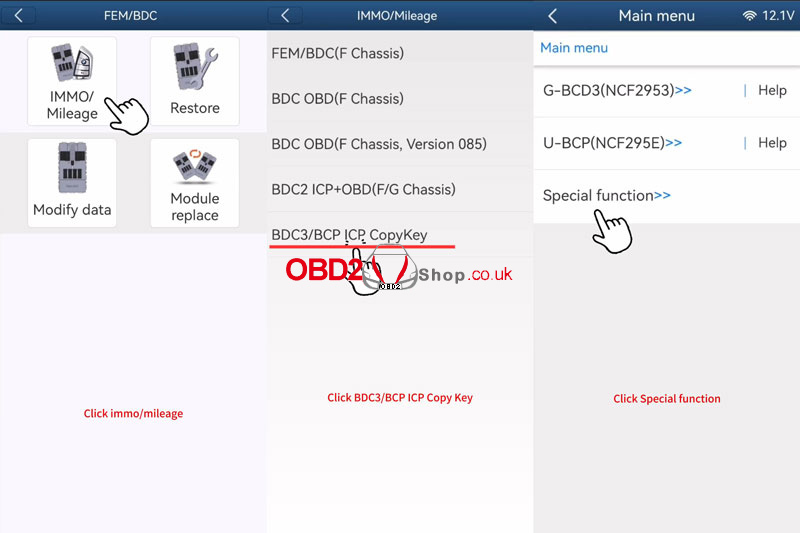
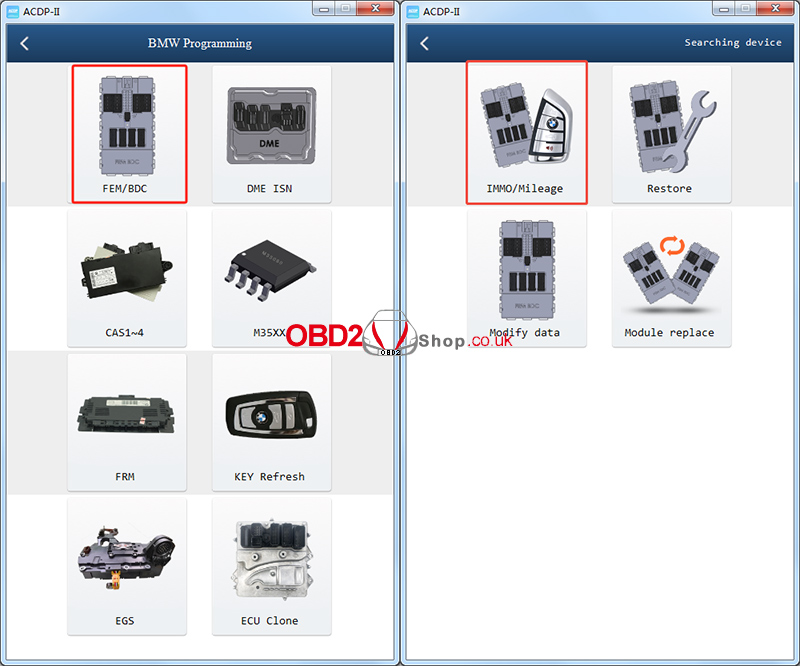
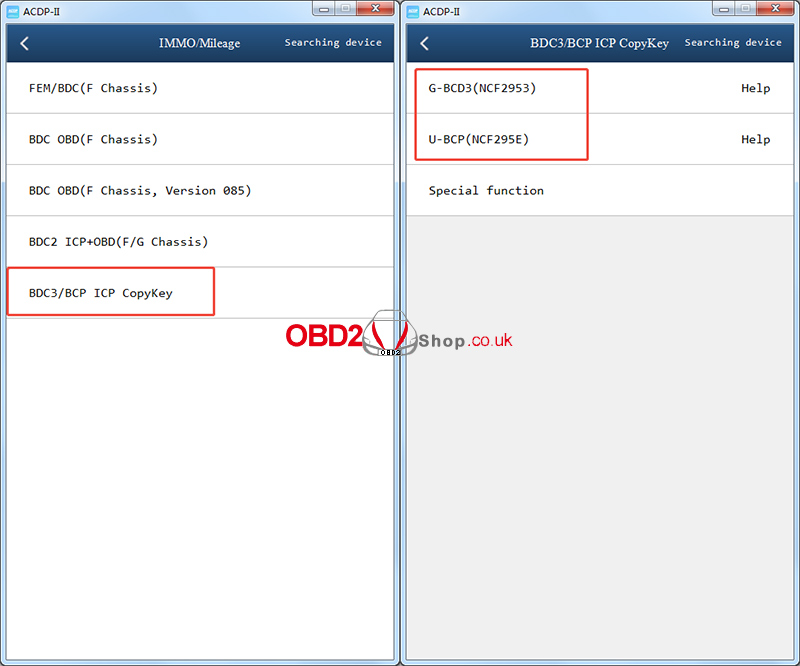
2. Go to: BMW ’ FEM/BDC ’ IMMO/Mileage ’ BDC3/BCP ICP CopyKey ’ Special Function.
3. Select Identify key info by BAV Adapter, then save the key data.
4. Verify the key information displayed.
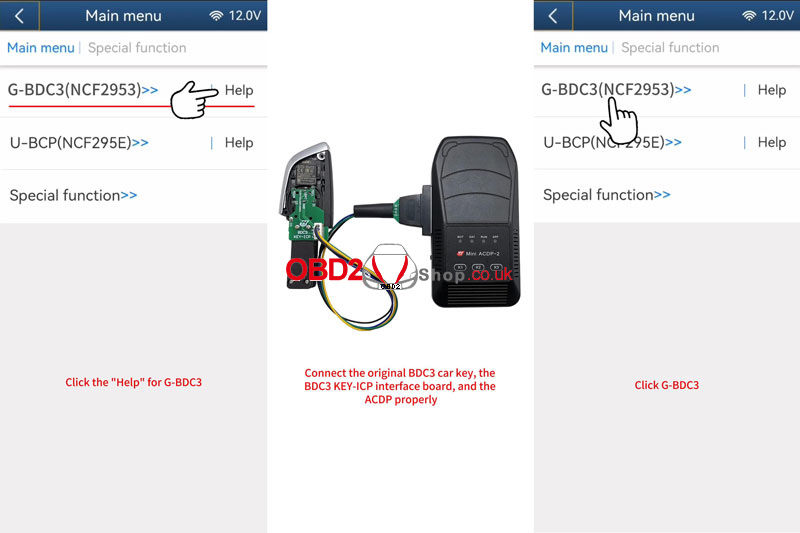
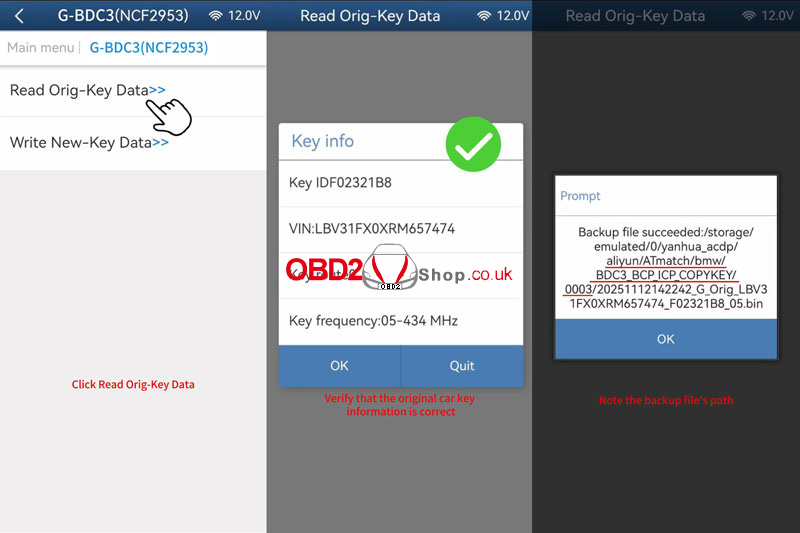
Step 3: Backup Original Key Data
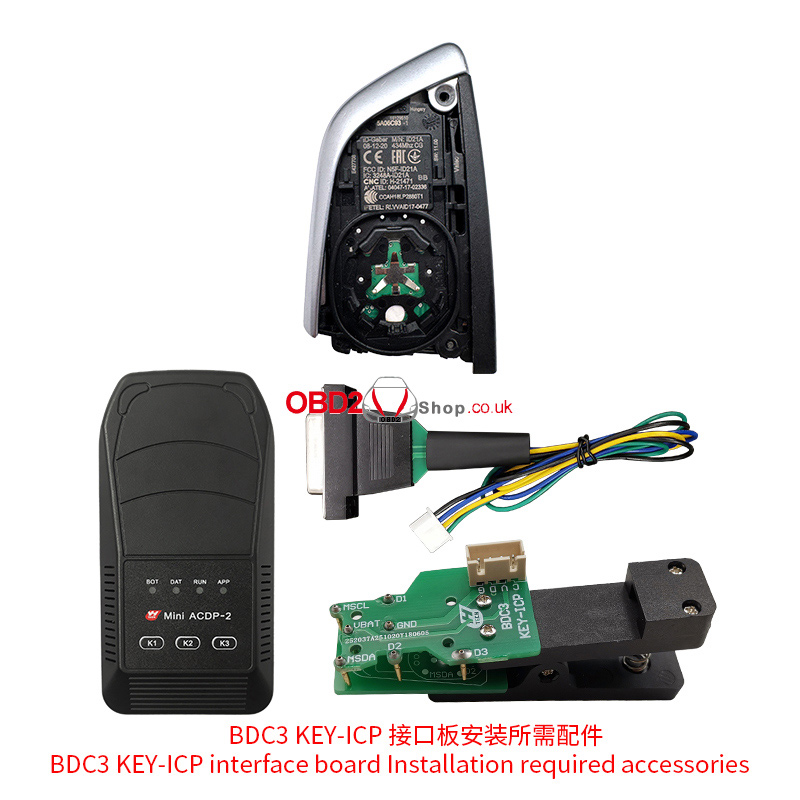
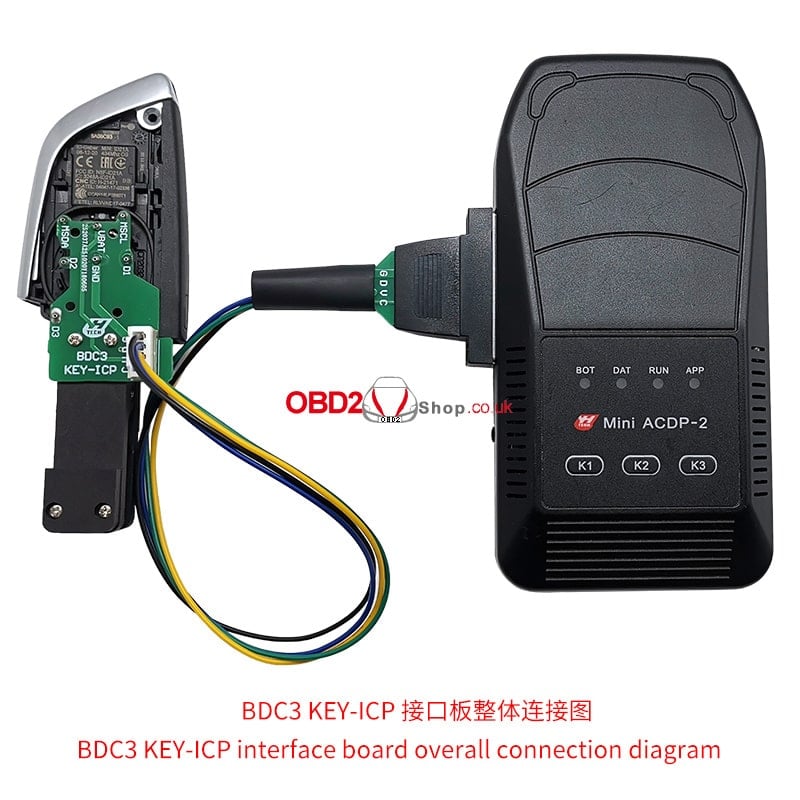
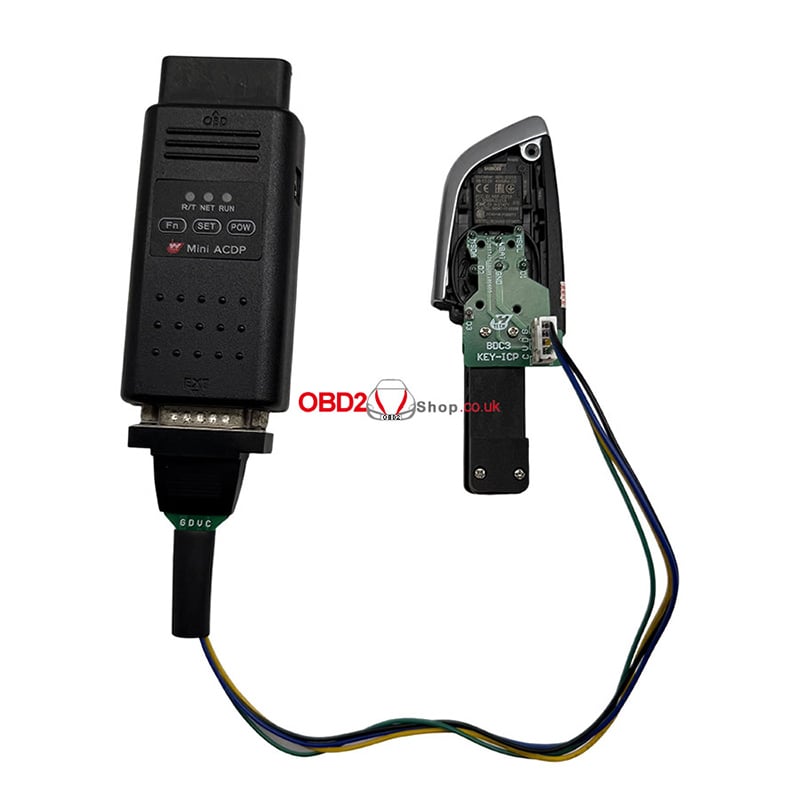
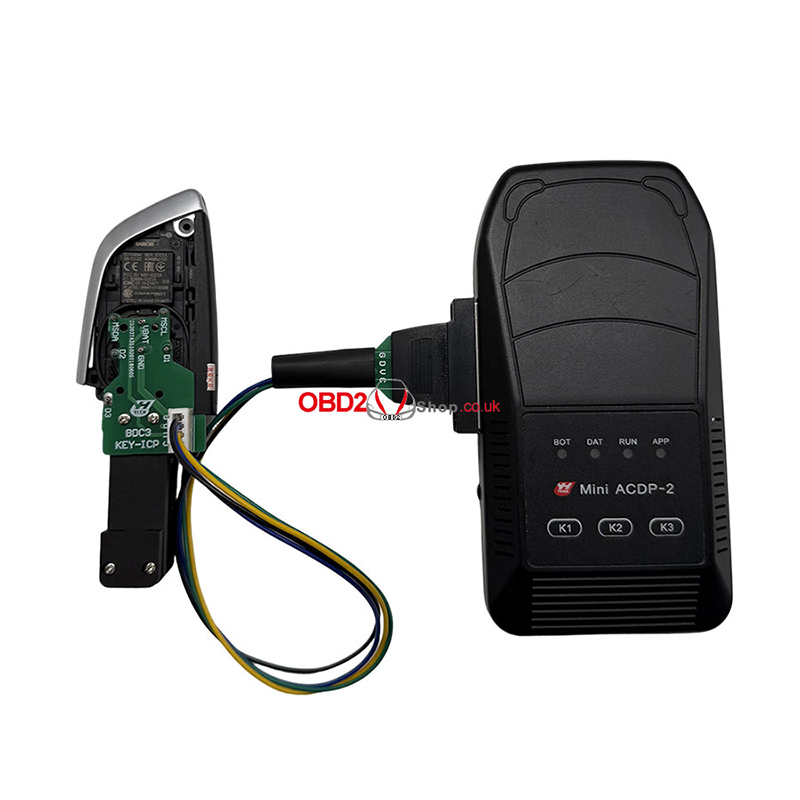
1. Connect the original key, the BDC3 KEY-ICP Interface Board, and the ACDP.
2. Select G. BDC3(NCF2953) ’ Read Orig-Key Data.
3. Confirm the key details and wait for the backup to complete.
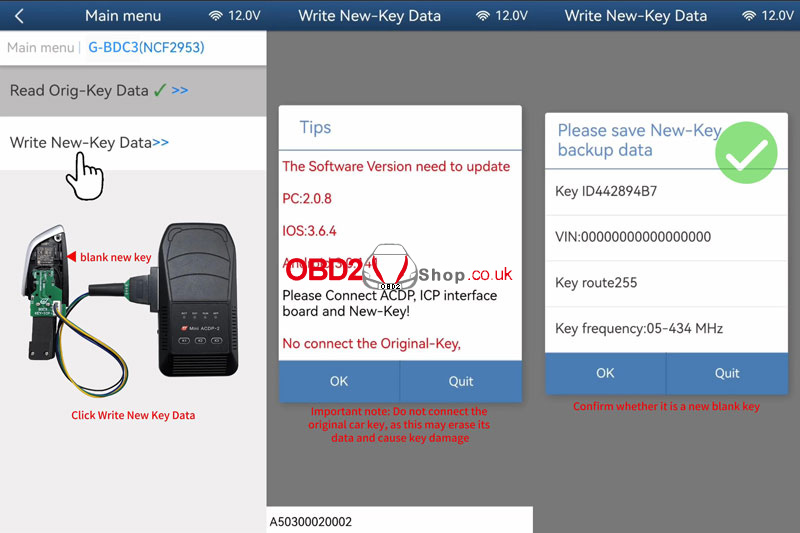
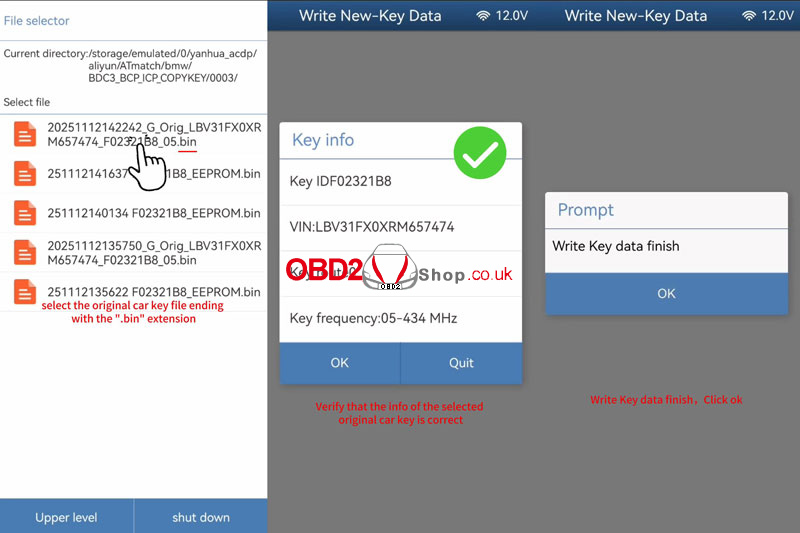
Step 4: Write Data to the New Key
1. Replace the original key with a new blank key.
2. Choose Write New-Key Data.
3. Important: Do not reconnect the original key during this step, as it may get erased.
4. Select the original key backup file (with .bin extension) and confirm the details.
5. Wait for the writing process to finish.
Step 5: Verify the Copied Key
1. Switch back to the BAV-key adapter and insert the new copied key.
2. Use Special Function ’ Identify key info by BAV Adapter.
3. Confirm that the new key’s information matches the original.
4. Get in the car to test the keys.
Done!
You have successfully copied a BMW BDC3 key using the YANHUA Mini ACDP.
www.obd2shop.co.uk
Oznake: yanhua acdp bmw
ponedjeljak, 17.11.2025.
How to Lonsdor K518 PRO to Program a 2024 Volvo S60 Smart Key
This guide outlines the procedure for programming a new smart key for a 2024 Volvo S60 using the Lonsdor K518 PRO tool. The process involves both reading data directly from the Central Electronic Module (CEM) and performing key programming via the OBD-II port.
Tools Required:
Lonsdor K518 PRO
OBD communication cable
KPROG adapter
LC202 cable
A new smart key
Step-by-Step Procedure:
Part 1: Reading Data from the CEM Module
1. Disassemble and Access the CEM:
Locate and carefully disassemble the Central Electronic Module (CEM) box from the vehicle. Follow the specific disassembly diagrams for your vehicle model.


2. Connect Hardware for Reading:
Connect the LC202 cable to your K518 PRO and the KPROG adapter.
Connect the 12-volt power cord to the K518 PRO.
Connect the KPROG adapter to the appropriate points on the CEM board to read the data.
3. Read CEM Data:
On the K518 PRO, navigate: [Immo & Remote] -> [Volvo] -> [S60] -> [2022-] -> [Program smart key] -> [Read CEM data].
Click [OK] to continue.
You will be prompted to enter a name for the backup file. Enter a name and proceed.
The tool will initialize the target chip and begin reading the data.
Once you see a "Read successfully" message, click [OK].
Reinstall the CEM: The CEM data has now been successfully backed up. Reinstall the CEM box into the vehicle before proceeding to the key programming stage.


Part 2: Programming the Smart Key via OBD
1. Connect Tool via OBD:
Plug the OBD communication cable into the vehicle's OBD-II port and connect it to the K518 PRO.
2. Start Key Programming Function:
Navigate: [Immo & Remote] -> [Volvo] -> [S60] -> [2022-] -> [Program smart key] -> [All smart key lost].
Then, select the second menu option: [Load CEM data to obtain 10-bit security code].
3. Load the Backup Data:
The tool will explain that this function requires the CEM data read via the KPROG adapter (supporting CEM main chip SPC5748G).
You will be prompted to select the PFLASH or DFLASH data file. Select the backup file you created in Part 1.
4. Confirm Key Deletion:
A warning message will appear stating that all registered keys will be deleted. Ensure you have all keys you wish to program ready.
The tool will connect to the vehicle and delete all existing keys. You will see a confirmation: "The number of programmed keys is 0".
5. Program the New Key:
You will be instructed to place the new smart key in the vehicle's induction area (typically the cup holder or center armrest).
Click [OK] to begin programming.
The tool will program the key. Once complete, you will see a message: "The number of programmed keys is 1".
If you do not need to program another key, click [Cancel].
6. Completion: The programming process is now complete. The newly programmed smart key should successfully start the vehicle.


www.obd2shop.co.uk
Oznake: lonsdor k518 pro
petak, 14.11.2025.
Streamline Common Vehicle Service Tasks with the OTOFIX D1
Routine maintenance tasks—such as brake pad replacement, oil changes, or resetting service indicators—are part of everyday vehicle repair. Whether you are a professional technician or a DIY car owner, the OTOFIX D1 diagnostic tablet helps simplify and accelerate these jobs.
This guide demonstrates how to perform an Oil Light Reset on a Volkswagen using the OTOFIX D1, highlighting the efficiency and user-friendliness of the process.
1. Connect the V1 VCI to the Vehicle
To begin, connect the OTOFIX V1 VCI to the vehicle’s OBDII port.
Next, open the VCI Manager on the OTOFIX D1 tablet and pair it with the V1 via Bluetooth. Once the connection is established, you are ready to access all available service functions.
2. Access the Oil Reset Service Function
Resetting the oil service light is one of the most common vehicle maintenance tasks—and OTOFIX makes it remarkably straightforward.
After completing the oil change:
` Tap [Service]
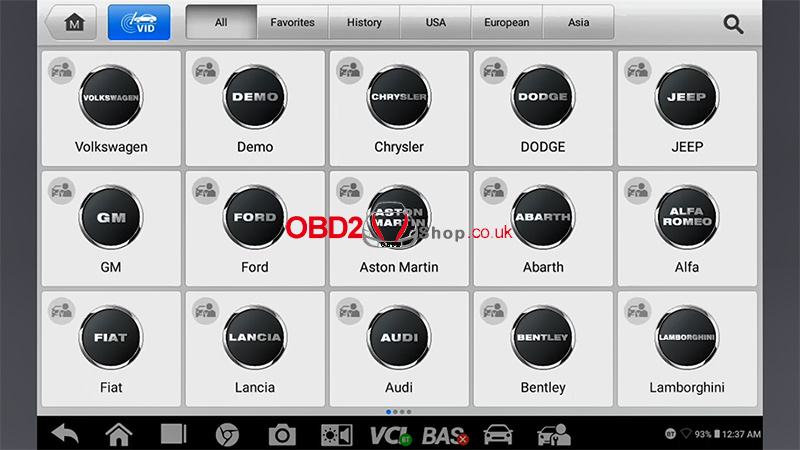
a Select [Oil Reset]
b Choose [Volkswagen]
c Tap [17 – Instruments]
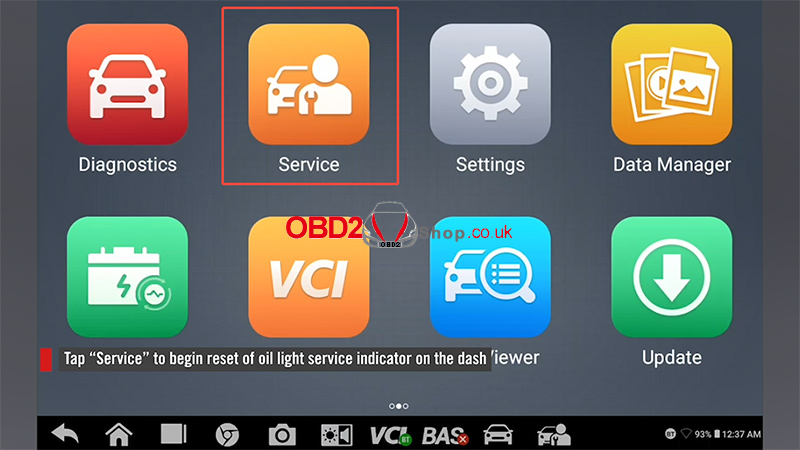
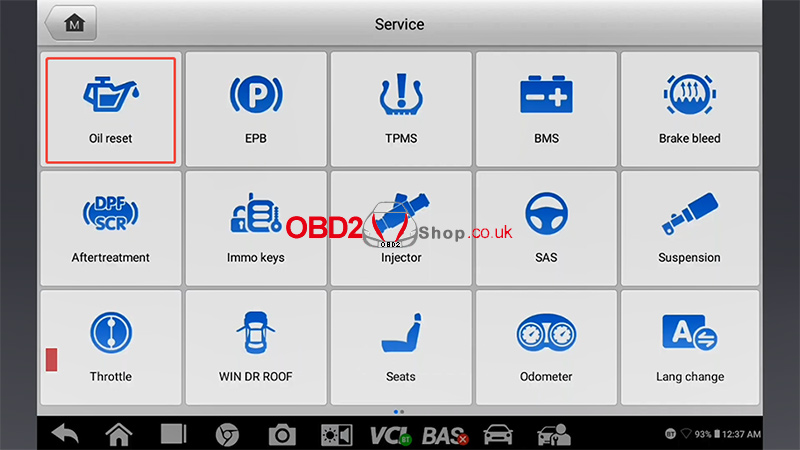
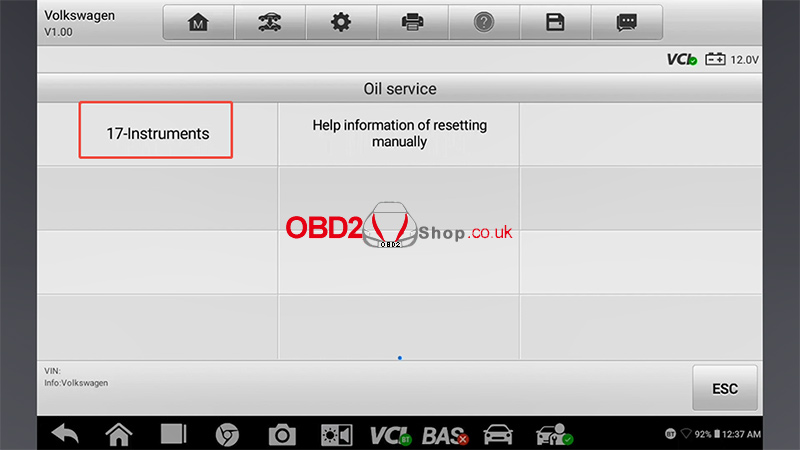
The system will initialize diagnostics and establish communication with the vehicle.
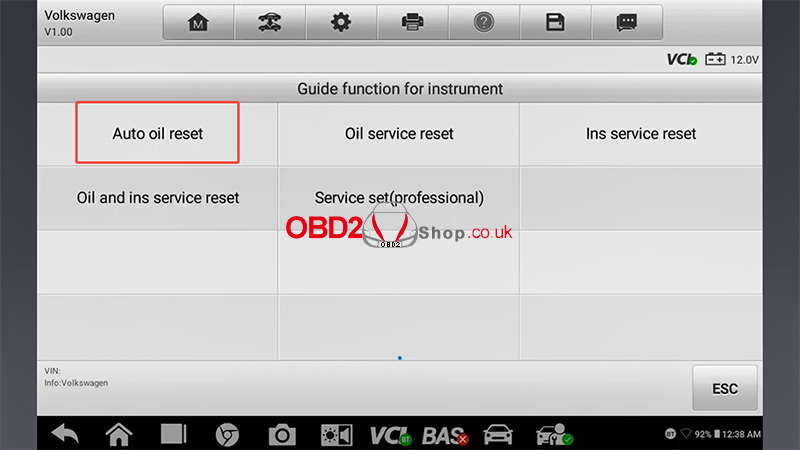
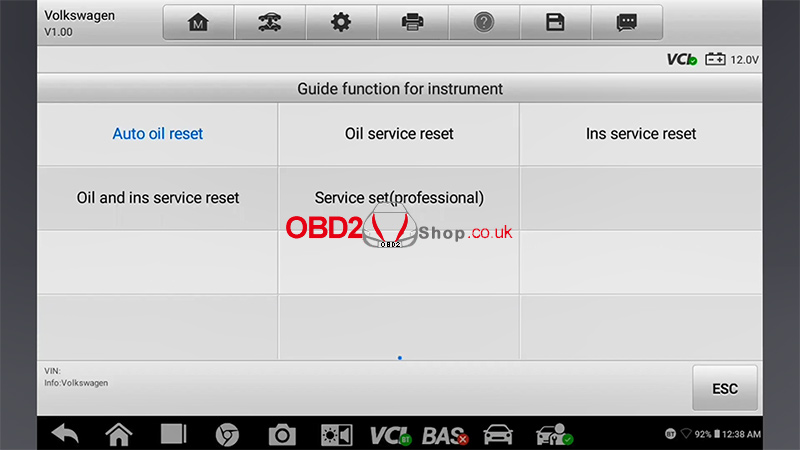
3. Perform the Automatic Oil Reset
To reset the service indicator automatically, select:
[Auto Oil Reset]
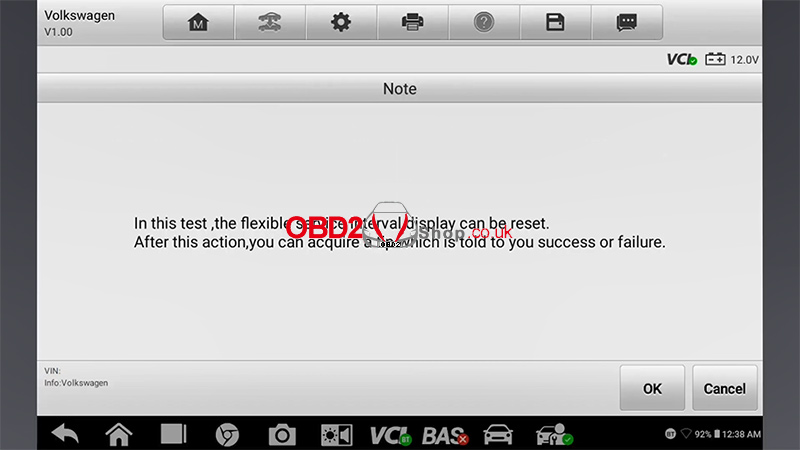
The device will confirm whether the reset can be performed.
Note: In this test case, the flexible service interval display is successfully reset.
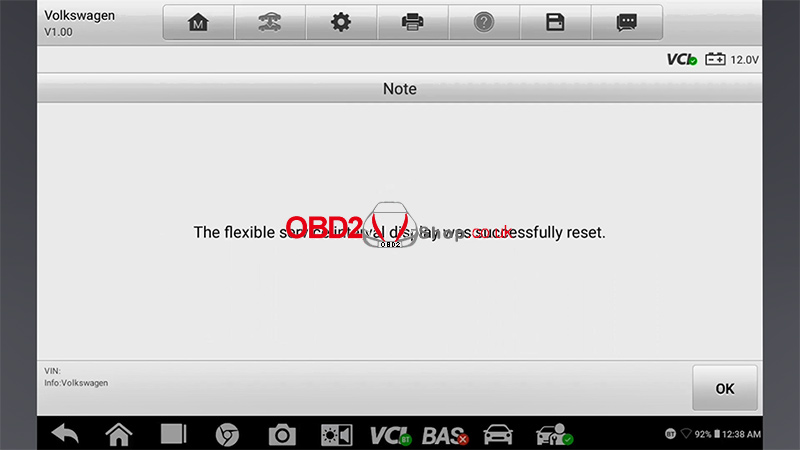
Once communication is complete, the message “The flexible service interval display was successfully reset” will appear.
Press [OK] to finish.
4. Manual Reset Option
If the automatic procedure cannot be completed, the OTOFIX D1 will display step-by-step on-screen instructions for performing the reset manually—ensuring you can still complete the service with ease.
For more diagnostic tools and automotive service equipment, visit:
www.obd2shop.co.uk
četvrtak, 13.11.2025.
Yanhua ACDP BDC3/BCP ICP CopyKey Function Upgrade Guide
The ACDP BDC3/BCP ICP CopyKey function has been newly upgraded, providing users with a faster, safer, and more stable way to copy BMW BDC3/BCP keys without soldering.
Required Tools:
To perform this function, you will need the following:
ACDP2 (or ACDP1) main unit
BMW BDC3/BCP Interface Board Kit
ACDP Module 38 License
Operation Guide:
Open the ACDP2 App, and follow the path below:
[BMW] ’ [FEM/BDC] ’ [IMMO/Mileage] ’ [BDC3/BCP ICP CopyKey]
1. G-BCD3 (NCF2953) Key
Required Accessories:
Installation Steps:
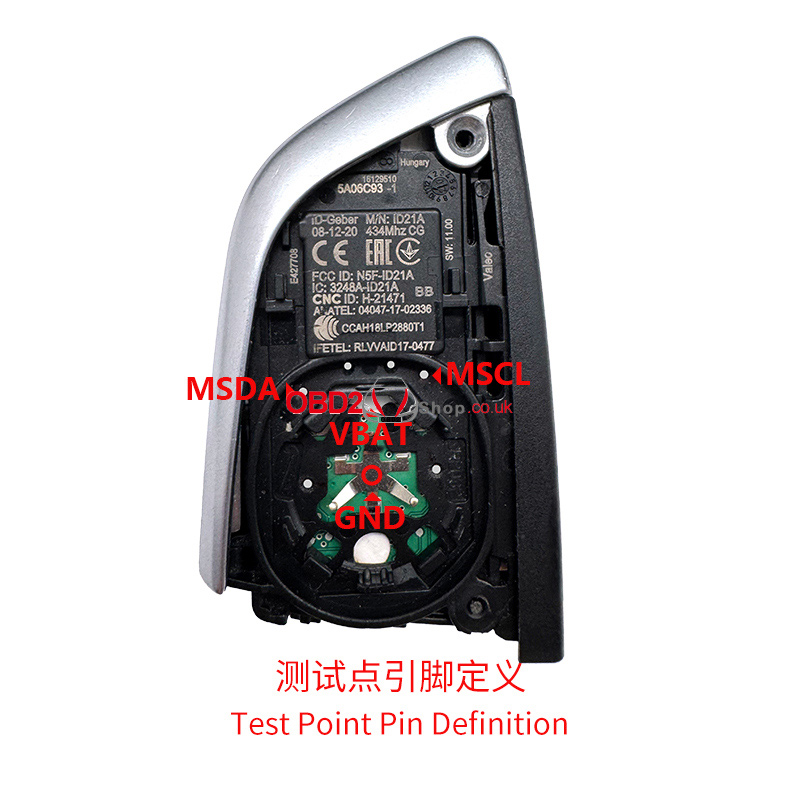
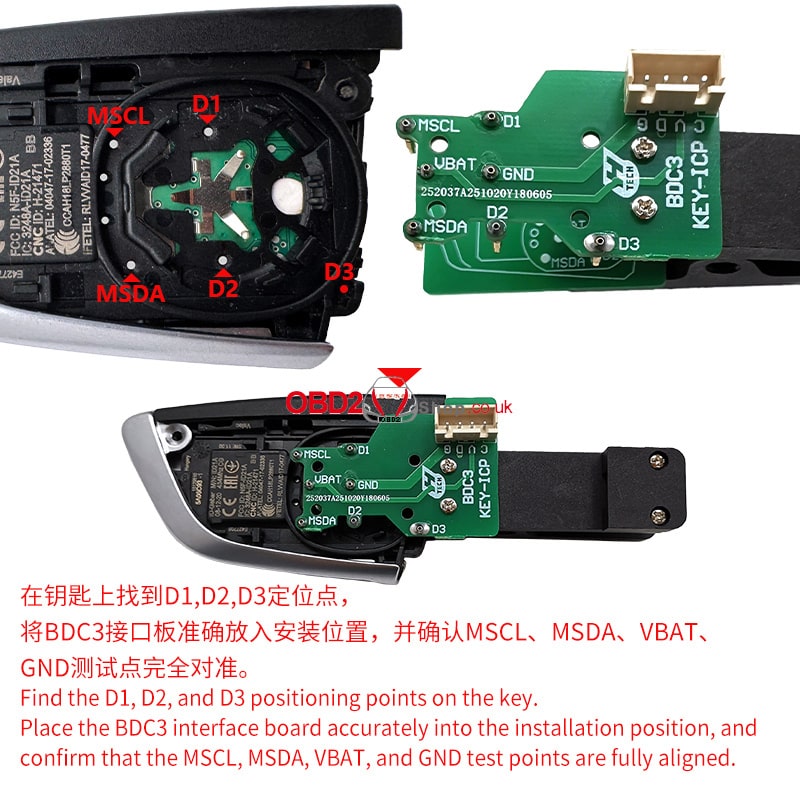
` Locate the D1, D2, and D3 positioning points on the key.
a Carefully place the BDC3 interface board into the correct installation position.
b Make sure the MSCL, MSDA, VBAT, and GND test points are perfectly aligned.
2. U-BCP (NCF295E) Key
Required Accessories:
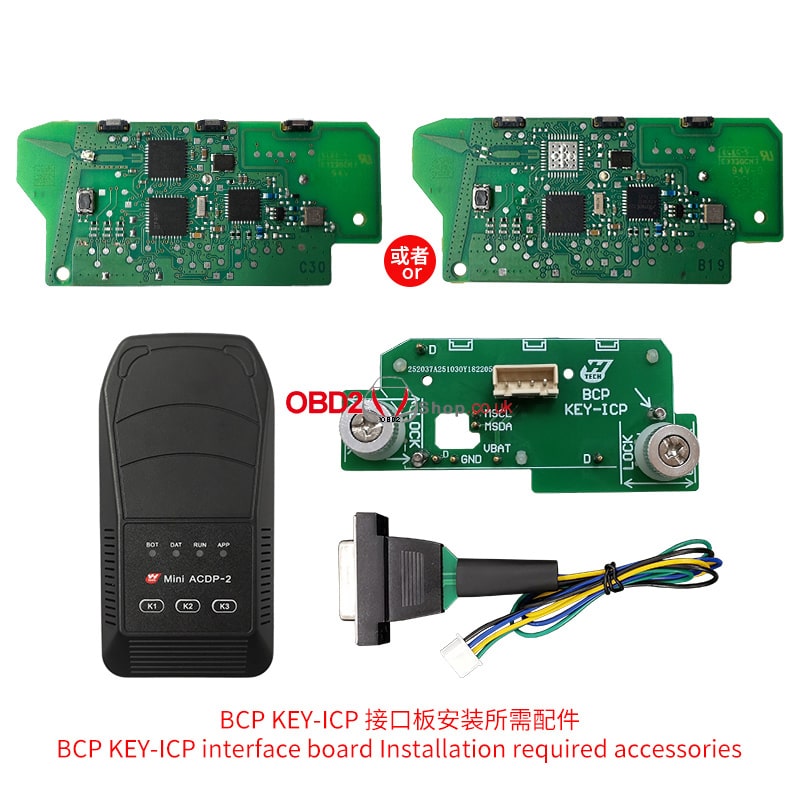
Installation Steps:
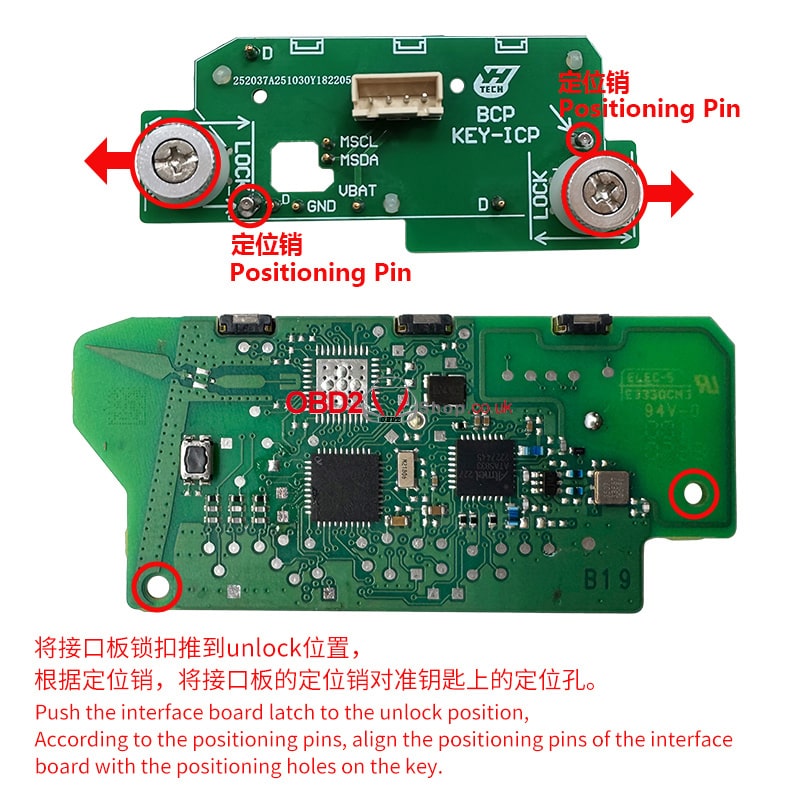
1. Push the latch on the interface board to the unlock position.
2. Align the positioning pins of the interface board with the positioning holes on the key.
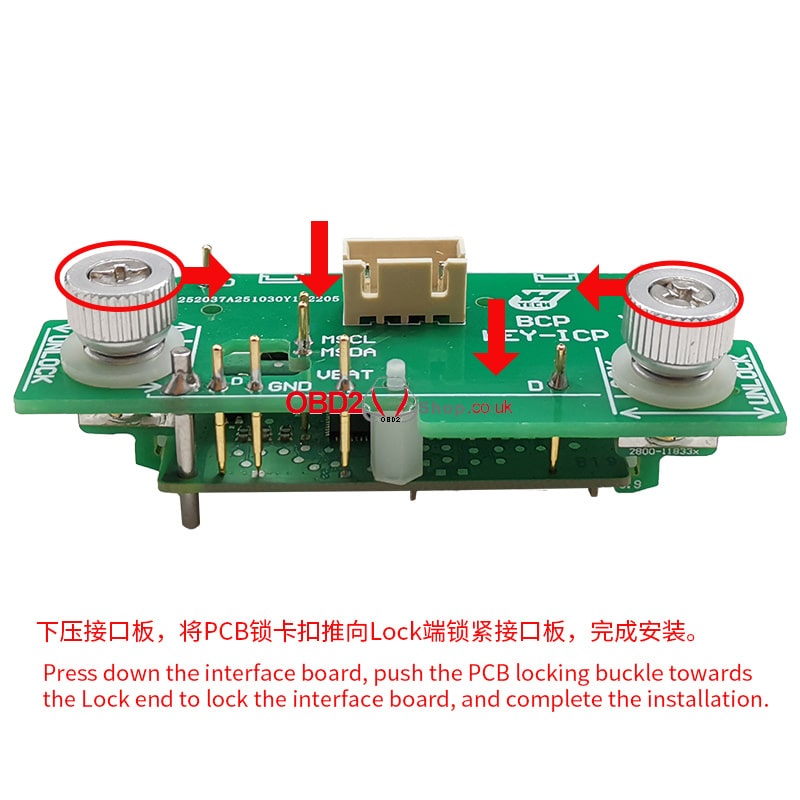
3. Press down the interface board gently, then push the PCB locking buckle toward the Lock end to secure it firmly.
Once installation is complete, you can proceed with key copying directly through the ACDP2 App — no soldering, no risk, and no damage to the original key or module.
For more product details or to purchase, please visit: www.obd2shop.co.uk.
Oznake: BDC3/BCP Interface Board
srijeda, 12.11.2025.
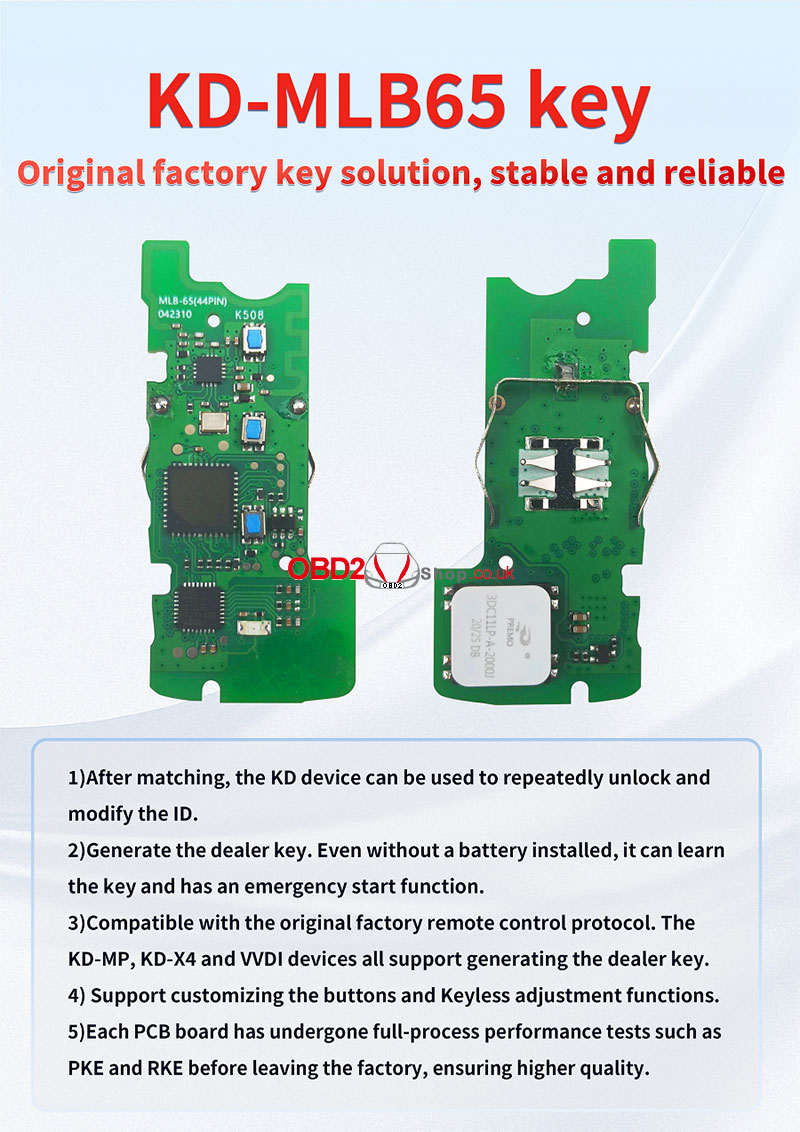
KEYDIY KD-MLB65 Key – Reliable Factory Solution
The KEYDIY KD-MLB65 Key is designed to deliver a stable, reliable, and factory-level key solution for professional automotive locksmiths and technicians. Built with precision and tested for performance, this advanced PCB board ensures both versatility and durability in key programming and remote control operations.
Key Features:
1. ID Unlocking and Modification – Once matched, the KD-MLB65 enables users to unlock and modify the key ID using KD devices repeatedly.
2. Dealer Key Generation with Emergency Start – Even without a battery installed, the key can learn and function, supporting an emergency start feature for added convenience.
3. Wide Device Compatibility – Compatible with original factory remote protocols. Supported by KD-MP, KD-X4, and VVDI devices for seamless dealer key generation.
4. Customizable Functions – Supports custom button configuration and keyless entry adjustments to meet different user preferences.
5. Comprehensive Quality Testing – Every PCB board undergoes full-process performance tests such as PKE and RKE, ensuring top-tier stability and quality before leaving the factory.
With its reliable structure, intelligent design, and high compatibility, the KEYDIY KD-MLB65 Key provides a complete solution for automotive professionals who demand precision and dependability.
For more details and the device, visit www.obd2shop.co.uk.
Oznake: keydiy kd remote
Yanhua BMW BDC3/BCP Key Copying Kit – Safe & Reliable
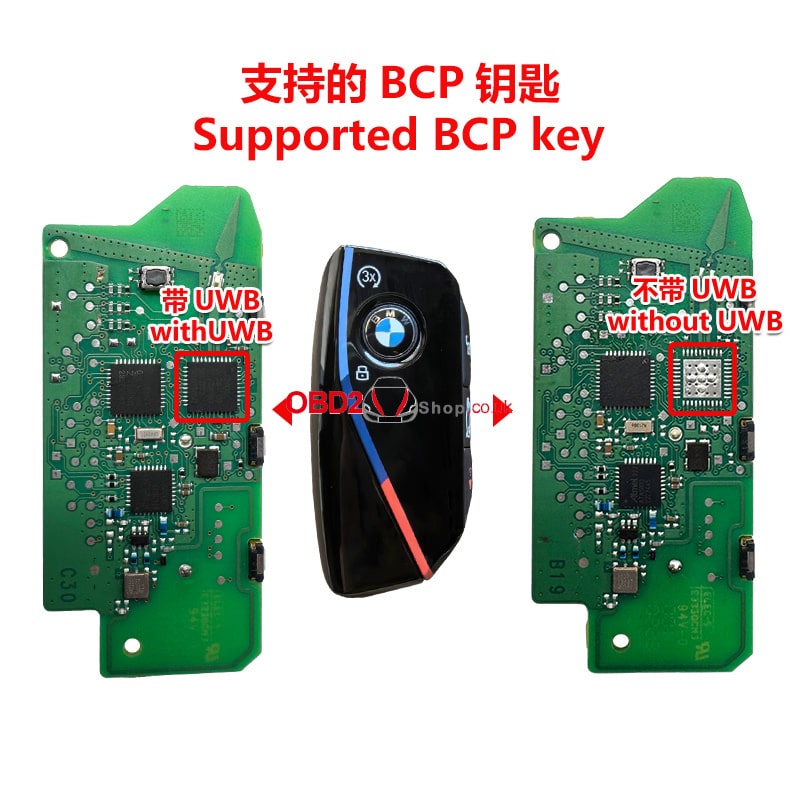
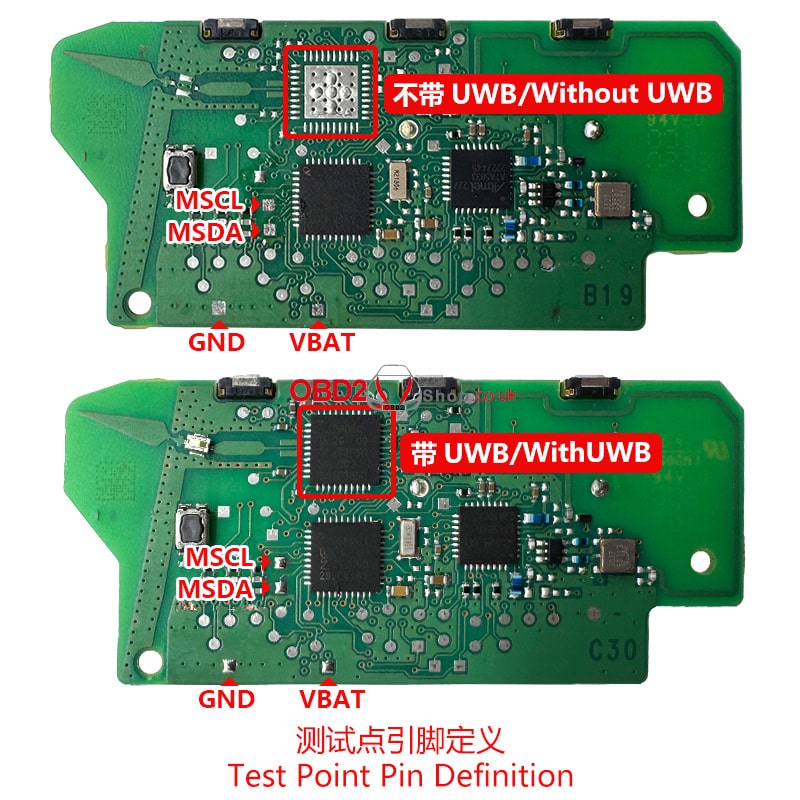
The Yanhua BMW BDC3/BCP Key Copying Interface Board Kit is an advanced, risk-free solution for duplicating BMW keys. Designed to work with the ACDP Module 38 License, it supports the copying of original brand-new keys for a wide range of BMW models from 2020 to 2024, with or without UWB functionality.
Module Functions:
1. Supports copying 2020–2024 BMW BDC3 keys (G chassis, manufactured in Hungary).
2. Supports copying BMW U chassis BCP keys, both with and without UWB.
Key Features:
1. Allows the use of original brand-new keys for key copying (aftermarket keys are not supported).
2. No soldering, no risk – a completely safe and efficient process.
3. No annual or per-use fees – once purchased, it’s free to use forever.
Supported Vehicle Models and Years:
1. BMW 2 Series/ 3 Series/ 4 Series/ 5 Series/ 6 Series/ 7 Series/ 8 Series /X3 /X4 /X5 /X6 /X7 /Z4 (2020–2024)
2. BMW 1 Series/ 2 Series (2021–2024) and X1 / X2 (2022–2024)
Supported key images:

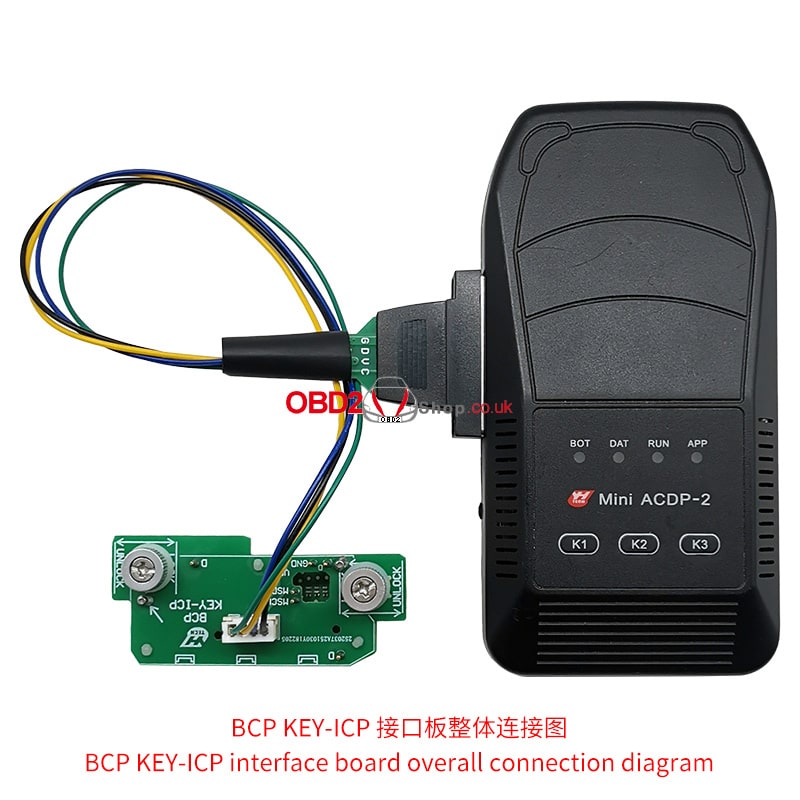
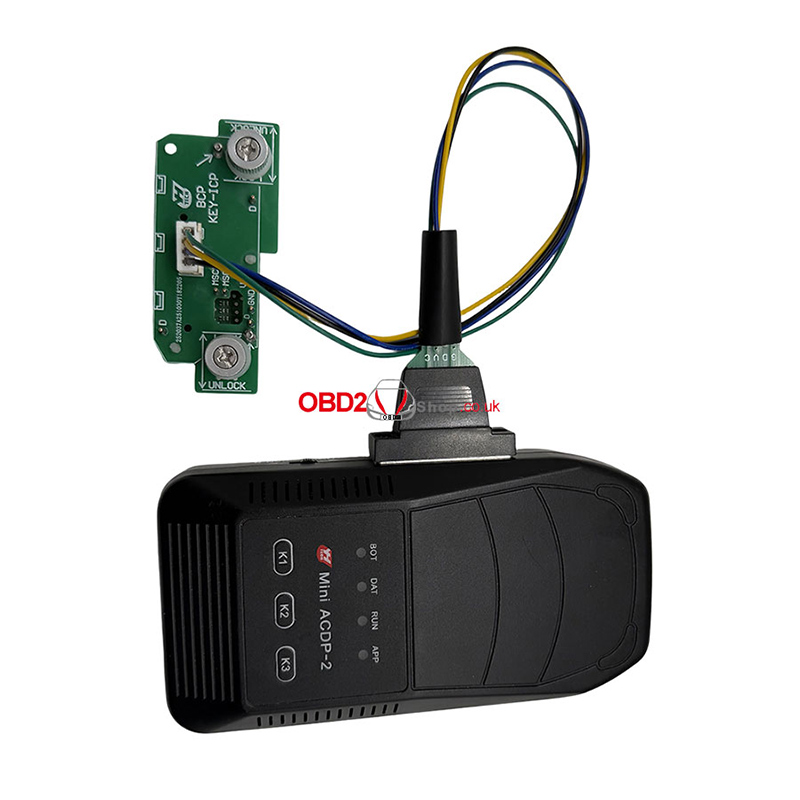
Overall Connection Diagram:
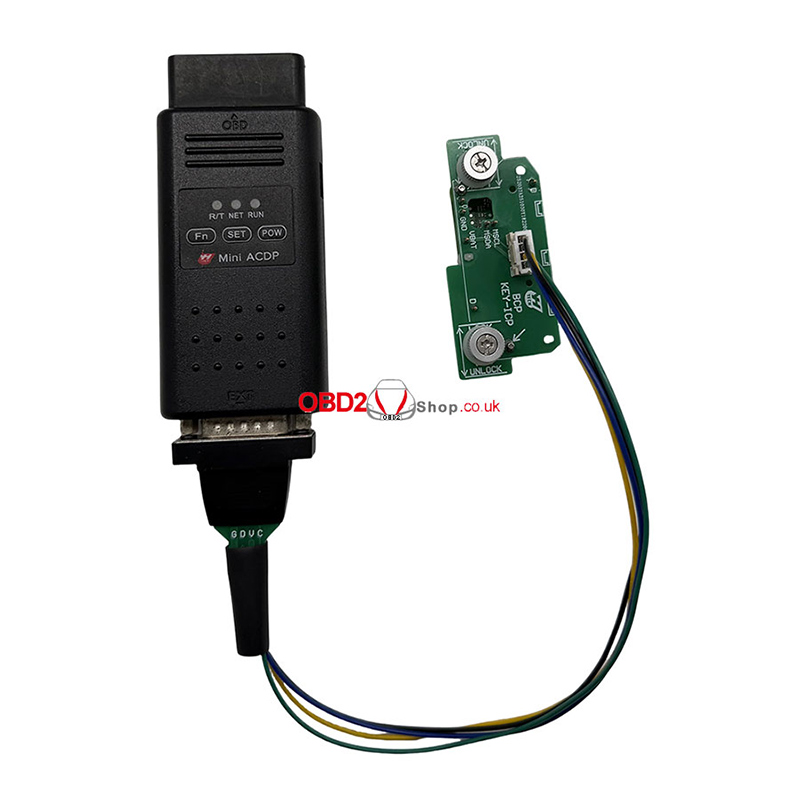
ACDP-1 BMW BCP Key Copying Connection
ACDP-2 BMW BCP Key Copying Connection
ACDP-1 BMW BDC3 Key Copying Connection
ACDP-2 BMW BDC3 Key Copying Connection
Compatibility:
The interface board kit is fully compatible with both ACDP and ACDP2 devices, offering seamless integration and stable performance.
With its easy plug-and-play design, zero soldering requirement, and broad BMW coverage, the Yanhua BDC3/BCP Interface Board Kit provides a safe, efficient, and cost-effective solution for professional key programming and duplication.
www.obd2shop.co.uk
Oznake: BDC3/BCP Interface Board
utorak, 11.11.2025.
OBDSTAR MOTOMASTER: New Data Stream Diagram Upgrade
The latest update of the OBDSTAR MOTOMASTER Motorcycle Scanner introduces a newly optimized "Data Stream Diagram" feature — now more intuitive, simpler, and easier to use. This improvement allows technicians and motorcycle enthusiasts to view and analyze real-time data more efficiently.
Step-by-Step Overview:
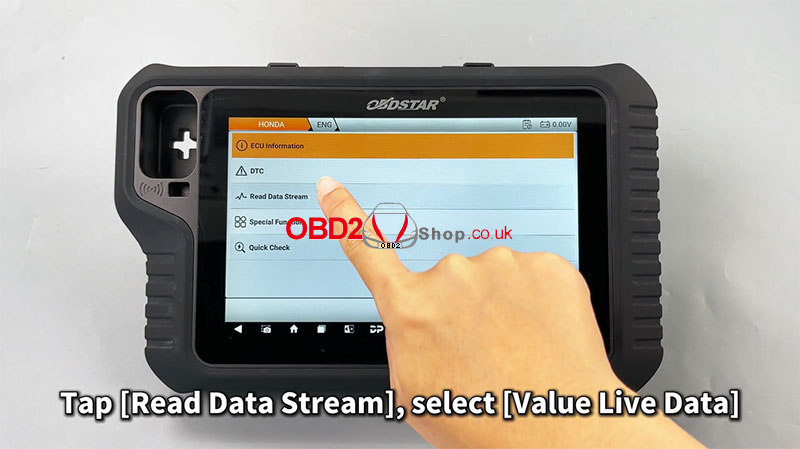
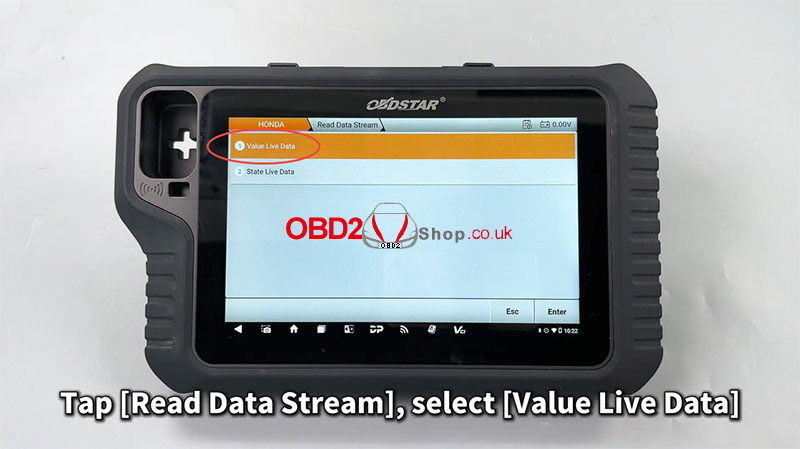
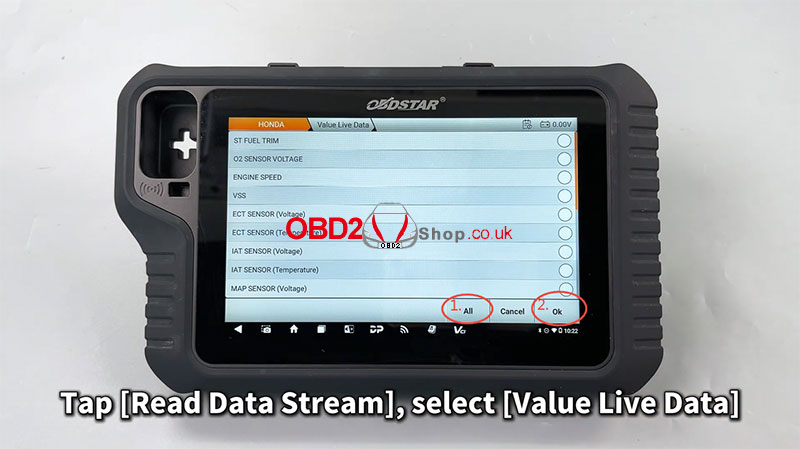
` Tap [Read Data Stream] ’ Select [Value Live Data]
This step allows you to enter the live data monitoring interface, where you can choose which vehicle parameters to observe in real time.
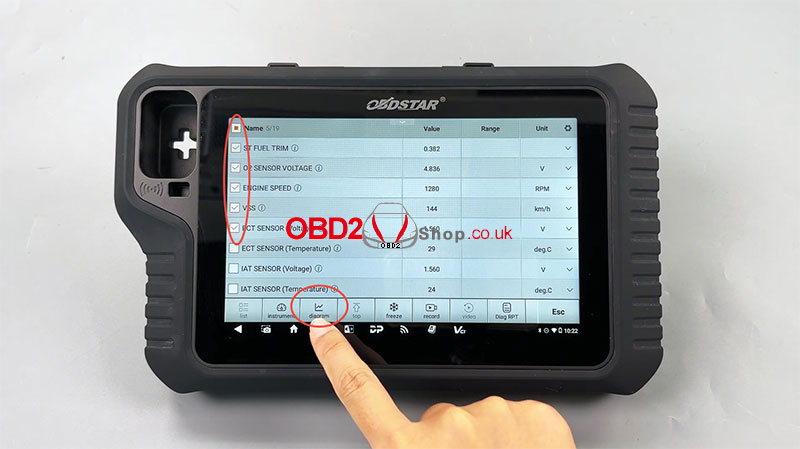
a Select the desired values and tap [Diagram]
The selected data will be visualized as a dynamic graph, helping you quickly understand performance trends and system behaviors.
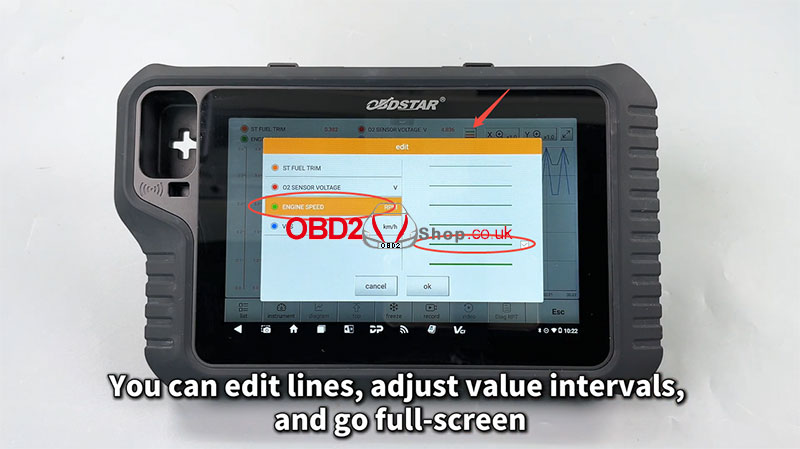
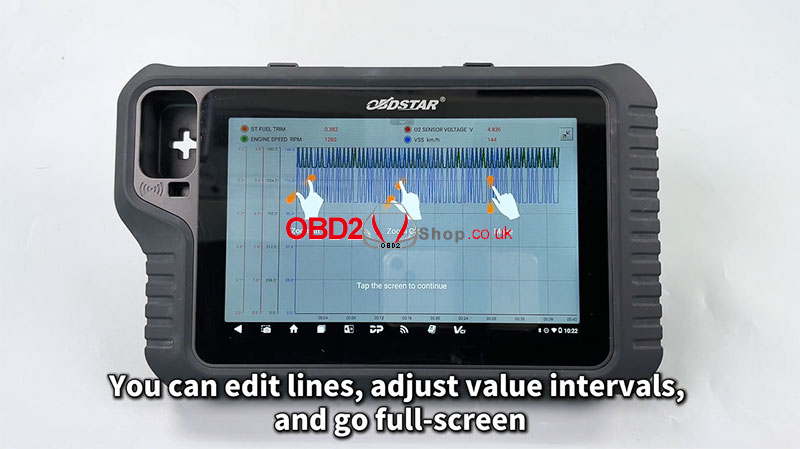
b Customize your viewing experience
You can easily edit the line display, adjust value intervals, and switch to full-screen mode for a clearer and more comprehensive view of the data.
With this update, MOTOMASTER makes diagnostic visualization smoother and more professional — perfect for workshops and motorcycle service experts who demand precision and convenience.
Learn more or get your device at: www.obd2shop.co.uk
For more details, please refer to the video:
https://youtu.be/wv3kccgK9KU
Oznake: obdstar motomaster
ponedjeljak, 10.11.2025.
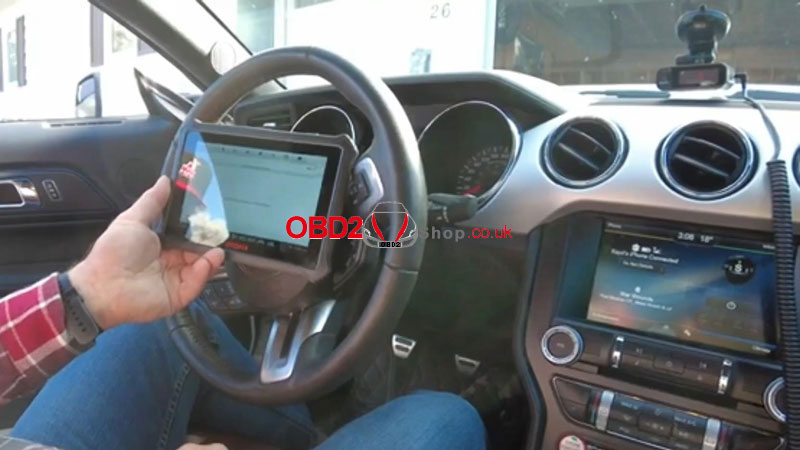
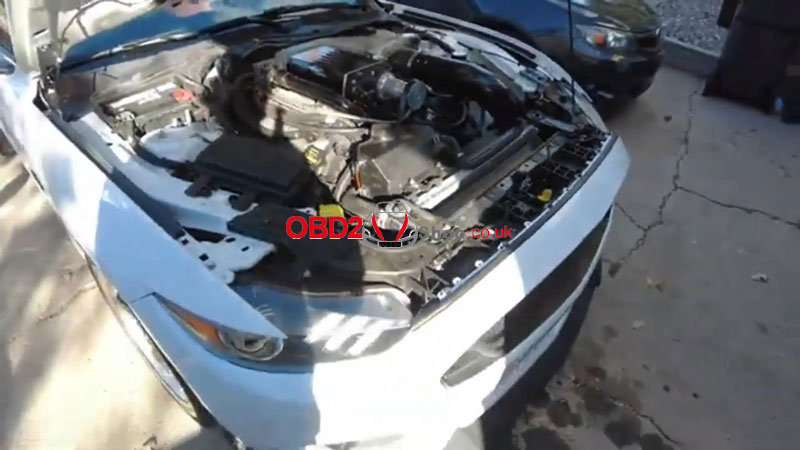
OTOFIX D1 Lite Review: Diagnose a Supercharged 2015 Mustang 5.0L
As a technician, I'm always skeptical of "pro-sumer" tools. So when I had the chance to test the OTOFIX D1 Lite on a tuned 2015 Ford Mustang GT with a Kenne Bell supercharger, I was curious to see if it could hold its own.
Spoiler alert: I came away impressed.
A quick note on the brand: Otofix is a professional sub-brand from Autel, and this unit runs on the same robust, user-friendly Android-based system that Autel is known for.
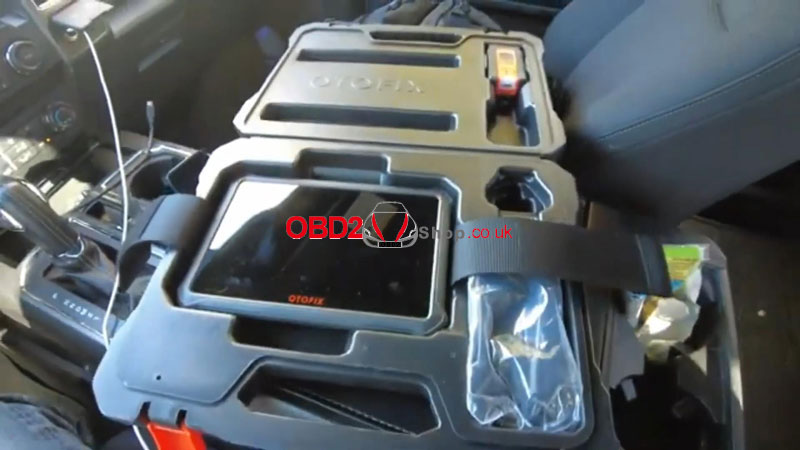
First Look & Setup: Unboxing the D1 Lite
The D1 Lite feels like a mini Android tablet. It's compact, the touchscreen is responsive, and it comes with a Bluetooth OBD2 dongle that has a built-in flashlight nice touch for dark garages.
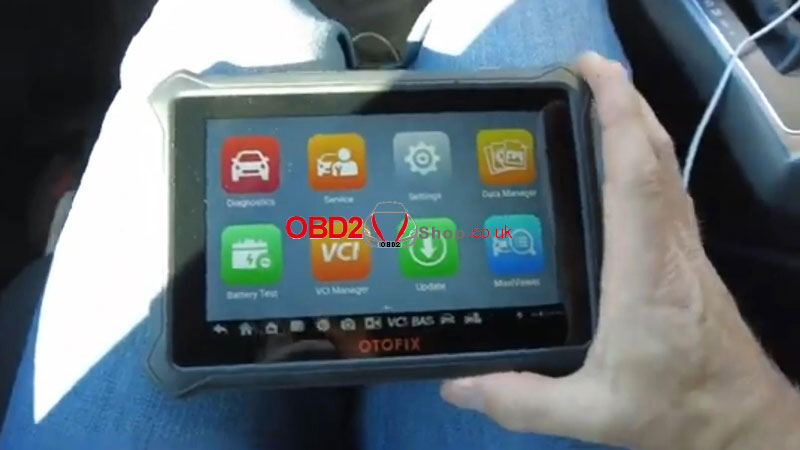
Our only hiccup was right at the start: you must pair the dongle to the tablet via Bluetooth before you can do anything. Once we figured that out (took 30 seconds), we were in business.
The Real-World Test: Diagnosing a Supercharged Coyote
We plugged into my buddy Cade's 2015 Mustang. The menu was intuitive: we selected Ford, and the tool automatically identified the vehicle as a 5.0L Gasoline Manual-spot on.
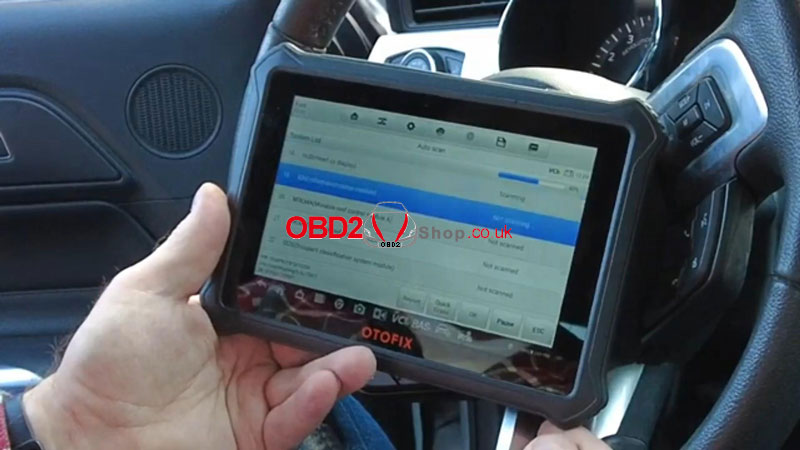
We ran the "Auto Scan," which checked every module in the car. The speed was decent. It's not quite as fast as my $8,000 shop laptop, but for the price, it's more than quick enough.
Here's what we found:
lPCM Codes: It flagged catalyst efficiency codes-no surprise, as the car has no catalytic converters.
lU-Codes: We found some communication codes (U-codes) which, from my experience, often point to a past low battery or voltage dip.
lThe Cool Find: It pulled a code for the Adaptive Cruise Control radar sensor. This was a great diagnostic clue. The car has a GT350 front bumper, so the sensor is likely misaligned or its calibration was lost. The D1 Lite told us exactly where to look without any guesswork.
lWe also poked through the live data stream, which was smooth and easy to read. This is perfect for monitoring sensor values if you're tracking down a tricky intermittent issue.
My Verdict as a Technician
The OTOFIX D1 Lite is a powerful bridge between basic code readers and intimidating professional tools.
What I Liked:
1. Extensive Vehicle Coverage: It works on everything from your daily driver to exotics. That's huge.
2. User-Friendly Interface: It's not clunky. Anybody with a smartphone can navigate it.
3. Deep Diagnostics: Reading codes, viewing live data, and resetting monitors across all systems (Engine, ABS, SRS, etc.) is exactly what a DIYer or home mechanic needs.
4. Incredible Value: It does about 90% of what most people would need from a professional scanner for a fraction of the cost.
The Limitation (and it's a good one):
It doesn't do module programming. And honestly, that's a safety feature. Programming can brick your car's computer if it goes wrong. For most home users, this is the perfect tool to diagnose, not to flash.
Should you buy the OTOFIX D1 Lite?
Absolutely. If you're a car enthusiast tired of paying $150 just for a shop to read your codes, or if you love working on your own modern vehicles and want to understand them better, this tool is a game-changer. It's the perfect partner for your garage, giving you the confidence and information to tackle jobs yourself.
It's a solid 9/10 for the DIY and pro-am crowd.
www.obd2shop.co.uk
petak, 07.11.2025.
3 Ways to Connect Your Launch X431 Tablet to the VCI Connector
This guide will show you three methods for connecting your Launch X431 Diagnostic Tablet to the VCI connector.
The available connection modes are:
Cable connection
Wi-Fi connection
Bluetooth connection
Each method is easy to set up and ensures stable communication between your X431 diagnostic tablet and the vehicle.
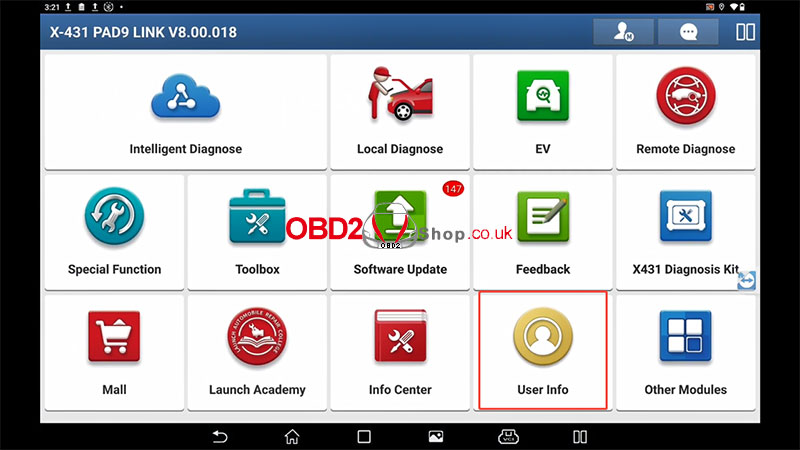
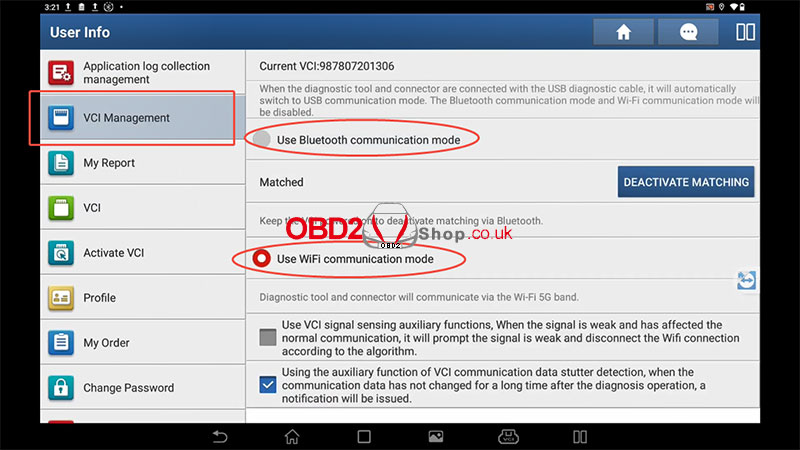
1. Wi-Fi and Bluetooth Connection
To switch between Wi-Fi and Bluetooth communication modes:
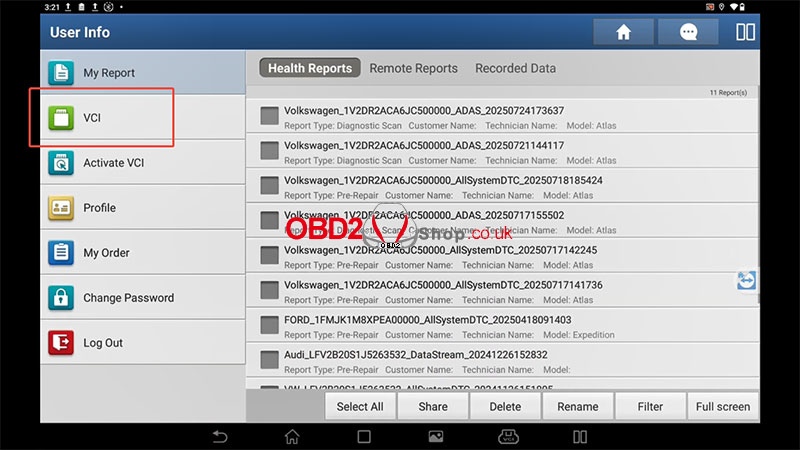
On the main tablet, tap [User Info].
Tap the [VCI] menu five times continuously — this will open the [VCI Management] menu.
In the VCI Management menu, you can select:
[Use Bluetooth communication mode]
[Use Wi-Fi communication mode]
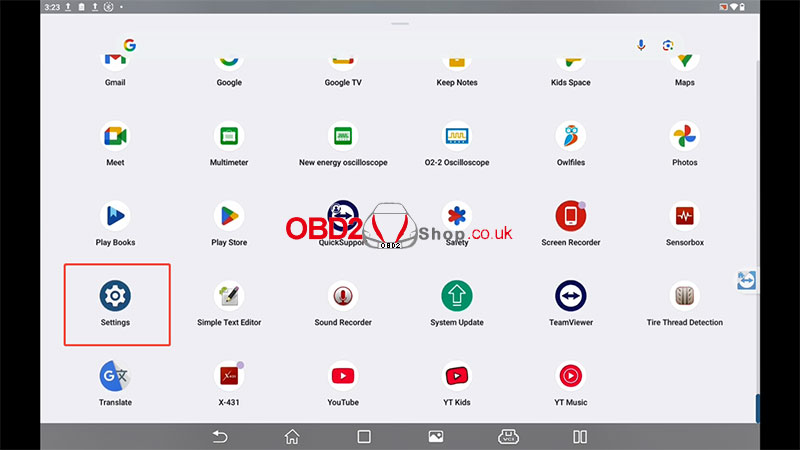
2. Cable Connection
To use a wired connection between the X431 tablet and the VCI connector:
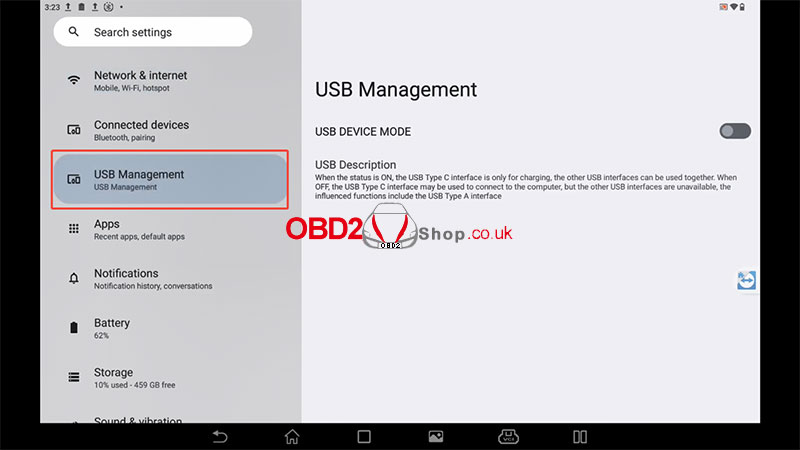
Tap [Settings] on the tablet.
Go to [USB Management].
When the diagnostic tablet and connector are connected using the USB diagnostic cable, the system will automatically switch to USB communication mode.
At this time, the Bluetooth and Wi-Fi communication modes will be disabled.
Tips:
When using the USB cable, there’s no need to switch connection modes manually. The system will detect and configure automatically.
For wireless connections, ensure that both the tablet and the VCI connector are powered on and within range.
For more information or to purchase diagnostic tools, please visit:
www.obd2shop.co.uk
Video guides:
https://youtu.be/W3vte1-ltIc
Oznake: Launch X431
četvrtak, 06.11.2025.
How to Use Xhorse AO.D BCM2 Adapter with Key Tool Plus
This guide provides step-by-step instructions on using the Xhorse AO.D BCM2 adapter to read a vehicle's DFLASH and PFLASH memory and calculate immobilizer data. The new version of the adapter supports all BCM2 series, including 03xx, 04xx, 05xx, 06xx, 07xx, and 08xx.
While this adapter is compatible with both the Multi Prog and Key Tool Plus, this article will use the Key Tool Plus as an example.
Step 1: Hardware Connection
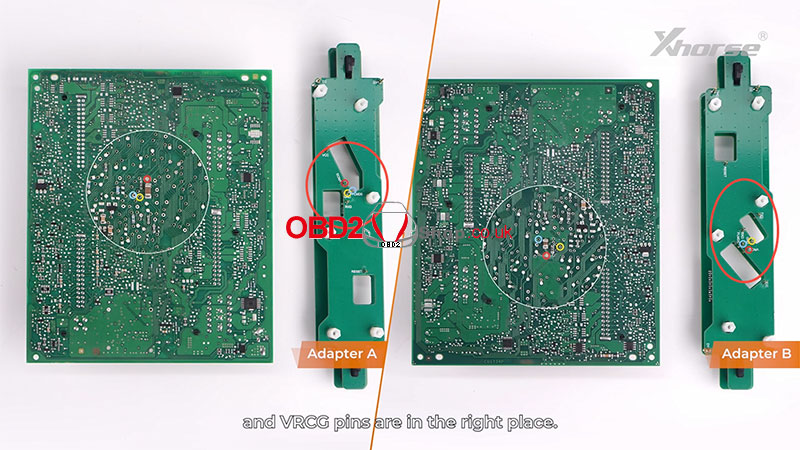
1. Identify the correct adapter for your specific Audi BCM2 module. There are two adapters (Adapter A and Adapter B) for different modules.
2. Carefully check that the adapter pins align correctly with the module. Ensure the FLMD, GND, and VRCG pins are in the correct positions. Refer to the wiring diagram and select the appropriate adapter.
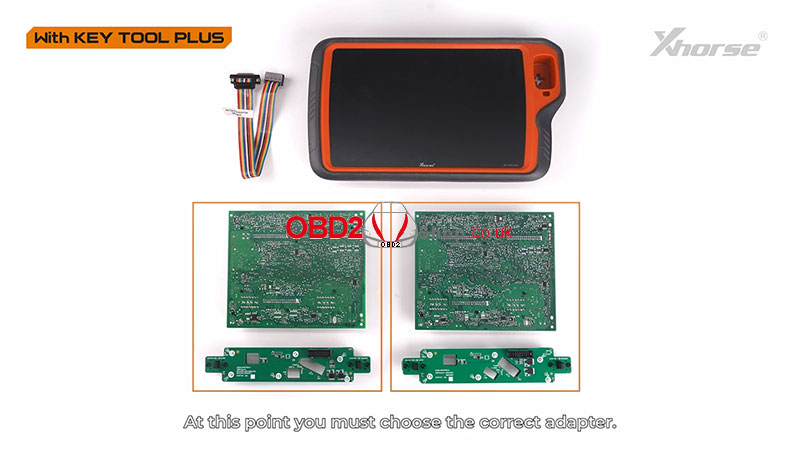
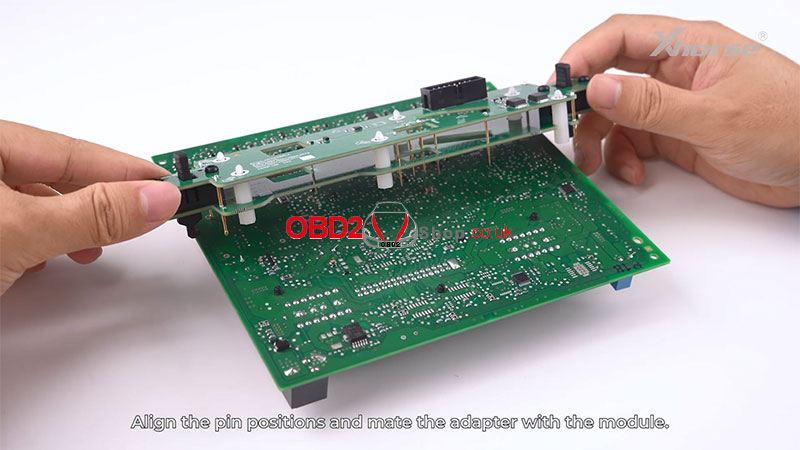
3. This demonstration uses Adapter A. Align the pin positions and connect the adapter to the BCM2 module.
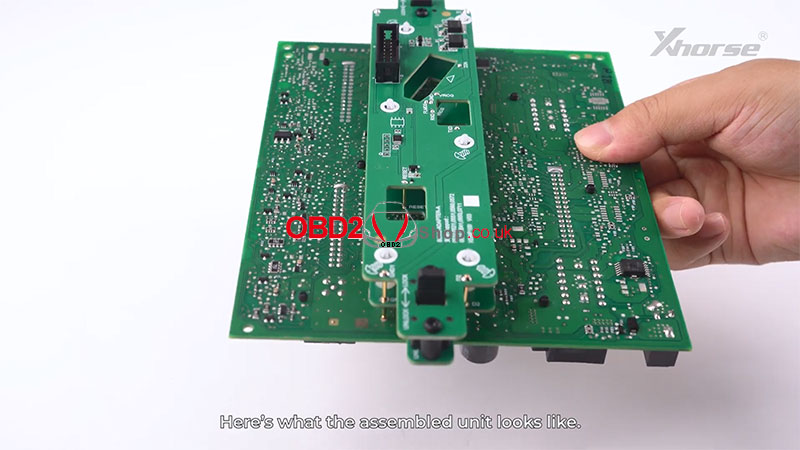
4. Flip and snap the two side buttons on the adapter to lock it securely onto the module.
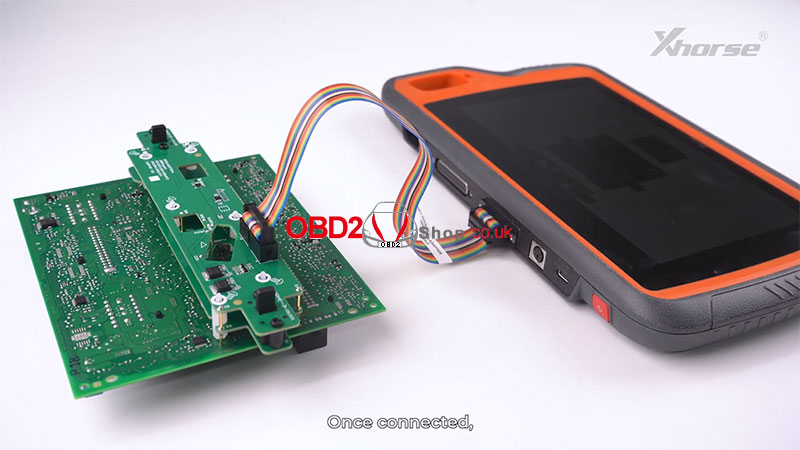
5. Use the Key Tool Plus Adapter Cable to connect the assembled unit (BCM2 module + adapter) to your Key Tool Plus device.
Step 2: Software Navigation & Reading Data
1. On your Key Tool Plus, navigate to the following menu path:
Immo Programming >> Audi >> Select by type >> Fifth Immobilizer System >> Start programming
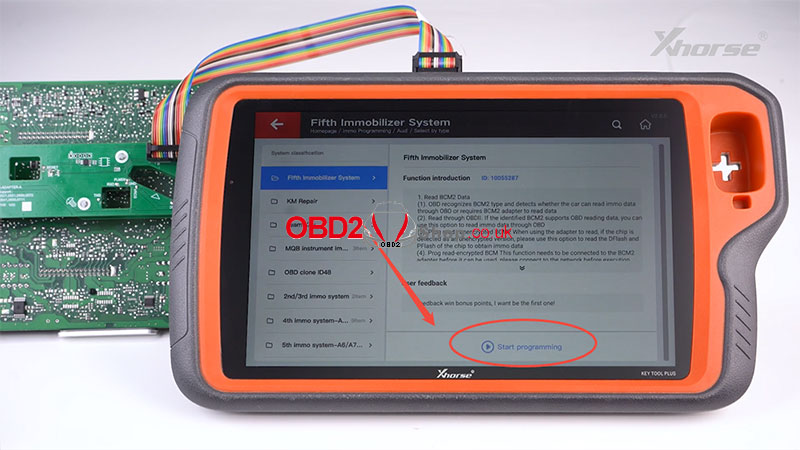
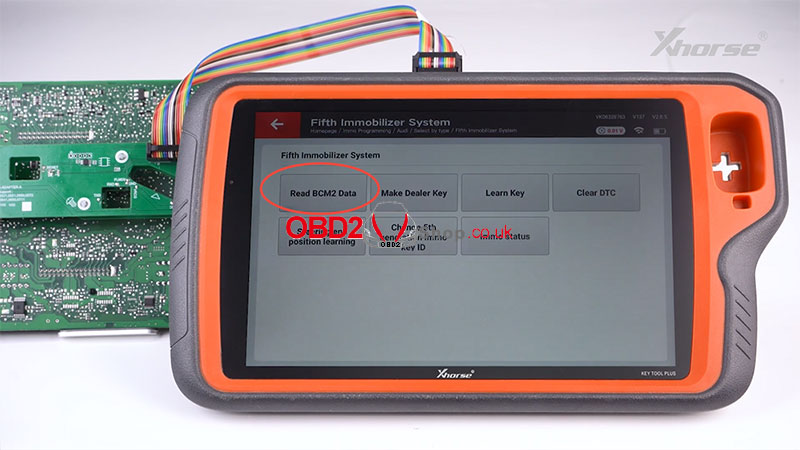
2. Select "Read BCM2 Data".
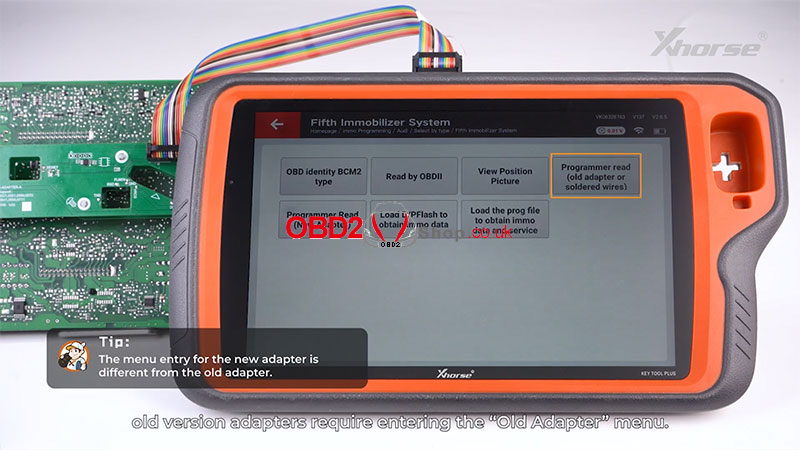
Tip: The new adapter uses a different menu entry. If you are using an old version adapter, you would need to enter the "Old Adapter" menu.
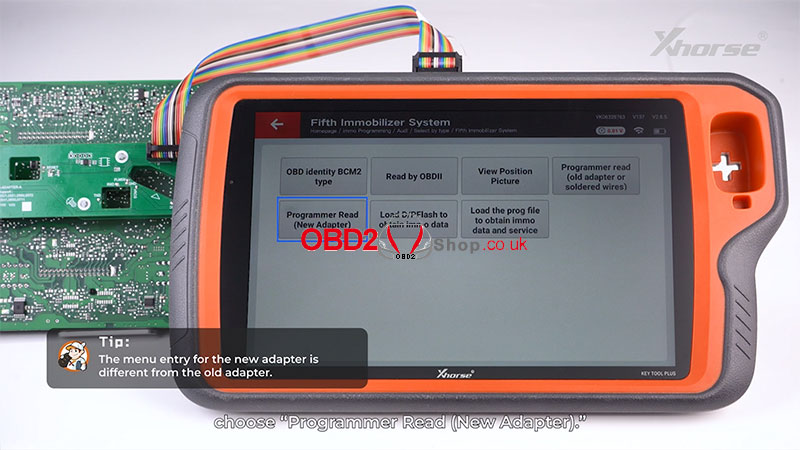
3. For the new version adapter, choose "Programmer Read (New Adapter)".
Step 3: Reading DFLASH and PFLASH
A. Read DFLASH
Select the chip "D70F3381_3634".
Choose "D-FLASH".
You can view the wiring diagram for reference on the screen. Click "Read" to read the DFLASH data.
Tip: Ensure the adapter and chip are properly connected.


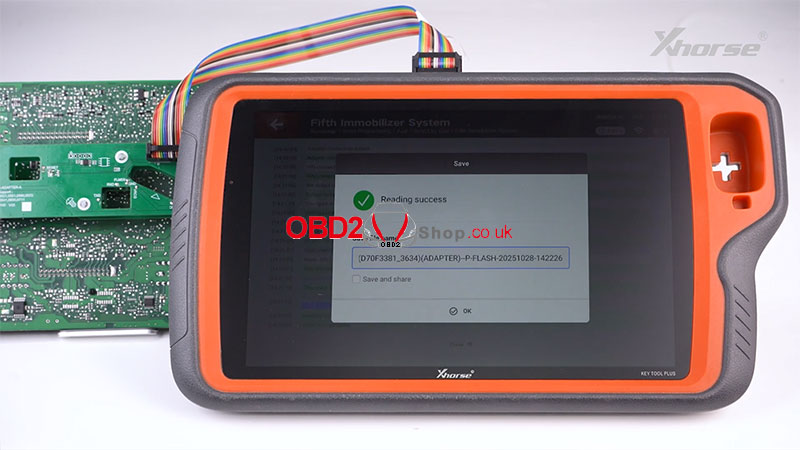
The message "Read successfully" will appear when the task is completed.
B. Read PFLASH
Select the chip "D70F3381_3634" again.
This time, choose "P-FLASH".
Click "Read" to read the PFLASH data.
Step 4: Calculating Immobilizer Data
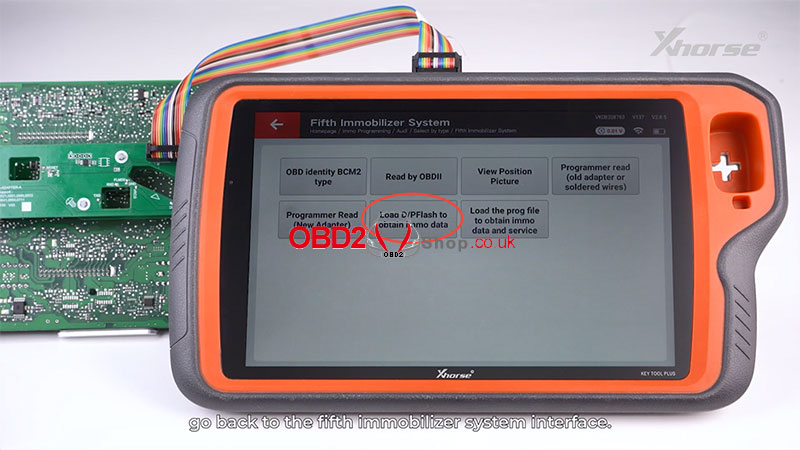
1. After successfully reading both memory sections, return to the Fifth Immobilizer System main interface.
2. Select "Load D/PFLASH to obtain immo data".
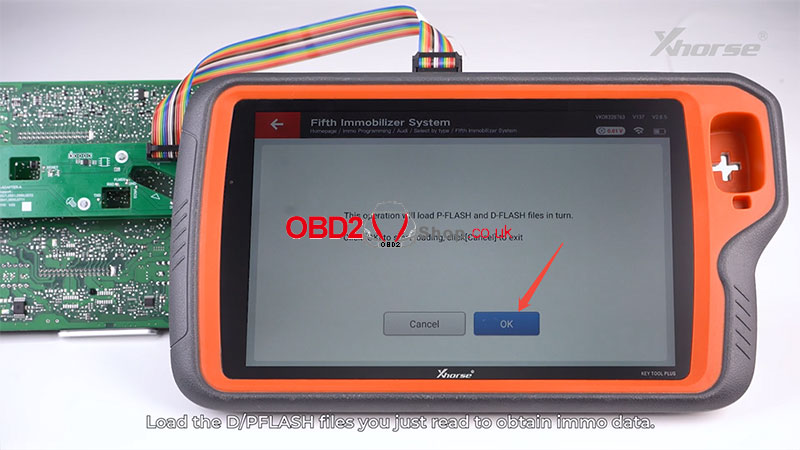
Tip: This operation will automatically load both the P-FLASH and D-FLASH files in sequence.
3. Click "OK" to start the process.
4. Once the data is successfully read, click "OK" again to save it.


5. After the save is complete, you can proceed with functions like generating a dealer key or performing key learning.
For more information, watch this video:
https://youtu.be/usX6xBlMsfc
www.obd2shop.co.uk
Oznake: xhorse audi bcm2 adapter
srijeda, 05.11.2025.
Lonsdor K518 PRO Add 2023 Toyota BZ3 Smart Key OBD Tutorial
Today, we're gonna show how to add a 2023 Toyota BZ3 smart key with Lonsdor K518 PRO by OBD.

What We Need:
Lonsdor K518 Pro Key Programmer
OBD Communication Cable
An Original Key & a New Smart Key
Step-by-Step Procedure
Plug in the OBD communication cable.
Immo &Remote >> Toyota >> Select from vehicle >> China >> BZ3 >> 2023- >> Smart key >> PEPS(CAN) >> Add smart key


All keys require reprogramming; unprogrammed keys will become invalid. You can program up to 4 keys.
Click OK to confirm the IK controller serial number.
Start to program no.1 key, pls hold the key closer to the car start button, click OK to continue.
Programmed successfully. Click OK to program the next key.
Start to program the no.2 key. pls hold the key closer to the car's start button, click OK to continue.
Programmed successfully. Click Cancel to complete.
Count of currently programmed and valid keys: 2
Both keys can start the vehicle and remote work well.
Done.
The Lonsdor K518 Key Programmer proves to be a reliable and user-friendly tool for modern Toyota smart key programming.


Video guides:
https://youtu.be/MR0BLC_MocU
www.obd2shop.co.uk
Oznake: lonsdor k518 pro
utorak, 04.11.2025.
Guide: How to Add a Key to BMW BDC3 Using Keydiy KD-MAX
This guide provides step-by-step instructions for cloning a smart key for the BMW BDC3 using the Keydiy KD-MAX system.
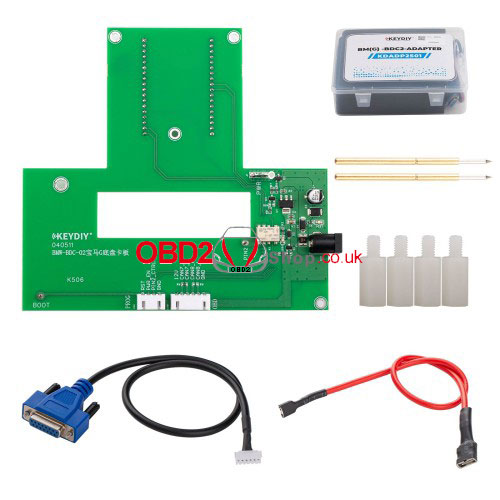
Required Tools:
Keydiy KD-MAX
Unlocking cable
BDC03 solder-free dismantling clip
KD FGB57 Board
Original key
Step 1: Initial Setup
Power on the KD-MAX device.
Navigate to:
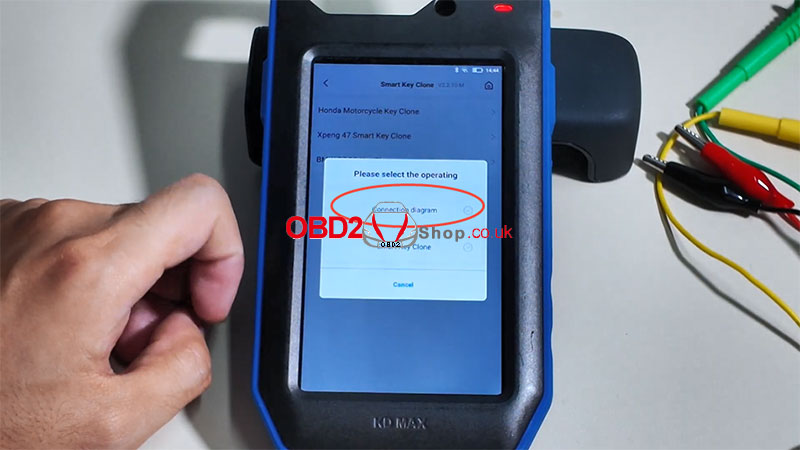
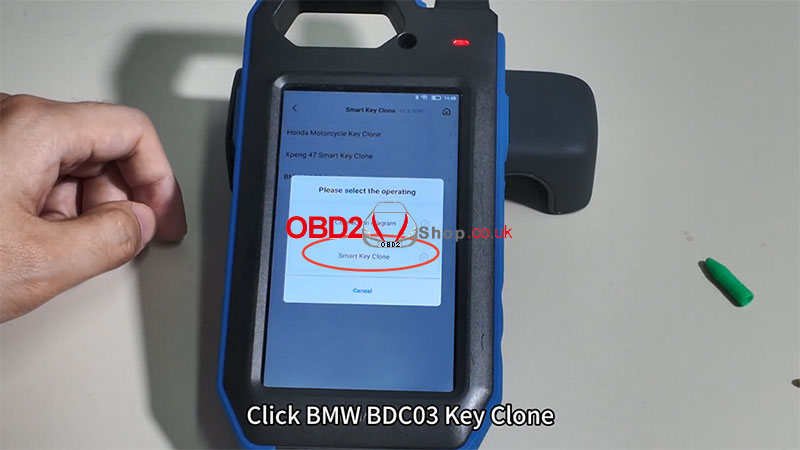
[Remote Function] ’ [Smart Key Clone] ’ [BMW BDC3 Key Clone]
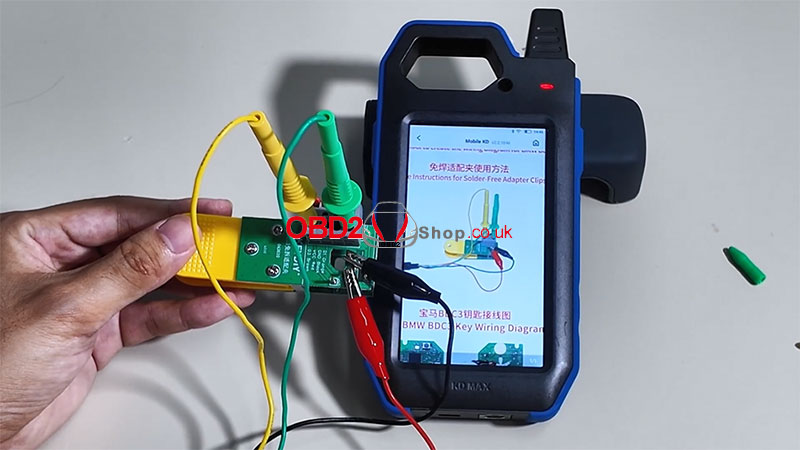
Select [Connection diagram] to view the correct wiring setup for the KD BDC03 solder-free adapter clip.
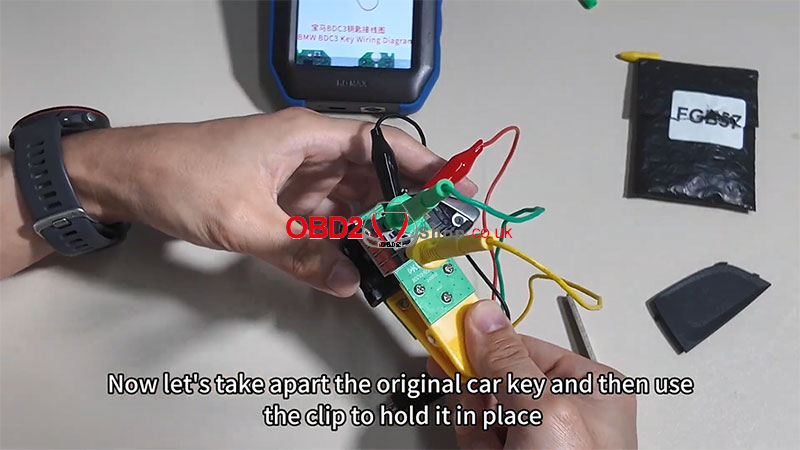
Step 2: Prepare the Original Key
Disassemble the original car key.
Secure the key using the BDC03 clip.
Connect the clip to the KD-MAX device.
Step 3: Read Chip Data
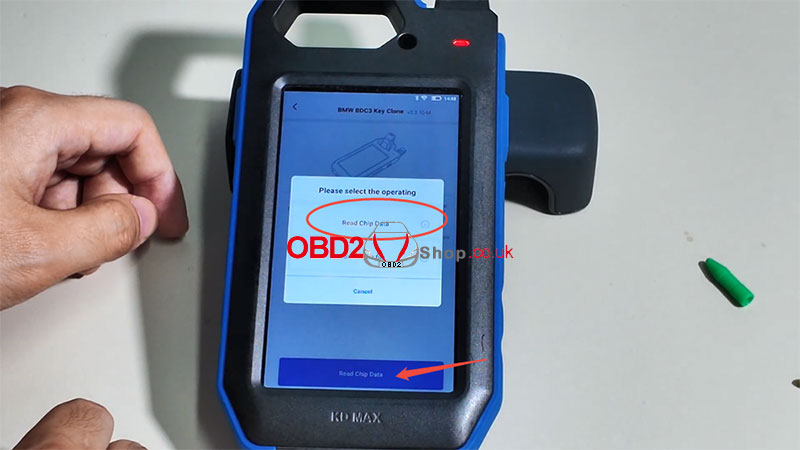
From the main menu, select [BMW BDC3 Key Clone] again.
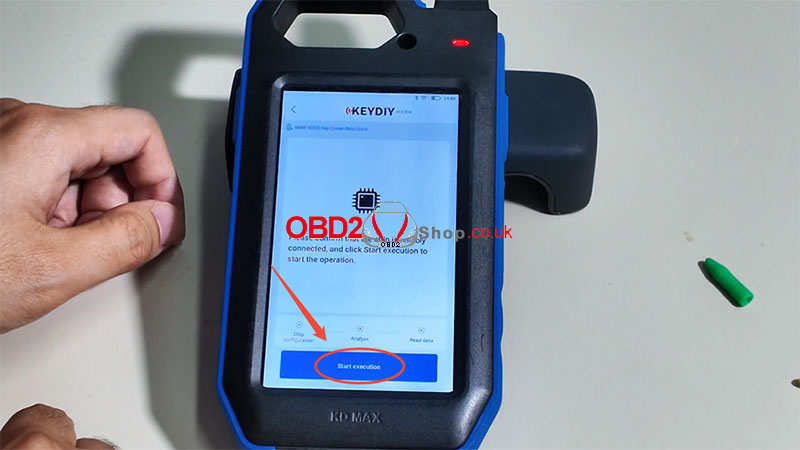
Choose [Smart Key Clone] ’ [Read Chip Data] ’ [Start Execution]
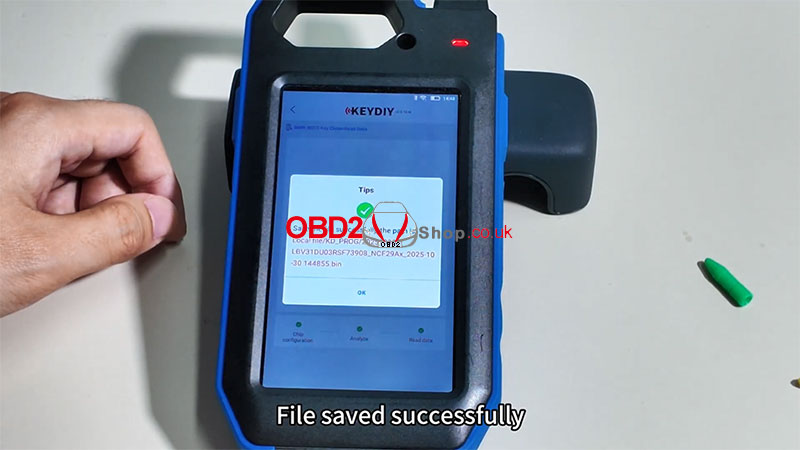
Wait for the data to be read.
File saved successfully!
Step 4: Generate New Key Data
Remove the original car remote and place the KD FGB57 Board on the KD-MAX induction area.
Select [KD-FGB Remote].
The system will begin generating data.
Generation successful!
Step 5: Final Assembly
Reassemble the new key into its housing.
The key is now ready for use with the vehicle.
Additional Resources:
For a visual demonstration, watch the tutorial video:
https://youtu.be/z_xlzcO58sI
For more tools and accessories, visit:
www.obd2shop.co.uk
Oznake: keydiy kd max
ponedjeljak, 03.11.2025.
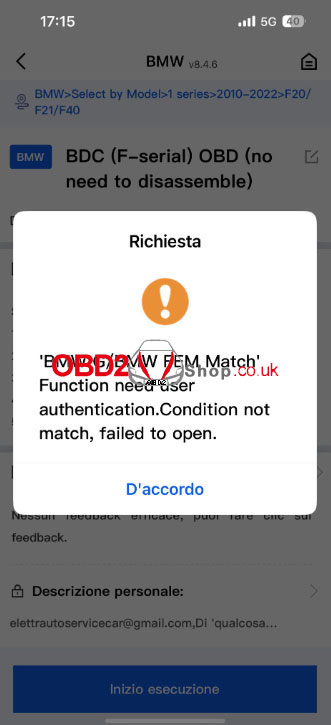
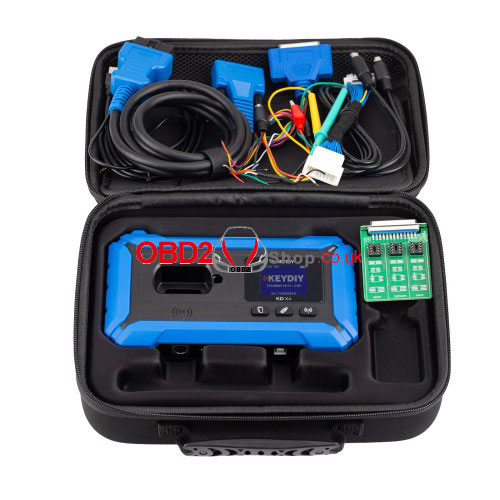
KEYDIY KD-X4 FAQ: BMW BDC2/BDC3, UWB & Authorization Explained
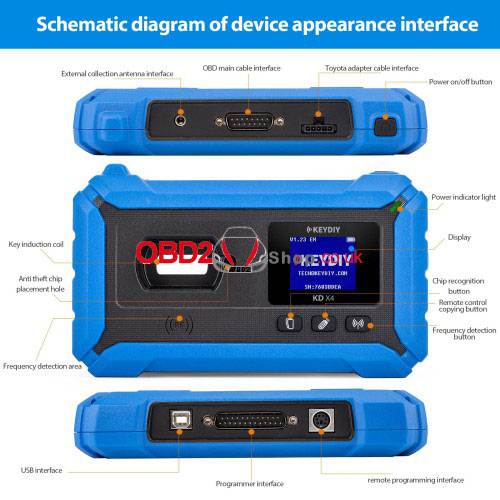
The KEYDIY KD-X4 Key Programmer is a versatile tool designed for automotive key programming, offering support for a wide range of vehicle systems, including BMW BDC2 and BDC3 platforms. Below are frequently asked questions regarding its authorization, compatibility, functions, and usage.
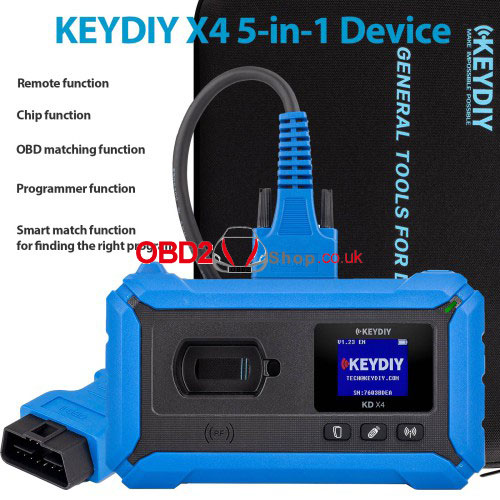
1. Authorization and Payment
Q: Do BDC2 and BDC3 authorizations require credits or payment?
A: Both authorizations are activated together. You can use K-coins if available; otherwise, payment is required.
Q: Is there a list of K-coin costs for different key types?
A: Yes. Standard keys require 20 K-coins, while smart keys require 30 K-coins.
2. Regional Restrictions
Q: Is the KD-X4 region-locked? Can it be used in Taiwan?
A: There are no regional restrictions. The device can be used globally, including Taiwan.
3. Adapter and Compatibility
Q: Do I need to purchase the BM(G)-BDC2 Adapter?
A: Yes, but you must first complete real-name verification and activate the BMW function.
Q: Can KEYDIY BDC2/BDC3 keys be used with Xhorse devices?
A: No. BMW keys are only compatible with KEYDIY or OEM equipment.
4. Vehicle Support
Q: Does the KD-X4 support key programming for the G20 (BMW 3 Series)?
A: Yes, as long as the key is not locked. The G20 uses the BDC3 platform. If not listed in the menu, navigate by type.
5. UWB Function
Q: Can the KD-X4 copy UWB-enabled BCP keys? Does it require an OEM key or KD's FGB?
A: Currently, only OEM keys are supported. This feature is enabled via app updates. Overseas UWB support is expected by October 31, 2025.
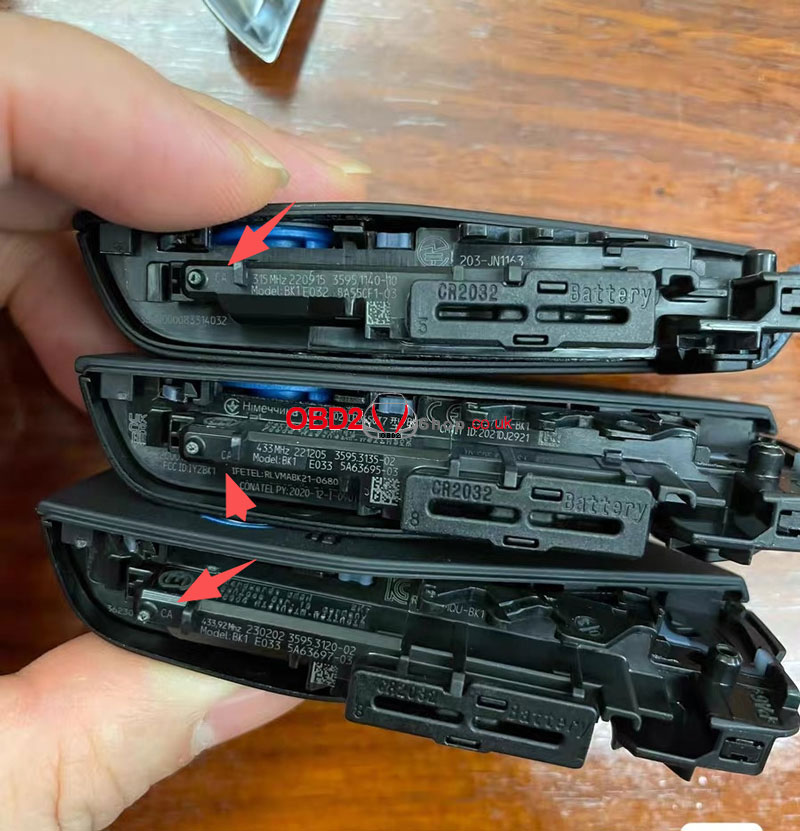
Q: How can I tell if a BMW U-key has UWB?
A: UWB-enabled keys have the code "CA" (high-end), while non-UWB keys are labeled "CG" (low-end). Low-end keys can be reliably programmed using KD's FGA key.
6. Chip Programming
Q: Does the KD-X4 support reading and programming the KD D26 chip?
A: Yes.
7. Device Locking
Q: Can the KD-X4 be locked by serial number, for example, in cases of fraud?
A: Yes, but this function is reserved for clear cases of fraud, such as non-payment after delivery.
8. All-Keys-Lost Support
Q: Does the KD-X4 currently support all-keys-lost for BDC2?
A: Not at this time.
9. Account Management
Q: What if a customer's account is deleted and K-coins are lost?
A: Users must prove ownership of the original account (e.g., via a linked Twitter account). After verification, K-coins can be merged into a new account.
Conclusion
The KEYDIY KD-X4 offers robust functionality for modern key programming, with ongoing updates to expand vehicle coverage and features. Always ensure your device and app are up to date to access the latest capabilities.
For more information, tutorials, or support, visit www.obd2shop.co.uk.
Oznake: keydiy kd x4

| < | studeni, 2025 | > | ||||
| P | U | S | Č | P | S | N |
| 1 | 2 | |||||
| 3 | 4 | 5 | 6 | 7 | 8 | 9 |
| 10 | 11 | 12 | 13 | 14 | 15 | 16 |
| 17 | 18 | 19 | 20 | 21 | 22 | 23 |
| 24 | 25 | 26 | 27 | 28 | 29 | 30 |
Svibanj 2026 (1)
Siječanj 2026 (19)
Prosinac 2025 (22)
Studeni 2025 (21)
Listopad 2025 (20)
Rujan 2025 (21)
Kolovoz 2025 (8)
Srpanj 2025 (13)
Lipanj 2025 (9)
Svibanj 2025 (12)
Travanj 2025 (10)
Ožujak 2025 (12)
Veljača 2025 (14)
Siječanj 2025 (8)
Prosinac 2024 (6)
Studeni 2024 (6)
Listopad 2024 (4)
Rujan 2024 (7)
Kolovoz 2024 (14)
Srpanj 2024 (12)
Lipanj 2024 (10)
Svibanj 2024 (13)
Travanj 2024 (12)
Ožujak 2024 (11)
Veljača 2024 (2)
Siječanj 2024 (10)
Prosinac 2023 (8)
Studeni 2023 (6)
Listopad 2023 (7)
Rujan 2023 (9)
Kolovoz 2023 (6)
Srpanj 2023 (10)
Lipanj 2023 (4)
Veljača 2023 (8)
Siječanj 2023 (14)
Prosinac 2022 (13)
Studeni 2022 (14)
Listopad 2022 (18)
Rujan 2022 (9)
Kolovoz 2022 (16)
Srpanj 2022 (11)
Lipanj 2022 (14)
Svibanj 2022 (13)
Travanj 2022 (12)
Ožujak 2022 (12)
Veljača 2022 (13)
Siječanj 2022 (10)
Srpanj 2021 (1)
Dnevnik.hr
Gol.hr
Zadovoljna.hr
Novaplus.hr
NovaTV.hr
DomaTV.hr
Mojamini.tv