OBD2 tools on OBD2shop.co.uk https://blog.dnevnik.hr/obd2shop
utorak, 30.04.2024.
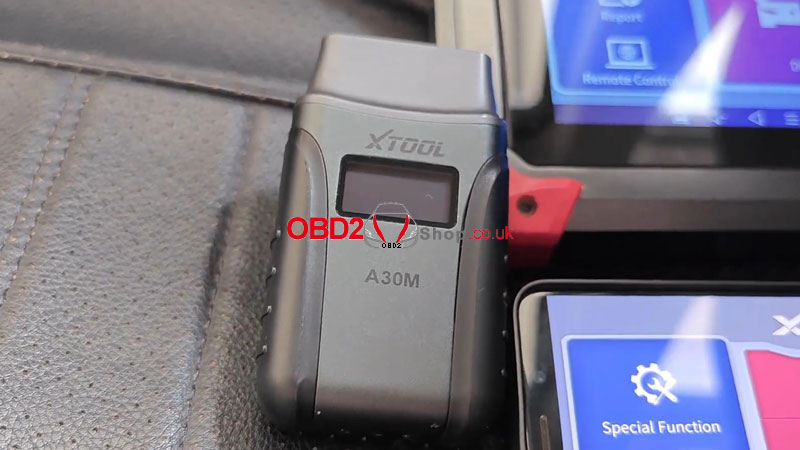
XTOOL A30M vs. D7 Comparison Review, What's Different?
What's different between XTOOL A30M & D7 Diagnostic Tool? Today I'm gonna do a detailed but quick comparison review of these 2 devices side by side. Hope this can help you to make an informed decision.
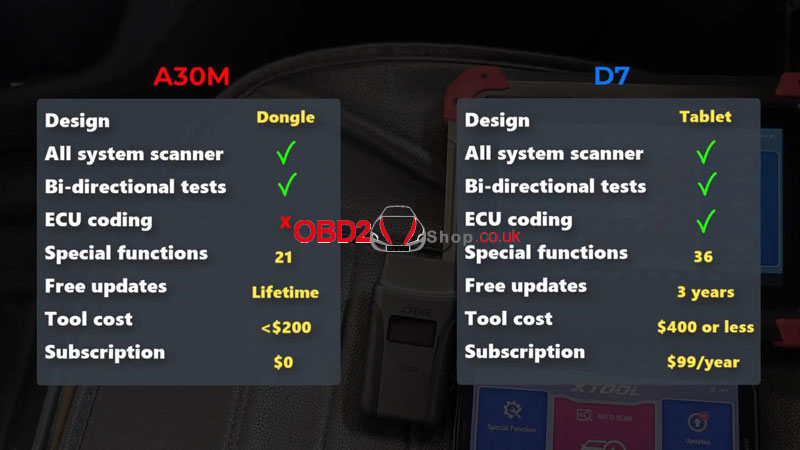
The first obvious difference is that the XTOOL D7 is a standalone tablet-style tool while the A30M needs you to pair it by Bluetooth on a phone.

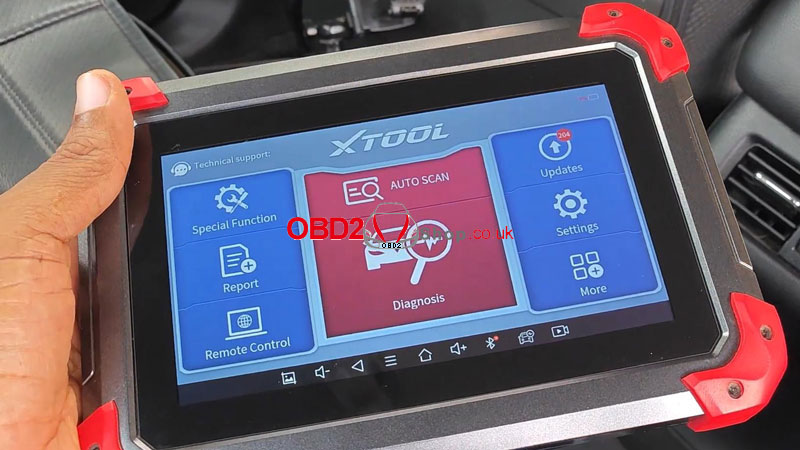
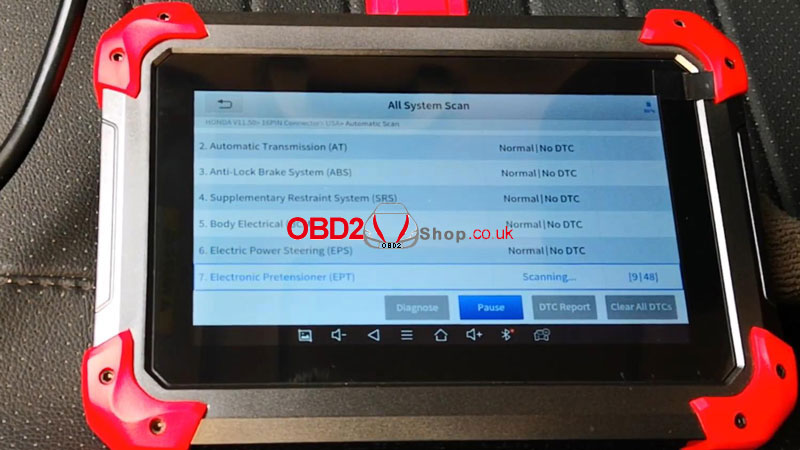
Despite this difference, these 2 scanners have a lot in common. They're both all system diagnostic scanners, meaning that you have access to every single ECU that's installed in the car.
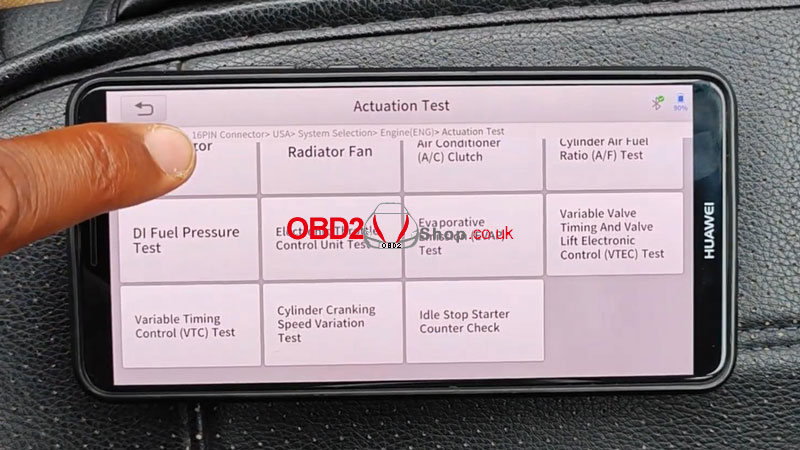
They're also fully bi-directional tools and the A30M has kept up with every single bi-directional or actuation test that I've been able to do with the D7 on my 2017 Honda Accord. So I haven't been able to put a knife between these two when it comes to directional tests in terms of OBD2 protocols. I haven't really seen any difference between the two as well.
By the way, if you're wondering what the difference is between the 3 versions of XTOOL D7, D7S, and D7W. The D7S simply boosts improved hardware and supports the diagnosis over Internet protocol when compared to the traditional D7. The D7W does everything that the D7S does but in addition, it makes a wireless connection to the car via Wi-Fi. So if diagnosis over Internet protocol is a must for you, then you should be looking at either the D7S or the D7W.

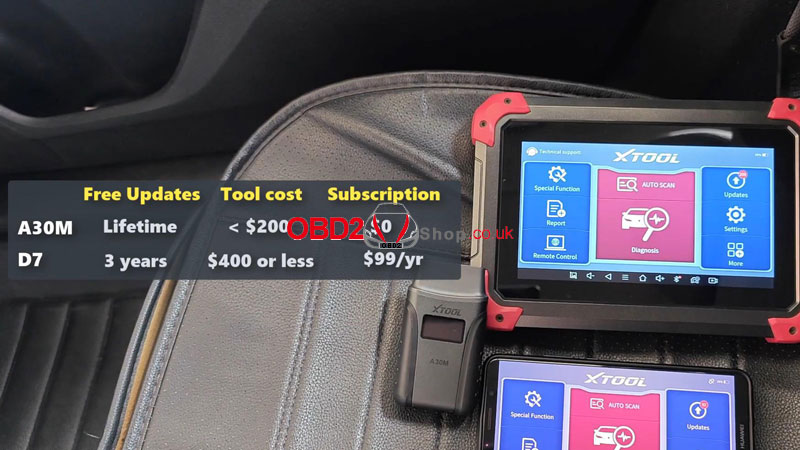
These tools really begin to differ when it comes to special functions. The A30M supports 21 kinds while the D7 supports 36 kinds for my Accord. For example, the A30M doesn't support key programming. So if key programming is an absolute requirement for you, the D7 should be more suitable.
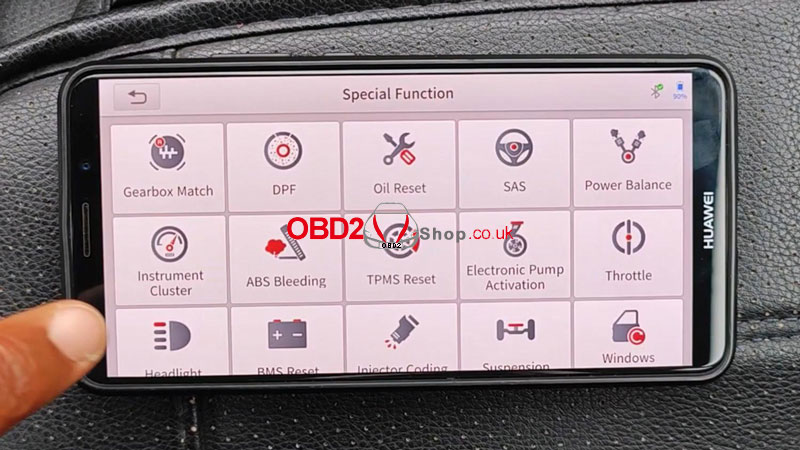
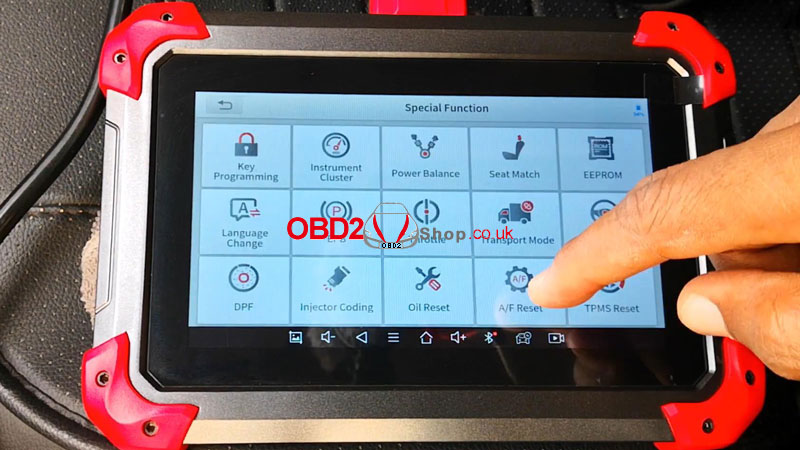
Another major difference between these tools is that the D7 supports ECU coding while the A30M doesn't. So if you're looking to customize those hidden functions or settings in your car, for example turning off those annoying beeps or doing other coding stuff again, the D7 will be the obvious choice here.
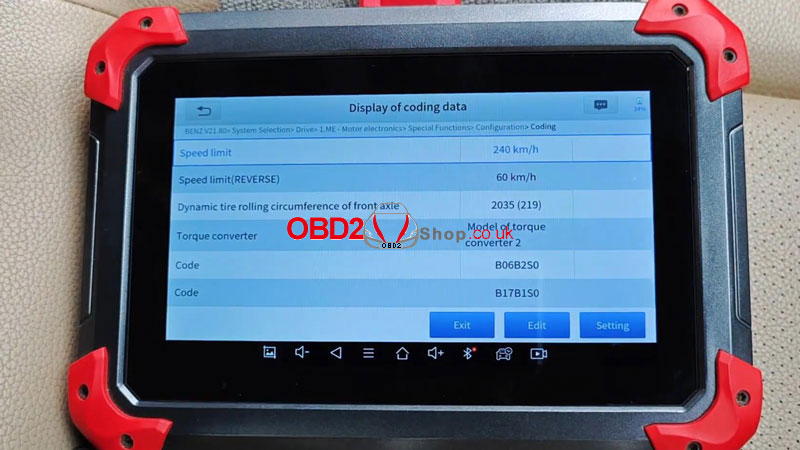
However, just to state that not all cars support ECU coding, you can't just simply buy a D7 or any other scanners that support ECU coding and say you want to code any cars. This is by no means exhaustive. But generally, Mercedes, VW, Audi, and Lexus are examples of cars that support ECU coding.
For me, the real break difference between these scanners is with support for vehicle updates and the cost. The 30M comes with lifetime free updates and I've been amazed at how frequently these updates get pushed to it. Despite being a lifetime free update tool, you'll also get it usually retailing for Ł138 on our web. For the D7, it comes with 3 years of free updates, and after that, it costs $99 per year. For a new license retail cost is typically around Ł294.
If you're looking for these 2 devices, all above are my comparison reviews.
www.obd2shop.co.uk
Oznake: xool a30m
ponedjeljak, 29.04.2024.
(Solved) CGDI CG Pro Can't Write Mileage on 35160WT EEPROM
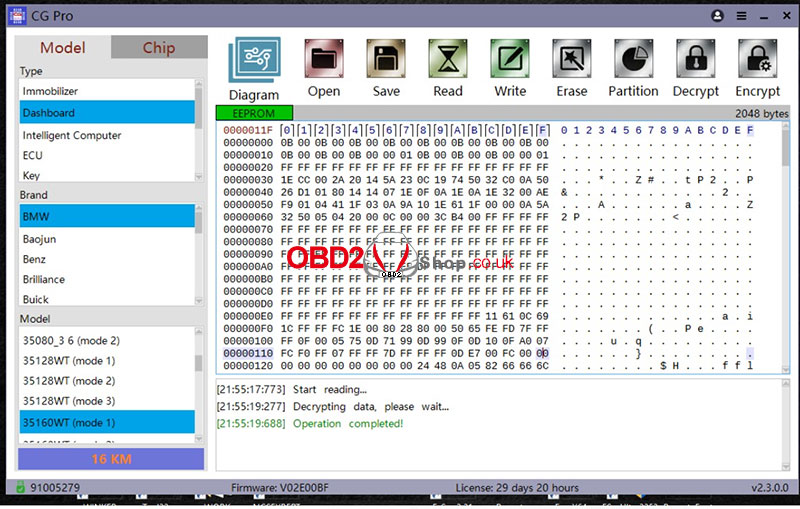
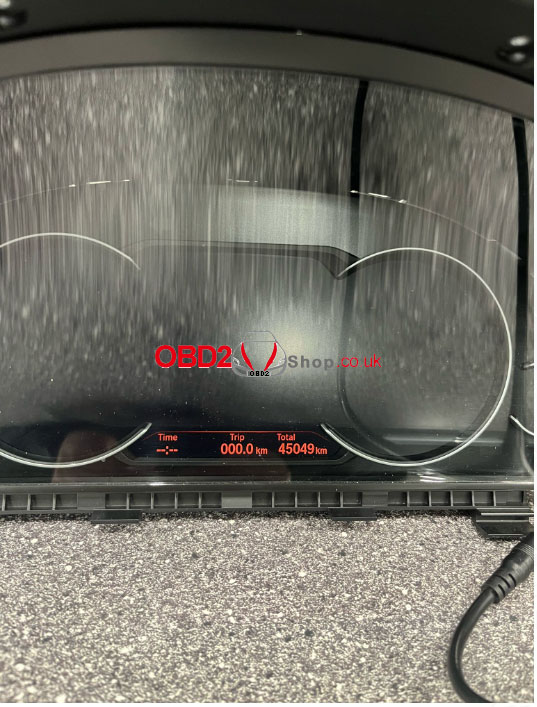
Customer's problem: I bought 10/2023 Cgpro v2.2.0.0 from you, I have issues with my device I cannot write mileage on 35160wt EEPROM, and it seems to not be able to initialize the device properly before writing new data to EEPROM. Is it possible to file a complaint about this to you?
I even just tried increasing mileage by 2000km and trying to write backup Again, the same issue. Initialization error after 25 mins at 95%.
Is new status, after messing around with it I can only read 16km dump out of my EEPROM. When it's soldered to the cluster it shows a mileage of 45019km. It looks like it cannot read the EEPROM any longer either.....
Solution:
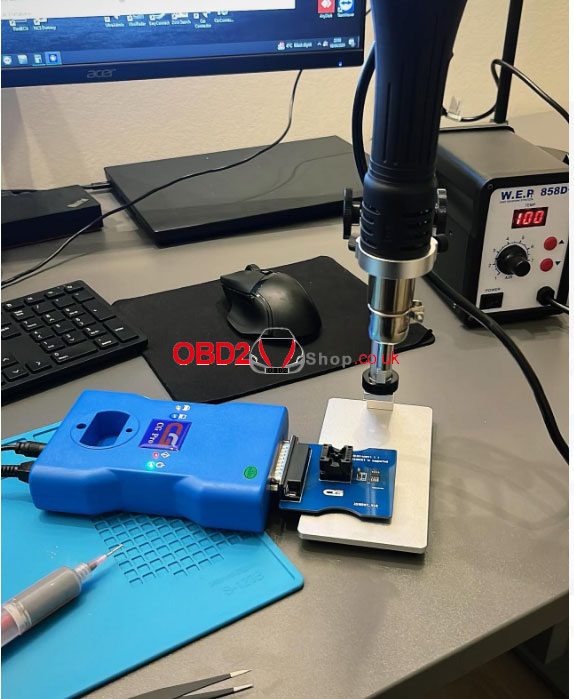
Chip heating or replacing the spare chip.
35160WT erasing heating method instructions (if the chip cannot be erased, you can try it):
Before operation, adjust the air gun to 100°C and heat the chip for 20 to 30 seconds (the chip is soldered to the board). After that, stop heating and put it on immediately to try the operation. After waiting for the chip to cool down completely, if the chip has not entered the second stage for erasing, you can reheat it with an air gun for 20 to 30 seconds and then stop heating. The chip may be erased during the cooling process.
Customer's feedback:
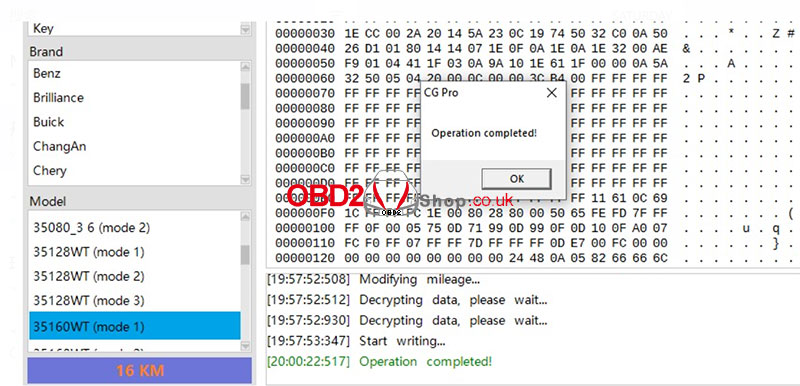
I tried and tried and tried today and I found a method with a heat gun that finally worked! So now I have successfully written 16km to EEPROM. I will remember this method for next time and Hopefully, it'll last! I'm sorry for the inconvenience but please understand my anger when in the field and this didn't work. Have a great weekend!
For more technical support, please follow www.obd2shop.co.uk
Oznake: cgdi cg pro
nedjelja, 28.04.2024.
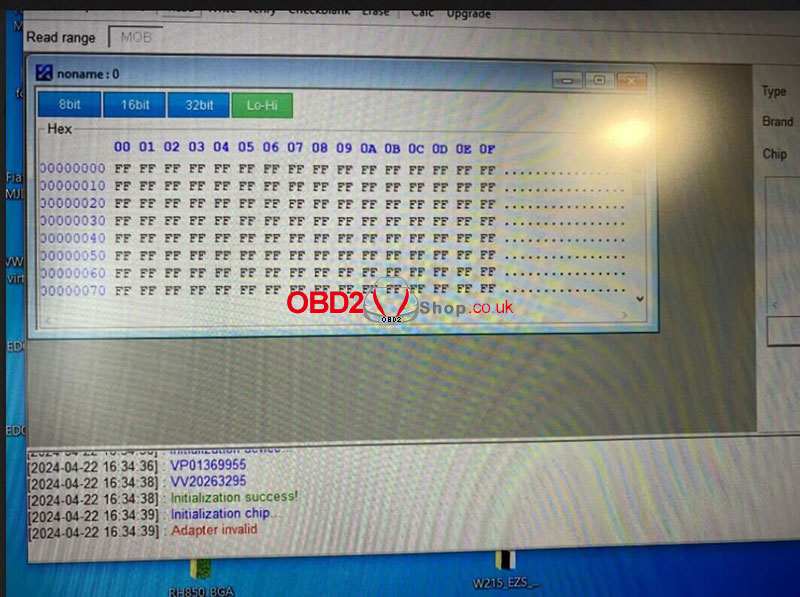
(Fixed) VVDI PROG Read NEC3529 Prompts "Adapter invalid"
A few days ago we received a case sharing from a customer about the solution to "VVDI PROG read NEC3529 prompts 'Adapter invalid' ".
Customer's problem: I tried to read the NEC3529 using the XDNP82 adapter and the software still tells me that the adapter is invalid, look at the picture.
all contacts are ok, also on FLMD 3.3V
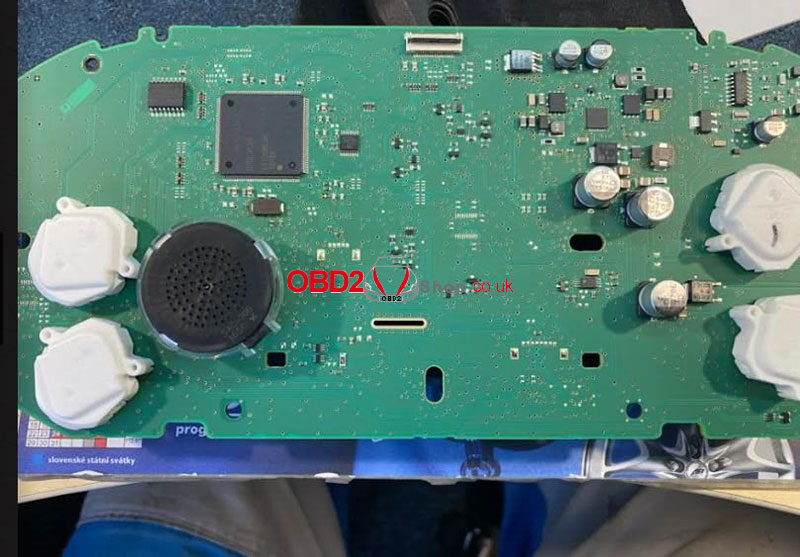
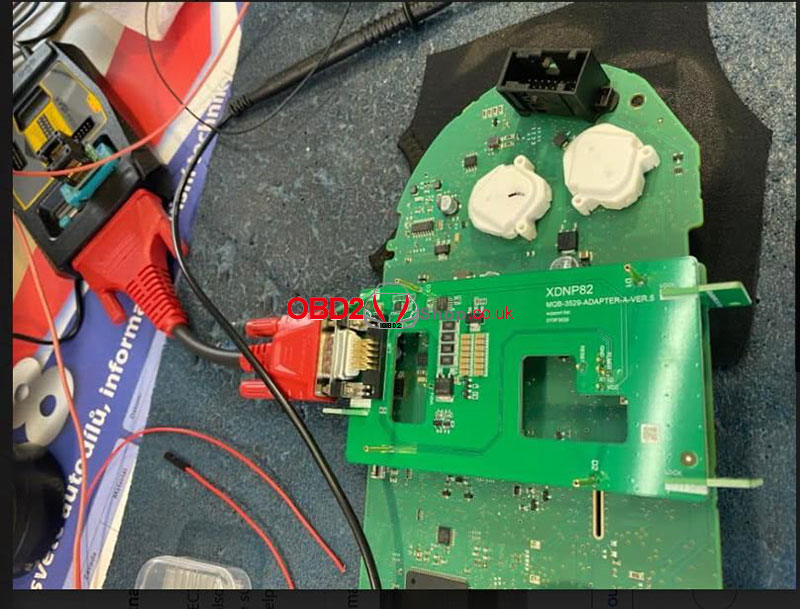
Later, the customer found the problem himself and successfully solved it:
Problem solved!
The adapter does not work at a voltage of 12V.
The voltage on the power supply must be at least 12.5 V.
Thanks to Jan Sima for sharing with us.
For more technical support, please follow www.obd2shop.co.uk
Oznake: xhorse vvdi prog
petak, 26.04.2024.
(Solution) VXDIAG VCX SE JLR "VCI Connection not detected"
Customer question:
Hello, Pathfinder can not find VCX SE, what can I do? Also, I have installed the JLR original driver.
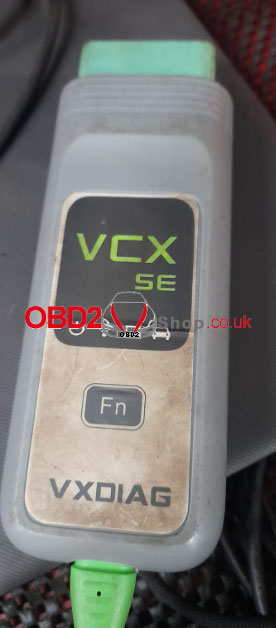
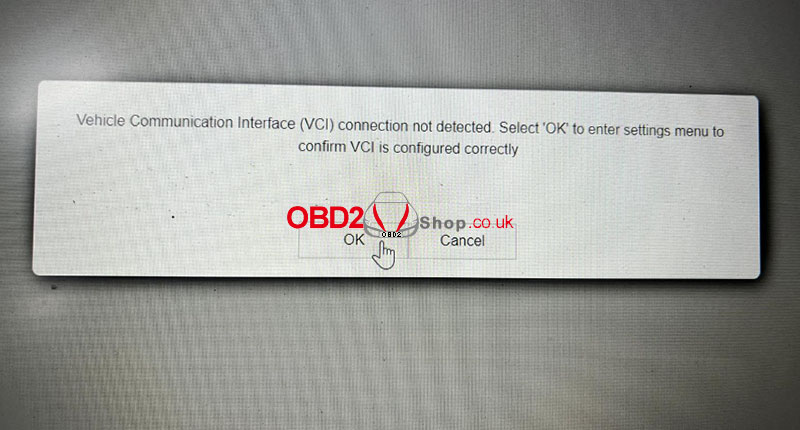
OBD2shop.co.uk engineer responded:
After installing the original driver, then install the VX DOIP driver.
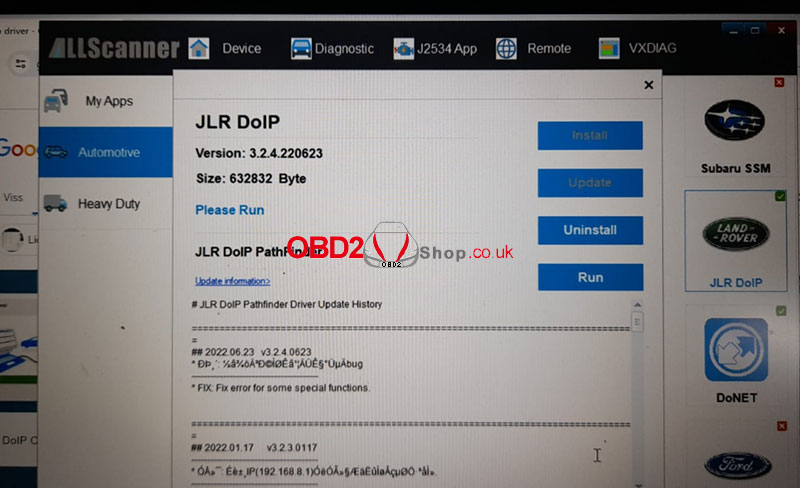
Customer feedback:
Reinstalled DOIP and now working fine
THX

www.obd2shop.co.uk
Oznake: vxdiag vcx se jlr
srijeda, 24.04.2024.
Autel IM608 II + Xhorse XM38 Program 2018 Hyundai Sonata AKL
Today I'm working on a 2018 Hyundai Sonata with all keys lost. It's a push-to-start vehicle. Following I'm gonna try if the Autel MaxiIM IM608 PRO II + Xhorse XM38 Universal Key can be successfully programmed for this car.
As we know, the Autel only supports to program IKEY Universal Key in normal. Anyway, let's start the test.
IMMO >> Accept >> Hyundai >> Manual selection >> America >> SONATA(LFA) >> 2016-2019 >> Smart key >> OK >> Control unit >> Read immobilizer password >> Read Pin code(8A smart card)
This function only supports models with 8A chip-type smart cards.
Please ensure the key type is correct!
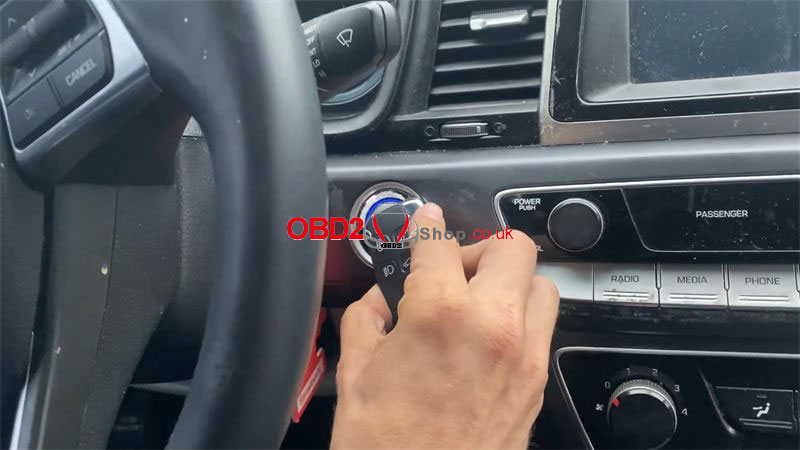
Turn the Hazard warning light on.
Turn the ignition off(note: the instrument screen is black).
Open and then close the driver's door once!
Reading password...
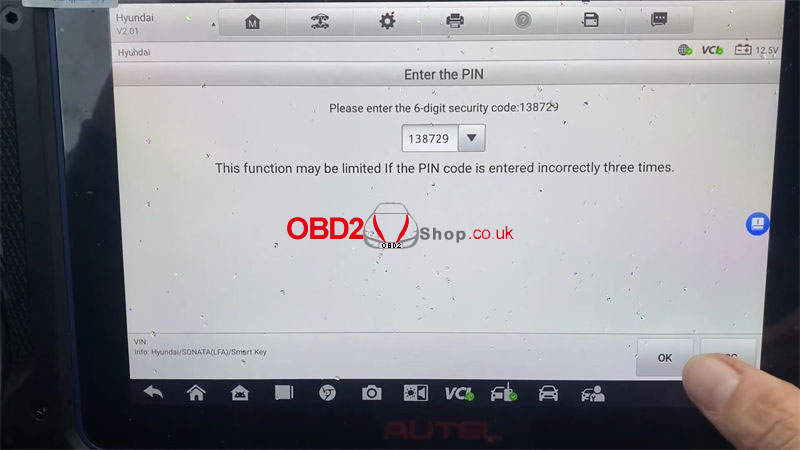
Autel IM608 II gives the pin code: 138729
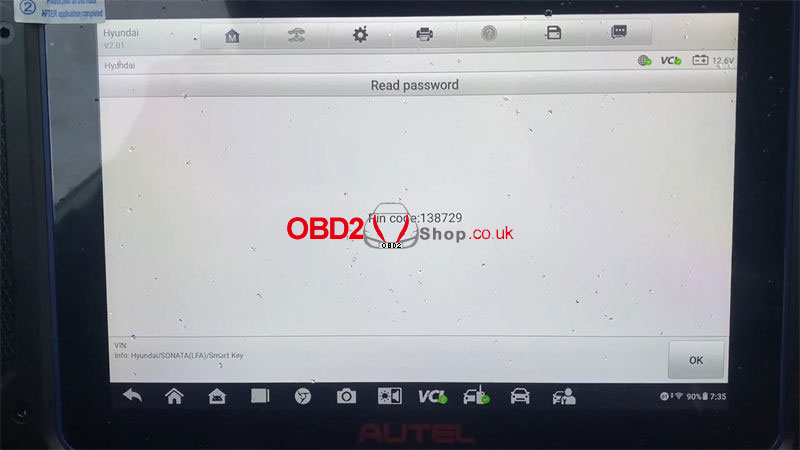
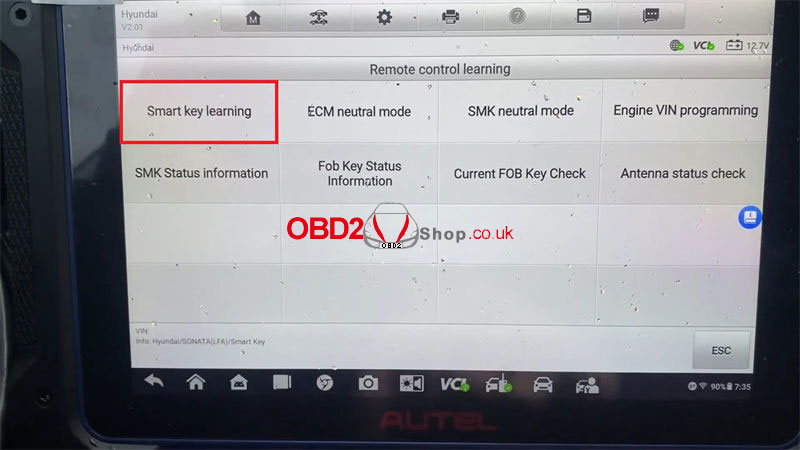
Keyless system >> Remote control learning >> Smart key learning
This function supports adding key and all keys lost;
Performing this function will erase all existing keys, all the old keys must be relearned again to be able to be used normally, press "Yes" to continue.
Turn the Hazard warning light on.
Turn the ignition off(note: the instrument screen is black).
Open and then close the driver's door once!
Please enter the 6-digit security code: 138729
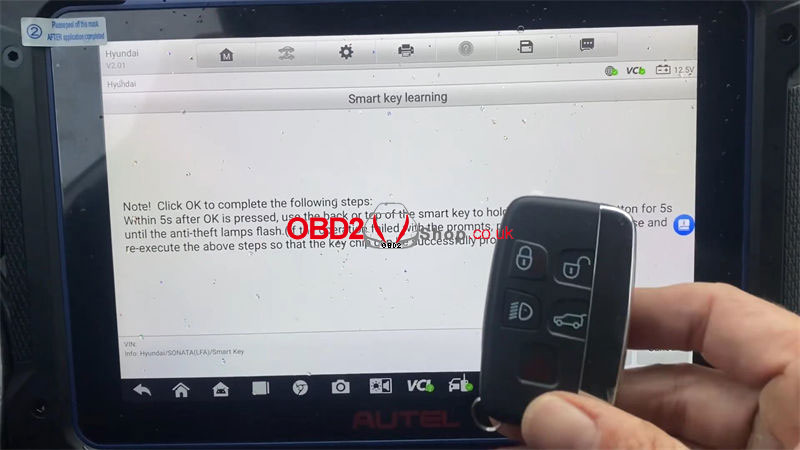
Note! Click OK to complete the following steps:
Within 5s after OK is pressed, use the back or top of the smart key to hold down the START button for 5s until the anti-theft lamp flashes. (If the operation fails with the prompts, please remove the key case and re-execute the above steps so that the key chip can be successfully programmed.)
Programming succeeded.
Press "No" to complete.
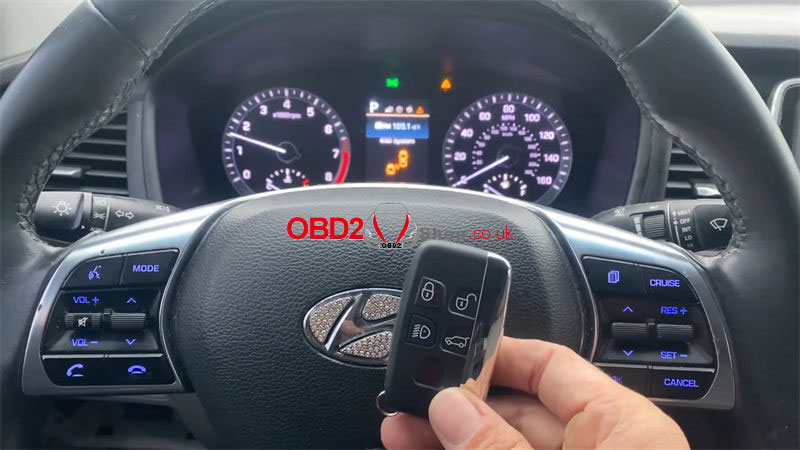
Number of current keys: 1
Please exit the system to the vehicle selection menu and check if the key is programmed successfully.
Test the new key, it can work normally.
www.obd2shop.co.uk

www.obd2shop.co.uk
utorak, 23.04.2024.
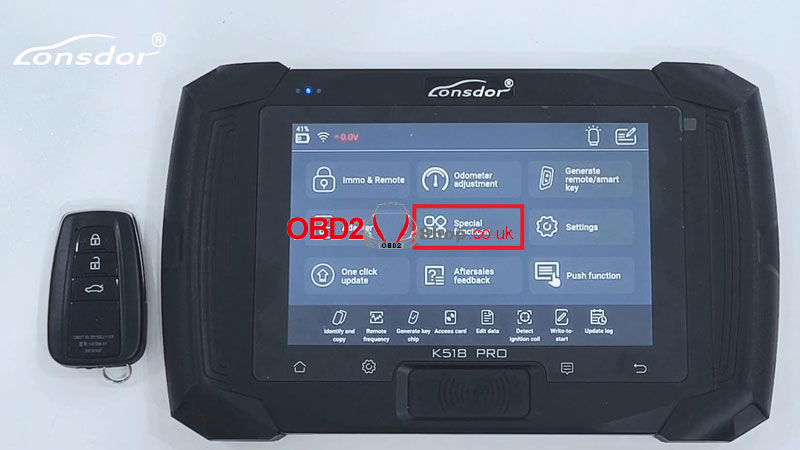
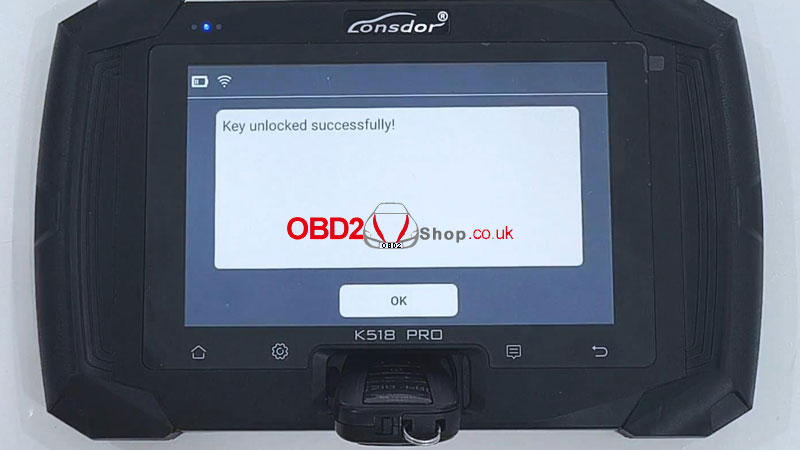
Lonsdor K518 PRO Unlock Genuine/OEM Chip Type 8A Keys
How to unlock genuine/OEM chip type 8A keys with Lonsdor K518 PRO? Read this article carefully to learn. Here is an original key for the Toyota Camry as an example.
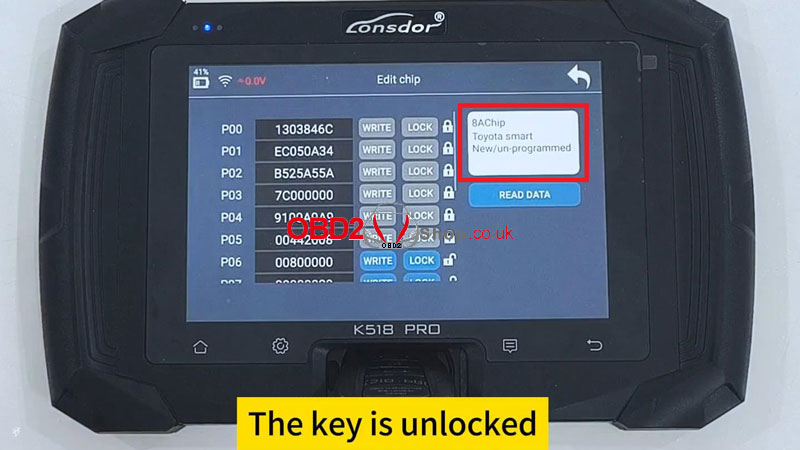
Read Key
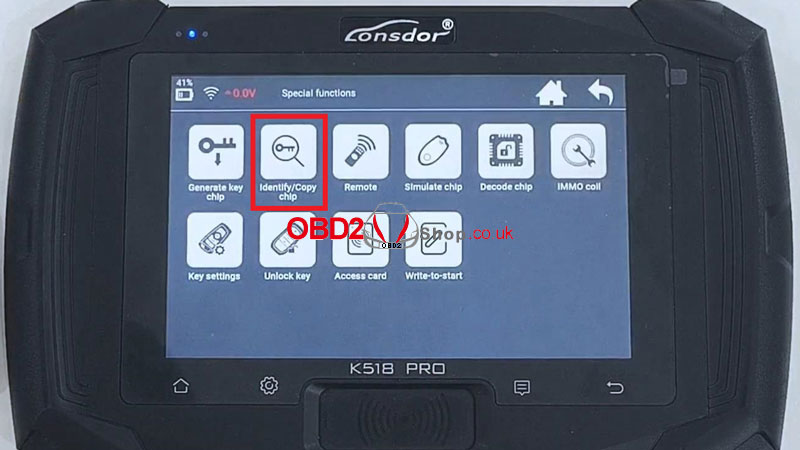
Special functions >> Identify/copy chip >> Identify/copy >> Identify/Copy
Put chip to be identified into K518 PRO card slot.
Press OK.
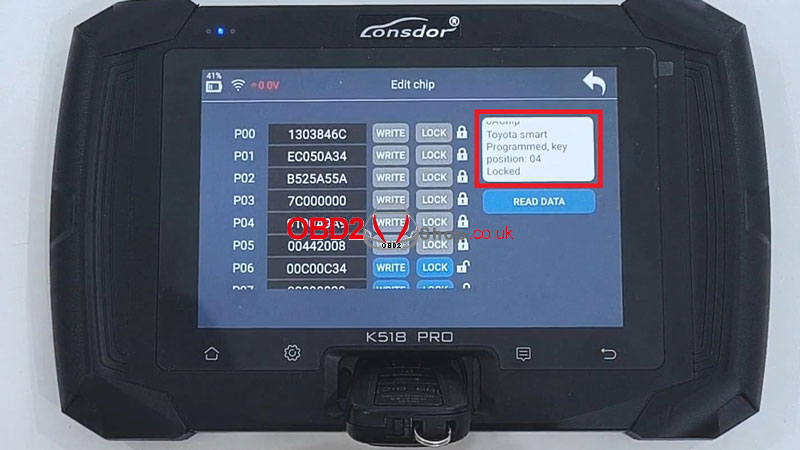
We can find this key's chip type is 8A-A9, and the key is locked.
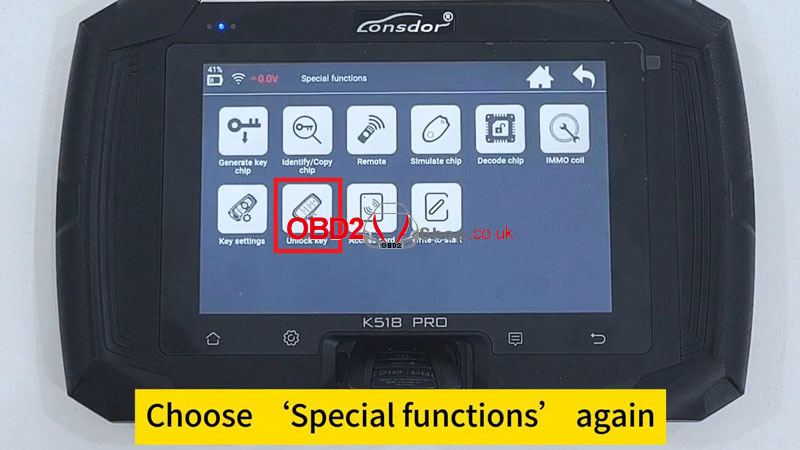
Unlock Key
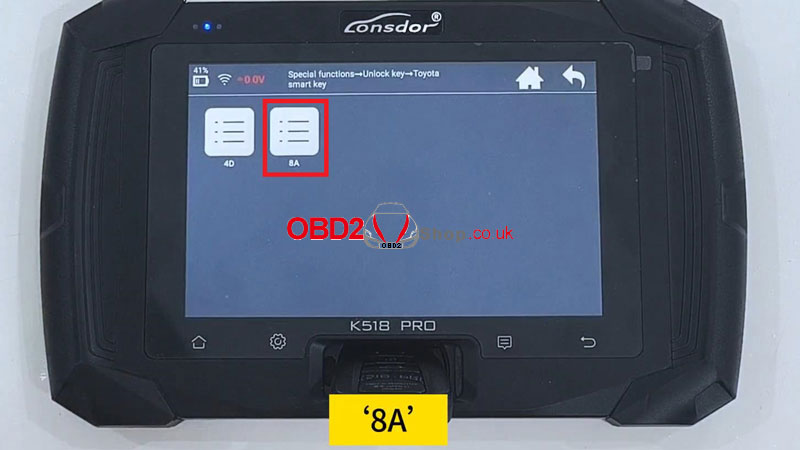
Return back to the Home page.
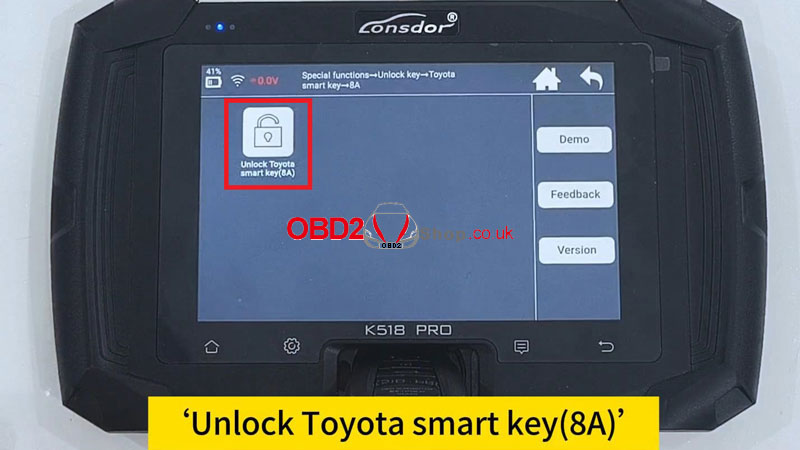
Special functions >> Unlock key >> Toyota smart key >> 8A >> Unlock Toyota smart key(8A)
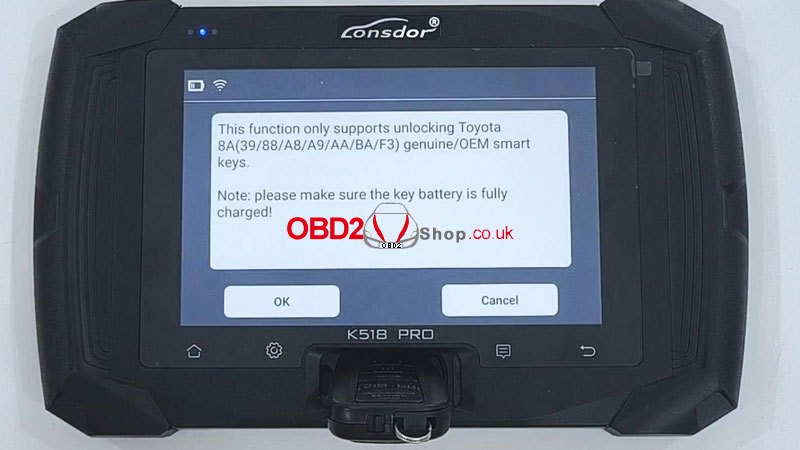
This function only supports unlocking Toyota 8A(39/88/A8/A9/AA/BA/F3) genuine/OEM smart keys.
Note: please make sure the key battery is fully charged!
Press OK.
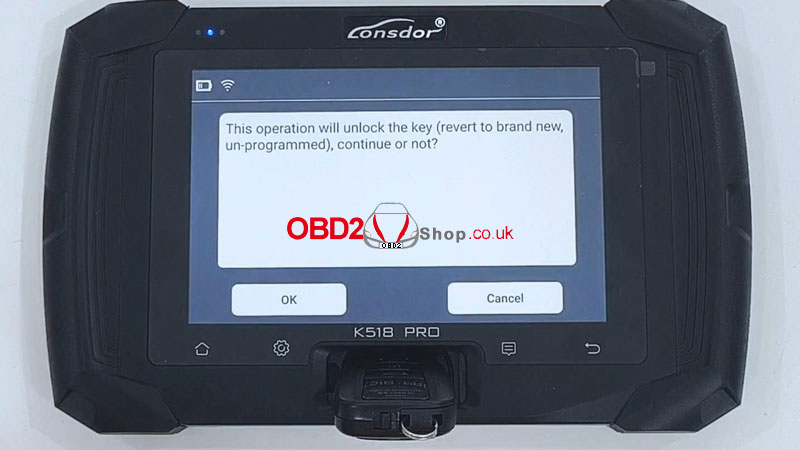
Please put the key into the K518PRO card slot.
This operation will unlock the key(revert to brand new, un-programmed).
Press OK to continue.
Please confirm again that you need to unlock the genuine/OEM key!
Press OK.
The key was unlocked successfully!
Go back to identify the key again.
The key is unlocked now.
Done.
www.obd2shop.co.uk
Oznake: lonsdor k518
ponedjeljak, 22.04.2024.
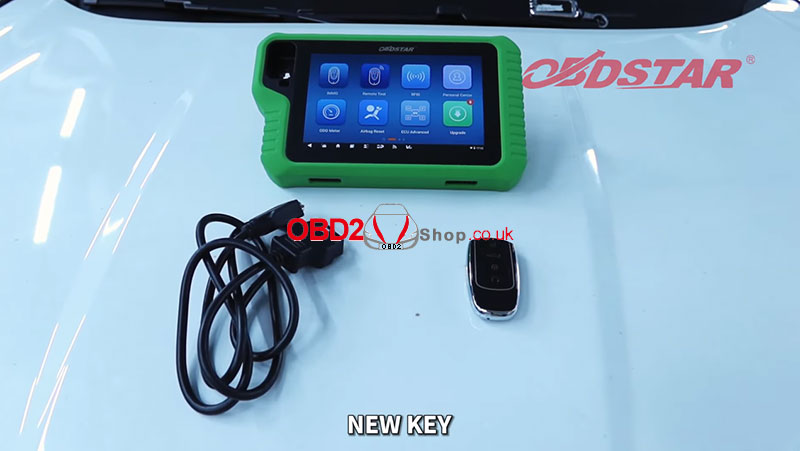
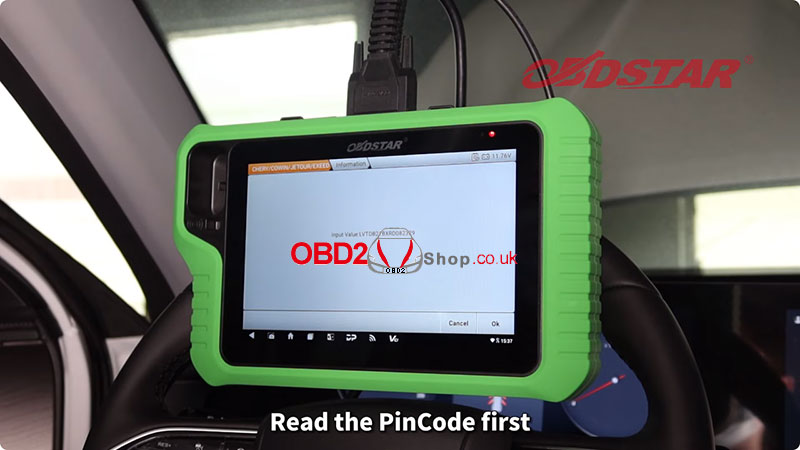
OBDSTAR X300 Classic G3 Chery Tiggo 8 Pro Proximity Key Programming
This post will guide you on how to use OBDSTAR X300 Classic G3 to do Chery Tiggo 8 Pro proximity key programming.
The tools we need:
X300 Classic G3
M001 Main Cable
New Key
Procedure:
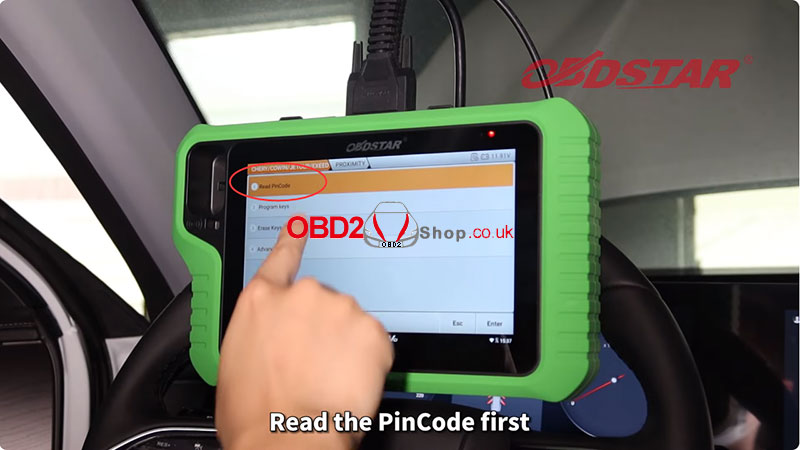
Connect OBDSTAR X300 Classic G3 to the car through M001 Main Cable
Select [IMMO], enter "Chery" to search, and select [CHERY/COWIN/JETOUR/EXEED]>>[Manual Select Model]>>[TIGGO]>>[TIGGO 8 PRO]>>[PROXIMITY]
Step 1. Read PinCode
Choose [Read PinCode]
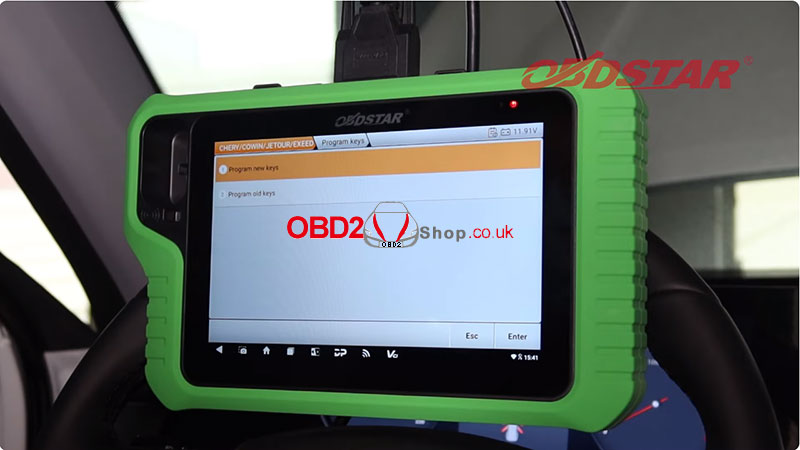
Step 2. Program keys
Choose [Program keys]>>[Program new keys]

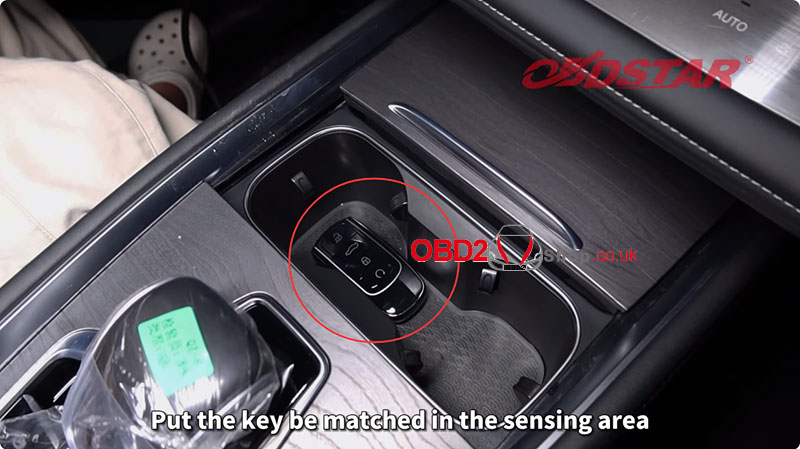
Information:
If it is a blade key please insert it into the keyhole;
If it is a proximity key. Please put the key to be matched in the sensing area and take the other keys out of the vehicle
The sensing area may be located at:
1. Cup holder (some models require moving the cup holder away)
2. Below the cigarette lighter or USB port
3. Near the gear lever
Put the key matched in the sensing area, and input the PinCode just read.
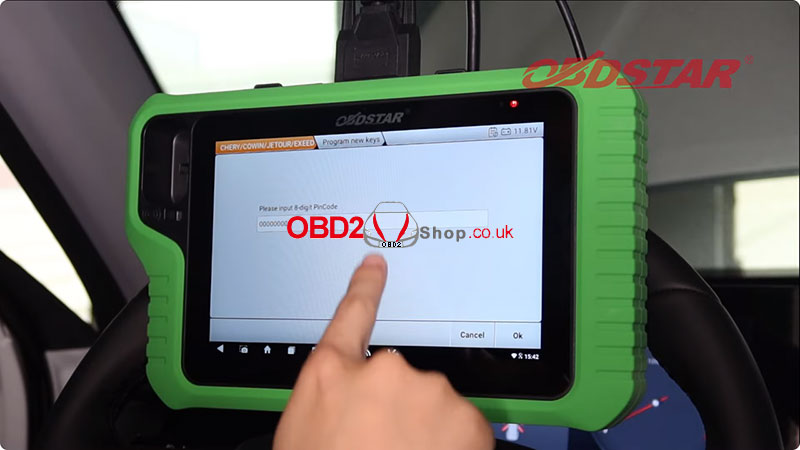
End of function execution!
The proximity key programming is completed.
Video Guides:
https://youtu.be/QQKbODd79iY
www.obd2shop.co.uk
Oznake: obdstrar x300 classic g3
četvrtak, 18.04.2024.
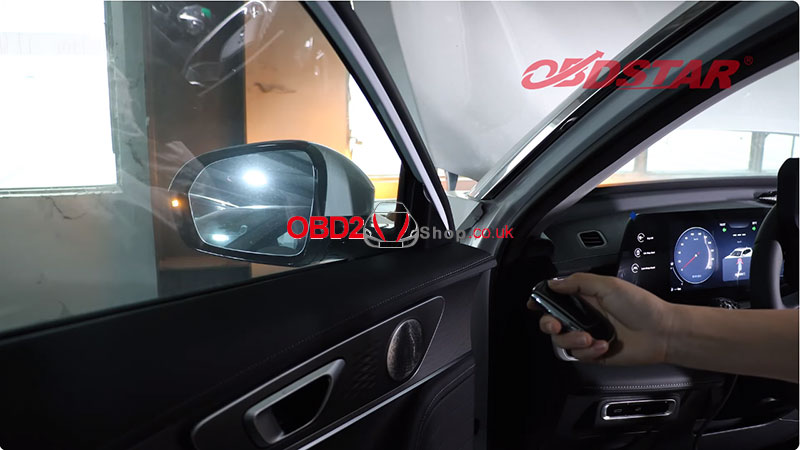
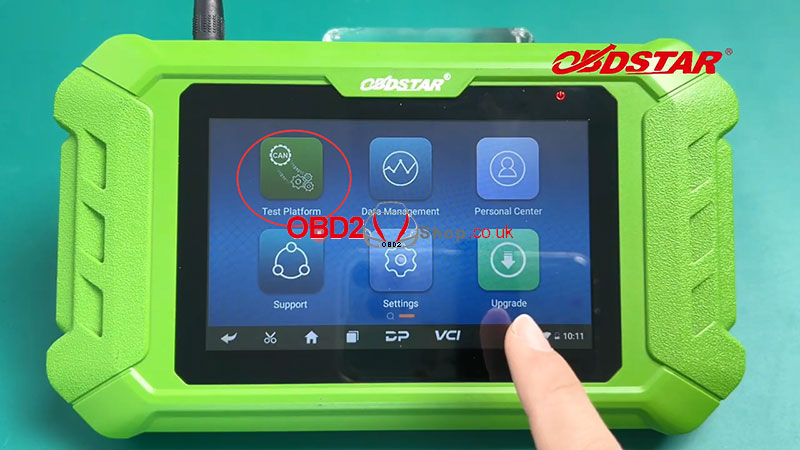
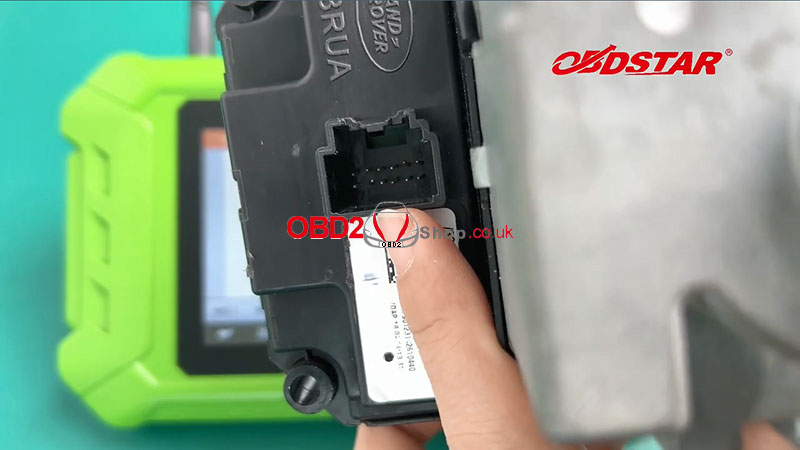
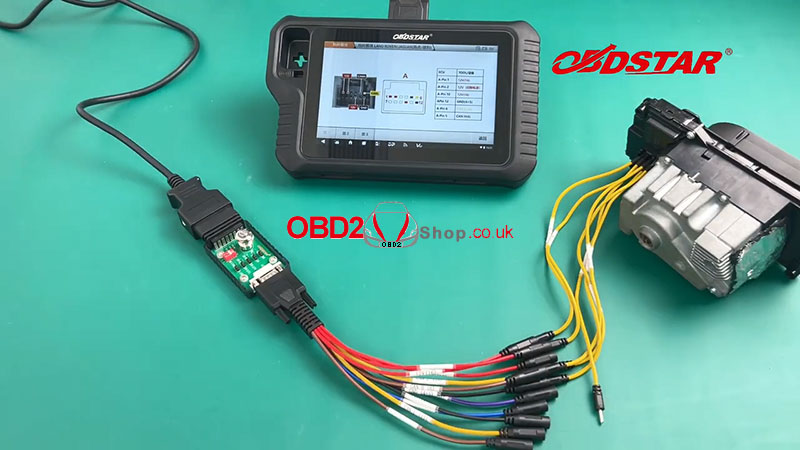
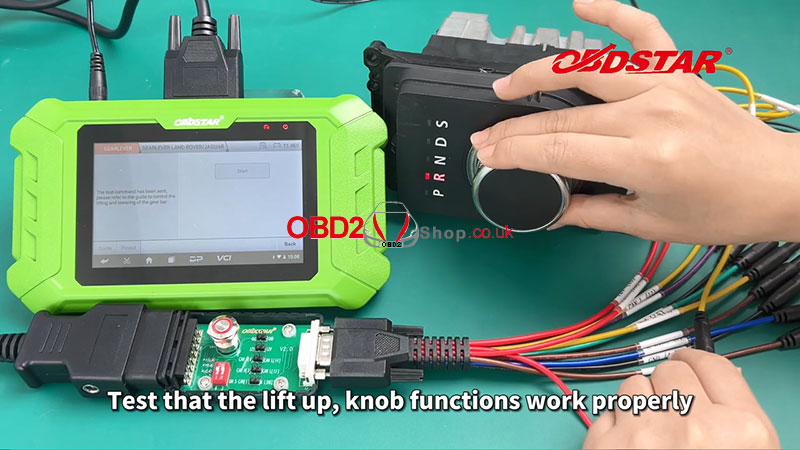
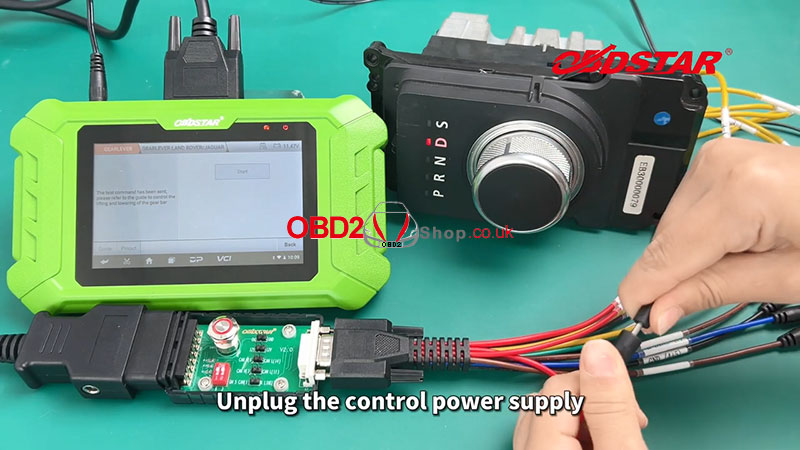
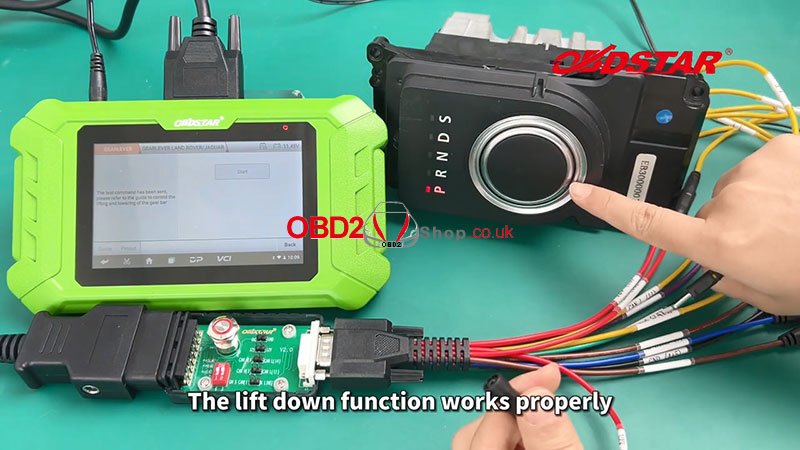
OBDSTAR MT502 Performs Land Rover Knob Gear Lever Action Test
This post will show you how to use the OBDSTAR MT502 Automotive Compressor Test Platform to do a knob gear lever action test for Land Rover by bench.
The tools we need:
MT502
Main Cable
P004 ECU Clone Jumper
P004 Adapter
Lander Rover Gear Lever Control ECU

Procedure:
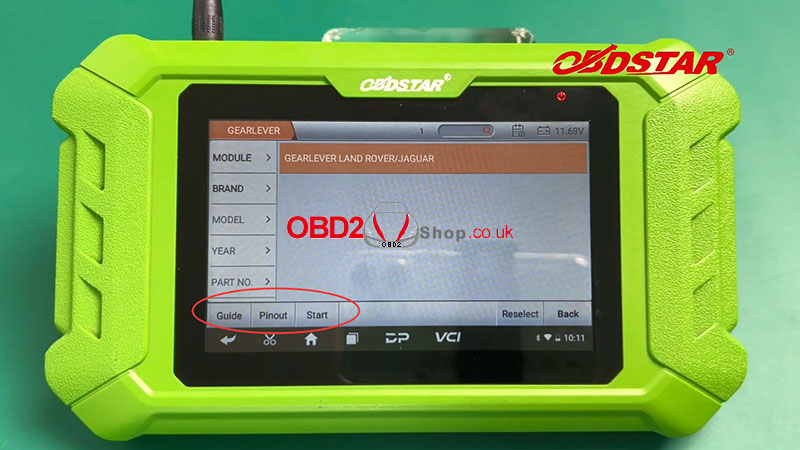
Choose [Test Platform] >> [GEARLEVER] >> [GEARLEVER LAND ROVER/JAGUAR]
Click [Guide] in the lower left corner, carefully read the development background and operation methods.
There are two methods to choose from:
Method 1:
The wire in terminal 2 of the T006 wiring harness needs to be cut off and you need to install a 12V control switch yourself or reconnect and disconnect both ends of the cut wire when you click start to control the lifting and lowering of the gear lever.
Method 2:
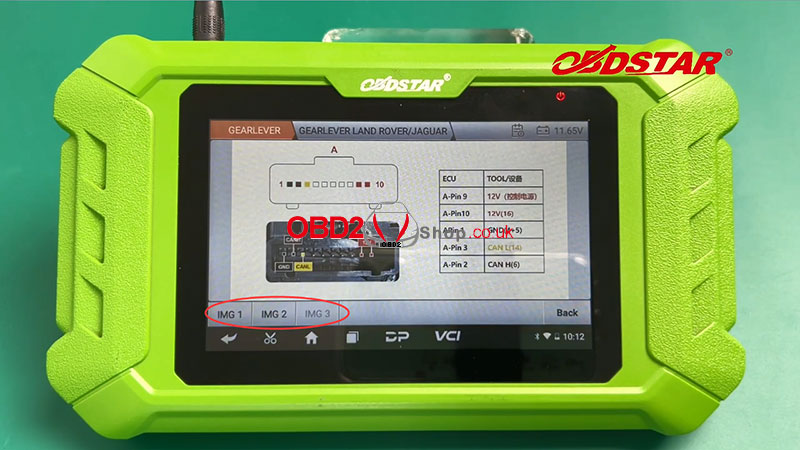
Use a jumper connection. When you click Start, test the gear lever by plugging and unplugging the jumper of the control power terminal (see the wiring diagram for the control power terminal).
Here we are using method 2, connecting with the ECU jumper
We will test the gear lever by plugging and unplugging the jumper from the control power terminals
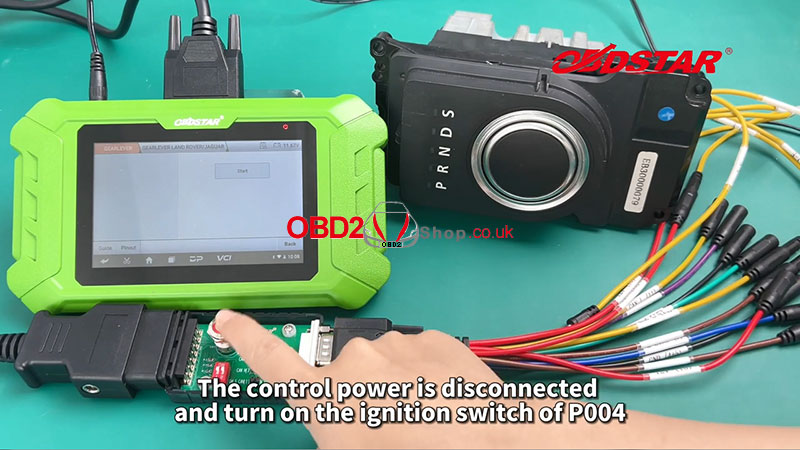
Click [Pinout] to view a detailed connection diagram.
Find the wiring diagram for the corresponding module and connect the harness according to the wiring diagram.
The control power is disconnected and turn on the ignition switch of P004.
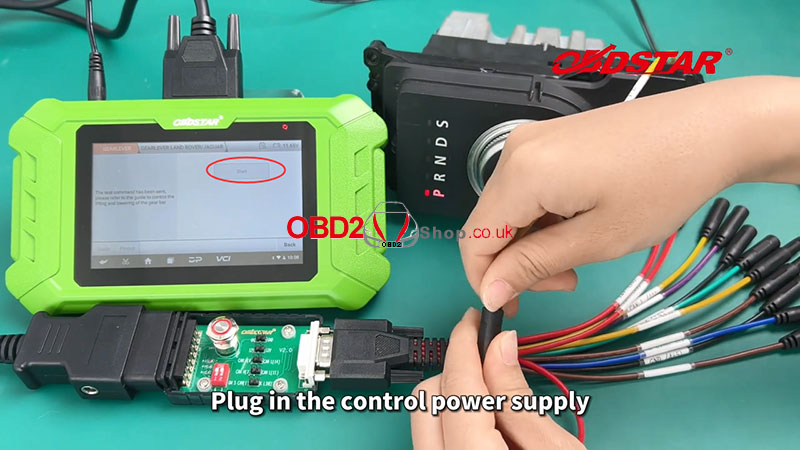
Click [Start] to test.
Plug in the control power supply
Test that the lift-up, knob functions work properly.
Unplug the control power supply
The lift-down function works properly.
For more details please refer to the video below:
https://youtu.be/EFWmjGX0aMc
Oznake: obdstar mt502
srijeda, 17.04.2024.
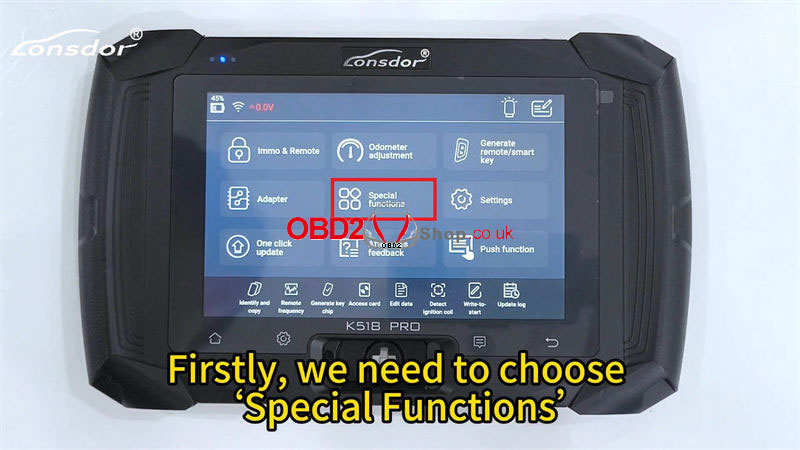
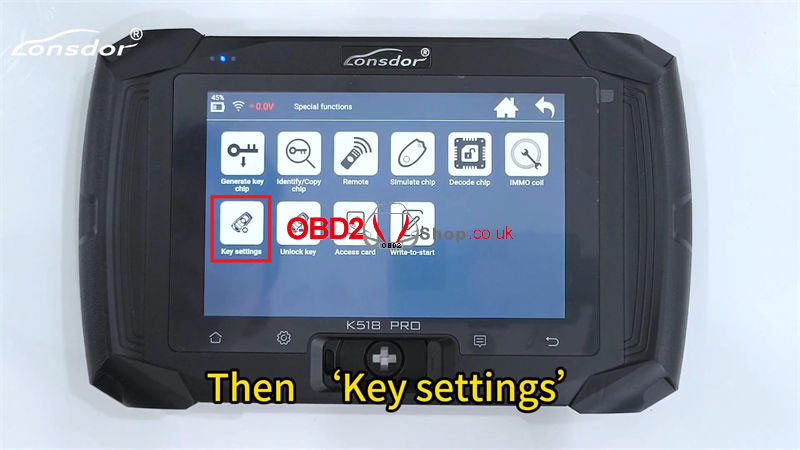
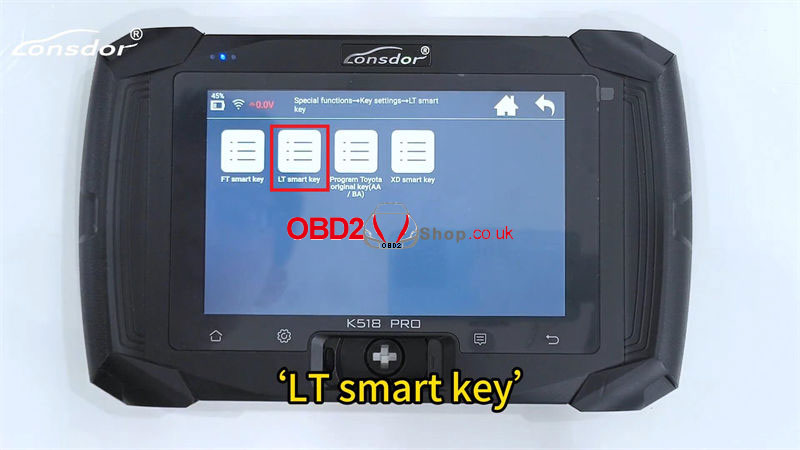
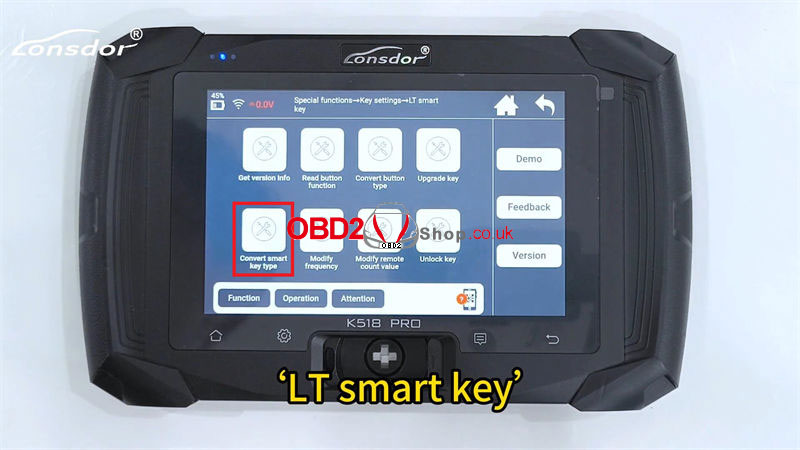
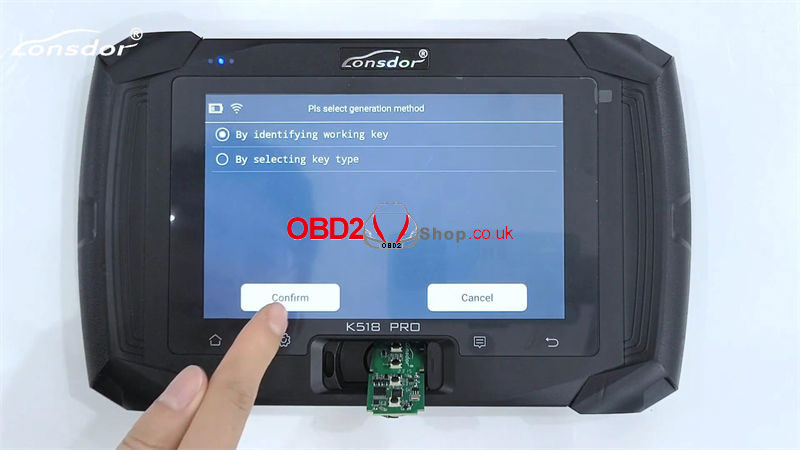
How to Convert LT20 Smart Key Type in Lonsdor K518 PRO?
This is a tutorial on how to convert the LT20 Smart Key type in Lonsdor K518 PRO. We'll need an original key for detecting first.
Special Functions >> Key settings >> LT smart key >> Convert smart key type
This function requires an Internet connection.
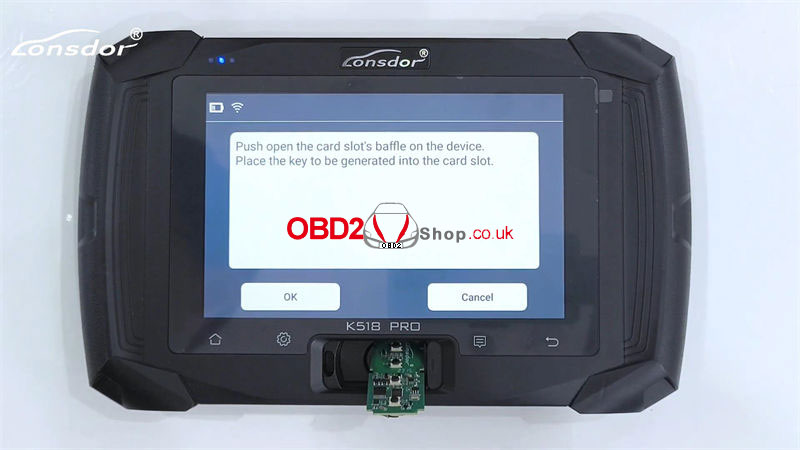
Push open the card slot's baffle on the device.
Place the key to be generated into the K518 PRO card slot.
Press "OK".
Selected "By identifying working key".
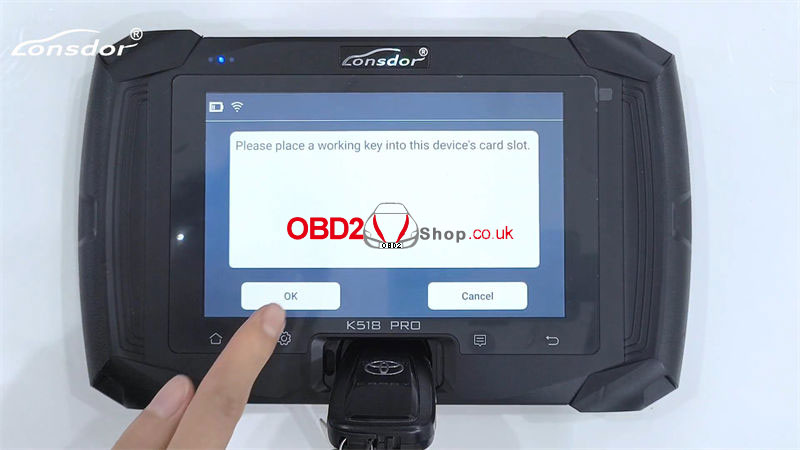
Please place a working key into this K518 PRO card slot.
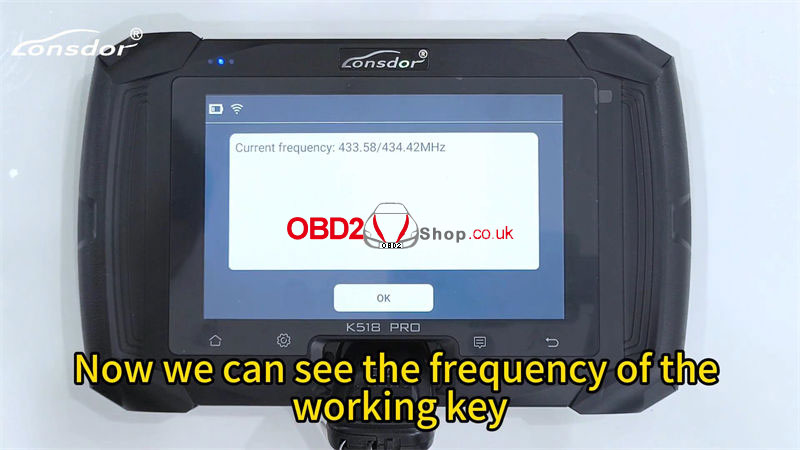
In the frequency test, slowly take the LT20 smart key 20cm away from the card slot.
Now we can see the frequency of the working key.
Current frequency: 433.58/434.42 MHz
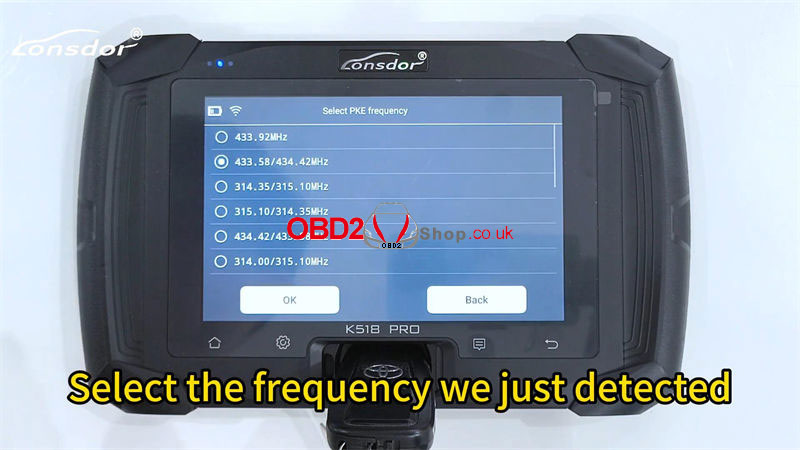
Select the frequency we just detected >> Choose the button type same as the working key
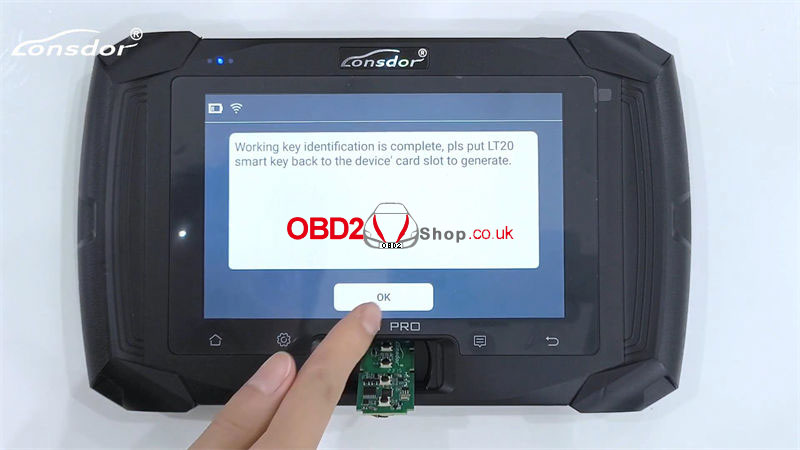
Working key identification is complete.
Please put the LT20 smart key back into the K518 PRO card slot to generate.
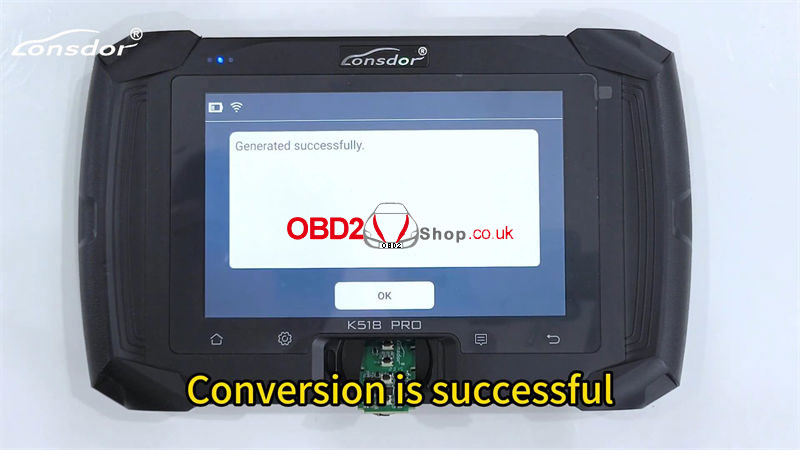
Start to convert...
Generated successfully.
If the key has a remote but no smart function after key programming is successful, please enter the "Modify frequency" function menu to change.
Done.

www.obd2shop.co.uk
Oznake: lonsdor k518 pro
četvrtak, 11.04.2024.
Autel KM100 Prompts "Authorization verification failed"
Customer problem: My KM100 recently had this error, and some vehicles cannot be entered at all, such as Fiat-Bmw, how should I solve it?

Solution: Enter the Data Manager menu and remove vehicles.
Then delete the software and go to update and download it again.
For more tech support, please contact:
www.obd2shop.co.uk
Oznake: autel km100
srijeda, 10.04.2024.
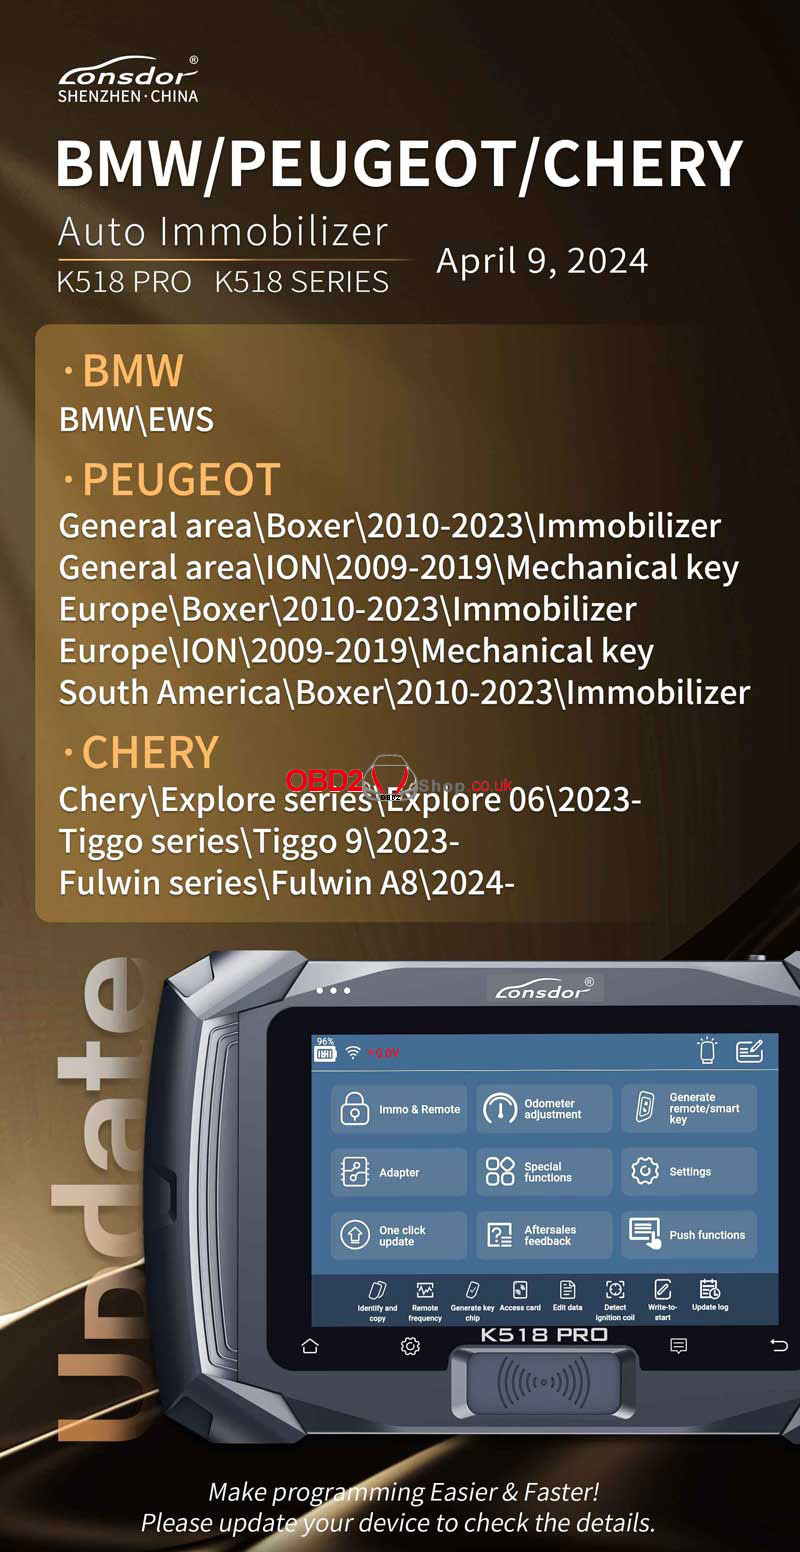
Lonsdor K518 PRO BMW/Peugeot/Chery Auto IMMO Upgrade
Lonsdor K518 PRO and K518 Series key programmer upgraded the auto immobilizer car list for BMW, Peugeot, and Chevrolet on April 9, 2024. Please update your device to check the details.
lBMW
BMWEWS
lPEUGEOT
General areaBoxer2010-2023Immobilizer
General areaION2009-2019Mechanical key
EuropeBoxer2010-2023Immobilizer
EuropeION2009-2019Mechanical key
South AmericaBoxer2010-2023Immobilizer
lCHERY
CheryExplore seriesExplore 062023-
Tiggo seriesTiggo 92023-
Fulwin seriesFulwin A82024-
www.obd2shop.co.uk
Oznake: lonsdor k518
srijeda, 03.04.2024.
Lonsdor KW100 Quick Generate 2023 Toyota Camry AKL & Add Key
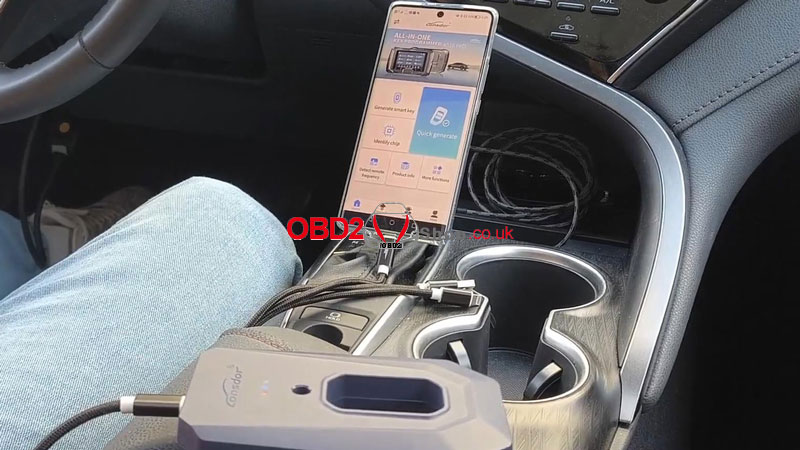
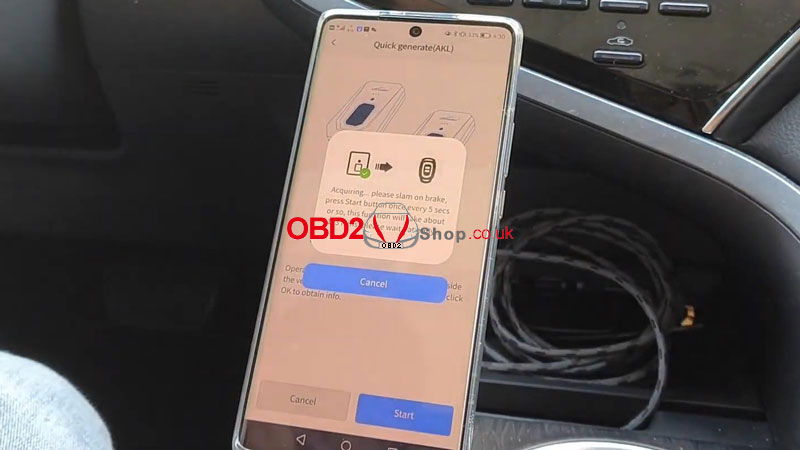
Lonsdor KW100 is smart and genius to help users generate smart keys without any chip type and frequency. Today we're gonna show how to use it to quickly generate a 2023 Toyota Camry with all keys lost & add keys.
Generate 2023 Toyota Camry All Keys Lost
Note:
Please use the LT20 Smart Key and don't put any other keys nearby. Make sure the frequency detected from the car is accurate.
Connect the KW100 Key Generator to a smartphone with the Lonsdor App downloaded.
Quick generate >> Quick generate(AKL) >> Start
Please slam on the brake, and press the Start button once every 5s or so.
This function will take about 1-3 mins, please wait patiently...
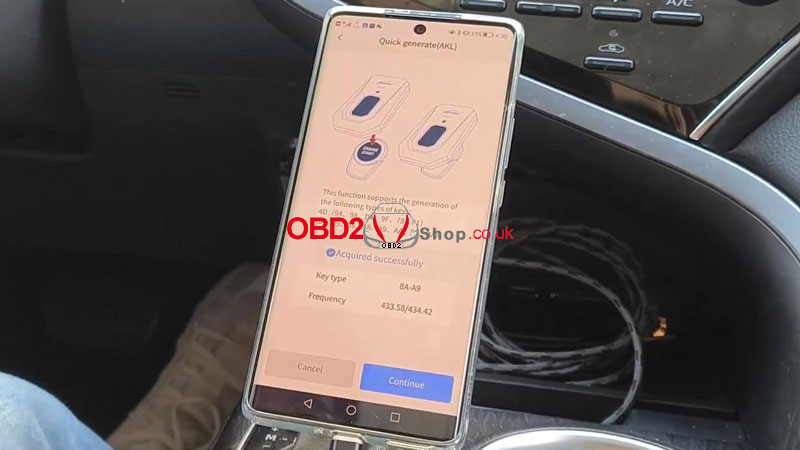
Acquired successfully
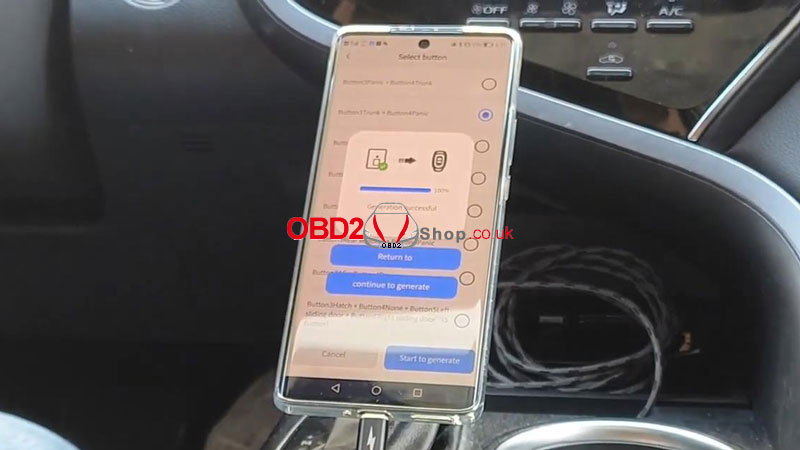
Continue >> Select button, start to generate
Place the LT20 smart key into the KW100 card slot, and press OK.
Key generation is successful.
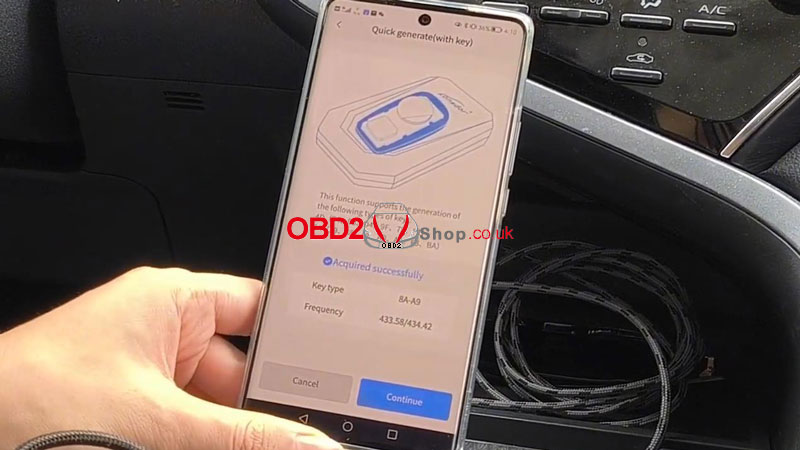
Generate 2023 Toyota Camry Key Adding
Note:
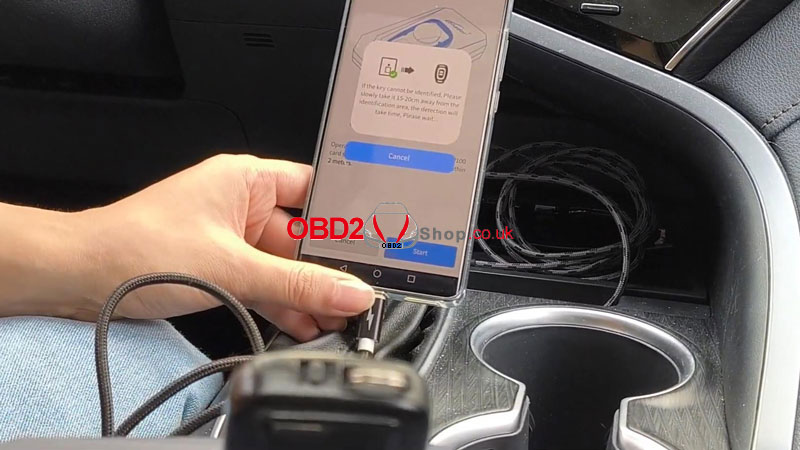
We cannot have any other keys nearby to make sure the frequency detected from the original key is accurate.
Place the original key into the KW100 card slot.
Quick generate >> Quick generate(with key) >> Start
Next, we can use Lonsdor K518 PRO to program the key to this car.
Acquired successfully
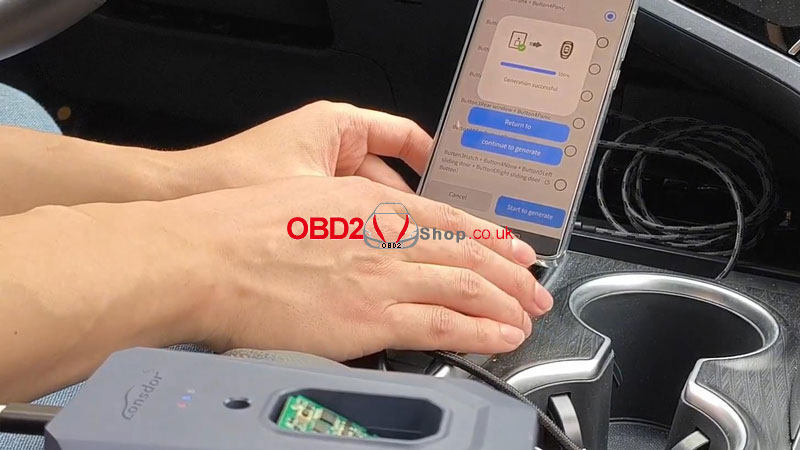
Remove the original key, and put the LT20 smart key into the card slot.
Continue >> Select button, start to generate >> OK
Key generation is successful.
Next, we can use Lonsdor K518 PRO to program the key to this car.

www.obd2shop.co.uk
Oznake: lonsdor kw100

| < | travanj, 2024 | > | ||||
| P | U | S | Č | P | S | N |
| 1 | 2 | 3 | 4 | 5 | 6 | 7 |
| 8 | 9 | 10 | 11 | 12 | 13 | 14 |
| 15 | 16 | 17 | 18 | 19 | 20 | 21 |
| 22 | 23 | 24 | 25 | 26 | 27 | 28 |
| 29 | 30 | |||||
Svibanj 2026 (1)
Siječanj 2026 (19)
Prosinac 2025 (22)
Studeni 2025 (21)
Listopad 2025 (20)
Rujan 2025 (21)
Kolovoz 2025 (8)
Srpanj 2025 (13)
Lipanj 2025 (9)
Svibanj 2025 (12)
Travanj 2025 (10)
Ožujak 2025 (12)
Veljača 2025 (14)
Siječanj 2025 (8)
Prosinac 2024 (6)
Studeni 2024 (6)
Listopad 2024 (4)
Rujan 2024 (7)
Kolovoz 2024 (14)
Srpanj 2024 (12)
Lipanj 2024 (10)
Svibanj 2024 (13)
Travanj 2024 (12)
Ožujak 2024 (11)
Veljača 2024 (2)
Siječanj 2024 (10)
Prosinac 2023 (8)
Studeni 2023 (6)
Listopad 2023 (7)
Rujan 2023 (9)
Kolovoz 2023 (6)
Srpanj 2023 (10)
Lipanj 2023 (4)
Veljača 2023 (8)
Siječanj 2023 (14)
Prosinac 2022 (13)
Studeni 2022 (14)
Listopad 2022 (18)
Rujan 2022 (9)
Kolovoz 2022 (16)
Srpanj 2022 (11)
Lipanj 2022 (14)
Svibanj 2022 (13)
Travanj 2022 (12)
Ožujak 2022 (12)
Veljača 2022 (13)
Siječanj 2022 (10)
Srpanj 2021 (1)
Dnevnik.hr
Gol.hr
Zadovoljna.hr
Novaplus.hr
NovaTV.hr
DomaTV.hr
Mojamini.tv