OBD2 tools on OBD2shop.co.uk https://blog.dnevnik.hr/obd2shop
petak, 31.05.2024.
How to find BMW folder in ACDP software directory
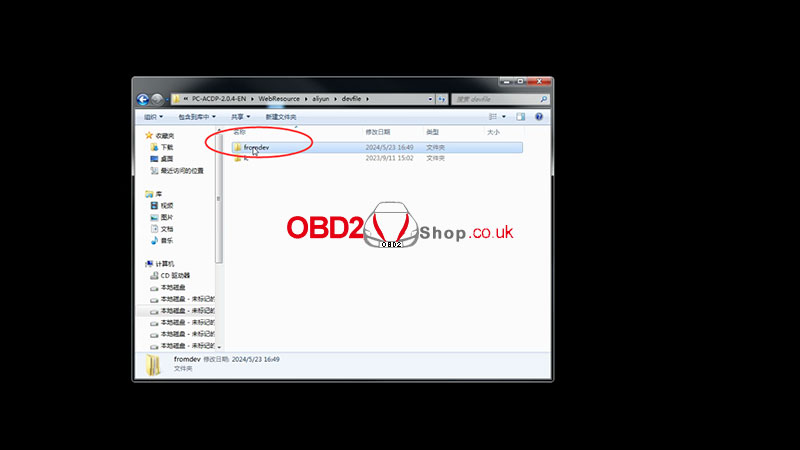
Recently, a customer reported encountering a "DME Communication Error" while using ACDP for vehicle operations. The technician requested to send the BMW folder located in the ACDP software directory to diagnose the issue and assist in resolving it.
If you encounter a similar problem and need to send relevant folders to a technician, you can follow these steps:
1. Find the ACDP APP on your computer, right-click it and select "Open file location".
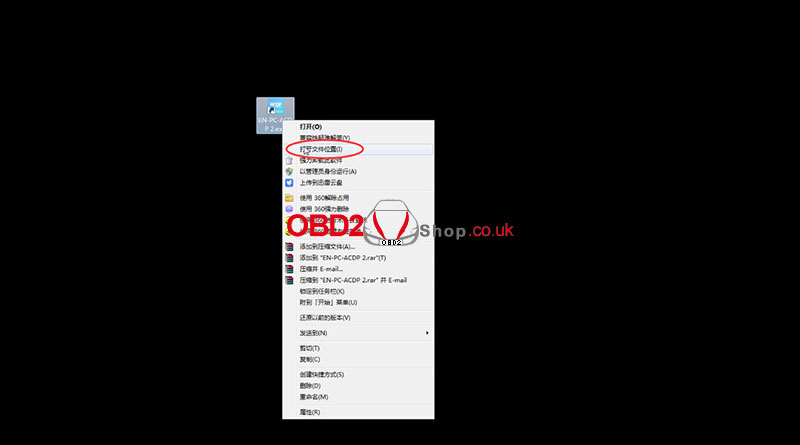
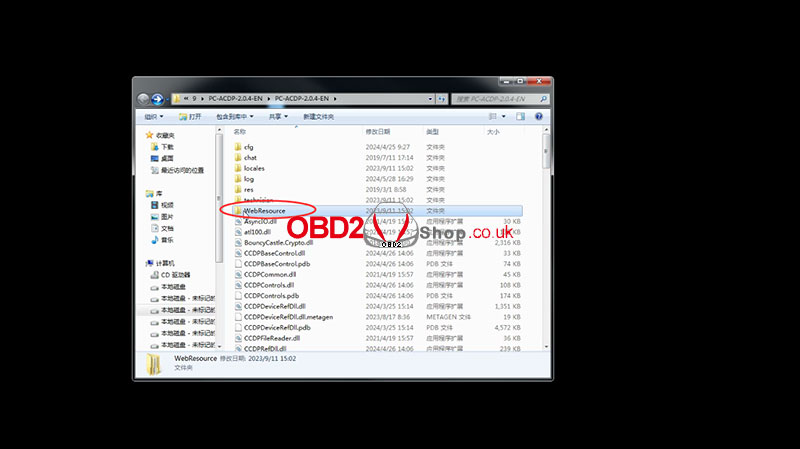
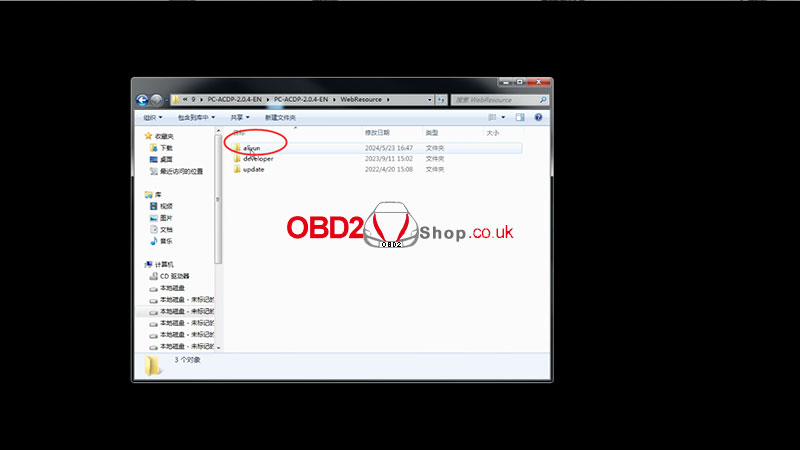
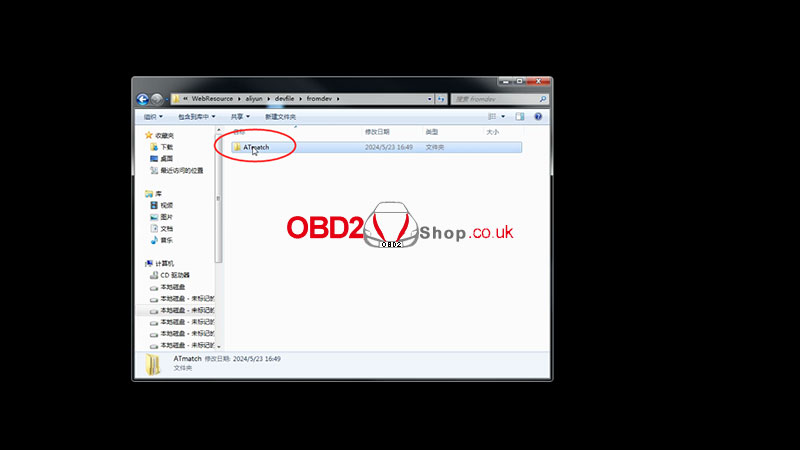
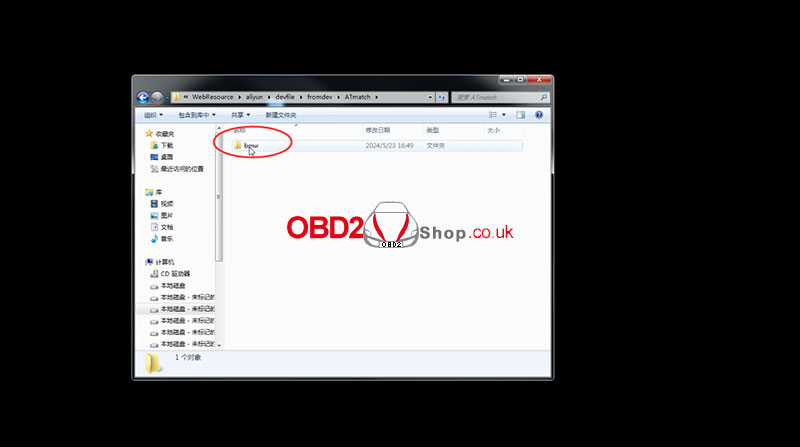
2. In the opened file, find "WebResource" >> "aliyun" >> "devfile" >> "formdev" >> "ATmatch" >> "BMW".
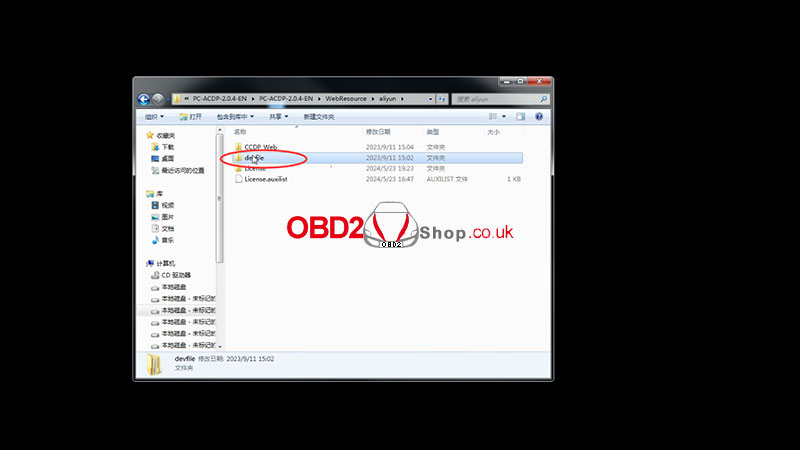
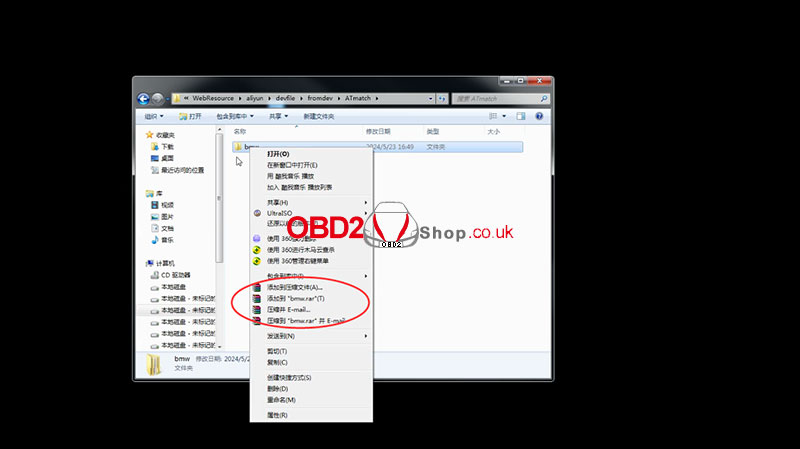
3. Compress the BMW folder and send it to a technician for analysis and troubleshooting.
For more technical service support please follow www.obd2shop.co.uk
Oznake: yanhua mini acdp
četvrtak, 30.05.2024.
OBDSTAR X300 Classic G3 Manual: Screen Recording
This article will guide you on how to use OBDSTAR X300 Classic G3 to record screens.
Procedure:
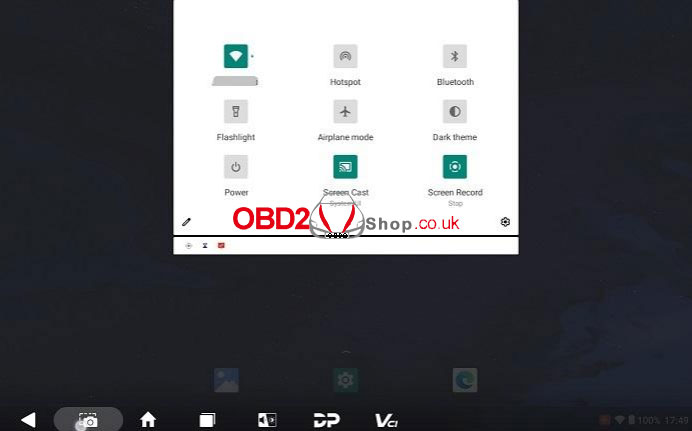
Step 1. Open the hidden menu at the bottom of the desktop and select [Screen Recording]. Or you can swipe down from the top of any interface to expand the drop-down box, then swipe down again to expand the first column and select [Screen Recording].
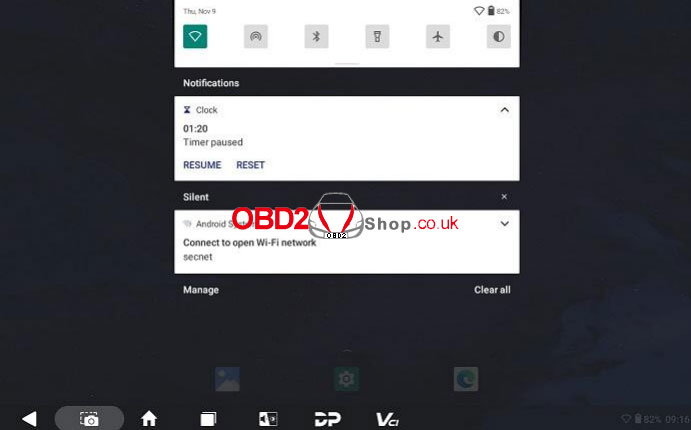
Step 2. After tapping [START] in the pop-up box, a countdown will be displayed in the lower right corner and a beep will sound after three seconds, indicating that recording has started.
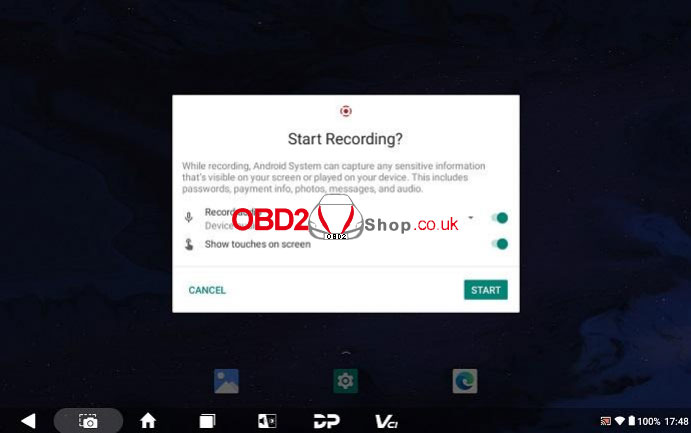
Step 3. When you want to end recording, tap the red icon in the bottom right corner and the hidden menu at the top of the screen will open automatically, tap [Stop Screen Recording] to end recording.
For more information about OBDSTAR X300 Classic G3 please follow www.obd2shop.co.uk
Oznake: obdstar x300 classic g3
srijeda, 29.05.2024.
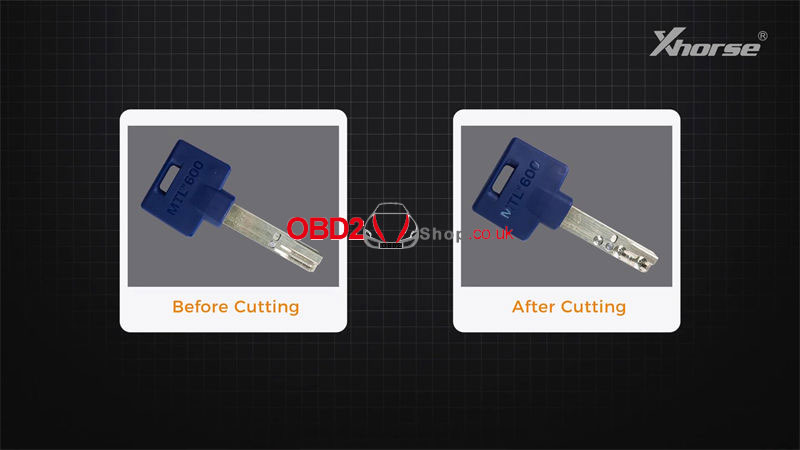
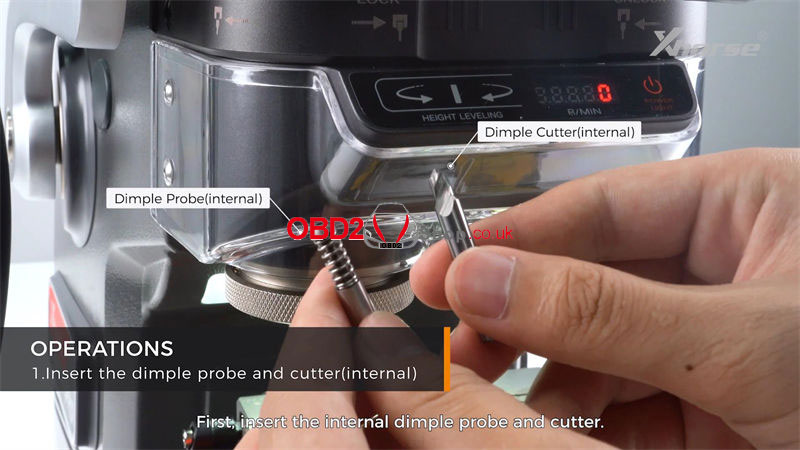
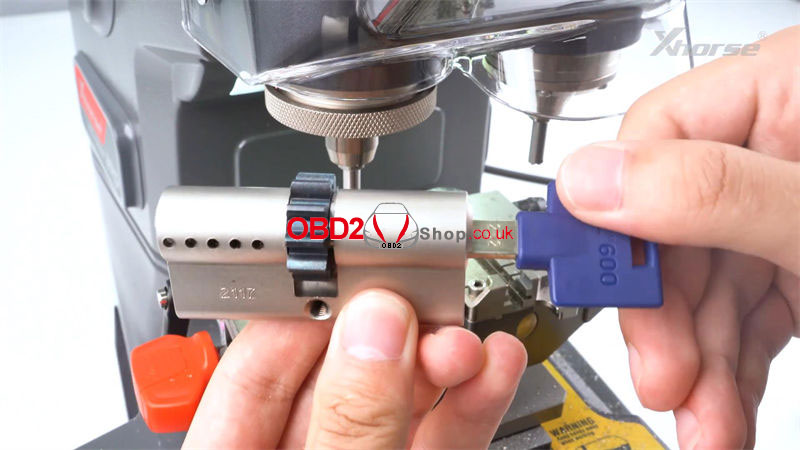
Xhorse Condor XC-002 PRO Dimple Key Cutting Tutorial
This tutorial introduces how to cut a dimple key with Xhorse Condor XC-002 PRO machine step by step.
Procedure
1. Insert The Internal Dimple Probe & Cutter
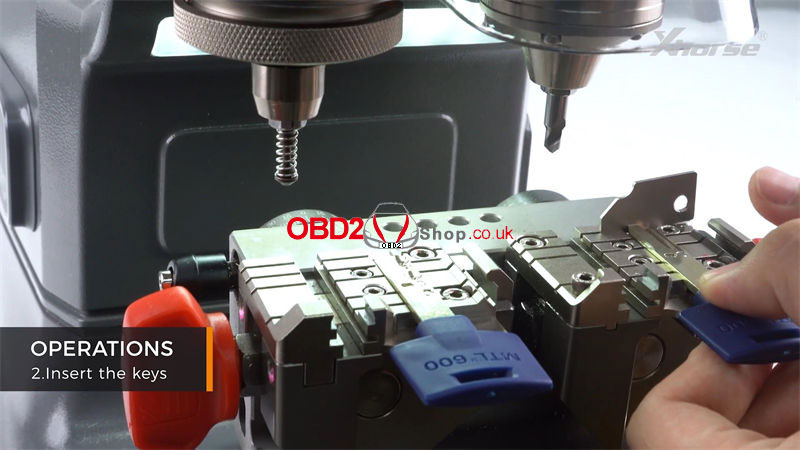
2. Insert The Keys
Insert the original key and the blank key using a shim.
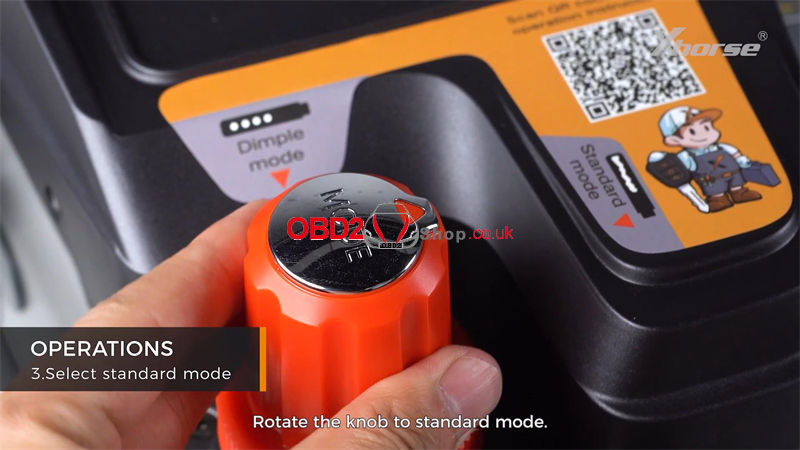
3. Select Standard Mode
Rotate the knob to standard mode.
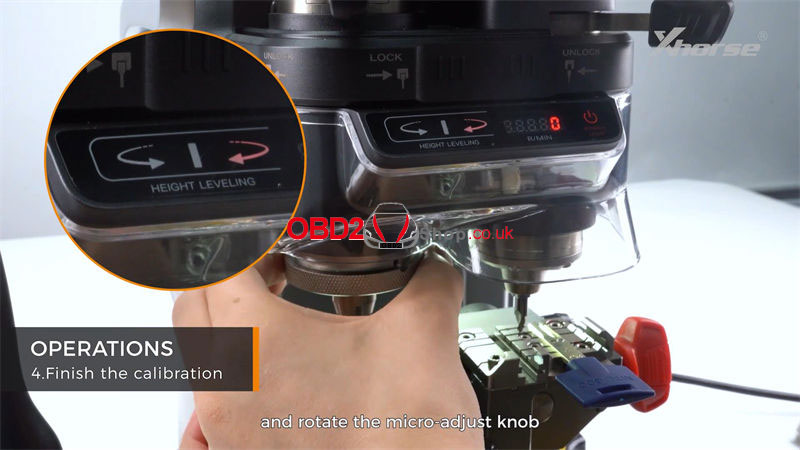
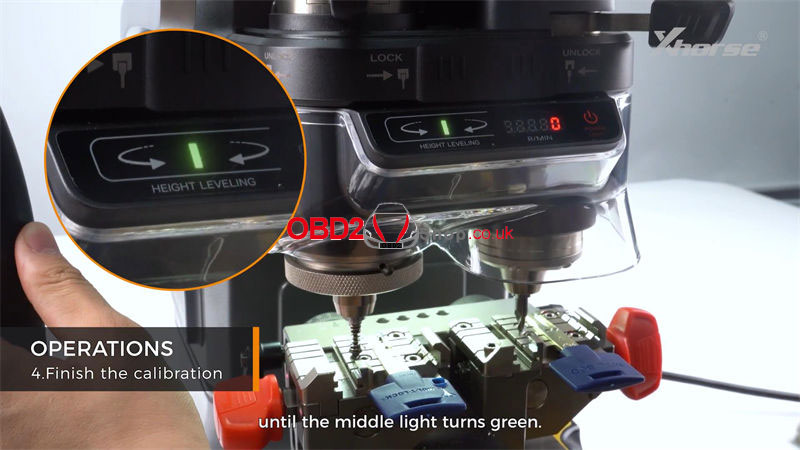
4. Finish The Calibration
Press down the handle and finish the calibration.
Just follow the direction of the light and rotate the micro-adjust knob until the middle light turns green.
Make sure that the clamp is in the corresponding position.
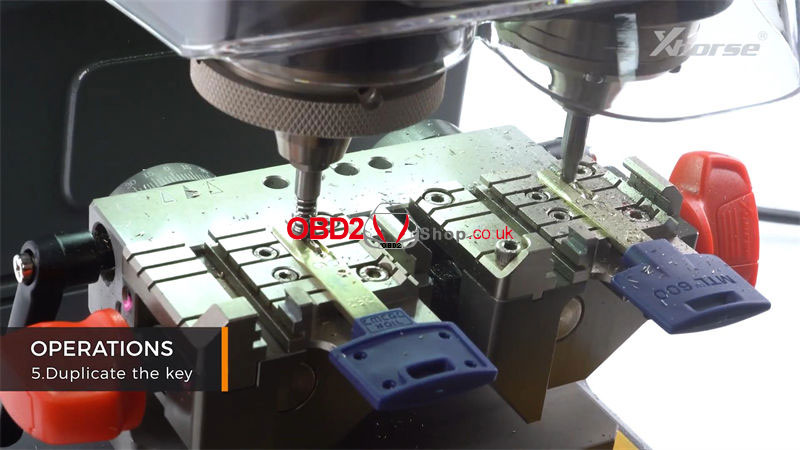
5. Duplicate The Key
Turn on the cutter switch and press down the main handle to duplicate the key.
Turn off the switch after finishing one side cutting.
Flip the key and continue to cut the other side.
After finishing one side, turn off the switch and clean up.
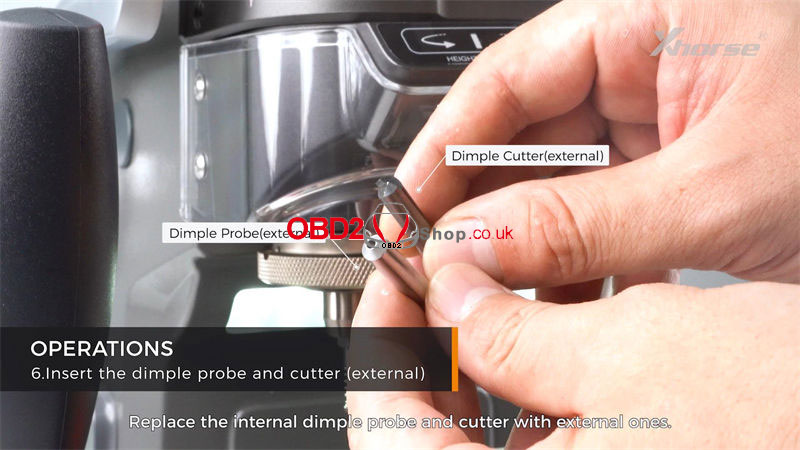
6. Insert The External Dimple Probe & Cutter
Replace the internal dimple probe and cutter with external ones.
7. Select Dimple Mode
Switch the knob to dimple mode.
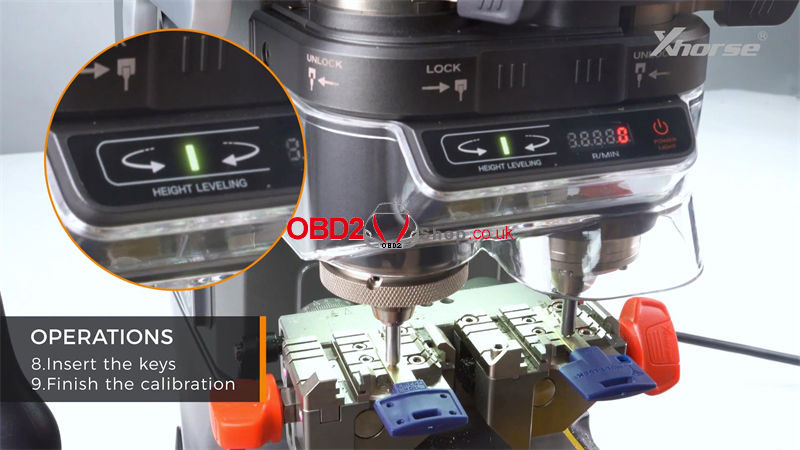
8. Insert The Keys
9. Finish The Calibration
Clamp the keys and don't forget to complete the calibration.
10. Duplicate the key
After finishing one side, turn off the switch and clean up. Flip the key and cut the other side.
Now we've got a perfect duplicate by Condor XC-002 PRO Key Cutting Machine.
Let's give it a try, it works perfectly.
www.obd2shop.co.uk
utorak, 28.05.2024.
OBDSTAR X300 Classic G3 Manual: Transfer Files Using USB Flash Drive
This post will guide you on how to transfer files using a USB flash drive on your OBDSTAR X300 Classic G3 Key Programmer.
Procedure:
Step 1. Insert the USB flash drive into the USB port of your device.
Step 2. Expand the hidden menu at the bottom of the desktop and select [ES File Explorer] to open it. In the left menu, select [Local] > [Home]. The block under the Internal Storage block is for USB storage.
Step 3. Open [Internal Storage], select any folder (or open the folder to select files) and hold. An empty circle will appear under each file, and function buttons such as copy, cut, delete, and rename will appear at the bottom right. Select the folder (or file) you want to transfer, the circle under the selected folder will be marked with a checkmark and turn green, then tap [Copy].
Step 4. Go back to the Home tab, then select the storage for the USB you inserted.
Step 5. Open the [Usb Storage] folder and all the folders in the USB drive will be displayed (See example below). Paste the copied folder (or file) to the desired location.
Step 6. After everything is done, just pull out the USB flash drive.
For more information about OBDSTAR X300 Classic G3 please follow www.obd2shop.co.uk
Oznake: obdstar x300 classic g3
četvrtak, 23.05.2024.
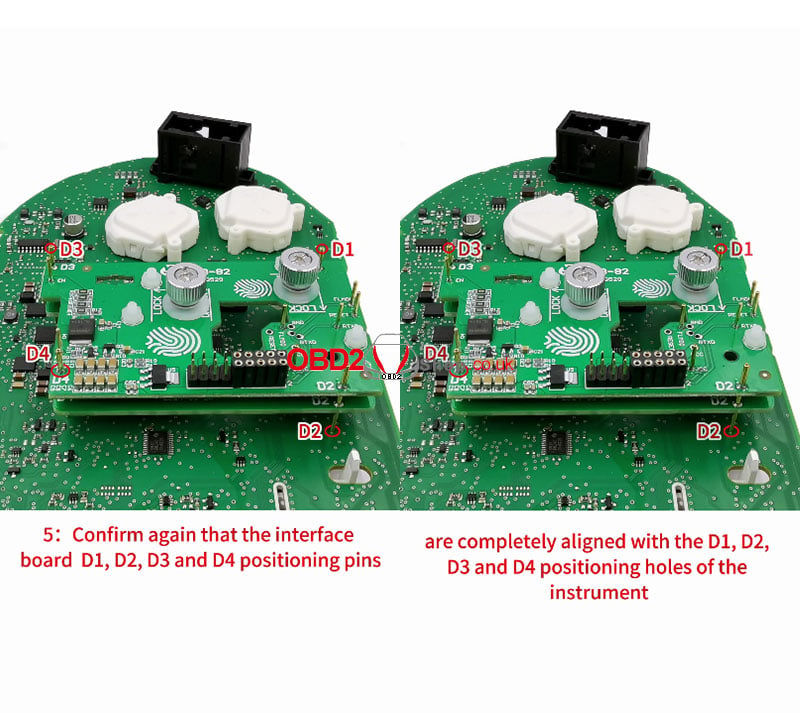
How to install ACDP Module 33 MQB-82 interface board
This post will guide you on how to install the MQB lock fastening (MQB-82) interface board from Yanhua ACDP Module 33.
Here comes the procedure:
1. Push the lock fastening of the interface board to the unlock position.
Find the interface board installation area on the instrument according to the visual positioning mark on the interface board.
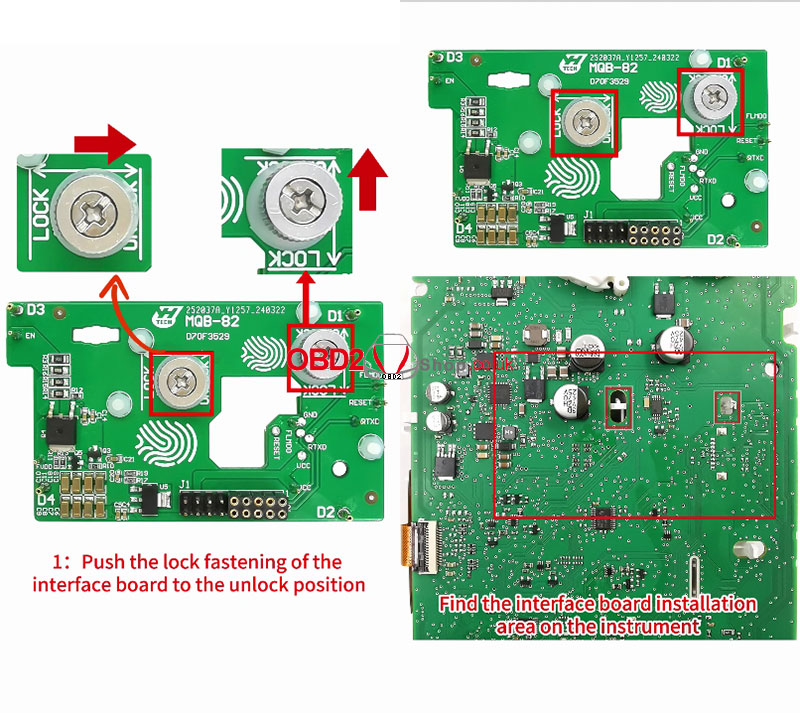
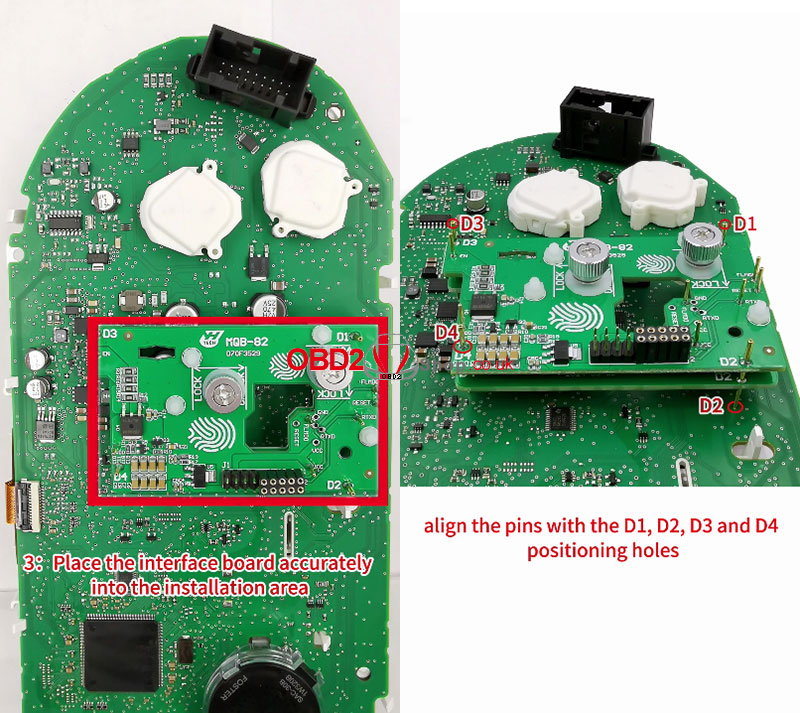
2. Find the correct positioning holes of D1, D2, D3 and D4 on the instrument.

3. Place the interface board accurately into the installation area and align the pins with the D1, D2, D3, and D4 positioning holes.
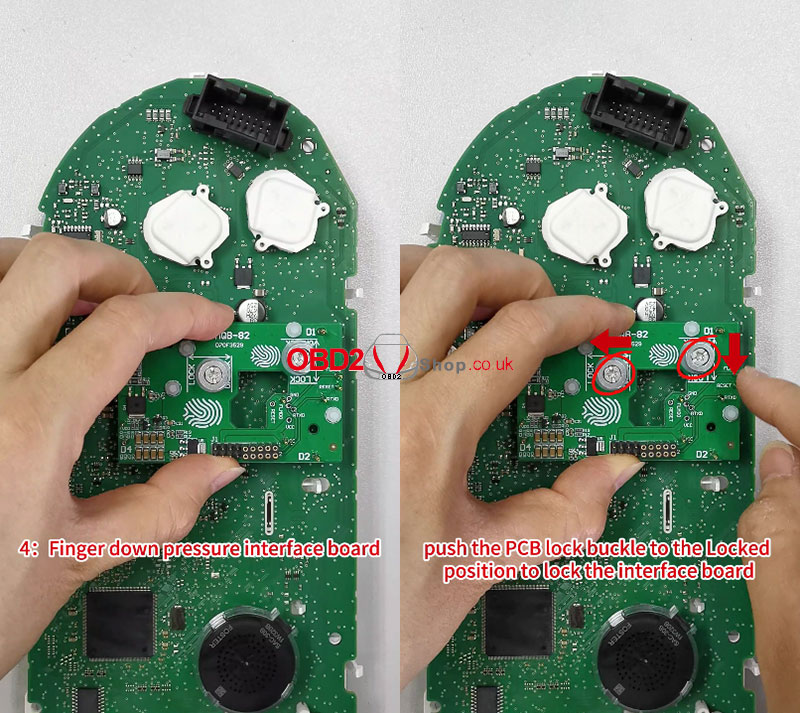
4. Finger-down pressure interface board.
Push the PCB lock buckle to the Locked position to lock the interface board.
The installation is done.
5. Confirm again that the interface board D1, D2, D3, and D4 positioning pins are completely aligned with the D1, D2, D3, and D4 positioning holes of the instrument.
Check the video to view the detailed operation:
https://youtu.be/gPqZ3l5emZ0
www.obd2shop.co.uk
Oznake: acdp module 33
utorak, 21.05.2024.
Yanhua Mini ACDP 2 + Module 33 Add VW MQB48 5A Smart Key
This is a tutorial on how to use Yanhua Mini ACDP 2 + Module 33 to add a smart key for Volkswagen MQB48 5A. Read the article carefully to learn.
Check the video for full operation:
https://youtu.be/vuYyhE19FCs
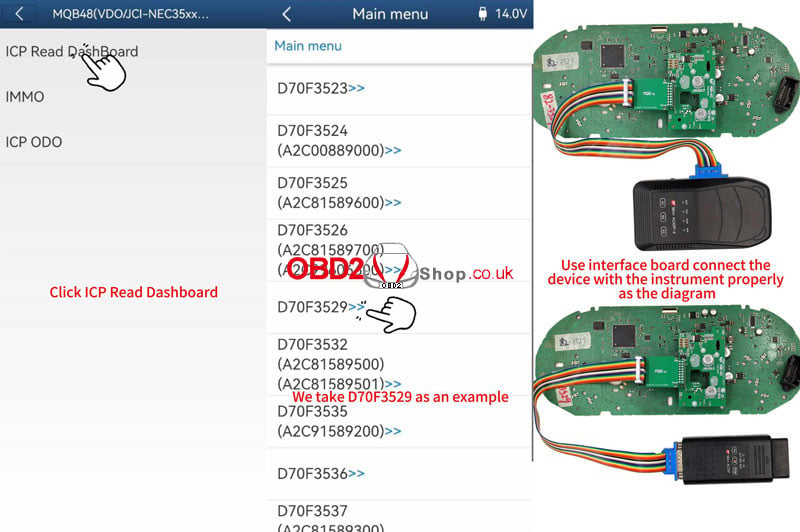
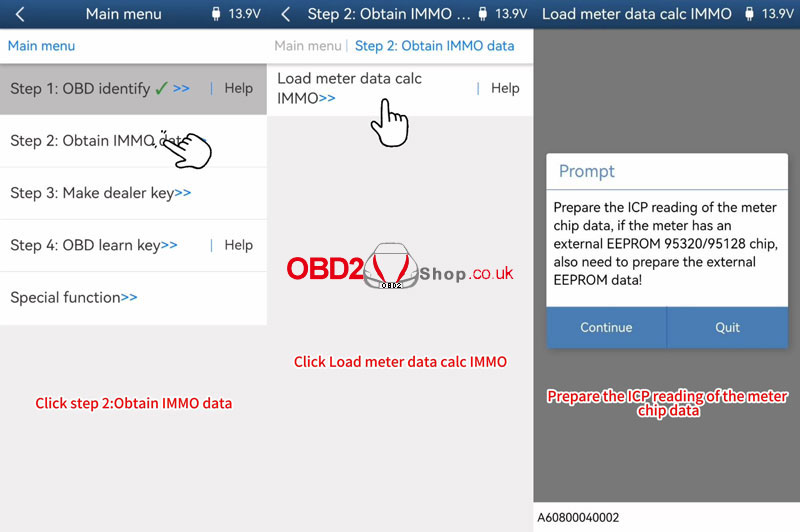
Step1. Obtain IMMO Data
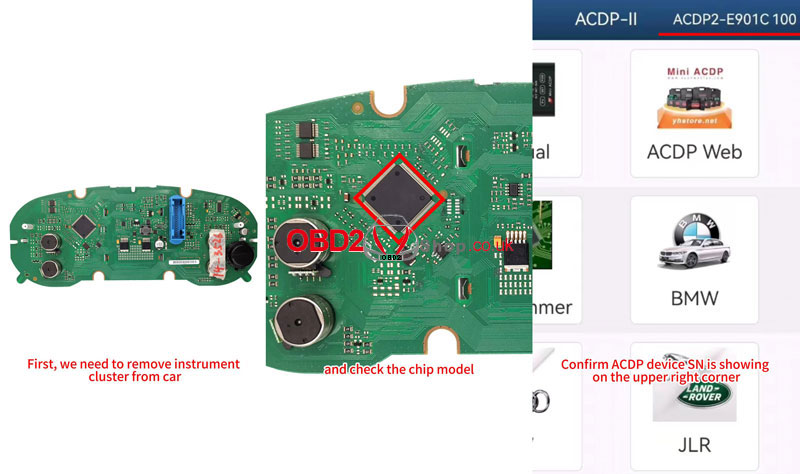
1. Remove the instrument cluster from the car, and open the cluster shell to check the chip model.
2. Power on Mini ACDP-2.
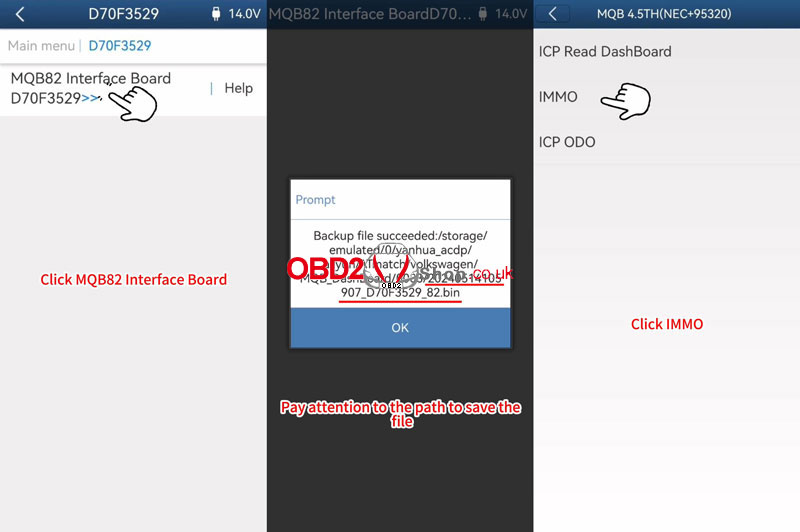
Mini ACDP >> VW >> VW MQB IMMO >> MQB48(VDO/JCI-NEC35xx Lock) >> ICP read dashboard >> D70F3529 >> Help
Follow the diagram to connect the device & instrument properly.
MQB82 interface board >> OK >> OK >> Continue >> Continue
The data was read successfully!
Please save all backup data of the chip.
Execution complete!
Reinstall the instrument panel into the vehicle and confirm that the vehicle is functioning properly.
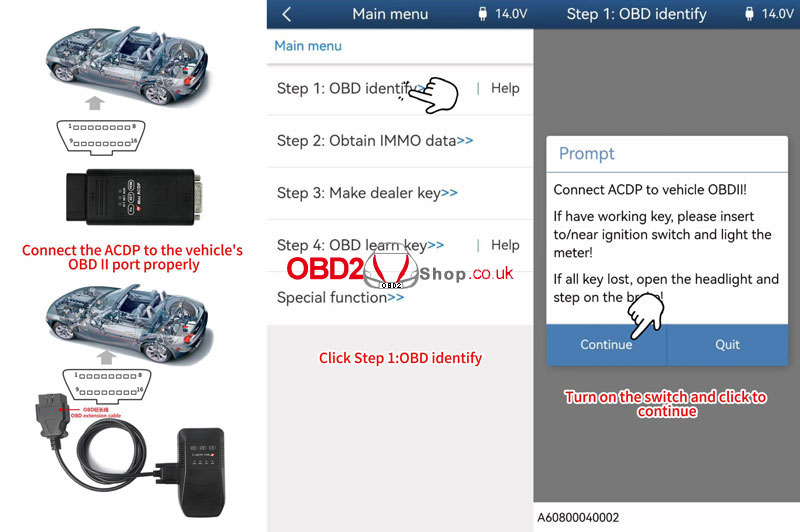
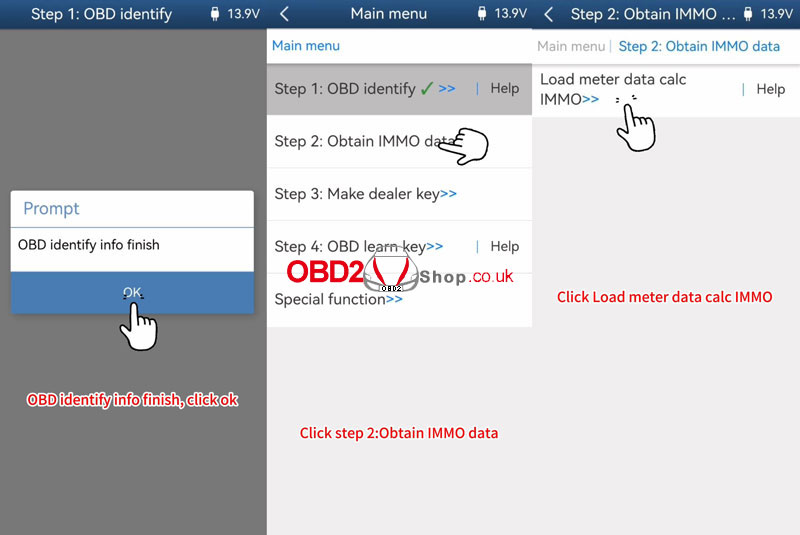
IMMO >> OBD identify Help
Connect Mini ACDP 2 to the OBDII port properly.
OBD identify >> OK
Connect ACDP to vehicle OBDII!
If you have a working key, please insert it to/near the ignition switch and light the meter!
If all key lost, open the headlight and step on the brake!
Turn on the switch, and click "Continue".
Recognized vehicle info is correct.
OBD identify info to finish.
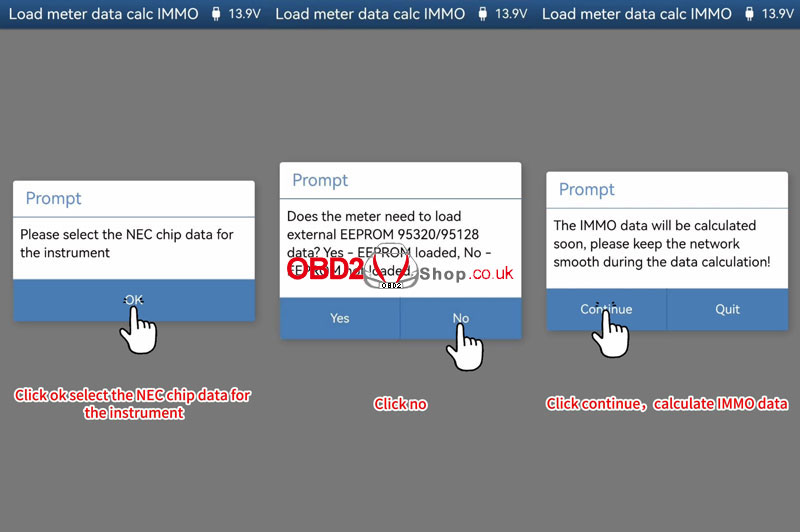
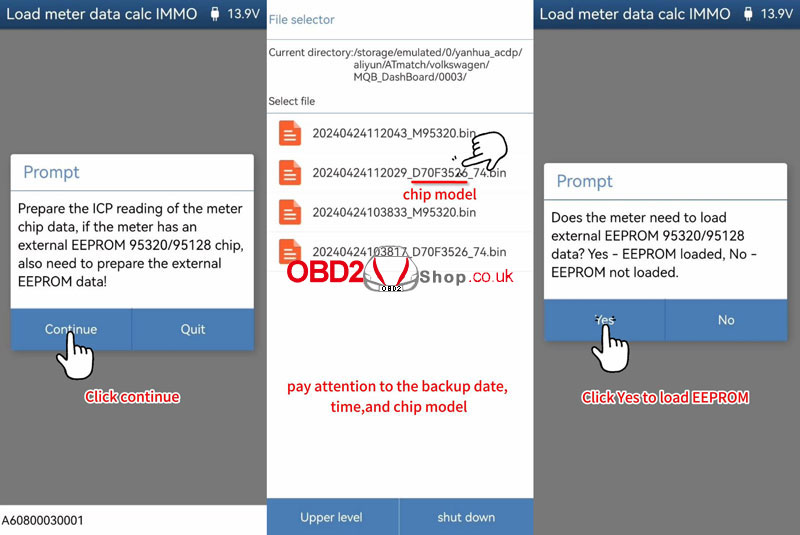
Obtain IMMO data >> Load meter data calc IMMO >> OK
Prepare the ICP reading of the meter chip data, if the meter has an external EEPROM 95320/95128 chip, also need to prepare the external EEPROM data!
Please select the NEC chip data for the instrument.
Does the meter need to load external EEPROM 95320/95128 data?
No - EEPROM is not loaded.
The IMMO data will be calculated soon, please keep the network smooth during the data calculation!
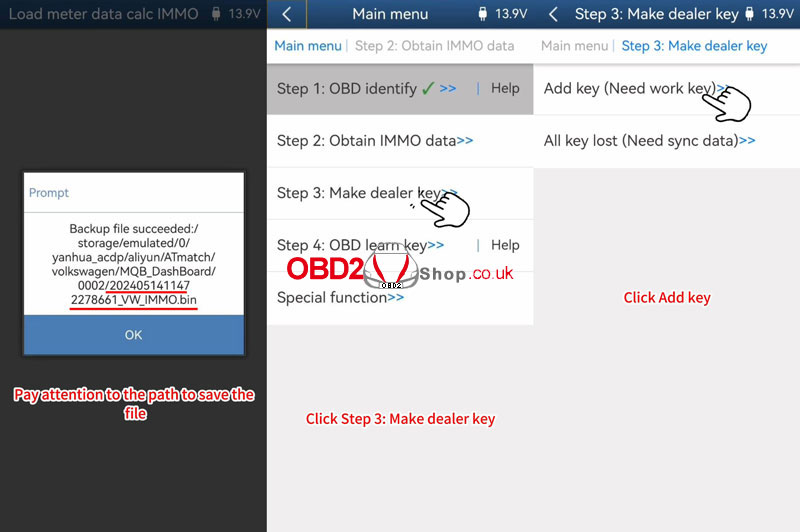
Please save IMMO data.
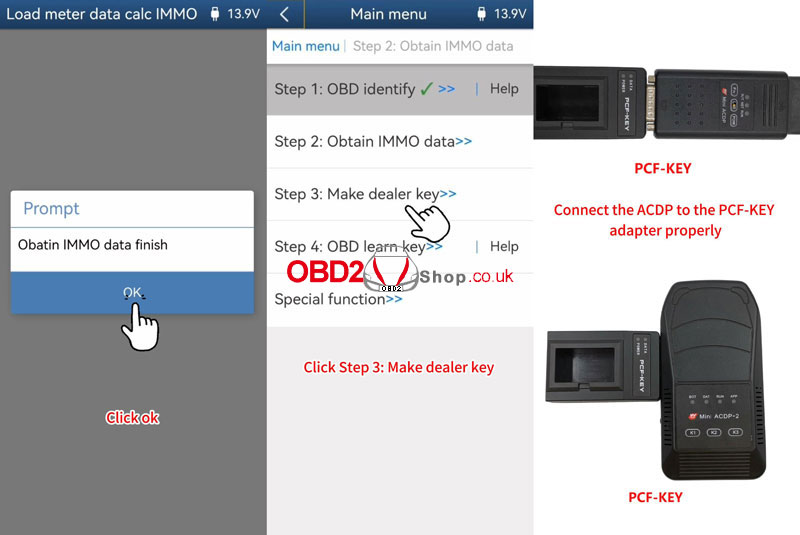
Obtain IMMO data finish.

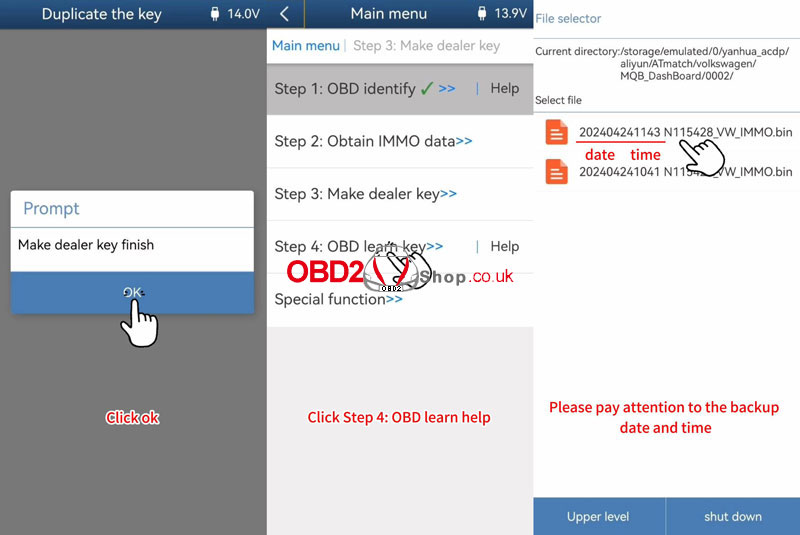
Step2. Make Dealer Key
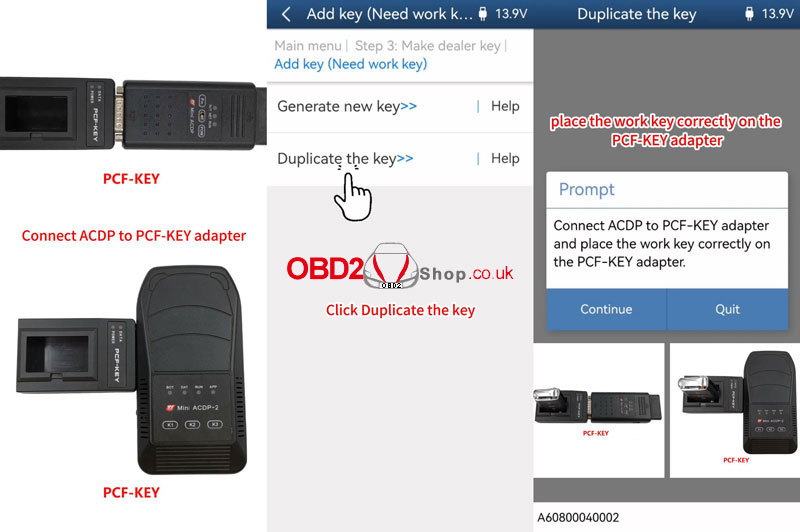
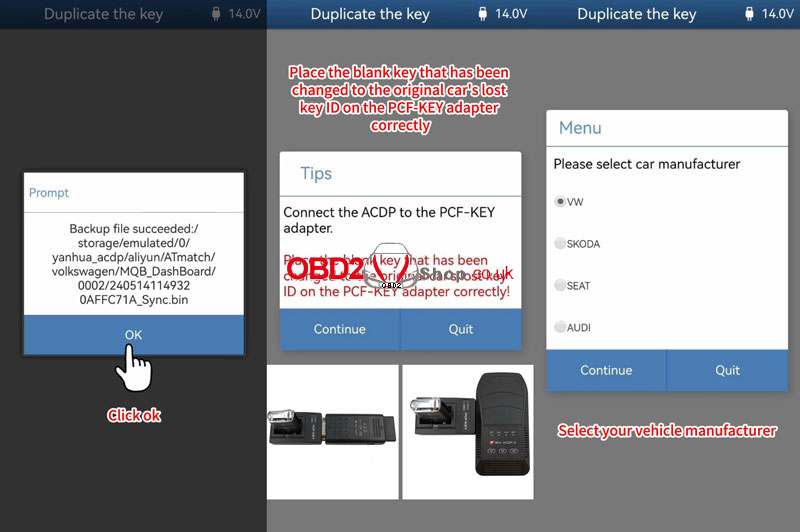
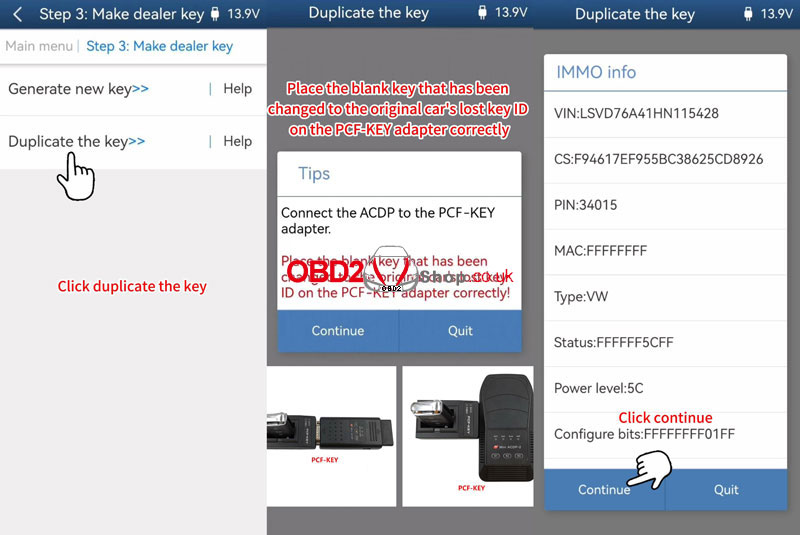
Make dealer key >> Add key(Need work key) >> Duplicate the key Help
Connect ACDP to PCF-KEY adapter.
Duplicate the key >> OK
Place the work key correctly on the PCF-KEY adapter.
Continue >> Please select IMMO data
IMMO info is correct.
Please save sync data.
Connect the ACDP to the PCF-KEY adapter.
Place the blank key that has been changed to the original car's lost key ID on the PCF-KEY adapter correctly!
Note: The new key should be a blank key that ID can be changed and the blank key has been changed to the ID of the lost key.
Place the blank key that has been changed to the original car's lost key ID on the PCF-KEY adapter correctly.
The key info is correct.
Select your vehicle manufacturer: VW
Programming key data is about to begin, and forbidden to power off or unplug the device during operation!
Make dealer key finish.
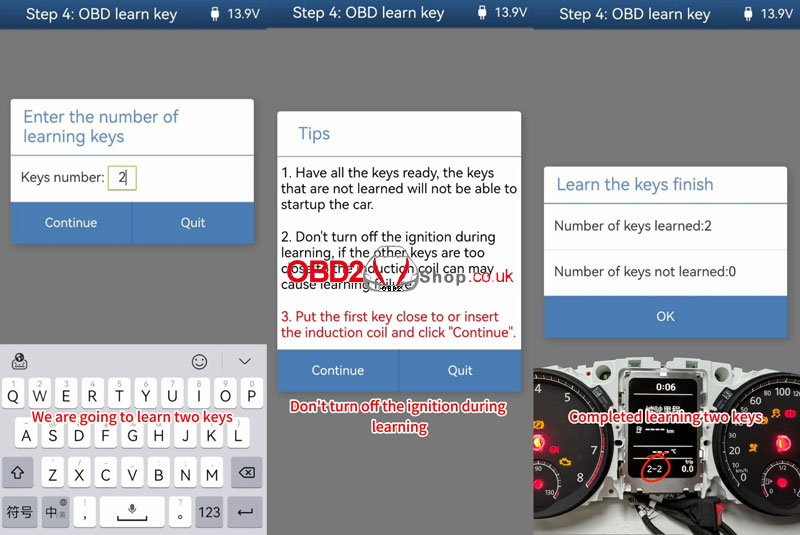
Step3. Learn Key
OBD learn key >> OK >> Continue
The read system info is correct.
Please select IMMO data.
Enter the number of learning keys: 2
1. Have all the keys ready, the keys that are not learned will not be able to start the car.
2. Don't turn off the ignition during learning, if the other keys are too close to the induction coil may cause learning failure.
3. Put the first key close to or insert the induction coil, and click "Continue".
Put the keys close to or insert the induction coil, and click "Continue".
Number of keys learned: 2
Completed.
Please try on the car and verify if the added key functions are normal.

www.obd2shop.co.uk
Oznake: yanhua mini acdp 2
petak, 17.05.2024.
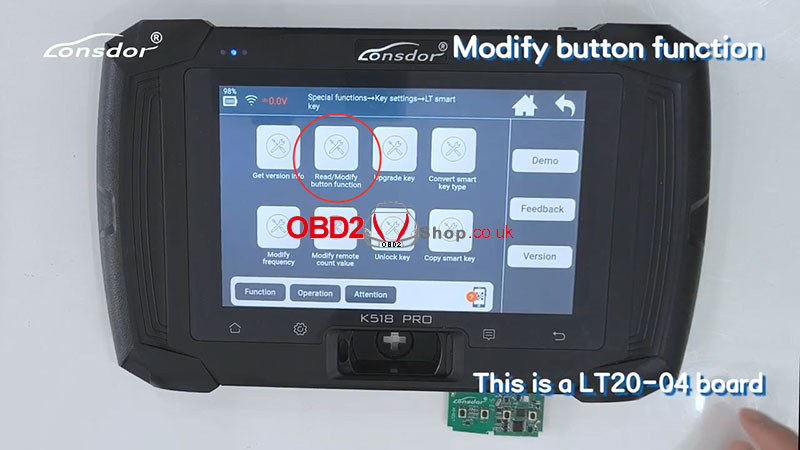
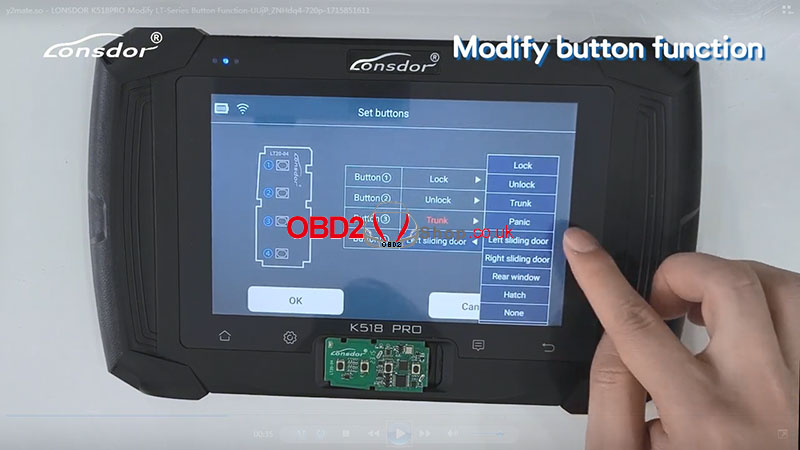
Lonsdor K518PRO Modify/Convert LT-Series Button Function
This post will guide you on how to use the Lonsdor K518PRO Programmer to modify and convert the LT-Series smart key Button Function.
The tools we need:
K518 PRO
LT-Series Smart key
Procedure:
Part 1. Modify LT-Series Button Function
Take LT20-04 as an example.
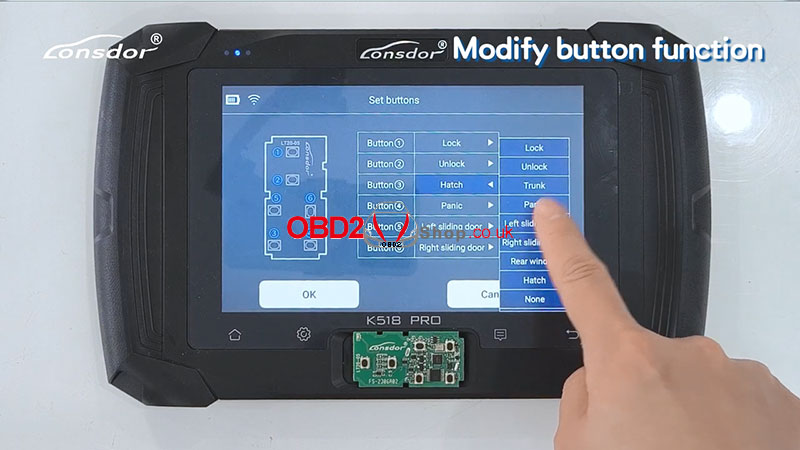
Choose [Special functions]>>[Key settings]>>[Lt smart key]>>[Read/Modify button function]
Put in LT20 smart key.
Please Note:
1. The key requires the battery installed properly.
2. Place the key horizontally on the card slot, easier to identify.
Click [OK] to continue.

Then we set the buttons, as shown in the figure below, we set Button b from "Rear window" to "Trunk".
Set Button c from "Left sliding door" to "Panic".
Click [OK] to continue.
Conversion is successful.
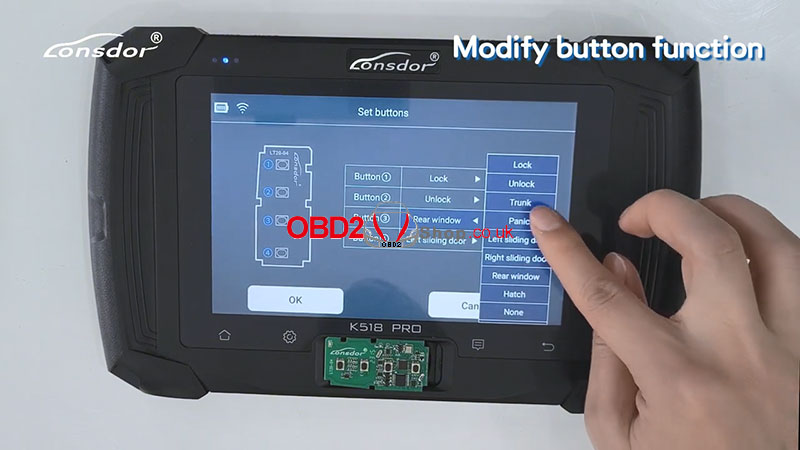
Then we return to the previous interface and select [Read/Modify button function] again to check.
As shown in the figure, the previously set information has been successfully saved.
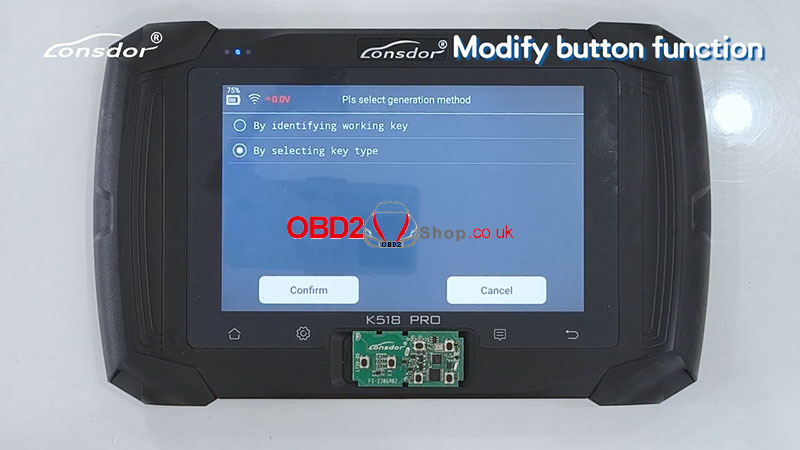
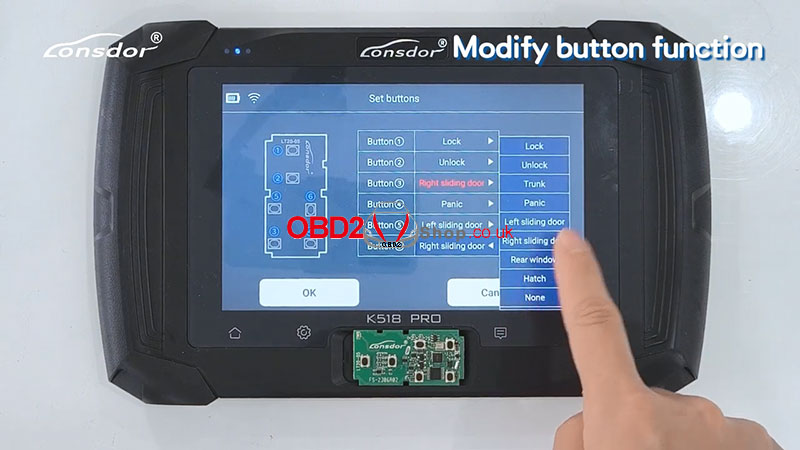
Part 2. Convert LT-Series Button Function
Take LT20-06 6 buttons as an example.
Choose [Special functions]>>[Key settings]>>[Lt smart key]>>[Convert smart key type].
This function requires an internet connection.
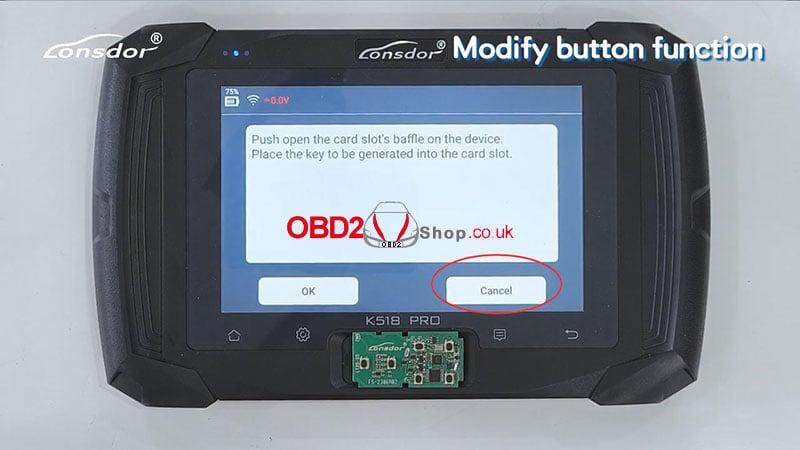
Push open the card slot's baffle on the device.
Place the key to be generated into the card slot.

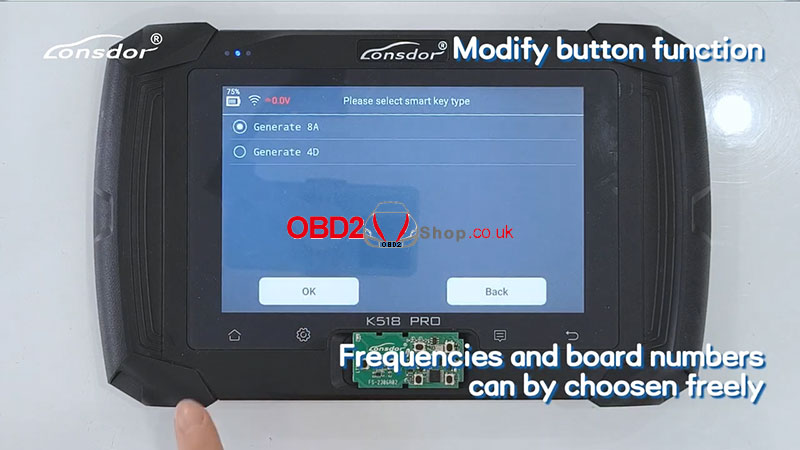
Choose [By selecting key type] >> [Generate 8A]
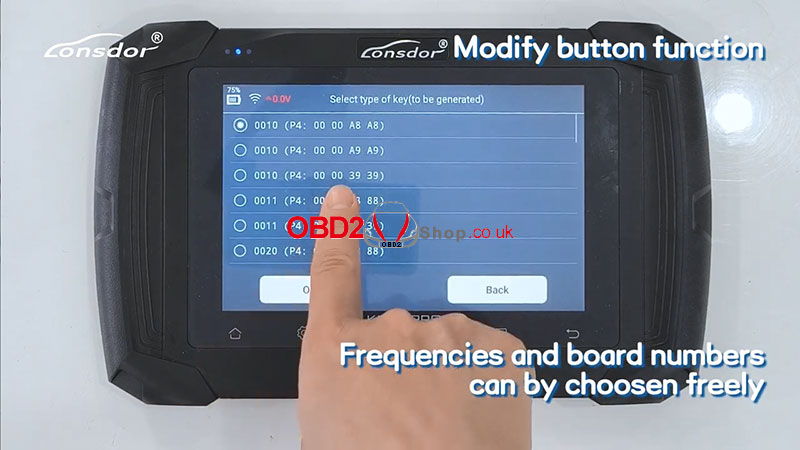
Frequencies and board numbers can be chosen freely.

Then we set the buttons, as shown in the figure below, we set Button b from "Hatch" to "Right sliding door".
Set Button e from "Right sliding door" to "Hatch".
Click [OK] to continue.
Generation successful.
Then we return to the previous interface and select [Read/Modify button function] to check.
As shown in the figure, the functions of Button b and Button e were successfully converted.
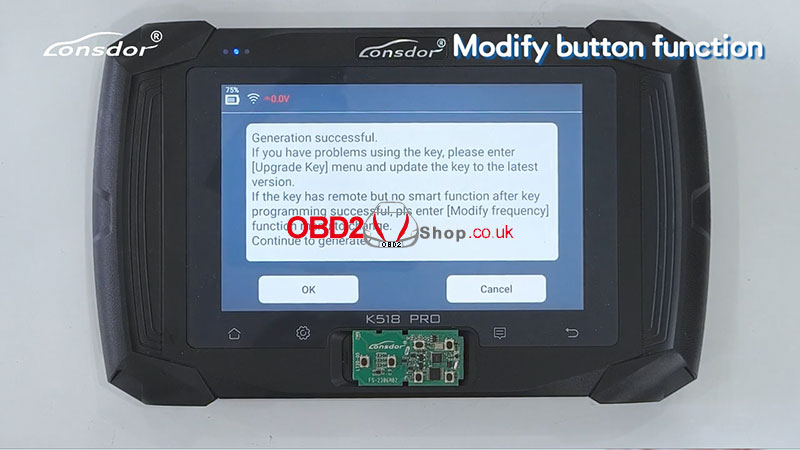
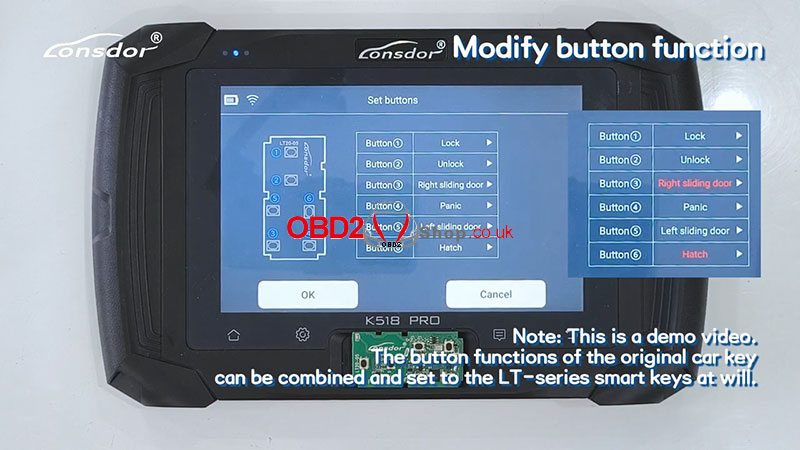
Note: The button functions of the original car key can be combined and set to the LT-series smart keys at will.
Video guides:
https://youtu.be/0zmkKeshPIU
www.obd2shop.co.uk
Oznake: lonsdor k518 pro
srijeda, 15.05.2024.
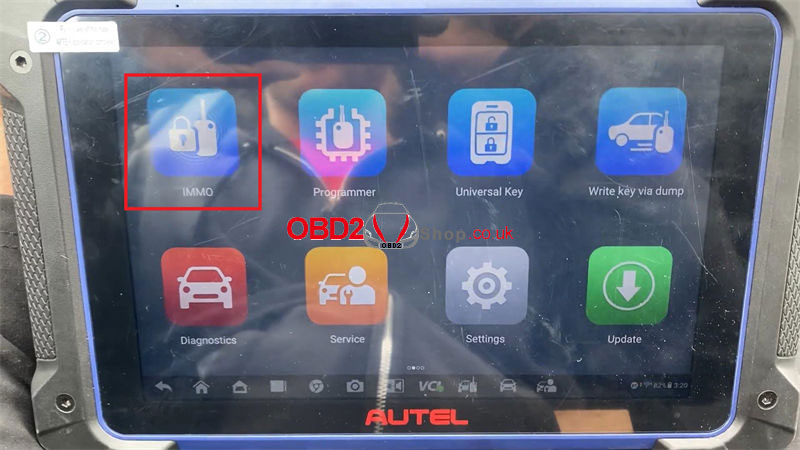
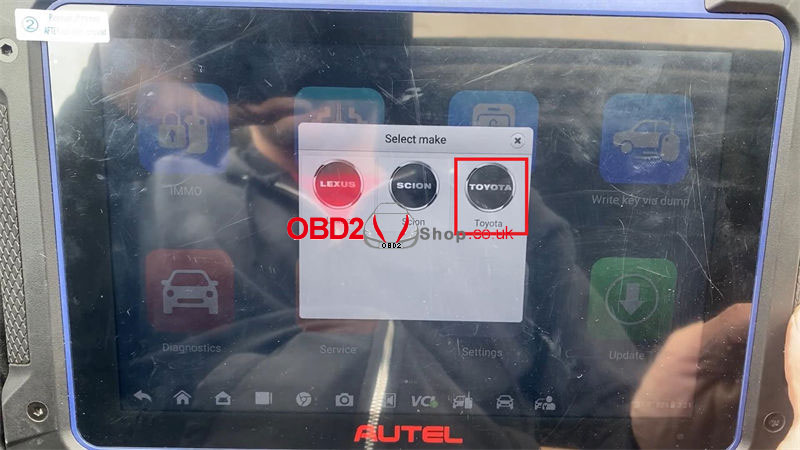
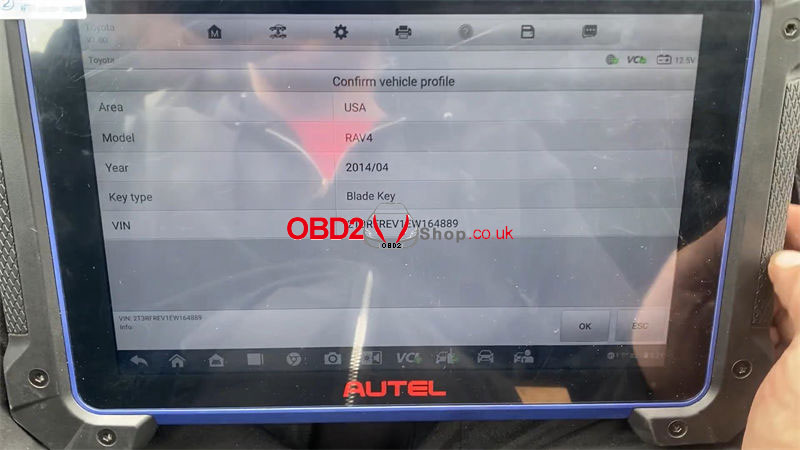
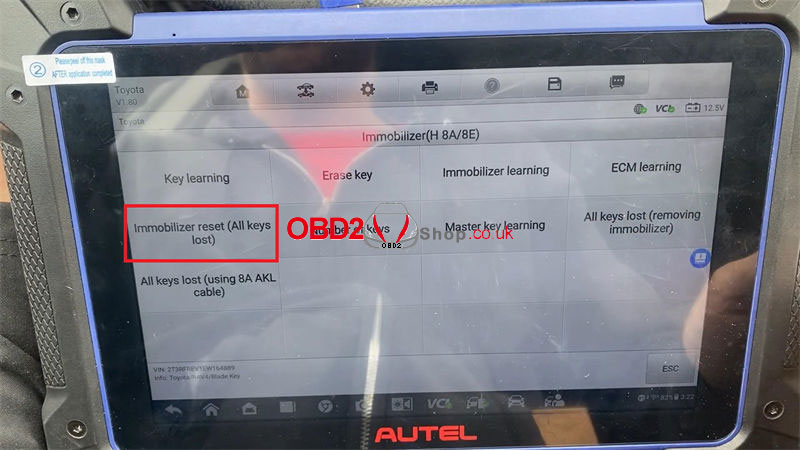
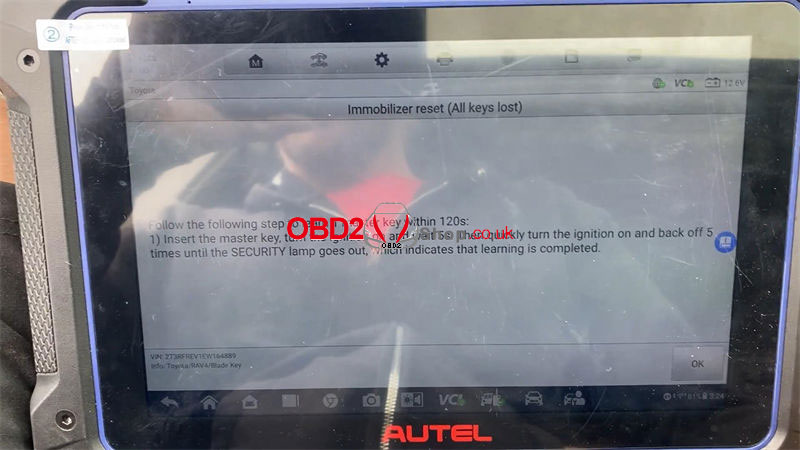
Autel IM608 PRO2 Program 2014 Toyota RAV4 All Keys Lost
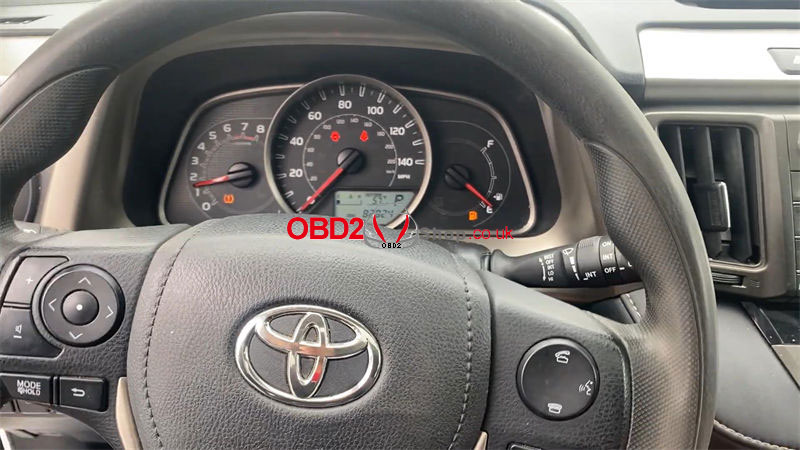
Now I'm working on a 2014 Toyota RAV4 with all keys lost. Next, I'm gonna use the Autel MaxiIM IM608 PRO II to program a new blade key for this car.
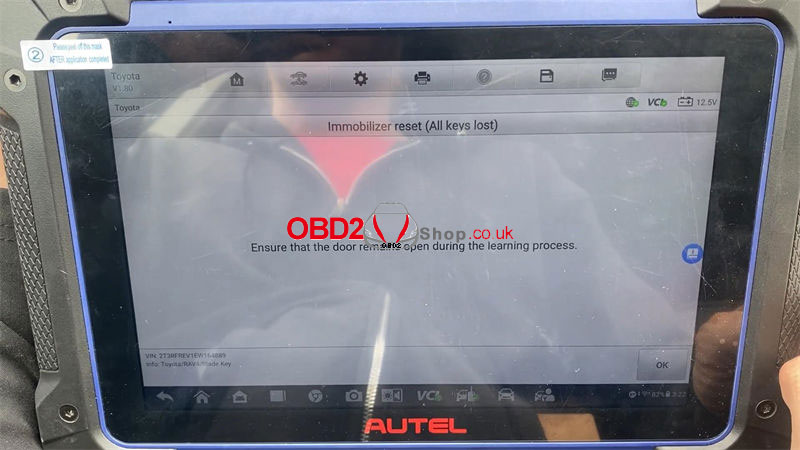
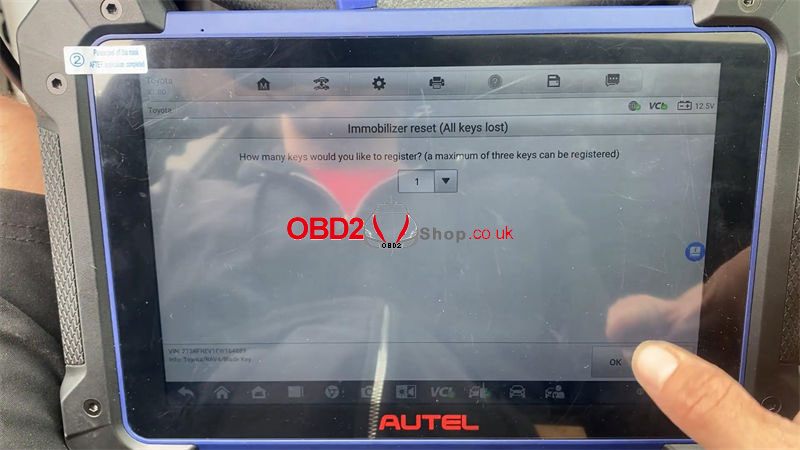
IMMO >> Auto VIN >> Toyota >> OK >> OK >> Control unit >> Immobilizer(H 8A/8E) >> Immobilizer reset(all keys lost)
This function is only supported for the Middle East and the USA now.
Ensure that the door remains open during the learning process.
Enter the number of keys to be registered: 1
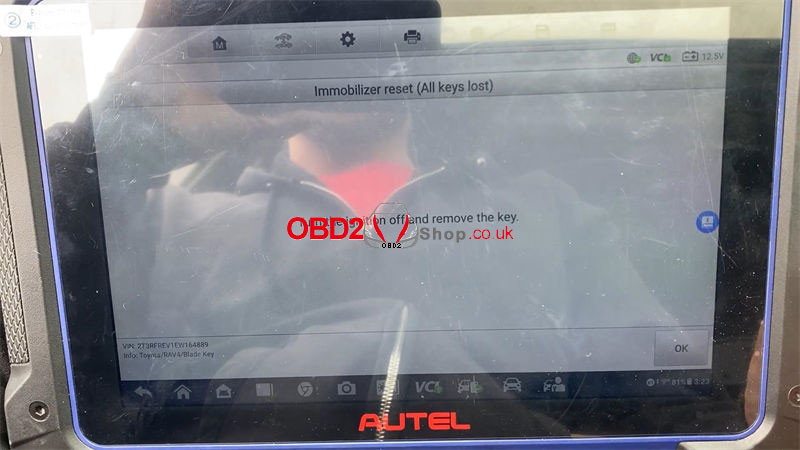
Turn the ignition off.
Turn the ignition on.
Turn the ignition off and remove the key.
Turn the ignition on.
Turn the ignition off and remove the key.
Follow the following steps to learn 1 master key within 120s:
1)Insert the master key, turn the ignition on, and wait for 5s. Then quickly turn the ignition on and back off 5 times until the SECURITY lamp goes out, which indicates that learning is completed.
Test the new key, it can start the engine normally.
Done.
This is using Autel IM608 Pro2 to program the 2014 Toyota RAV4 with all keys lost successfully.
www.obd2shop.co.uk
Oznake: autel im608 ii
subota, 11.05.2024.
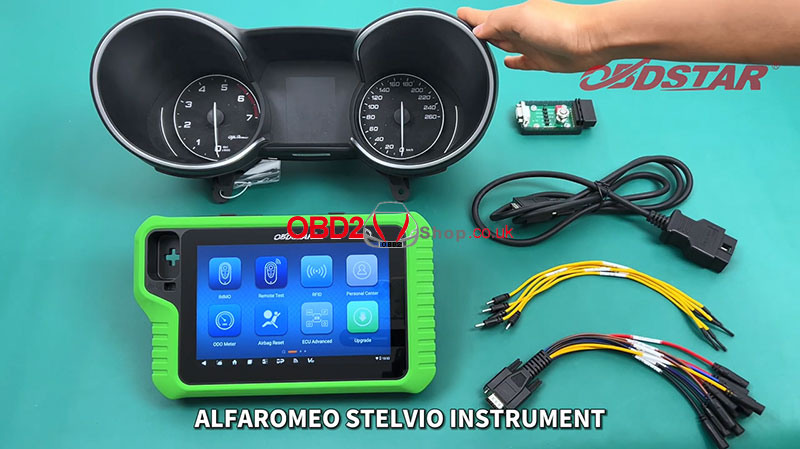
Alfa Romeo Stelvio Instrument ECU Unlock via OBDSTAR X300 Classic G3
This post will guide you on unlocking the used instrument ECU for Alfa Romeo Stelvio using the OBDSTAR X300 Classic G3 key programmer.
The tools we need:
Alfa Romeo Stelvio Instrument
X300 Classic G3
P004 Adapter
Main Cable
P004 ECU Clone Jumper
Procedure:
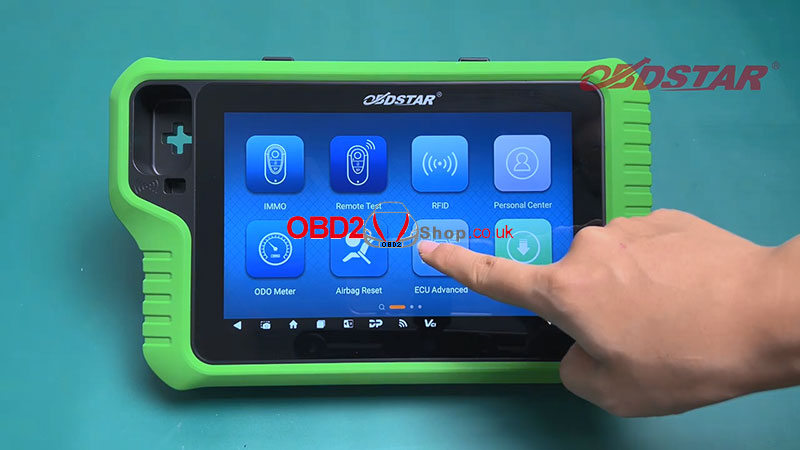
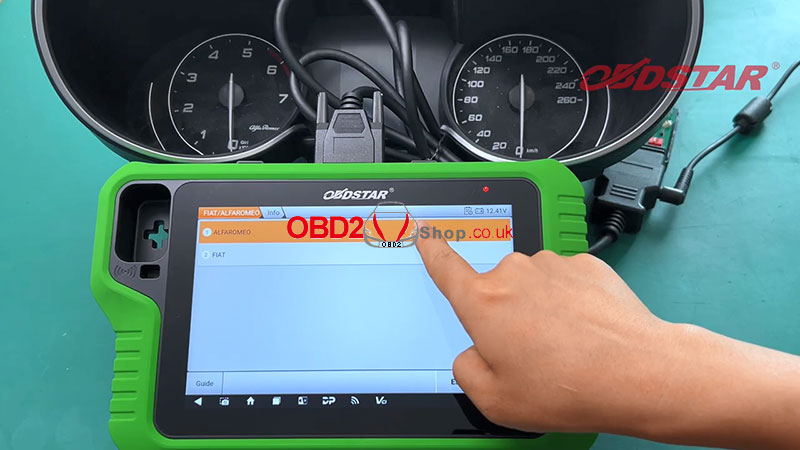
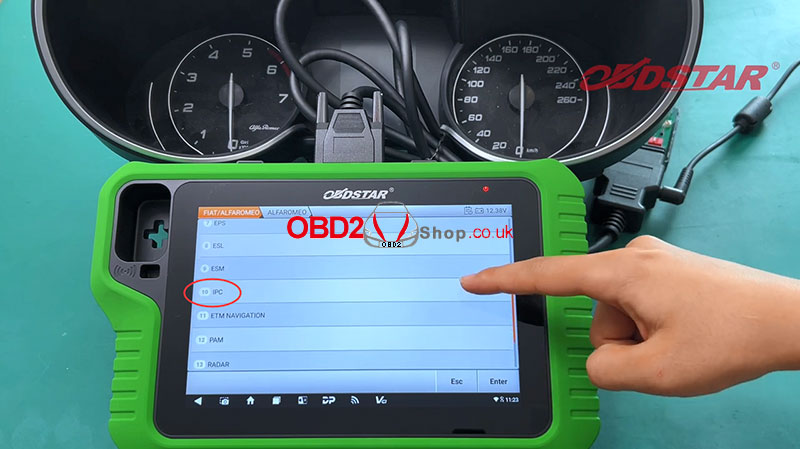
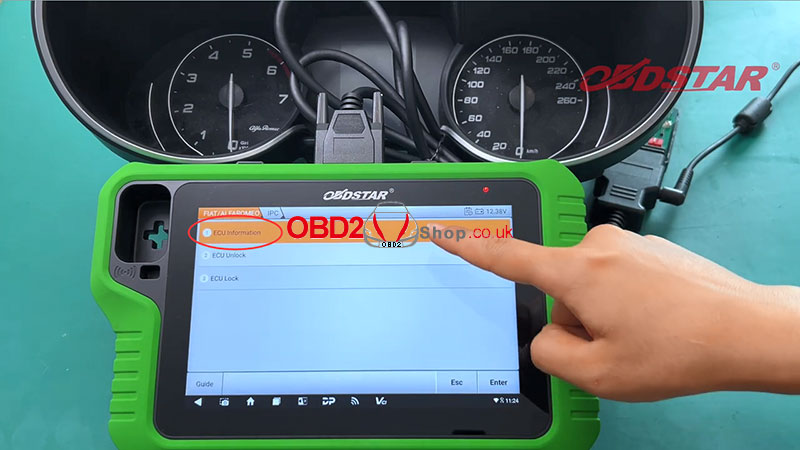
First, we select [ECU Advanced] >> [FIAT/ALFARMEO] >> [FIAT/ALFARMEO V30.04] >> [ALFARMEO] >> [IPC]
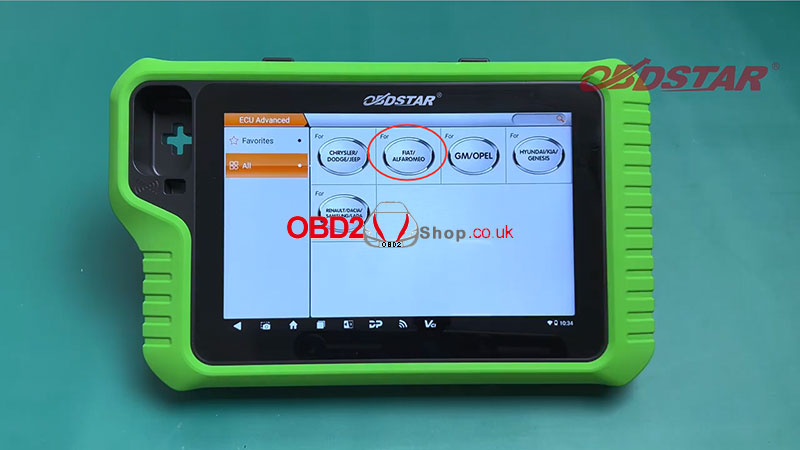
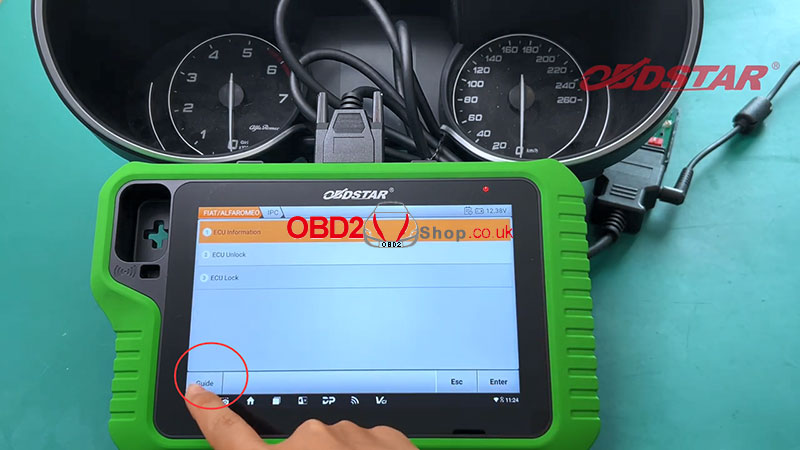
Click [Guide] in the lower left corner of the X300 Classic G3 tablet, and carefully read the development background and operation methods.
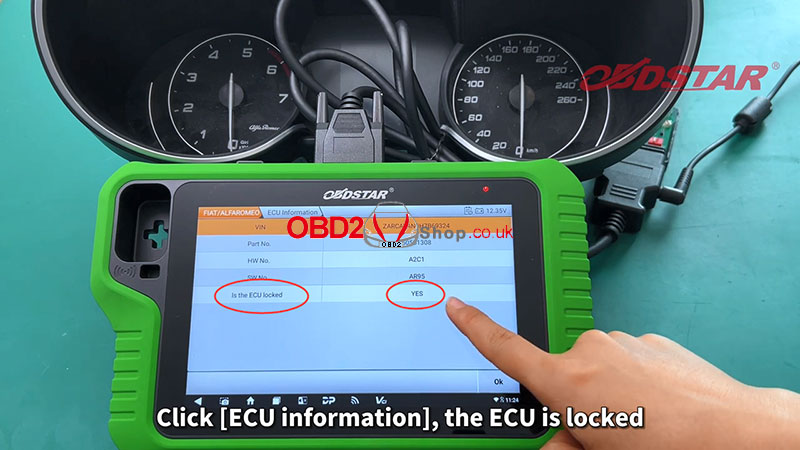
Then click [Back] to return to the previous interface, and select [ECU information] to view the information, we can see that ECU is locked here.
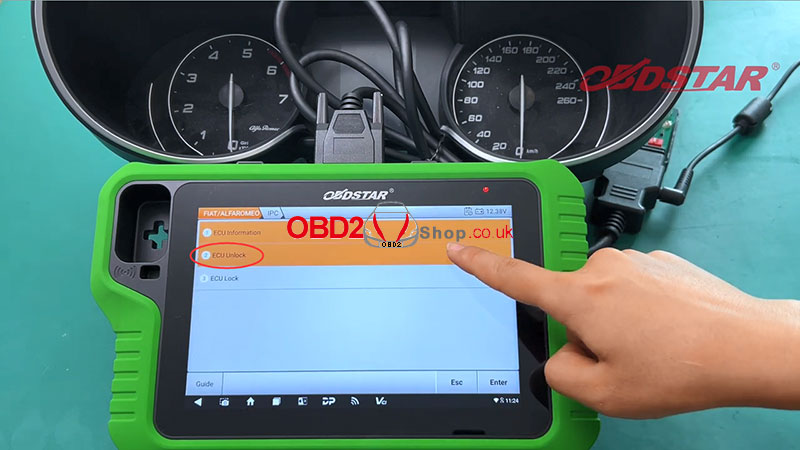
Then we select [ECU Unlock] to unlock.
Information:
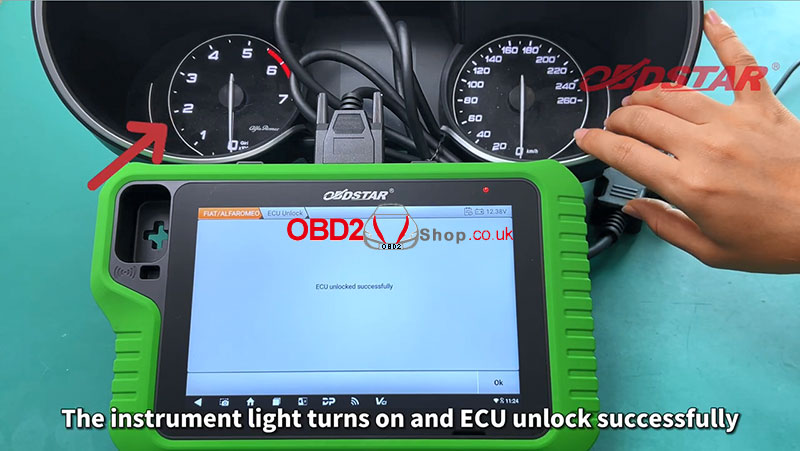
This function is available by connecting the server, please ensure the internet connection is normal.
We click "OK" to continue.
The instrument light turns on and the ECU unlocked successfully.
Video Guides:
https://youtu.be/b0y80urcd2Y
www.obd2shop.co.uk
Oznake: obdstar x300 classic g3
srijeda, 08.05.2024.
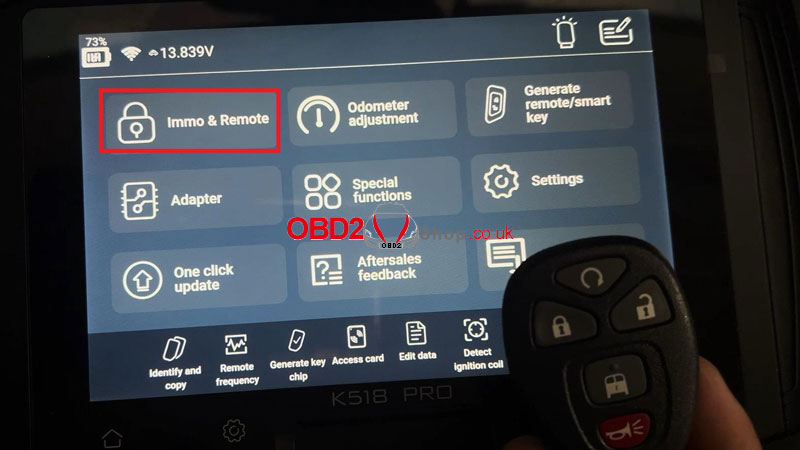
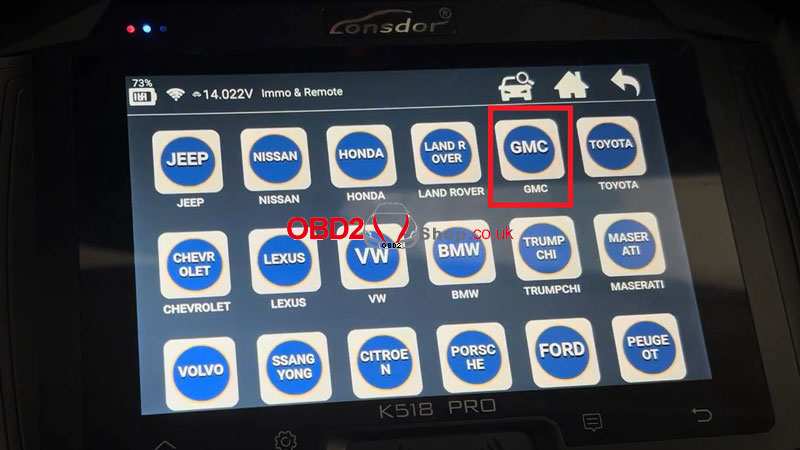
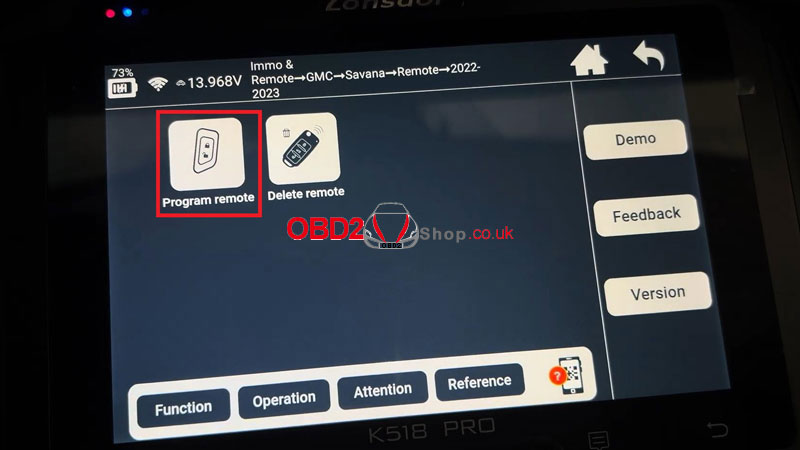
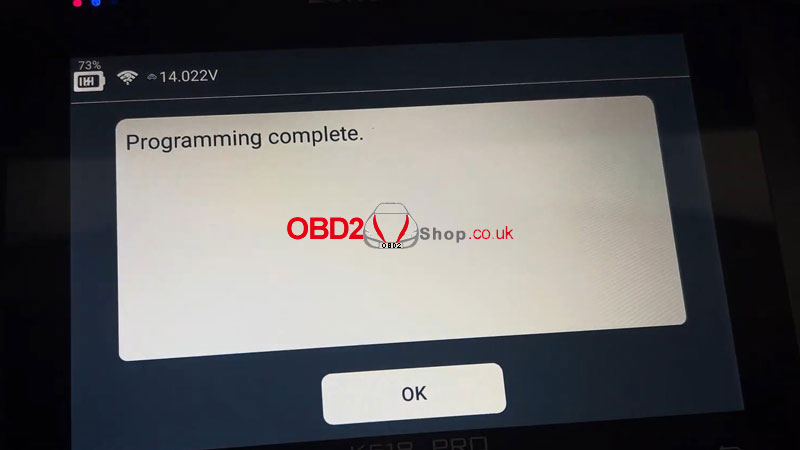
Lonsdor K518 PRO Add 2023 GMC Savana Smart Remote
Today I'm going to program a new remote for 2023 GMC Savana with Lonsdor K518 PRO. Since I've already had the original working key and a new key at hand, let's get started.
Immo & remote >> GMC >> Savana >> Remote >> 2022-2023 >> Program remote
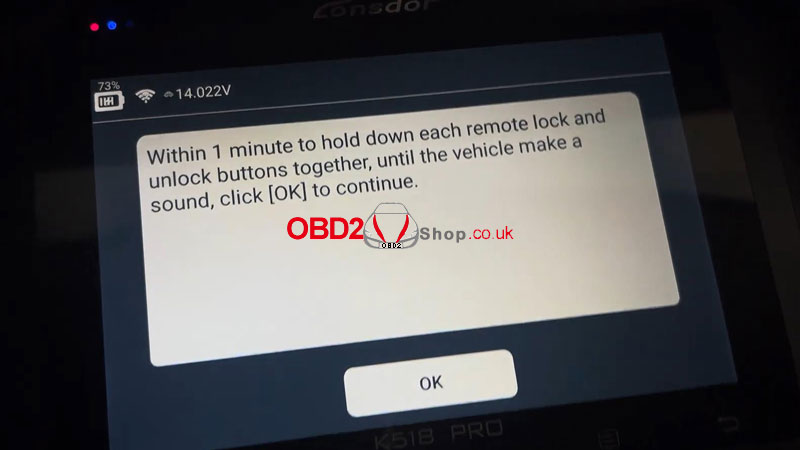
Please switch the ignition ON.
Within 1 minute hold down each remote lock and unlock buttons together, until the vehicle makes a sound, click "OK" to continue.
Programming complete.
Test the keys, both the original one and the new one are working.
Done.

www.obd2shop.co.uk
Oznake: lonsdor k518 pro
utorak, 07.05.2024.
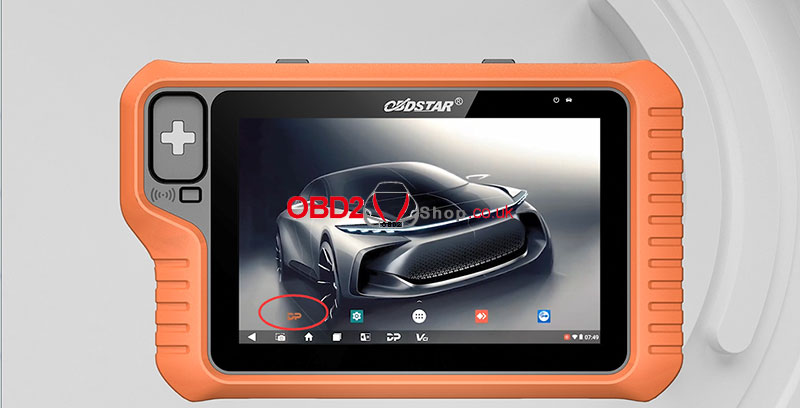
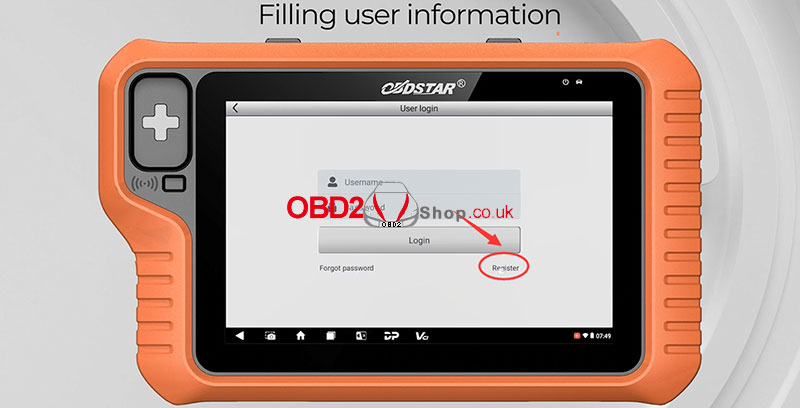
How to register and update OBDSTAR X300 Classic G3
This post will guide you on how to register and update your OBDSTAR X300 Classic G3 Programmer.
Connect the power supply, connect to the network.
Select [DP] in the lower left corner of the tablet, and select [Personal Center] to enter the user login page.
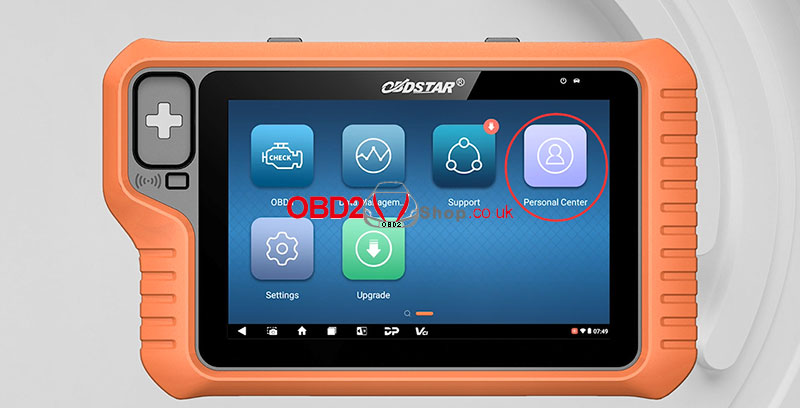
Select [Register] to fill in relevant information.
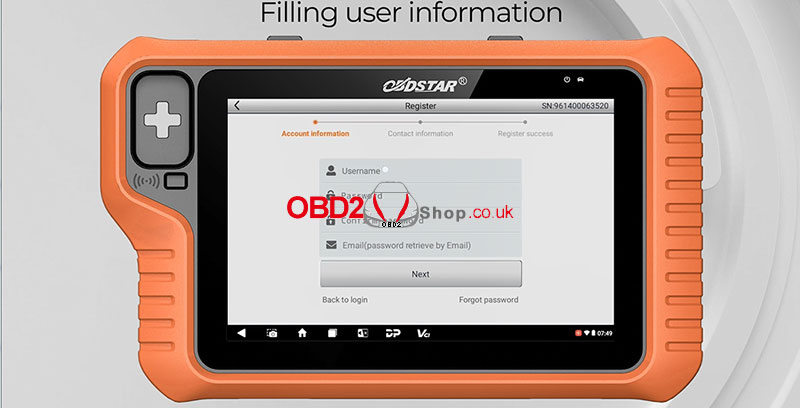
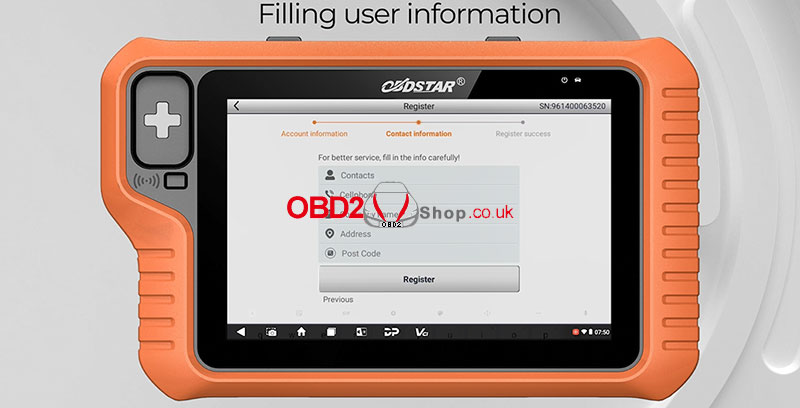
Registration is successful, select [Login now!].
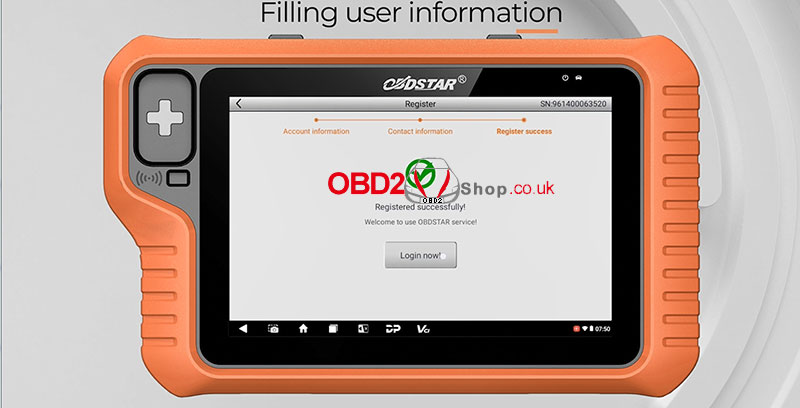
Enter your user name and password to login.
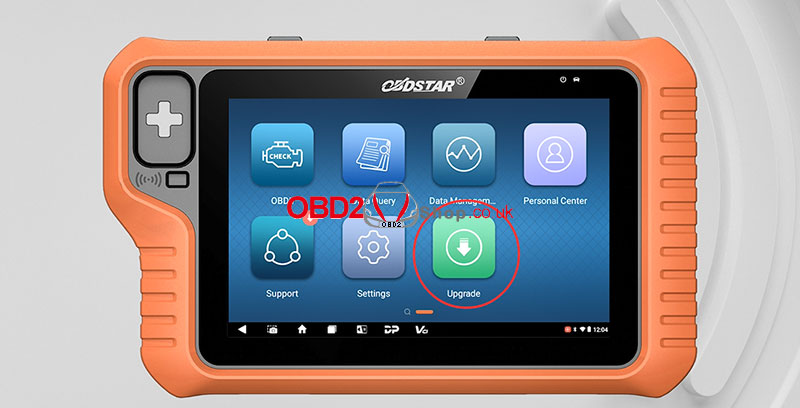
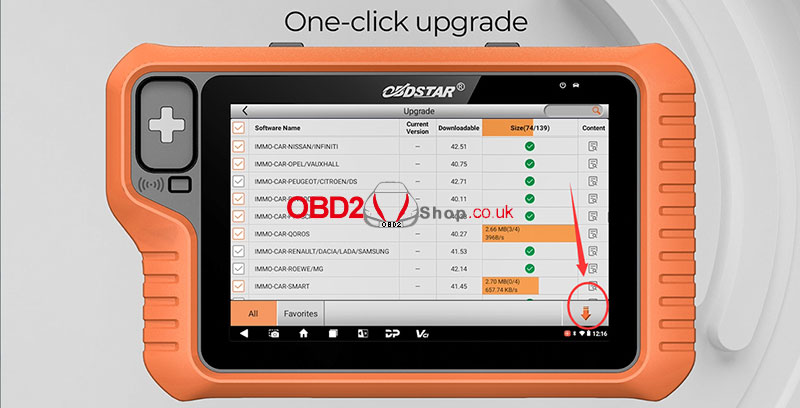
Then return to the previous interface and select [Upgrade] to update the software.
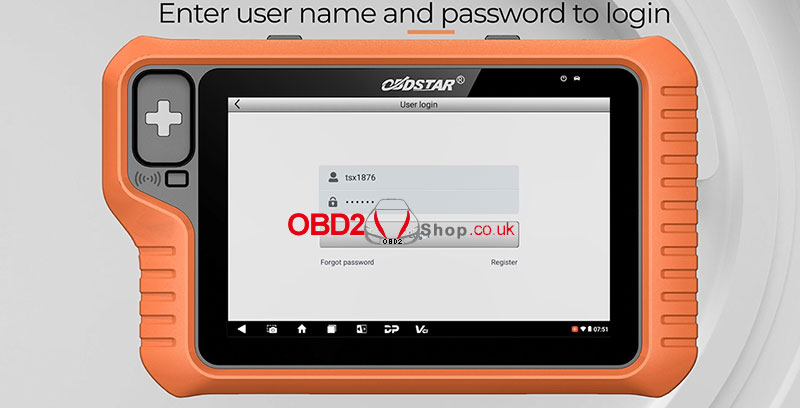
Done!
Video guides:
https://youtu.be/xDLO9t7J2hk
www.obd2shop.co.uk
Oznake: obdstar x300 classic g3
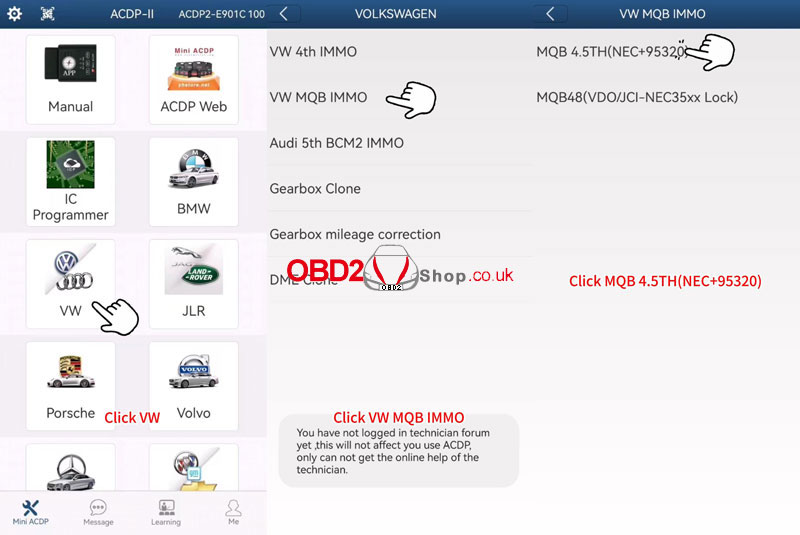
Yanhua Mini ACDP-2 Add VW 4.5th MQB 3526+95320 Smart Key
This is a tutorial on how to use Yanhua Mini ACDP-2 + Module 33 to add a smart key for the Volkswagen 4.5th generation MQB(3526+95320).
Remove the instrument cluster from the car and open the cluster shell to check the chip model.
Power on Mini ACDP-2.
Open the Mini ACDP app.
Confirm the SN is showing in the upper right corner, which means the device is connected to your phone or PC.
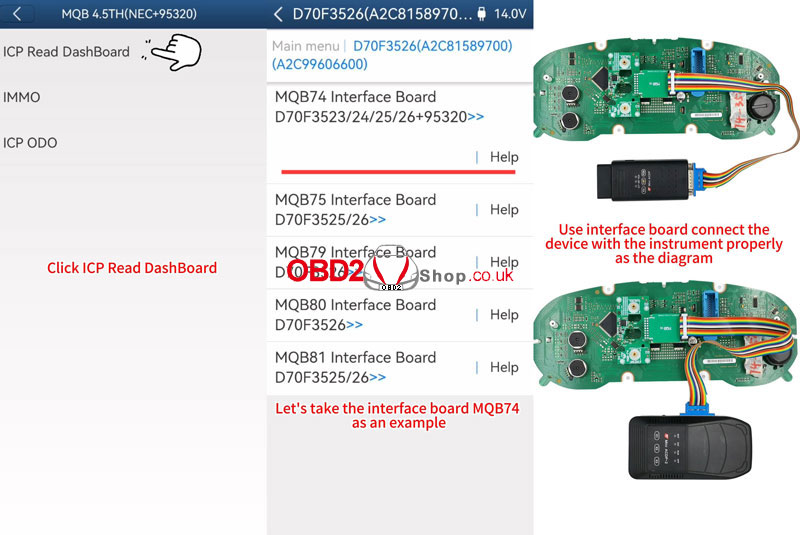
VW >> VW MQB IMMO >> MQB 4.5TH(NEC+95320) >> ICP Read Dashboard >> D70F3526(A2C81589700)(A2C99606600) >> MQB74 interface board D70F3523/ 24/ 25/ 26+95320
*Click "Help" to check the connection diagram.
Please use the ACDP standard power adapter(voltage+12V, current >= 2.5A).
Please connect the main unit and the meter.
Continue >> Continue
Data read successfully.
Please save all backup data of the chip.
OK >> OK
Please save the EEPROM data.
Reinstall the instrument panel into the vehicle and confirm that the vehicle is functioning properly.
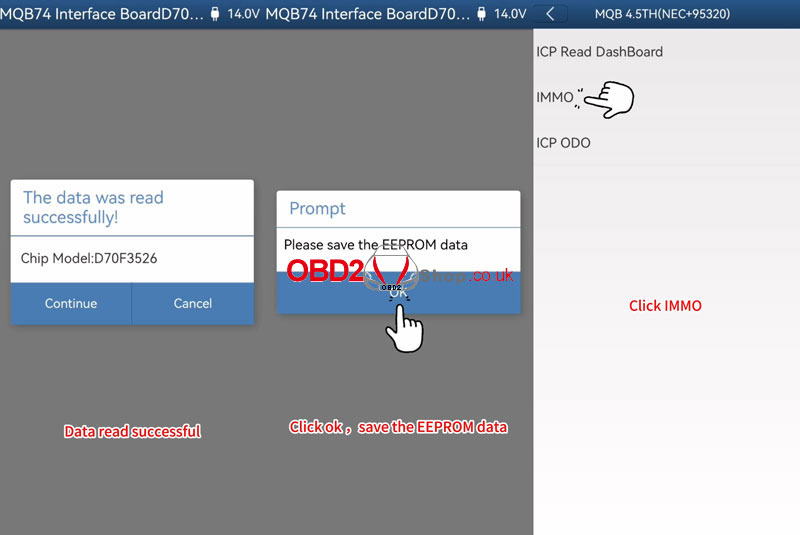
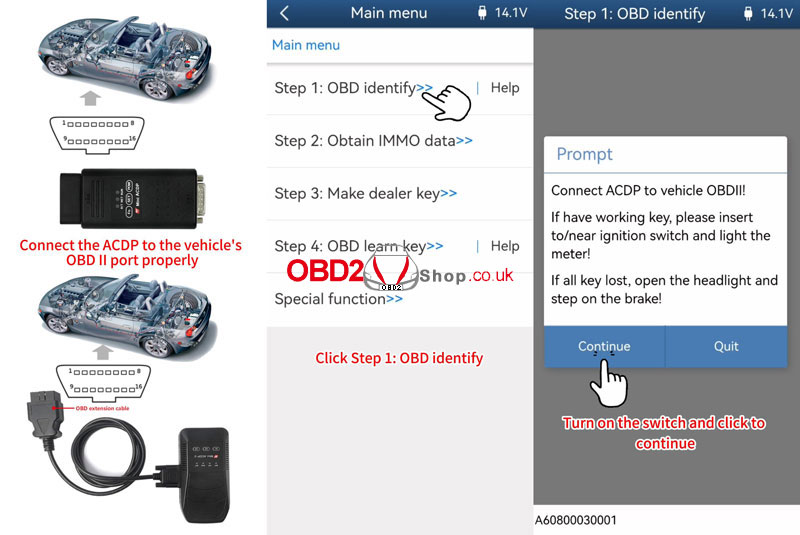
IMMO >> Step1: OBD identify Help
Connect the ACDP to the vehicle's OBDII port properly.
Step1: OBD identify >> OK
Connect ACDP to vehicle OBDII!
If have a working key, please insert it to/near the ignition switch and light the meter!
If all key lost, open the headlight and step on the brake!
Continue >> OK
OBD identifies info to finish.
Obtain IMMO data >> Load meter data calc IMMO >> OK
Prepare the ICP reading of the meter chip data, if the meter has an external EEPROM 95320/95128 chip, also need to prepare the external EEPROM data!
Please select the NEC chip data for the instrument.
Does the meter need to load external EEPROM 95320/95128 data?
Yes - EEPROM loaded.
Please select external EEPROM 95320/95128 data.
The IMMO data will be calculated soon, please keep the network smooth during the data calculation!
Please save IMMO data.
OK >> OK >> OK
Obtain IMMO data finish.
Make dealer key >> Duplicate the key >> OK
Connect the ACDP to the PCF-KEY adapter.
Place the blank key that has been changed to the original car's lost key ID on the PCF-KEY adapter correctly!
Note: the new key should be a blank key that ID can be changed and the blank key has been changed to the ID of the lost key.
Place the blank key that has been changed to the original car's lost key ID on the PCF-KEY adapter correctly.
Continue >> Continue
Please select IMMO data >> Continue >> VW
Programming key data is about to begin, and forbidden to power off or unplug the device during operation!
Make dealer key finish.
OBD learn key >> OK >> Continue >> Continue
Please select IMMO data.
Enter the number of learning keys: 2
Tips
1. Have all the keys ready, the keys that are not learned will not be able to start the car.
2. Don't turn off the ignition during learning, if the other keys are too close to the induction coil can may cause learning failure.
3. Put the first key close to or insert the induction coil and click "Continue".
Put the 1st key close to or insert the induction coil, and click "Continue".
Put the 2nd key close to or insert the induction coil, click "Continue".
Number of keys learned: 2
Completed learning 2 keys.
The smart key addition is complete.
Please try on the car and verify if the added key functions are normal.
Video guides:
https://youtu.be/_950NnvcFuk
www.obd2shop.co.uk
Oznake: yanhua mini acdp 2
srijeda, 01.05.2024.
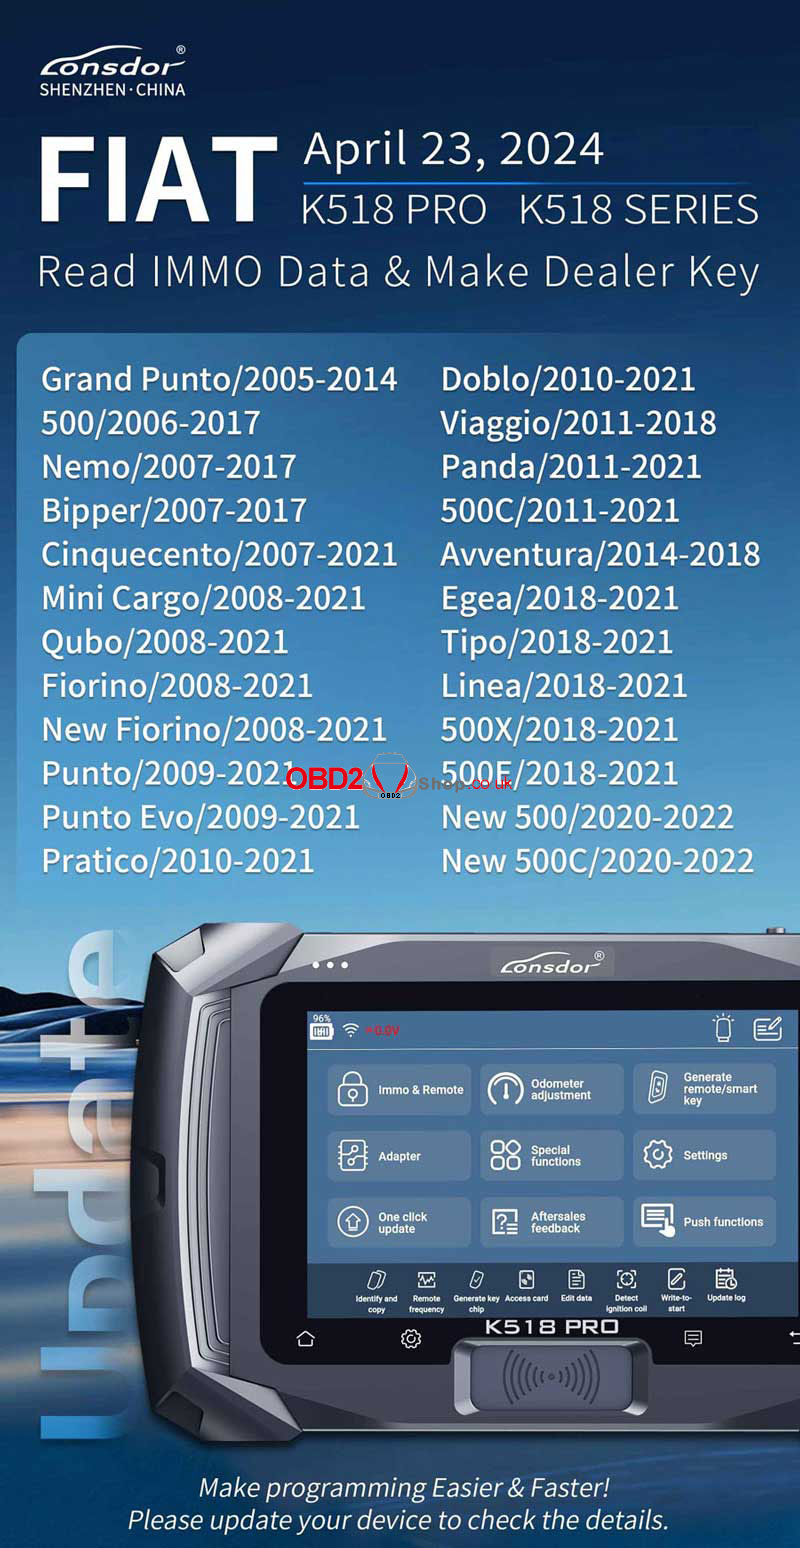
Lonsdor K518 PRO Fiat IMMO Update Car List & Add Key Guide
Lonsdor K518 PRO, and K518 series have upgraded FIAT vehicle coverage for reading immo data & making dealer key on April 23, 2024. Read this article to learn how to update K518 Fiat immo software & program new keys.
Supported FIAT Car List:
Grand Punto (2005-2014)
500 (2006-2017)
Nemo (2007-2017)
Bipper (2007-2017)
Cinquecento (2007-2021)
Mini Cargo (2008-2021)
Qubo (2008-2021)
Fiorino (2008-2021)
New Fiorino (2008-2021)
Punto (2009-2021)
Punto Evo (2009-2021)
Pratico (2010-2021)
Doblo (2010-2021)
Viaggio (2011-2018)
Panda (2011-2021)
500C (2011-2021)
Avventura (2014-2018)
Egea (2018-2021)
Tipo (2018-2021)
Linea (2018-2021)
500X (2018-2021)
500E (2018-2021)
New 500 (2020-2022)
New 500C (2020-2022)
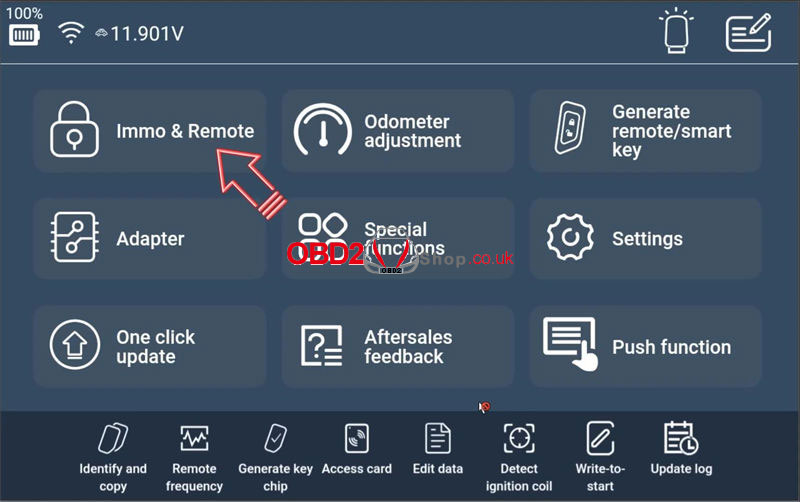
How to program Fiat's new key with K518 PRO?
1. Read Immo Data
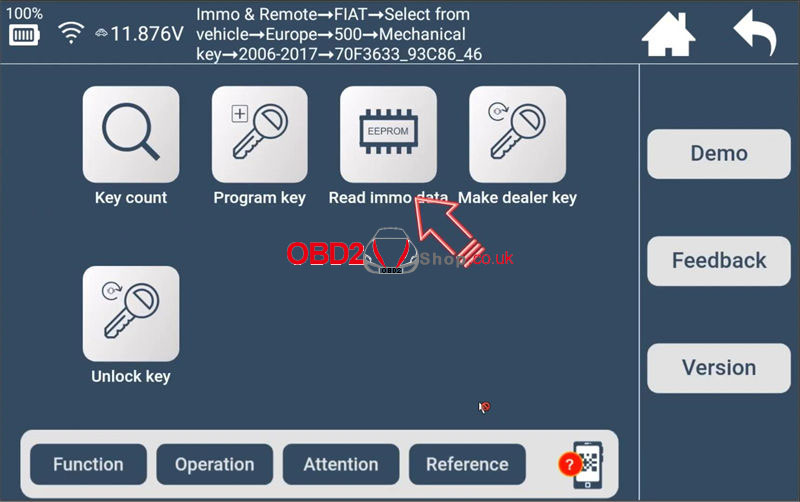
Immo & remote >> FIAT >> Select from vehicle >> Europe >> 500 >> Mechanical key >> 2006-2017 >> 70F3633_93C86_46 >> Read immo data
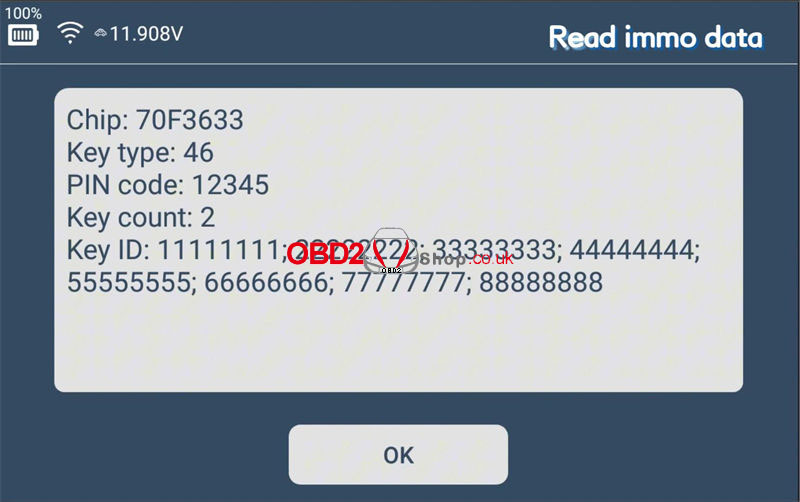
Check the immo data, and press "OK".
Save the immo data file.
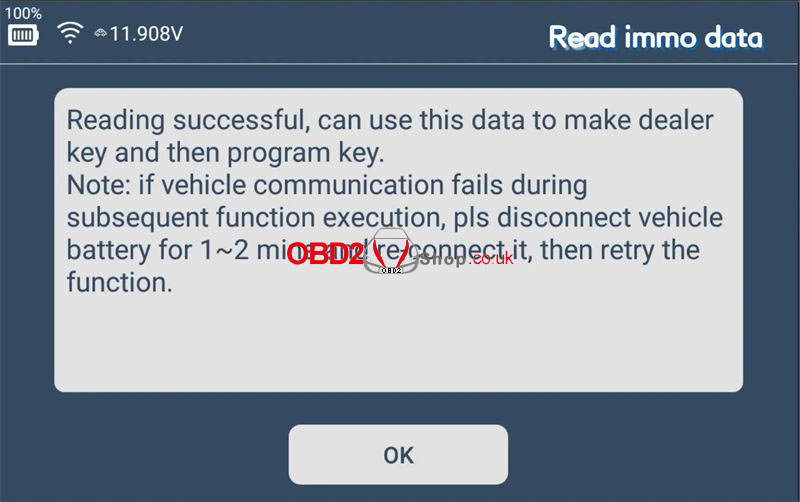
Reading successful. Can use this data to make the dealer key and then the program key.
Note: if vehicle communication fails during subsequent function execution, please disconnect the vehicle battery for 1-2 mins and re-connect it, then retry the function.
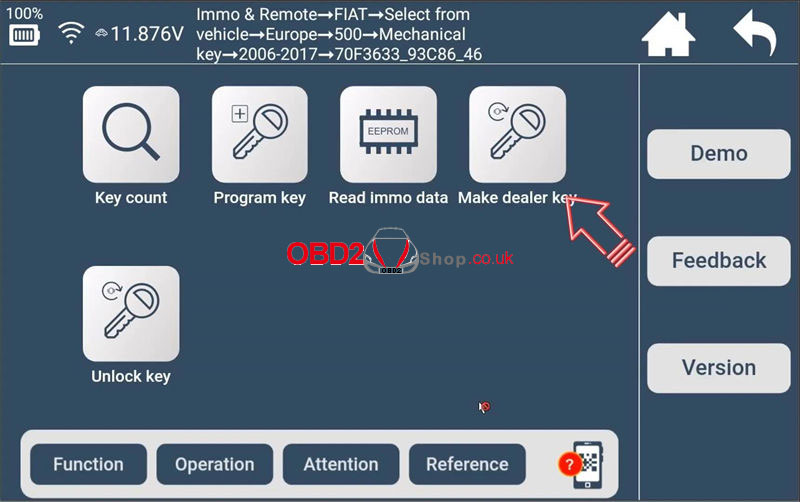
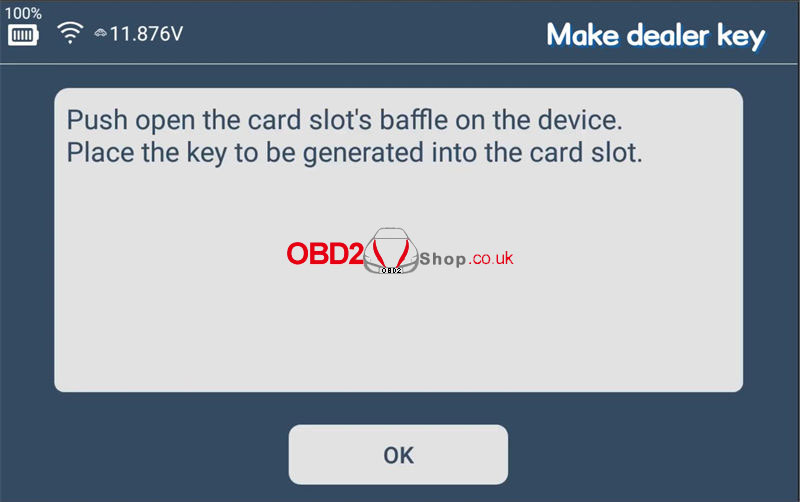
2. Make Dealer Key
Make dealer key >> OK >> Selected immo data file >> OK
Push open the card slot's baffle on the device.
Place the key to be generated into the K518 PRO card slot.
Operating to the key, please wait...
The dealer key was generated and locked successfully.
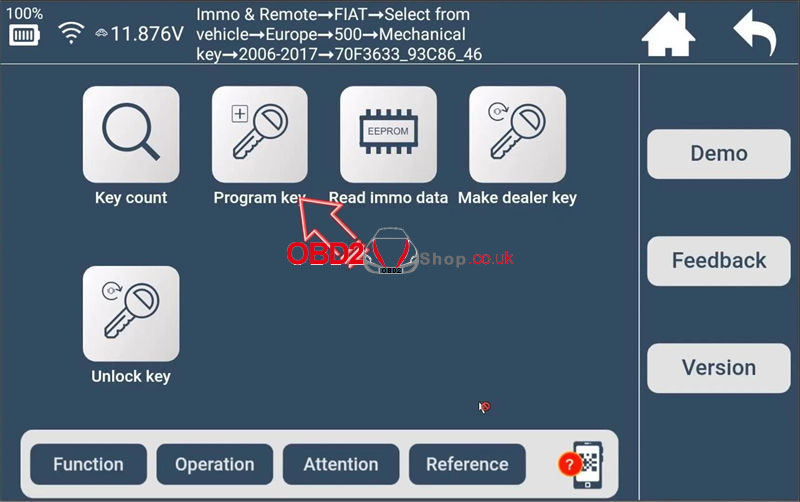
3. Add New Key
Press the "Program key".
This operation will delete all programmed keys, which need to be re-programmed before use, keys to be programmed need to be custom or dealer keys, press "OK" to continue.
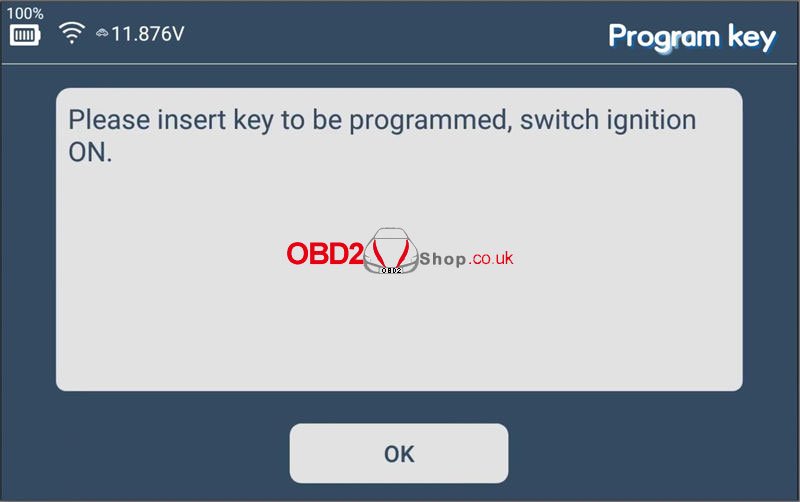
Please insert the key to be programmed, and switch the ignition ON.
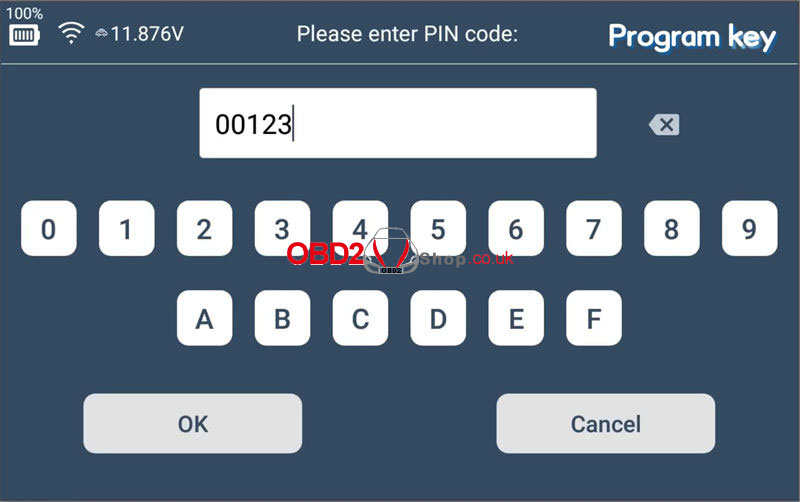
Enter PIN code.
Programming succeed.
Please switch the ignition off.
Turn the ignition on.
Current key count: 2
Programming complete.
www.obd2shop.co.uk
Oznake: lonsdor k518 pro

| < | svibanj, 2024 | > | ||||
| P | U | S | Č | P | S | N |
| 1 | 2 | 3 | 4 | 5 | ||
| 6 | 7 | 8 | 9 | 10 | 11 | 12 |
| 13 | 14 | 15 | 16 | 17 | 18 | 19 |
| 20 | 21 | 22 | 23 | 24 | 25 | 26 |
| 27 | 28 | 29 | 30 | 31 | ||
Svibanj 2026 (1)
Siječanj 2026 (19)
Prosinac 2025 (22)
Studeni 2025 (21)
Listopad 2025 (20)
Rujan 2025 (21)
Kolovoz 2025 (8)
Srpanj 2025 (13)
Lipanj 2025 (9)
Svibanj 2025 (12)
Travanj 2025 (10)
Ožujak 2025 (12)
Veljača 2025 (14)
Siječanj 2025 (8)
Prosinac 2024 (6)
Studeni 2024 (6)
Listopad 2024 (4)
Rujan 2024 (7)
Kolovoz 2024 (14)
Srpanj 2024 (12)
Lipanj 2024 (10)
Svibanj 2024 (13)
Travanj 2024 (12)
Ožujak 2024 (11)
Veljača 2024 (2)
Siječanj 2024 (10)
Prosinac 2023 (8)
Studeni 2023 (6)
Listopad 2023 (7)
Rujan 2023 (9)
Kolovoz 2023 (6)
Srpanj 2023 (10)
Lipanj 2023 (4)
Veljača 2023 (8)
Siječanj 2023 (14)
Prosinac 2022 (13)
Studeni 2022 (14)
Listopad 2022 (18)
Rujan 2022 (9)
Kolovoz 2022 (16)
Srpanj 2022 (11)
Lipanj 2022 (14)
Svibanj 2022 (13)
Travanj 2022 (12)
Ožujak 2022 (12)
Veljača 2022 (13)
Siječanj 2022 (10)
Srpanj 2021 (1)
Dnevnik.hr
Gol.hr
Zadovoljna.hr
Novaplus.hr
NovaTV.hr
DomaTV.hr
Mojamini.tv