OBD2 tools on OBD2shop.co.uk https://blog.dnevnik.hr/obd2shop
utorak, 30.12.2025.
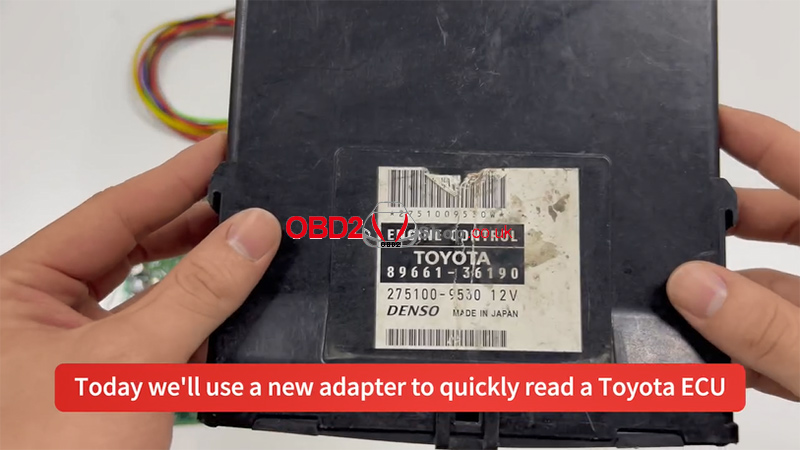
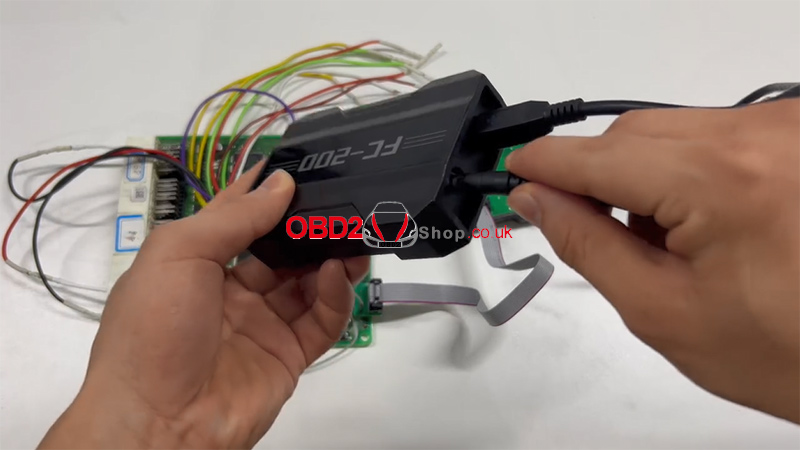
Using CGDI FC200 and FC200 DAP Adapter to Read a Toyota ECU
This guide demonstrates the process of reading a Toyota ECU using the CGDI FC200 tool and the FC200 DAP adapter.
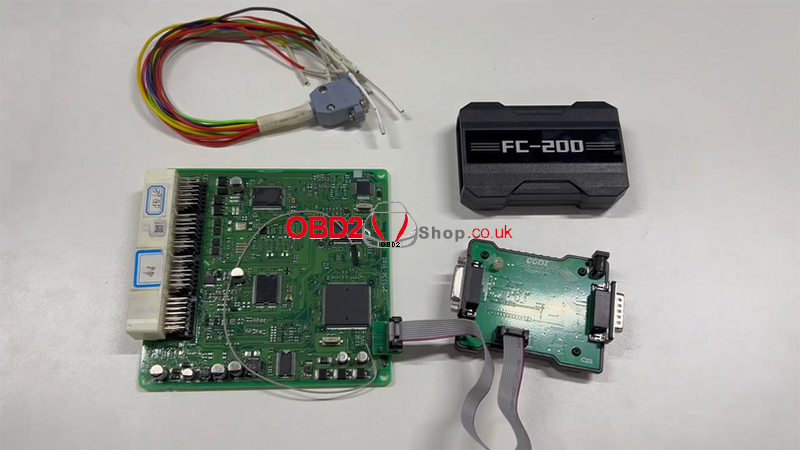
Connection Steps:
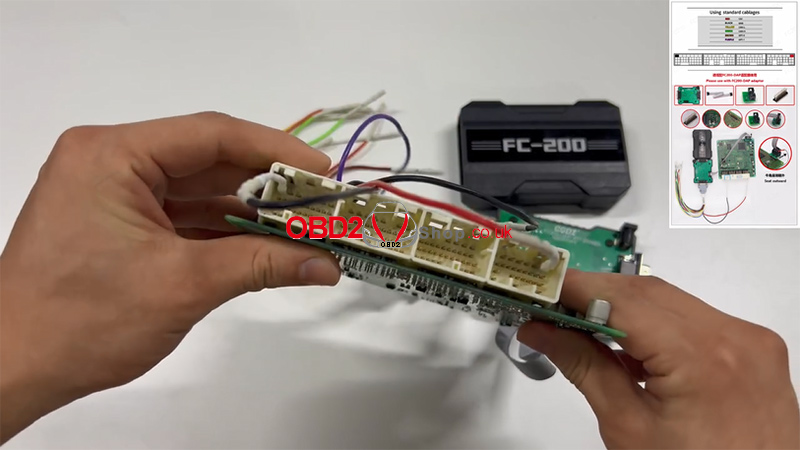
1. Connect the adapters in the correct sequence.
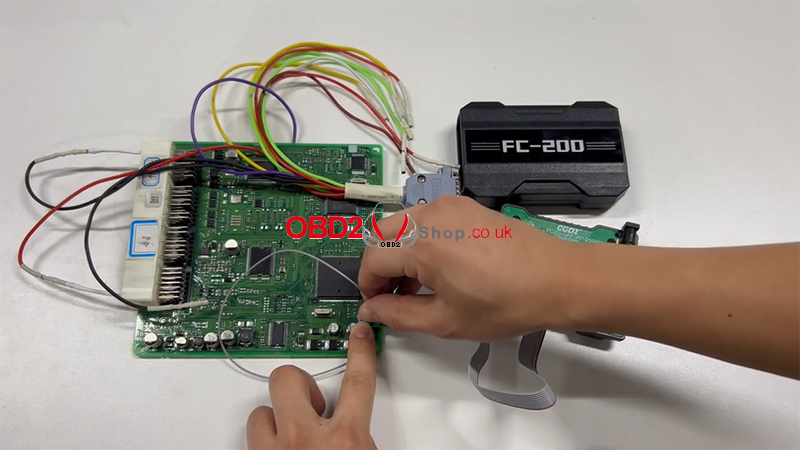
2. Refer to the wiring diagram and connect all pins accordingly.
3. Connect the device to a USB port and power supply.
4. Connect the host cable to the adapter, with the other end attached to your computer.
5. All connections are now complete.

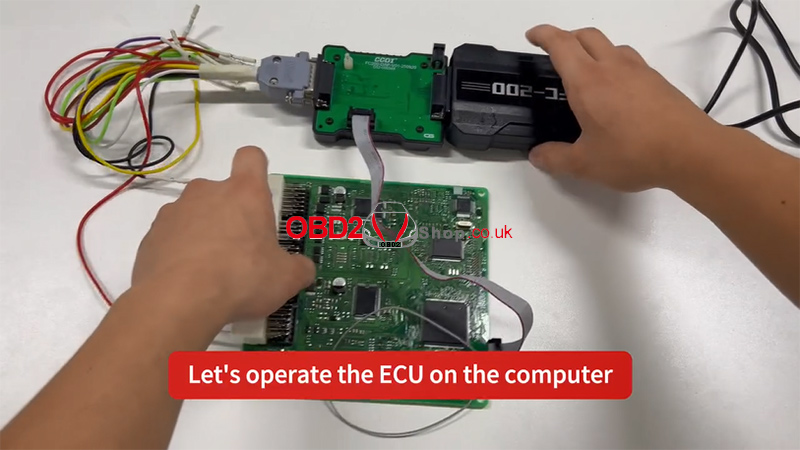
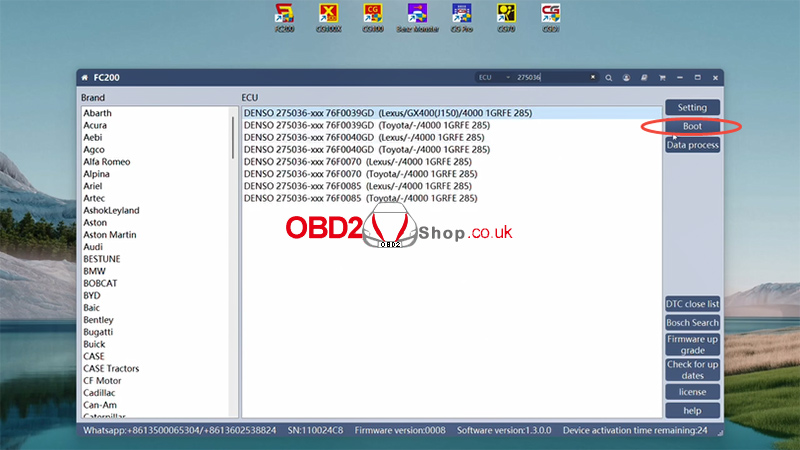
Software Operation:
1. On your computer, open the FC200 software and enter the specific ECU model.
2. Click "Connect." Once the connection is successfully established, proceed to read the Pflash memory.
3. After saving the data, the task is complete.


For a visual walkthrough, please refer to the video guide:
https://youtu.be/9iwlB8_-KBI
Tools available at: www.obd2shop.co.uk
Oznake: cgdi fc200
ponedjeljak, 29.12.2025.
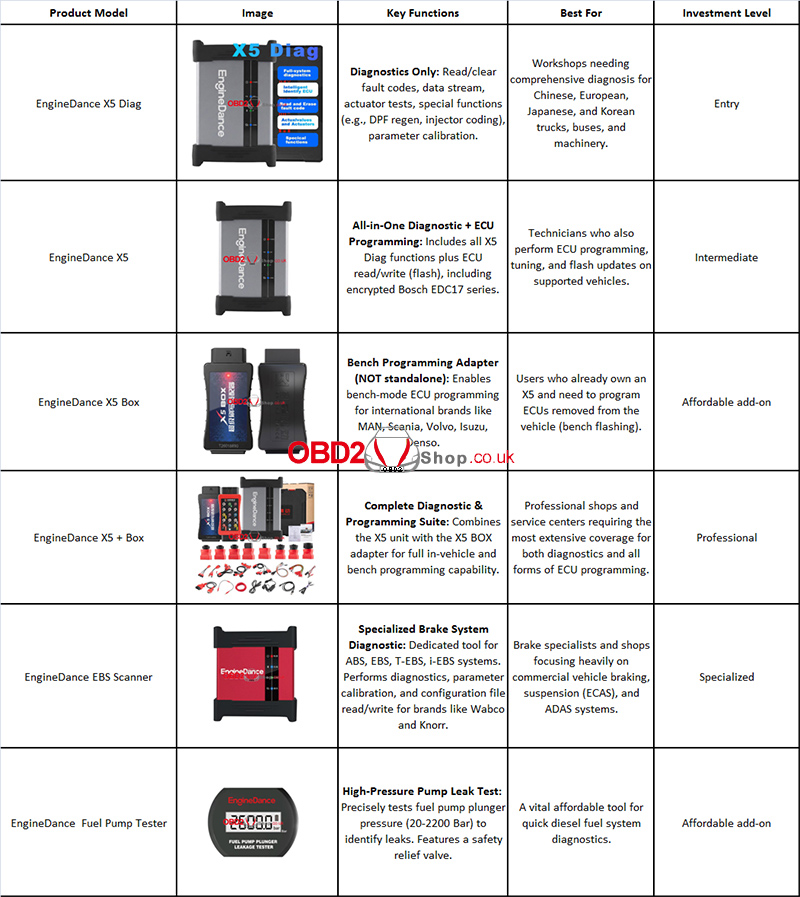
EngineDance X5 Diag, X5, X5 Box& EBS Scanner Comparison
Selecting the right diagnostic tool for commercial vehicles can be a challenging task. EngineDance offers a range of powerful devices tailored to different workshop needs. Here's a clear and concise comparison of our latest products to help you make an informed decision.
Note: All diagnostic tools cover a wide range of commercial vehicles: light/heavy trucks, buses, agricultural & construction machinery with diesel or natural gas engines.
Detailed Breakdown & Recommendations
1. EngineDance X5 Diag – The Diagnostic Specialist
Best for: General repair shops needing powerful, affordable diagnostics. Covers 99.9% Chinese brands + major international vehicles. Perfect for fault reading, DPF regen, injector coding, and parameter calibration.
2. EngineDance X5 – The All-Rounder Programmer
Best for: Full-service workshops requiring both diagnostics and ECU programming. Adds critical encrypted ECU read/write (e.g., Bosch EDC17) for repairs, tuning, and flashing.
3. EngineDance X5 BOX – The International Programming Key
Best for: X5 owners who service imported trucks. Enables bench programming for brands like MAN, Scania, and Volvo. An essential adapter for off-vehicle ECU work.
4. EngineDance X5 with BOX – The Ultimate Professional Suite
Best for: Large workshops and specialists demanding maximum coverage. Combines in-vehicle diagnostics/programming with bench flashing for international ECUs.
5. EngineDance EBS Scanner – The Brake System Expert
Best for: Brake-focused shops. Dedicated tool for deep ABS/EBS diagnostics, calibration, and file programming for Wabco, Knorr, and trailer systems.
6. Bonus Tool: Fuel Pump Plunger Tester
Best for: Every diesel technician. Affordable, precise leak testing for high-pressure fuel pumps. Built-in relief valve ensures durability.
Conclusion
lFor General Diagnostics: X5 Diag offers incredible value and breadth.
lFor Diagnostics + ECU Programming: The standard X5 is your best bet.
lFor Maximum Coverage: The X5 with both X bundles is the ultimate investment.
lFor Brake Specialists: The dedicated EBS Scanner is unparalleled.
EngineDance tools are built with aviation-grade alloy and offer a 2-year warranty, ensuring they withstand tough workshop environments. Choose the tool that matches your specific workflow to boost efficiency and service capability.
Ready to become a diesel expert? Explore the EngineDance range today.
www.obd2shop.co.uk
Oznake: EngineDance x5
petak, 26.12.2025.
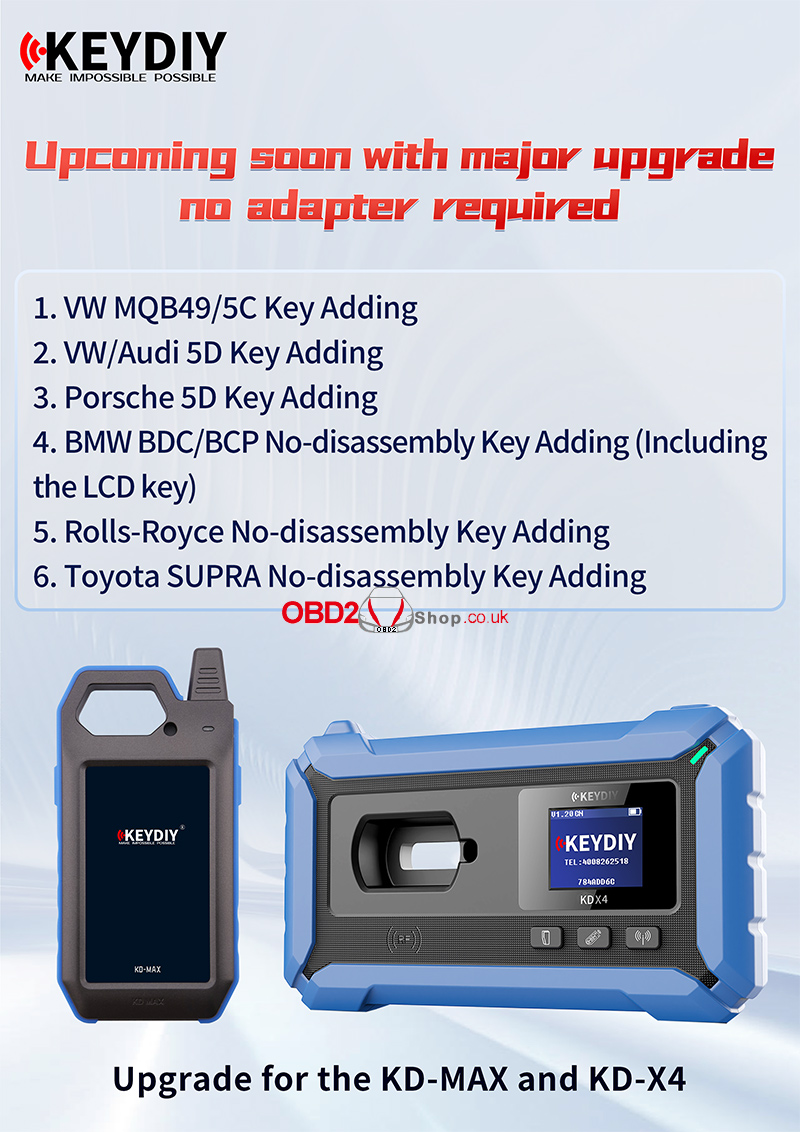
KEYDIY Announces Major Upgrade for KD-MAX and KD-X4
KEYDIY continues to push the boundaries of automotive key programming with an upcoming major upgrade for the KD-MAX and KD-X4 devices. This upgrade delivers broader vehicle coverage, advanced no-disassembly solutions, and—most importantly—no adapter required, making key adding faster, simpler, and more efficient for locksmiths worldwide.
What’s New in the Upcoming Upgrade?
With this release, KEYDIY significantly expands key adding capabilities across multiple high-end and popular vehicle platforms:
Expanded Key Adding Coverage
1. VW MQB49/ 5C Key Adding
Seamless support for Volkswagen MQB49 and 5C systems, improving efficiency on modern VW models.
2. VW/ Audi 5D Key Adding
Enhanced compatibility for Volkswagen and Audi vehicles using 5D systems.
3. Porsche 5D Key Adding
Professional-level support for Porsche 5D keys, helping technicians handle premium vehicles with confidence.
No-Disassembly Key Adding Solutions
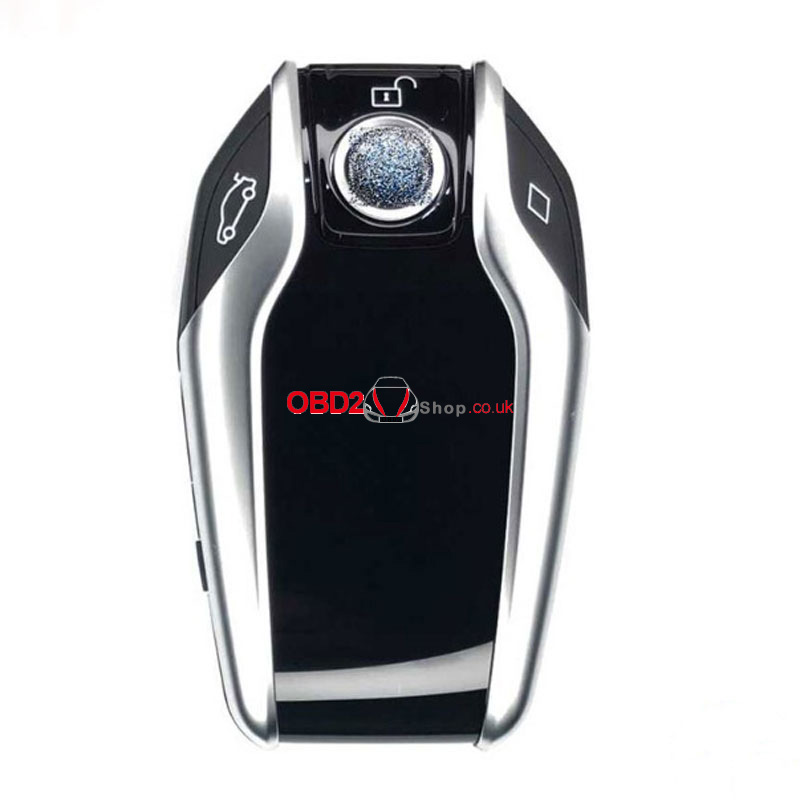
4. BMW BDC / BCP No-Disassembly Key Adding
Supports BMW BDC and BCP systems without disassembling modules, including LCD smart keys, saving time and reducing risk.
5. Rolls-Royce No-Disassembly Key Adding
High-end coverage for Rolls-Royce vehicles, designed for precision, safety, and efficiency.
6. Toyota SUPRA No-Disassembly Key Adding
Fast and reliable key adding for Toyota Supra models—again, no disassembly required.
Why This Upgrade Matters
1. No Adapter Required – Fewer accessories, cleaner workflow
2. Time-Saving – Faster key adding with simplified procedures
3. Lower Risk – No disassembly means reduced chance of module damage
4. Professional Coverage – From mainstream brands to luxury vehicles
Built for Professionals
Both KD-MAX and KD-X4 are designed with durability, performance, and real-world locksmith needs in mind. This upcoming upgrade further strengthens their position as essential tools for modern automotive key programming.
Coming Soon
Stay tuned for the official release. With this major upgrade, KEYDIY once again proves its mission: Make Impossible Possible.
www.obd2shop.co.uk
Oznake: keydiy update
četvrtak, 25.12.2025.
Yanhua ACDP BMW G Series Display Key Clone Now Supported
We are pleased to announce an upgrade to the Yanhua Mini ACDP system: it now supports cloning for BMW G Series smart display keys. This enhancement expands your diagnostic and key programming capabilities, allowing you to serve a wider range of BMW vehicles.
Key Features of the Update:
1. New Compatibility:
Clone BMW G Series smart display keys (in addition to existing functions).
2. Required Components:
YANHUA Mini ACDP 2
Module 38 license activation.
BMW BDC3/BCP Interface Board
3. How It Works:
The cloning process is performed through the BMW BDC3 menu. A dedicated display key copy option will be introduced in upcoming software releases for even more streamlined operation.
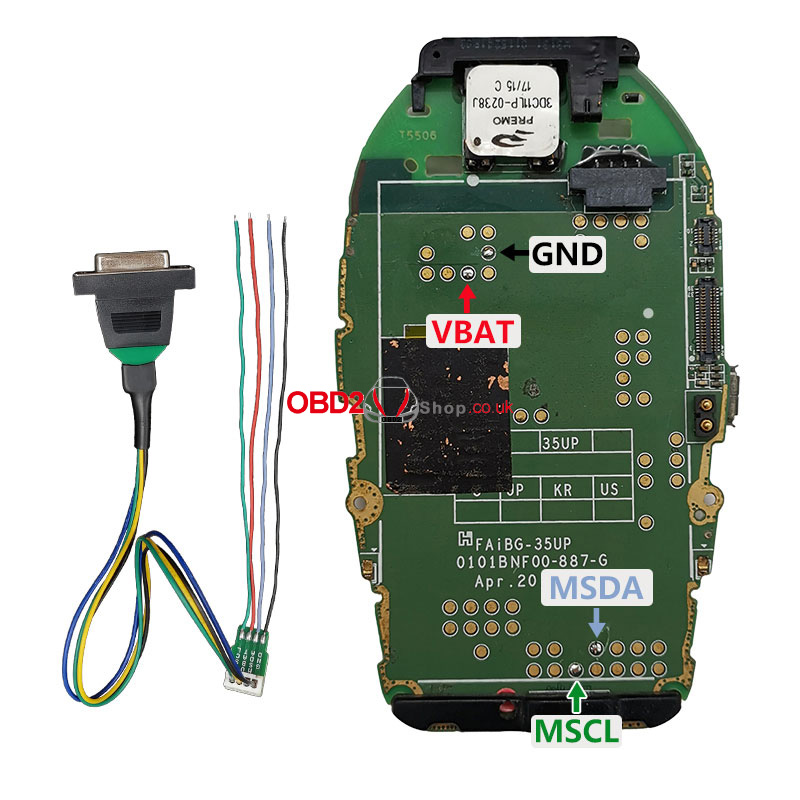
Wiring Support:
Refer to the included display key wiring diagrams for the correct setup and reliable performance.


This update reinforces Yanhua ACDP's commitment to providing advanced, user-friendly solutions for automotive locksmiths and technicians. Stay ahead in the industry with tools that keep pace with the evolving technology of vehicles.
For more information, updates, and support, visit our website.
www.obd2shop.co.uk
Oznake: yanhua acdp bmw
utorak, 23.12.2025.
How to Use CGDI K2: Easy Setup & Key Programming Guide
The CGDI K2 is a versatile remote key programmer that generates, copies, and reprograms car keys and remotes. Follow this simple guide to get started.
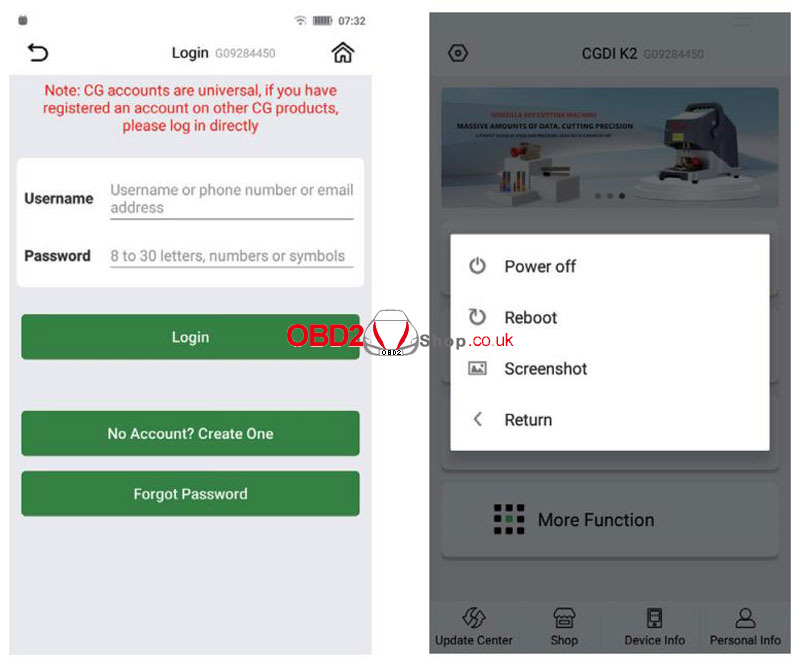
1. First-Time Setup
(1) Press and hold the power button to turn on.
(2) Connect to Wi-Fi to activate the device and update software/firmware.
(3) Log in to your CGDI account, or create one if you don't have one.
2. Basic Controls
(1) Short-press the power button: turns the screen on/off.
(2) Hold the power button for 5 seconds: forces a shutdown.
(3) Device auto-shuts down when battery is below 5%.
(4) Charge using a 4.5V–5.5V/1A charger and Type-C cable.
Main Functions
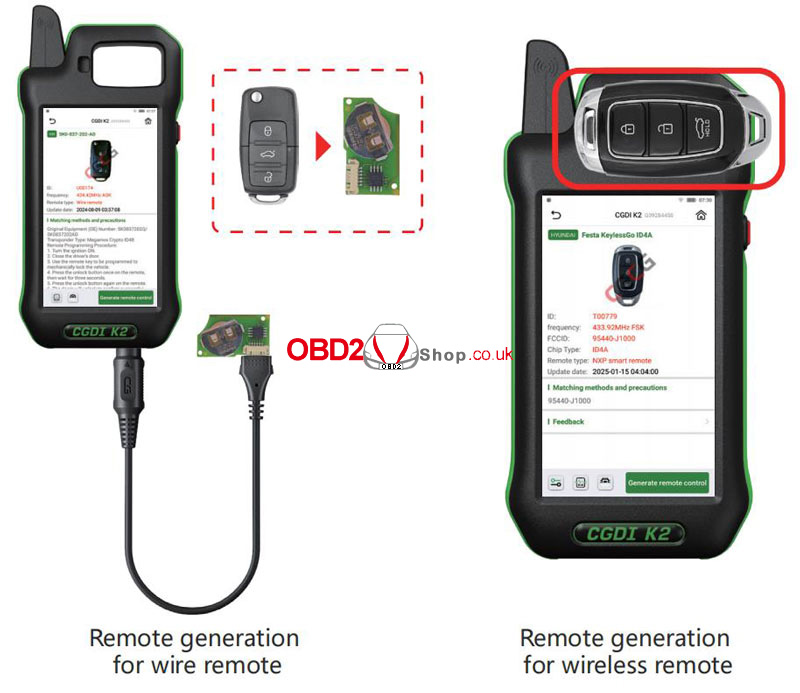
1. Generate Wireless Remote
` Go to Remote Generation from the home screen.
a Select your car model.
b Connect the remote to the device using the programming cable.
c Choose Wired Generation and confirm.
2. Generate Smart Remote
` Select the car model.
a Place the CG Smart Key on the device coil.
b Click Generate Remote and wait for completion.
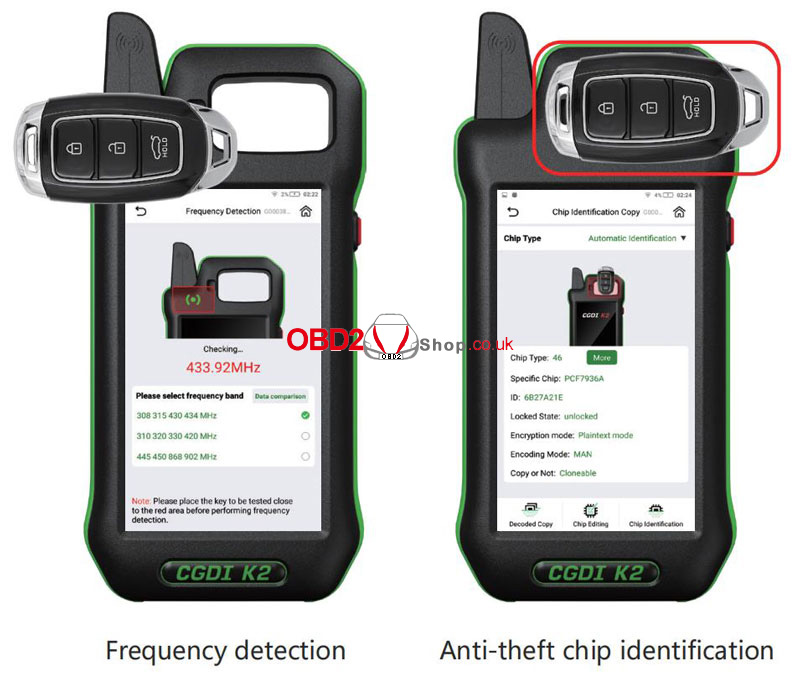
3. Frequency Detection
` Enter Frequency Detection from the main menu.
a Choose a frequency band and place the remote near the detection area.
b Press any button on the remote.
4. Chip Identification
` Select Chip Identification Copy.
a Choose Auto or Manual chip detection.
b Place the key on the coil and view chip details.
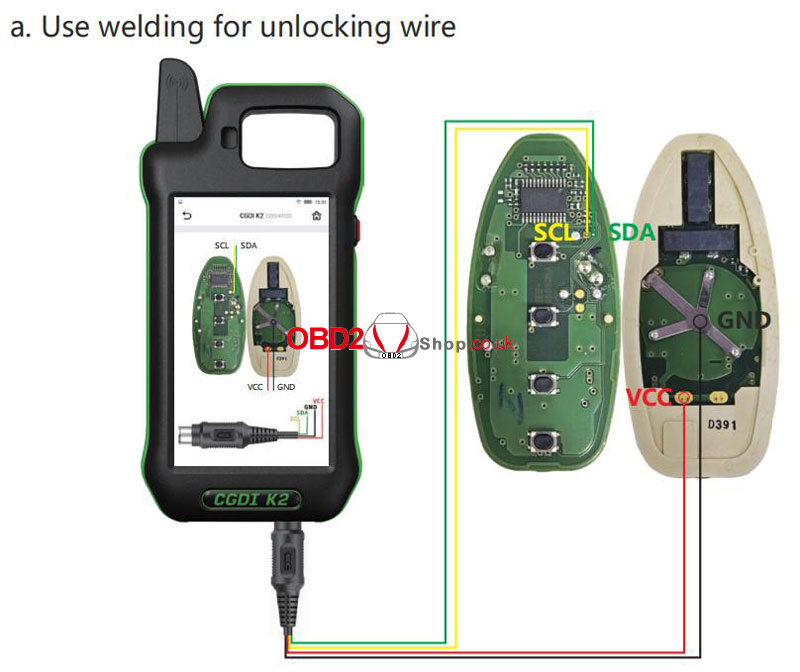
5. Remote Renew
` Access via More Functions ’ Remote Renew.
a Choose solder or solderless wiring.
b Connect the key with the Unlock Solder-free Cable correctly, confirm the model, and click Renew.

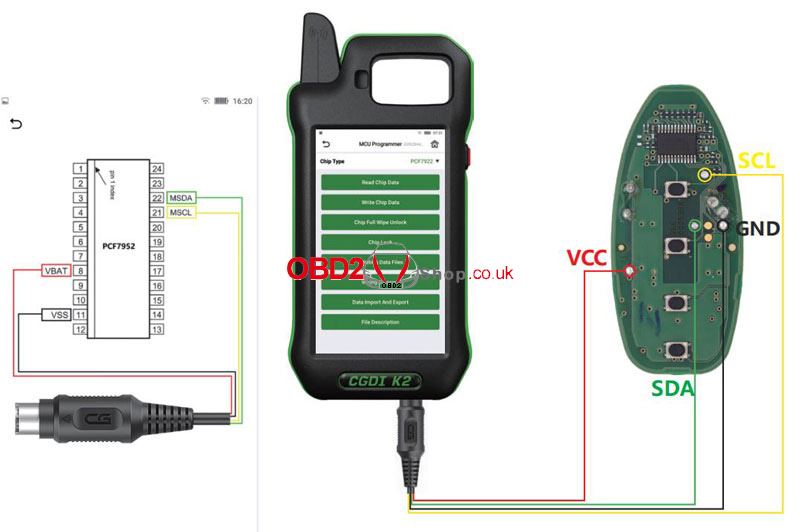
6. MCU Programmer
` Go to More Functions ’ MCU Programmer.
a Select the model and connect according to the wiring diagram.
b Read, write, or program the MCU as needed.
This CGDI K2 Remote Key Programmer guide is optimized for clarity and ease of use. Perfect for locksmiths, auto technicians, and car owners looking for a straightforward key programming solution.
www.obd2shop.co.uk
Oznake: cgdi k2
petak, 19.12.2025.
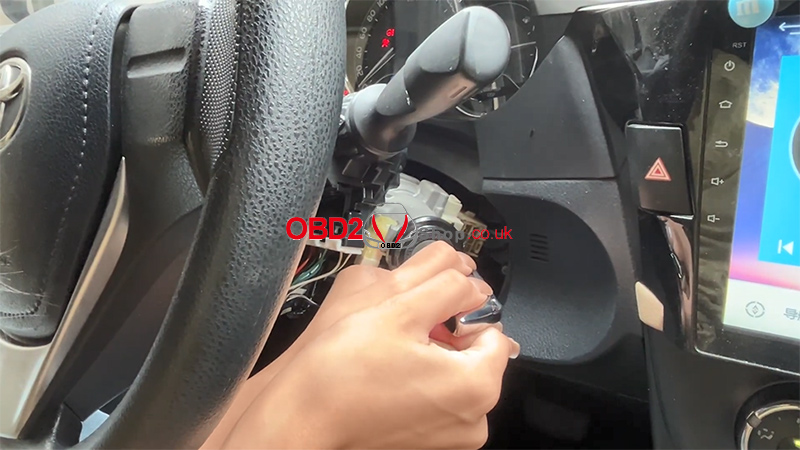
2016 Toyota Levin IMMO (8A) Smart Key Programming Guide
This article explains how to program a smart key for a 2016 Toyota Levin (IMMO 8A) using the Lonsdor K518 PRO and TY8A-MK1 Kit, including a scenario where all keys are lost (AKL). Follow the steps carefully to complete both key generation and remote programming.
Tools Required:
Lonsdor K518 PRO
OBD communication cable
TY8A-MK1 Kit
New smart key
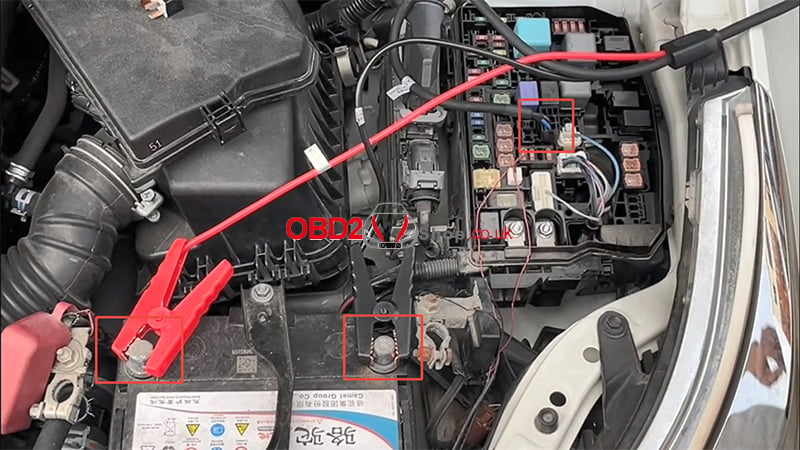
Step 1: Vehicle Preparation and Wiring
1. Open the fuse box, unplug the relay, and connect the 8A all-keys-lost harness.
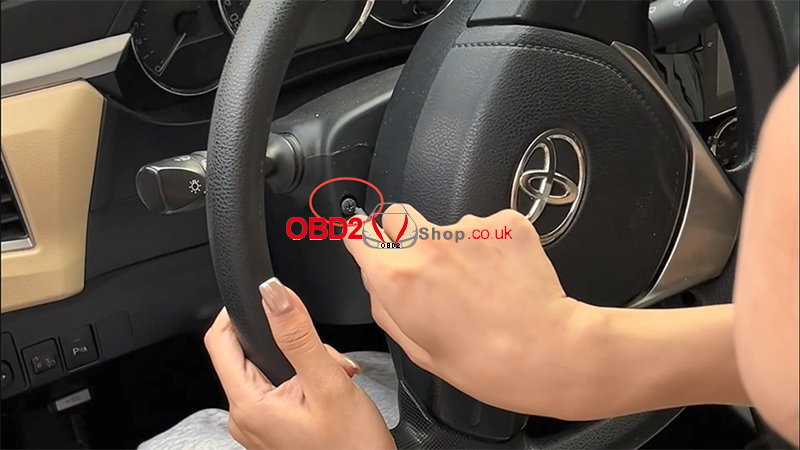
2. Remove the steering wheel screws and open the steering column cover.
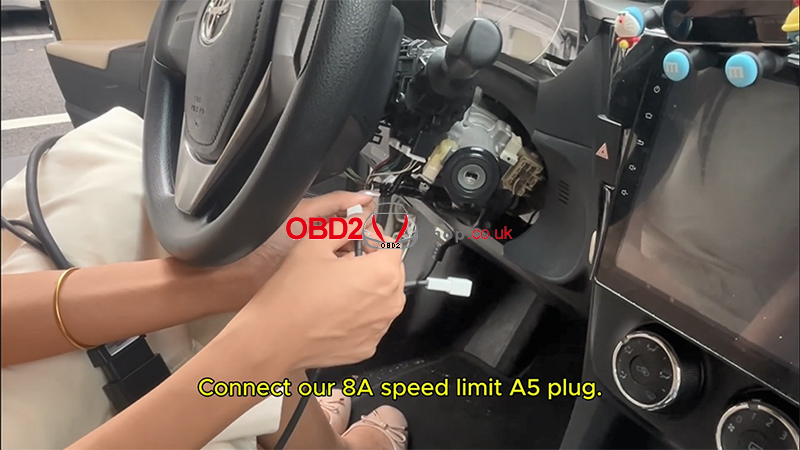
3. Unplug the lock connector, then connect the 8A speed limit A5 plug.
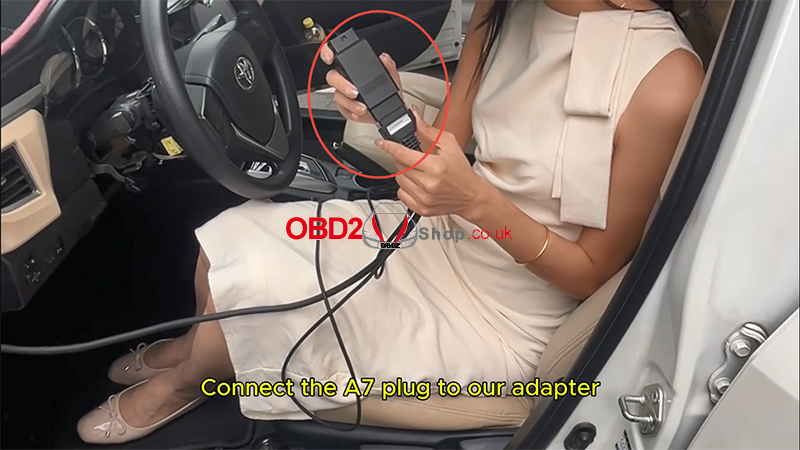
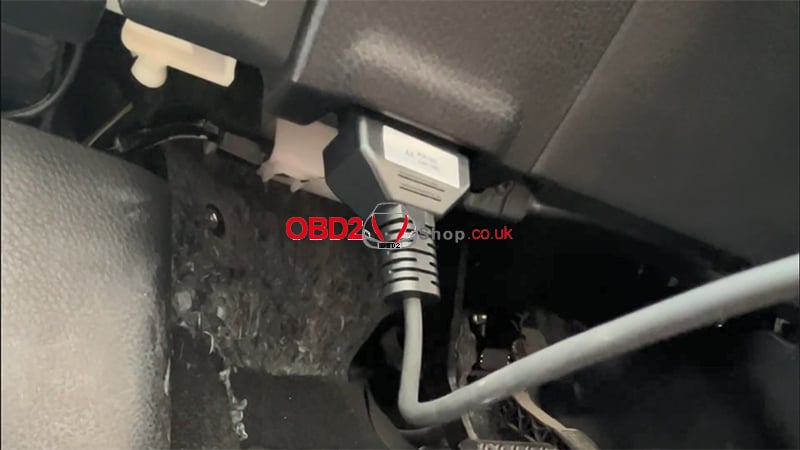
4. Connect the A7 plug to the adapter.
5. Plug the A4 plug into the vehicle’s OBD port.
6. Connect the OBD cable to the K518 PRO device.
Step 2: Read IMMO Data and Generate Master Key
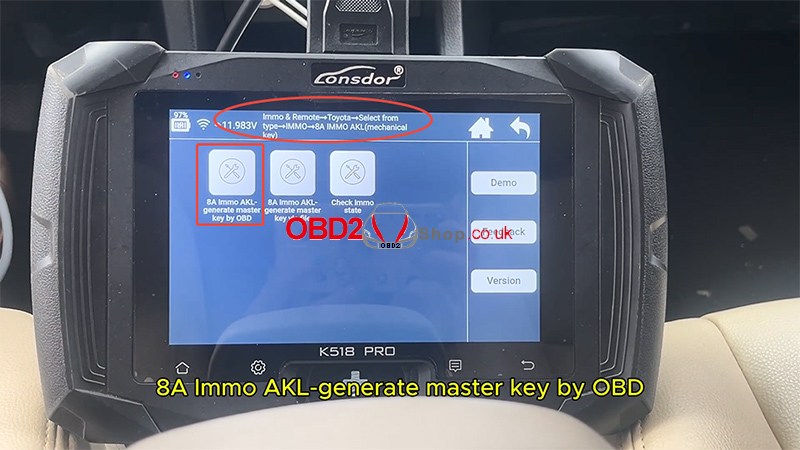
On the K518 PRO, follow this menu path:
[Immo & Remote] ’ [Toyota] ’ [Select by type] ’ [IMMO] ’ [8A IMMO AKL (Mechanical Key)] ’ [8A Immo AKL – Generate Master Key by OBD]
1. After the connection is completed, select [OK] to continue.
2. Adapter board detection will complete automatically.
*No adapter board software upgrade is required.
3. During the process, the anti-theft indicator light may turn on — this is normal.
4. Wait for the communication process to finish.
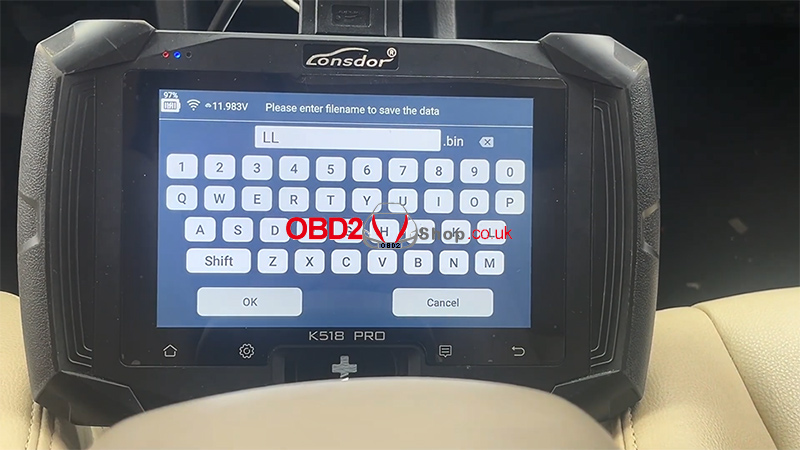
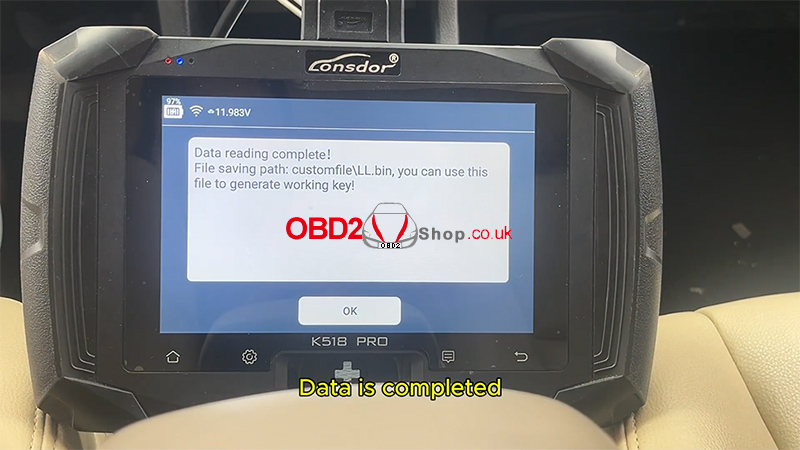
5. Enter a filename to save the IMMO data.
6. Data reading will complete successfully.

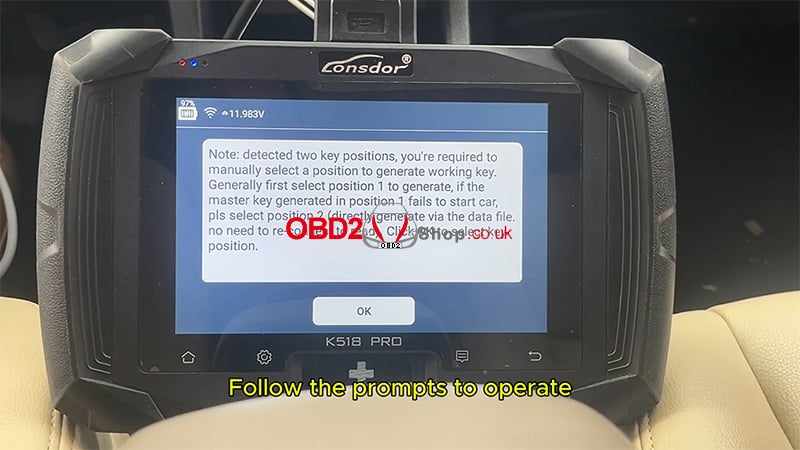
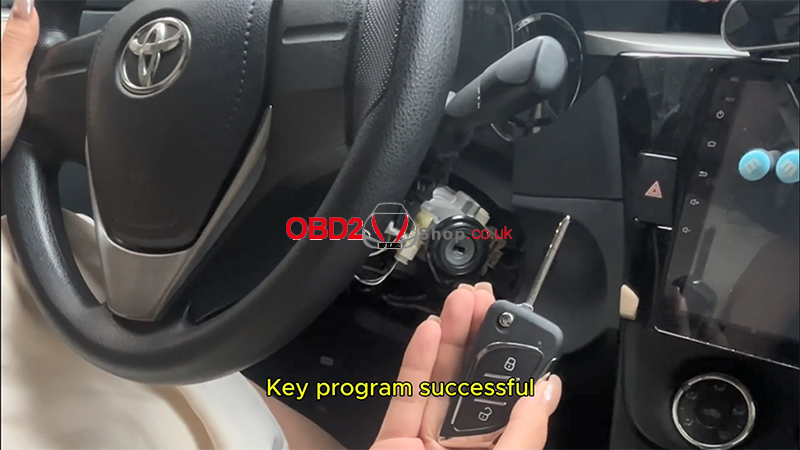
Step 3: Generate the Working Key
1. Use the saved IMMO data file to generate a working key.
2. Follow the on-screen prompts.
3. For the first key:
* Place the new key into the card slot of the device.
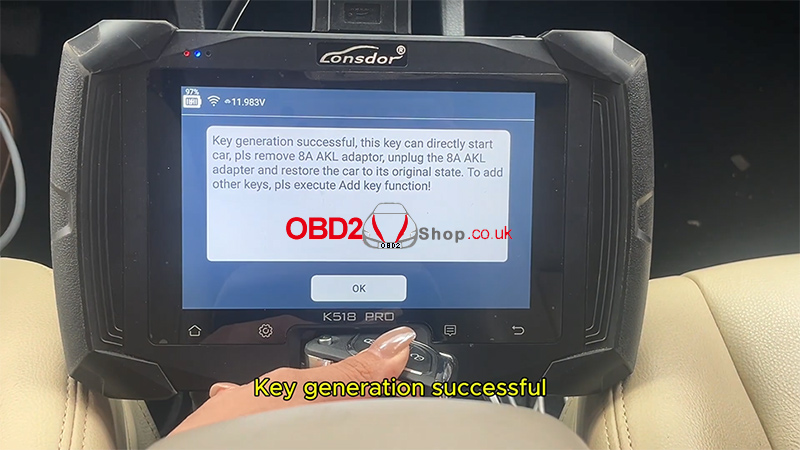
4. Once the process finishes, the screen will confirm key generation successfully.
5. Restore the original vehicle wiring harness.
Chip programming is now complete.
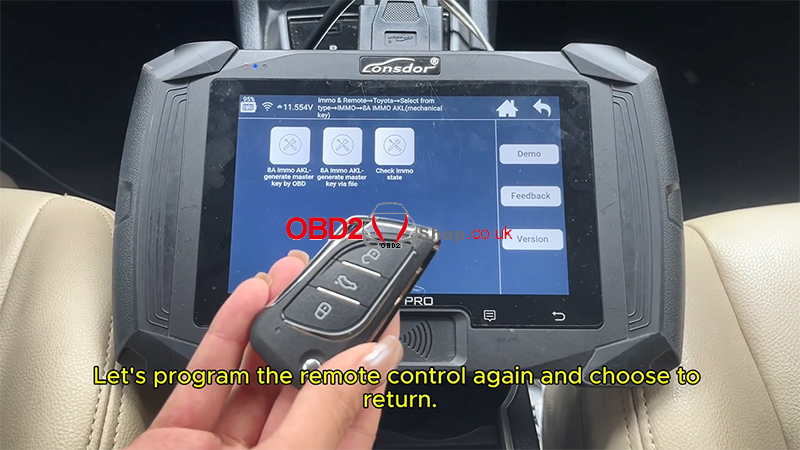
Step 4: Remote Control Programming
1. Select: [Remote] ’ [Type 2 (CAN)] ’ [Programming Remote]
2. Turn ON the ignition.
3. Open the driver’s door.
4. Press and hold the Lock and Unlock buttons together for 2 seconds, then press the Lock button again.
5. Click OK on the device once finished.
The screen will display Remote Programming Successful.
Step 5: Functional Test
1. Press the brake pedal.
2. Insert the key and start the vehicle.
* The vehicle should start normally.
3. Test the remote functions:
* Lock the car
* Unlock the car
Both key start and remote control functions should operate normally.


Video Guide
Watch the full video tutorial here:
https://youtu.be/sSJLqvgkAyg
For more information, visit www.obd2shop.co.uk
Summary
Using the Lonsdor K518 PRO with the TY8A-MK1 Kit, you can successfully perform all-keys-lost smart key programming for a 2016 Toyota Levin IMMO (8A) via OBD, including master key generation and remote control programming.
Oznake: lonsdor k518 pro
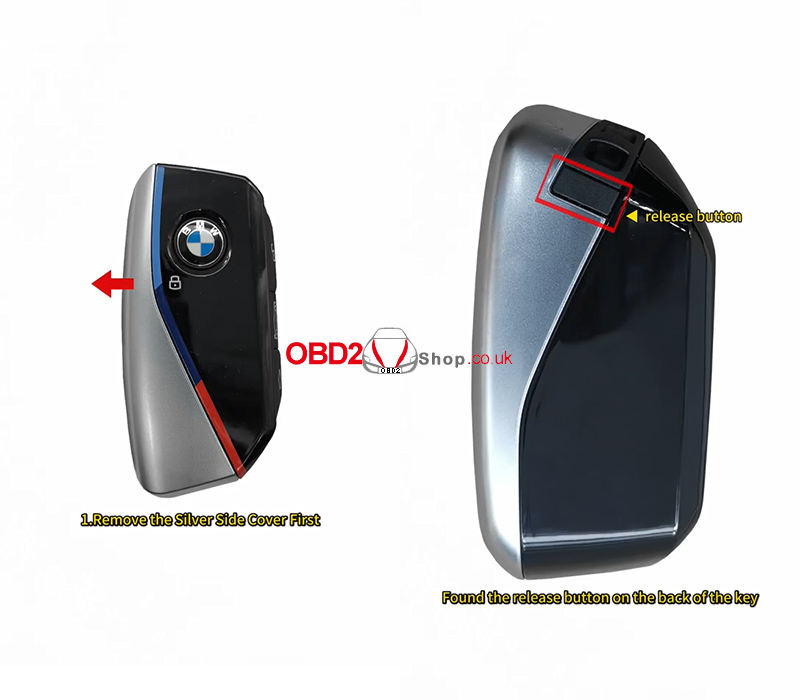
How to Disassemble the BMW U-Chassis BCP Key Shell
This article provides a detailed guide on how to safely disassemble a BMW U-chassis BCP key shell without causing damage. By following the steps carefully, you can remove each part of the key housing smoothly, which is especially useful for key repair, shell replacement, or internal component work.
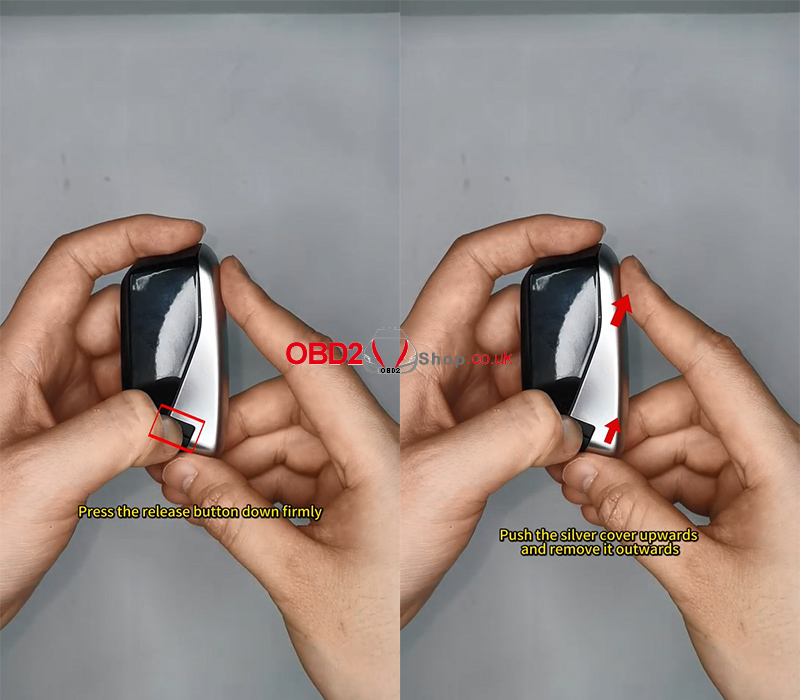
Step 1: Remove the Silver Side Cover
First, locate the release button on the back of the key.
1. Press the release button down firmly
2. While holding it, push the silver side cover upward
3. Slide the cover outward and remove it completely
Once done, the silver side cover will come off easily.
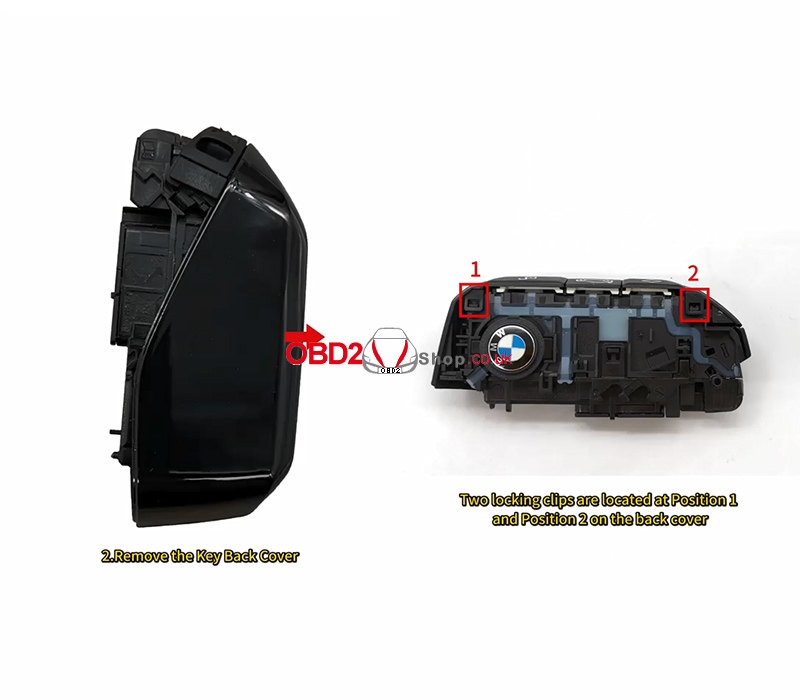
Step 2: Remove the Key Back Cover
There are two locking clips on the back cover, located at Position 1 and Position 2.
1. Turn the key on its side and place both thumbs on Position 1
2. Push the black cap upward with your thumbs
3. When you hear a “click,” the Position 1 locking clip is released
4. Next, place both index fingers on Position 2
5. Push the cover in the opposite direction
6. When you hear another “click,” the Position 2 locking clip is released
At this point, the back cover can be removed without any damage.


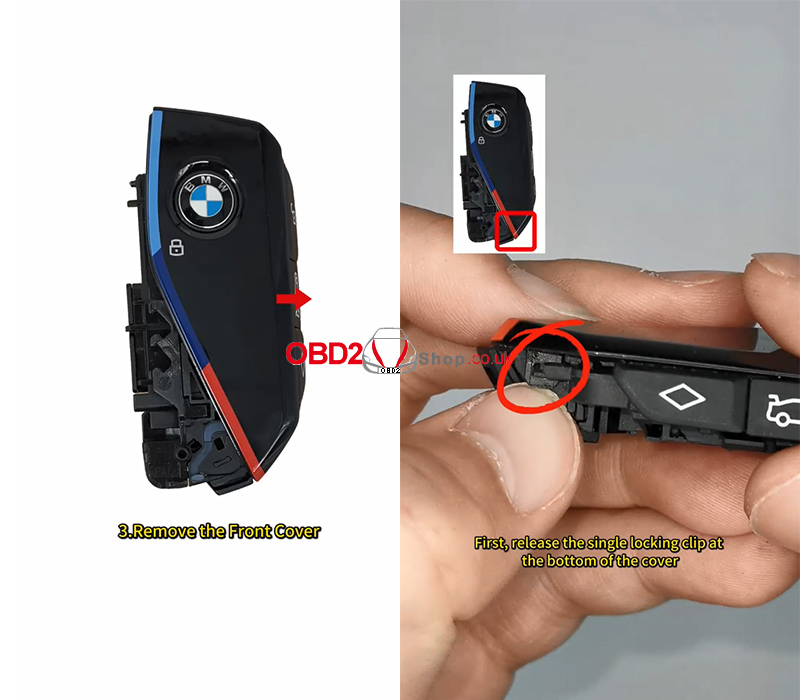
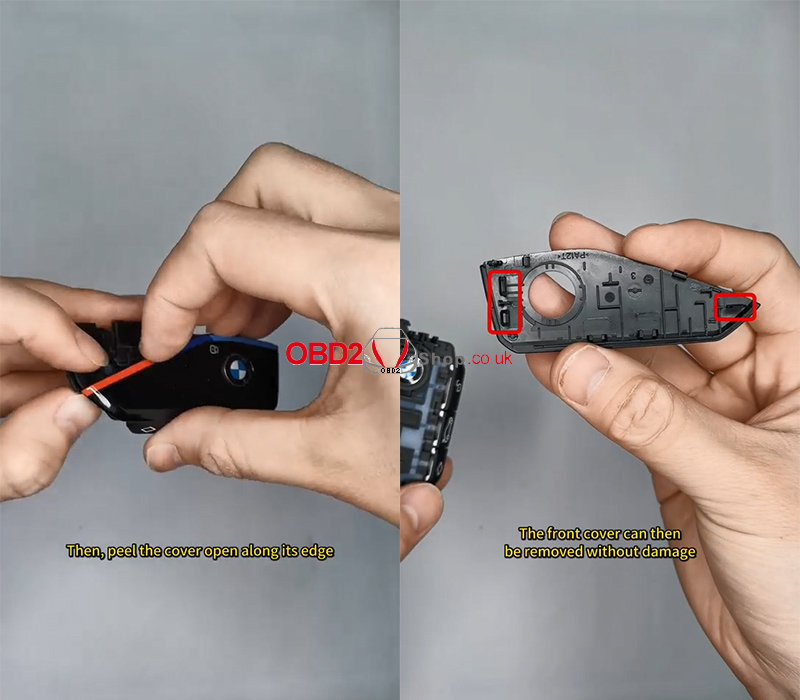
Step 3: Remove the Front Cover
1. First, release the single locking clip at the bottom of the front cover
2. Then, gently peel the cover open along its edge
3. The two locking clips at the top will disengage smoothly
After this, the front cover can be removed safely.
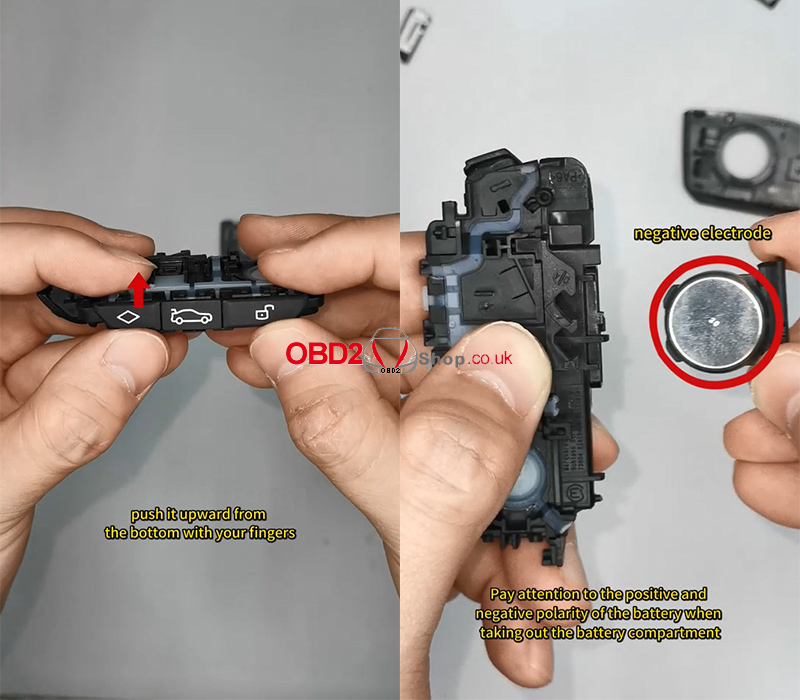
Step 4: Remove the Logo and Button
1. To remove the side button, push it upward from the bottom using your fingers
2. Carefully take out the battery compartment
3. Pay close attention to the positive and negative polarity of the battery during removal
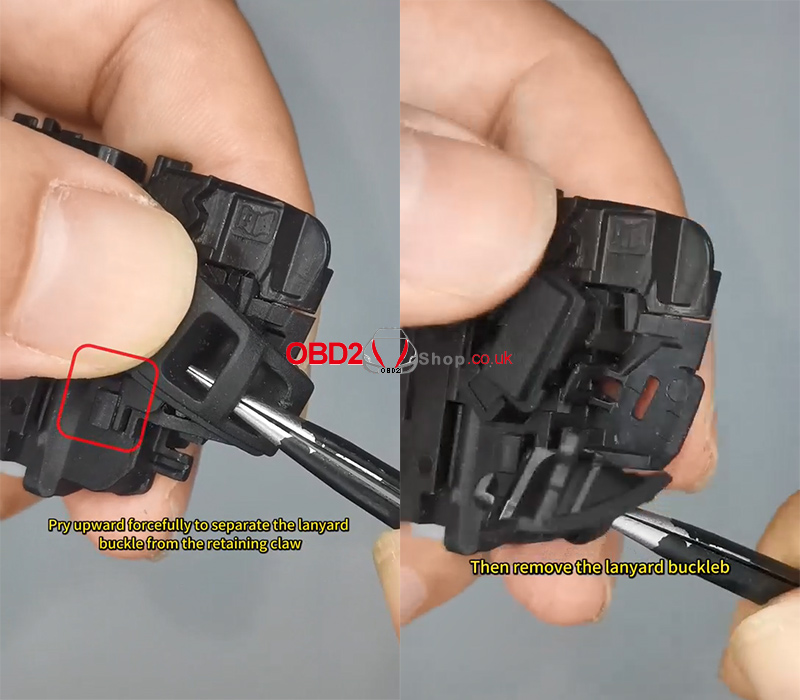
Step 5: Remove the Lanyard Buckle
1. Insert needle-nose pliers into the lanyard hole
2. Pry upward firmly to separate the lanyard buckle from the retaining claw
3. Remove the lanyard buckle completely
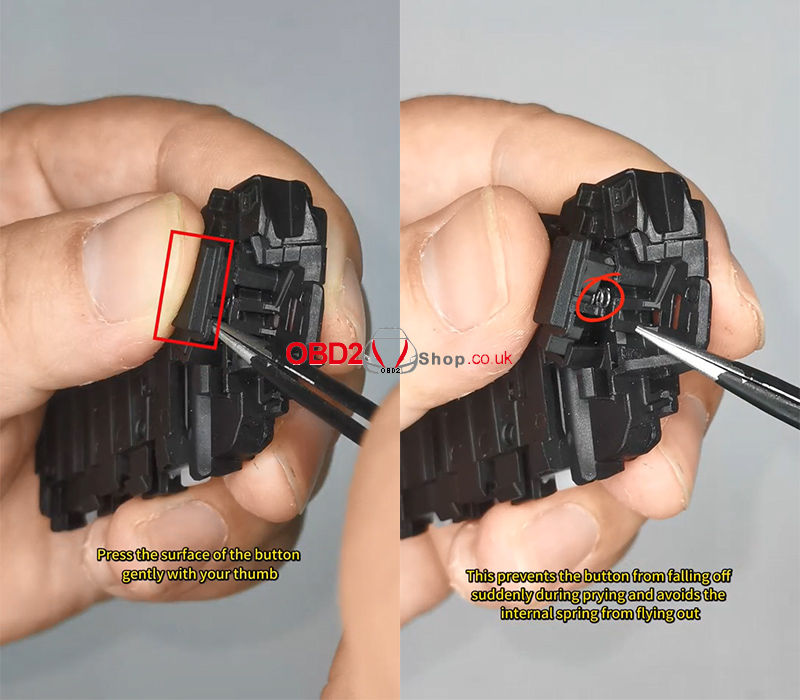
Step 6: Remove the Release Button
Before prying open the release button, take the following precaution:
1. Gently press the surface of the release button with your thumb
2. This prevents the button from popping out suddenly and avoids the internal spring from flying out
Once the locking clip is released, remove the release button smoothly.
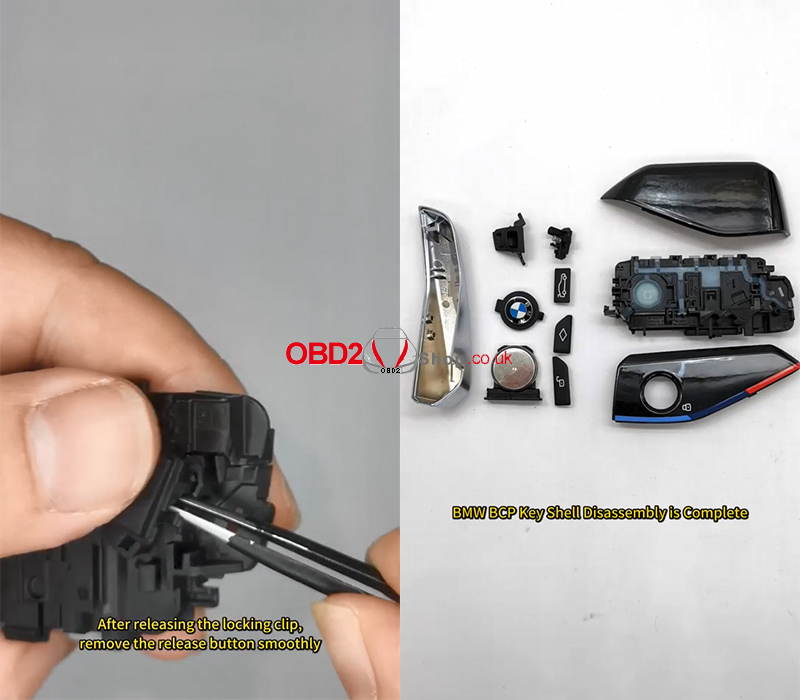
Disassembly Complete
You have now completed the BMW BCP key shell disassembly without damaging any components.
Video Guide:
https://www.youtube.com/shorts/kHJzBL2f__k?feature=share
More professional automotive tools and guides:
www.obd2shop.co.uk
Oznake: bmw bcp key
srijeda, 17.12.2025.
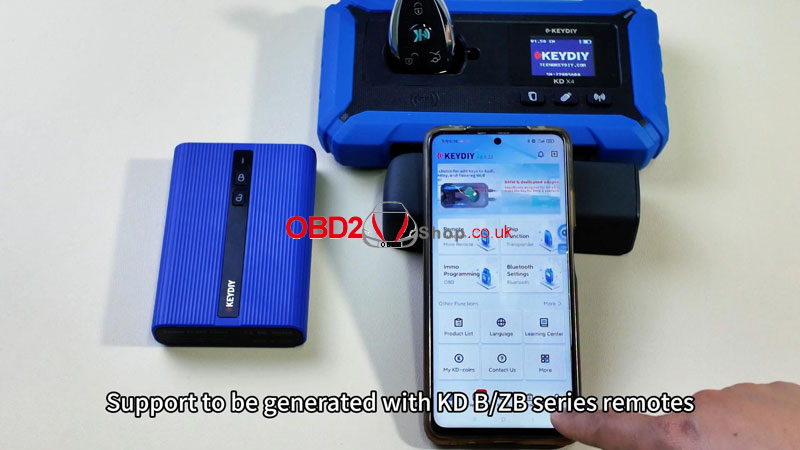
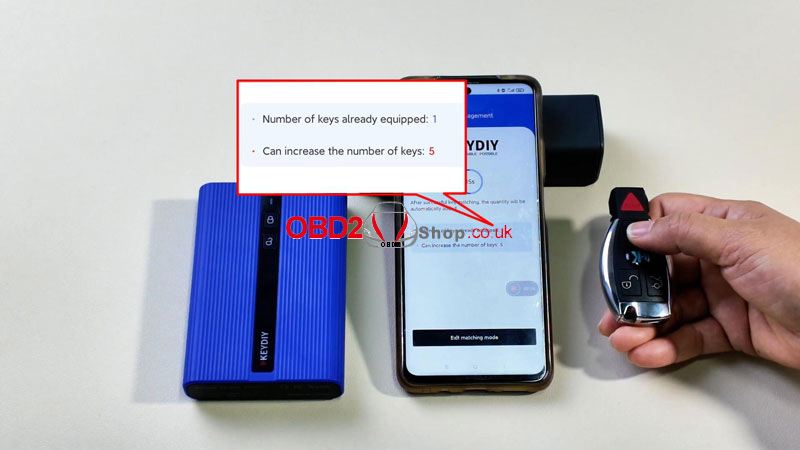
How to Add a Mercedes-Benz Key with KEYDIY PAK09?
KEYDIY PAK09 allows you to add up to 6 remote keys to your Mercedes-Benz, including a smartphone key with proximity functionality. Follow these clear steps to program your new key easily.
Watch Video Tutorial:
https://www.youtube.com/watch?v=mZqEV6Vbca8
Step 1: Prepare the Hardware
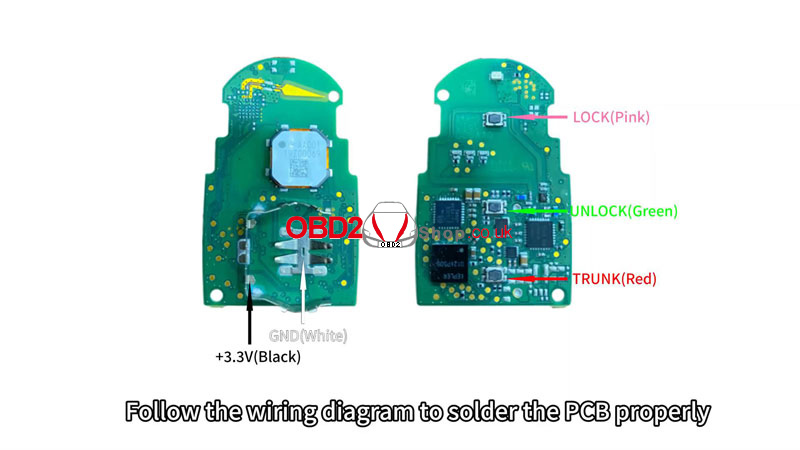
` Remove the PCB from your original car key.
a Refer to the wiring diagram in the KDAPP (under Learning Center ’ Help Center ’ Wiring Diagram From Original Remotes) to solder the PCB correctly.
b Connect the adapter cable to the trigger port, then place the PCB into the PAK09 case and close it.
c Press the power button: short-press once, then long-press for 3 seconds until the indicator flashes.


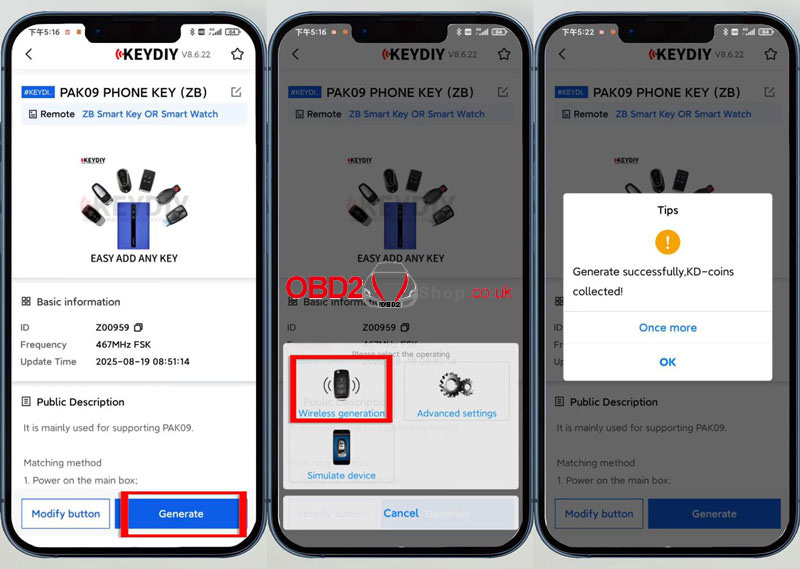
Step 2: Generate Remote Program
` Place the new remote (KDB/ZB Universal Key) into the KD-X4 holder.
a Open KDAPP ’ Remote Function ’ Vehicle Remote’ Select the correct remote control ’ Generate ’ Wireless Generation.
b Wait for "Generation Successful."
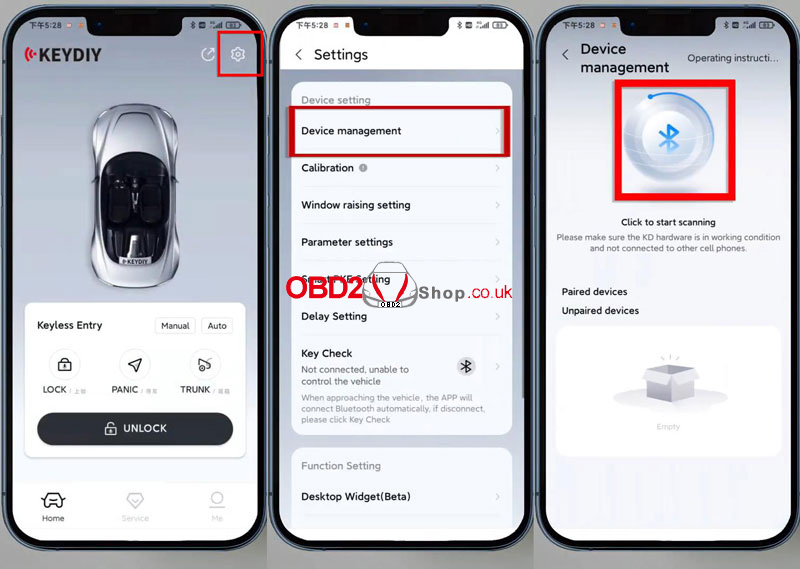
Step 3: Pair Key with Car
` In KDAPP, go to Settings ’ Device Management.
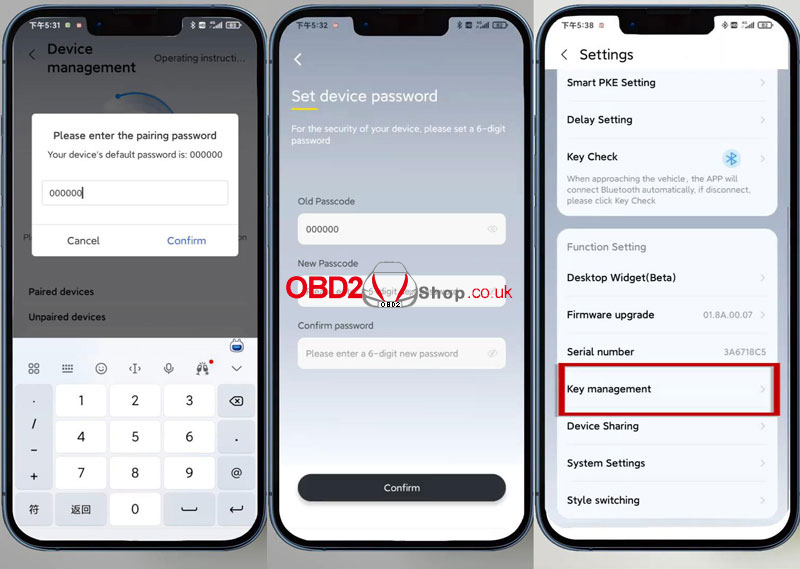
a Search and select your PAK09 kit. Enter default password: 000000 (change it on first use).
Step 4. Add Key
` Go to Settings ’ Key Management ’ Enter Matching Mode.
a Before the countdown ends, press any button on the new remote to add it.
Confirmation will appear once added.
Final Step: Test the Key
lCheck remote functions: lock, unlock, and proximity detection if using the phone key.
lYour Mercedes-Benz now supports up to 6 keys, including a convenient phone key.

www.obd2shop.co.uk
Oznake: keydiy pak09
utorak, 16.12.2025.
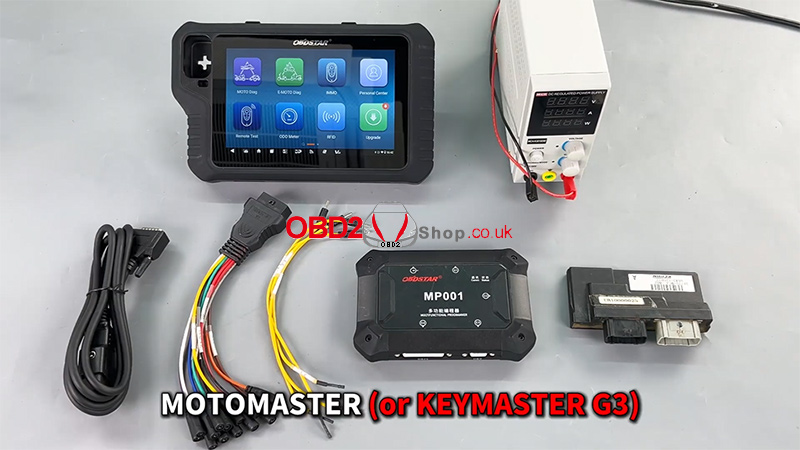
HONDA 38770-MFJ-A02 ECM Data Read & Write via MOTOMASTER
In this post, we’ll demonstrate how to perform ECM data read and write operations on the HONDA 38770-MFJ-A02 ECM using OBDSTAR MOTOMASTER. This procedure is suitable for technicians who need to back up, clone, or restore ECU data safely and efficiently.
Required Tools:
MOTOMASTER (or KEYMASTER G3)
High-power DC regulated power supply
Main cable
ECU clone jumper
MP001 programmer
HONDA 38770-MFJ-A02 ECM
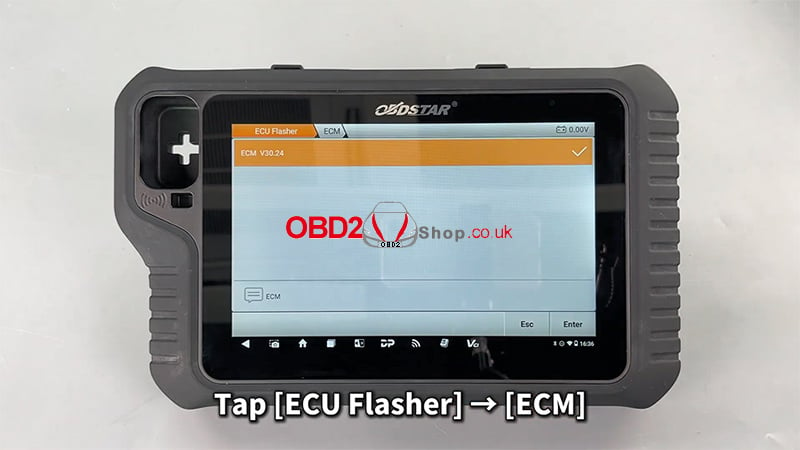
Software Preparation
Before proceeding, ensure that the device's software is up to date with the latest version.
1. Tap [ECU Flasher] >> [ECM]
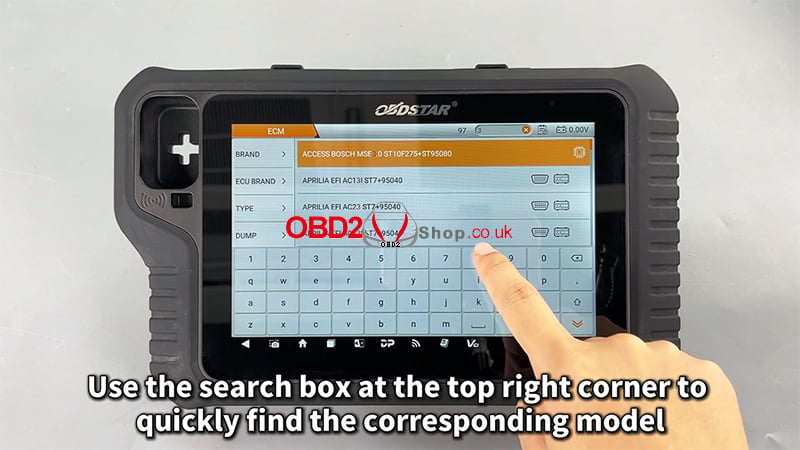
2. Use the search box in the top-right corner to quickly locate the corresponding ECM model
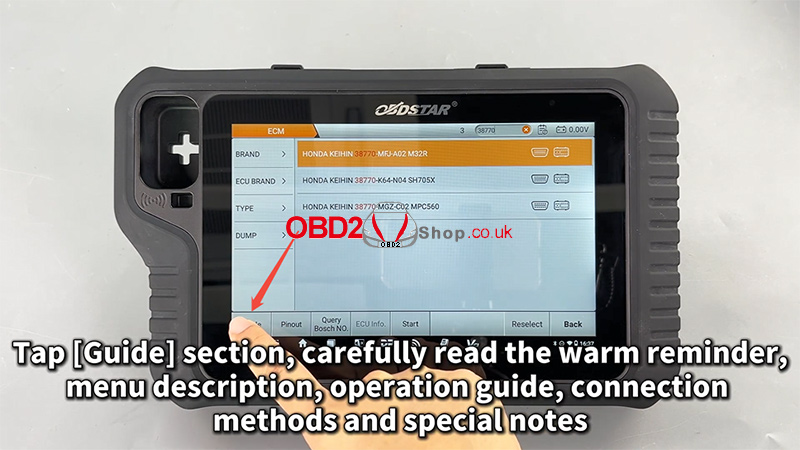
3. Enter the [Guide] section and carefully review:
Warm reminders
Menu descriptions
Operation steps
Connection methods
Special notes
This step ensures correct operation and helps avoid unnecessary risks.
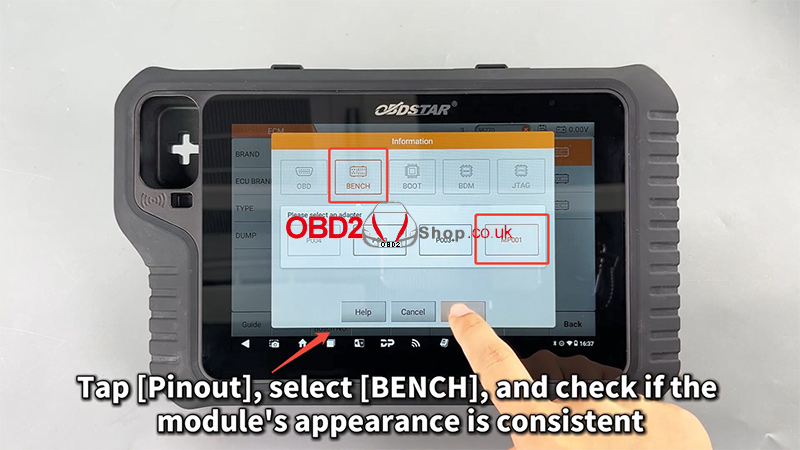
Pinout and Connection Setup
1. Tap [Pinout]
2. Select [BENCH] mode
3. Verify that the ECM appearance matches the displayed module
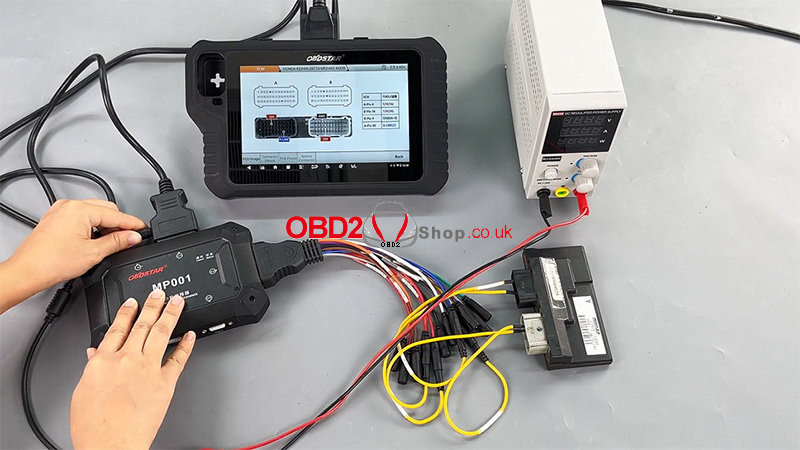
4. Tap [Connector Pinout] and connect all wires strictly according to the pinout diagram
Correct wiring is critical for stable communication and successful data operations.

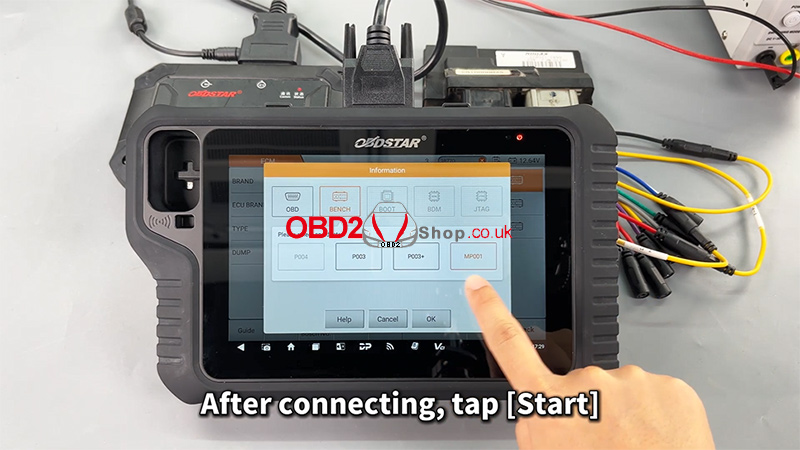
ECM Data Reading (Backup)
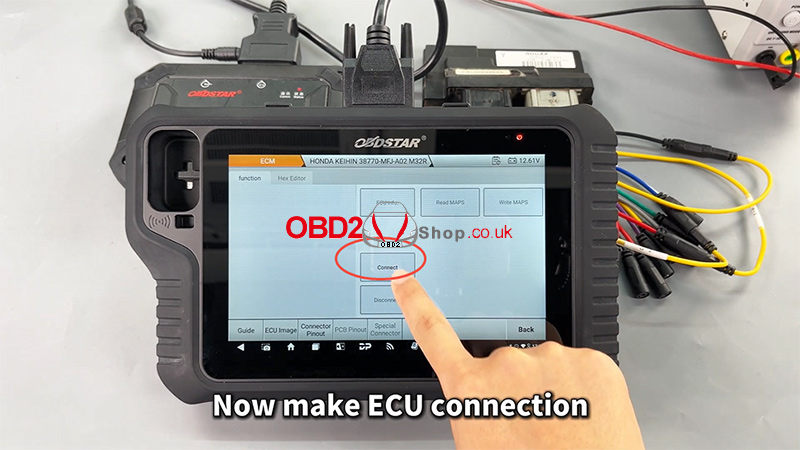
1. After completing all connections, tap [Start]
2. Establish the ECU connection
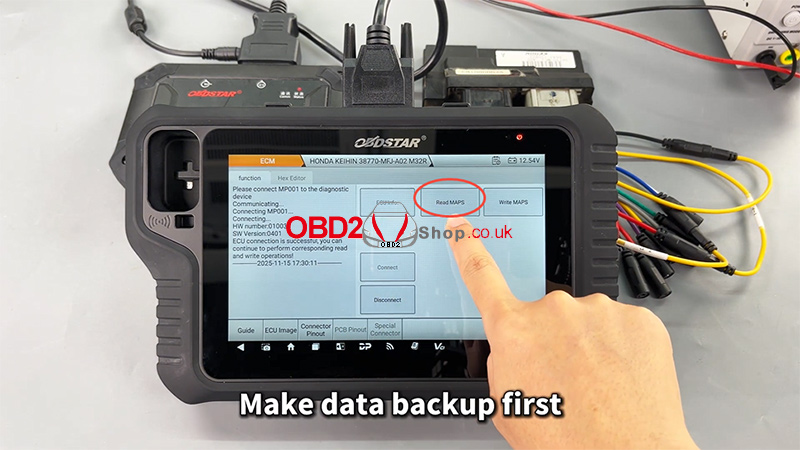
3. Perform a data backup first (strongly recommended)
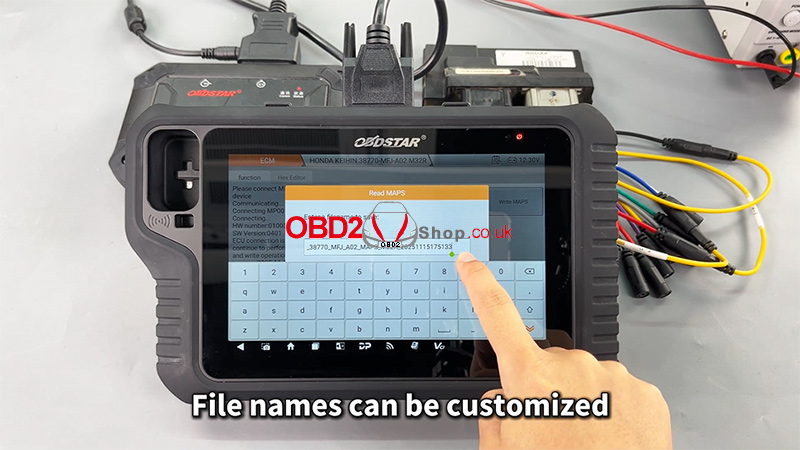
4. Customize the file name as needed
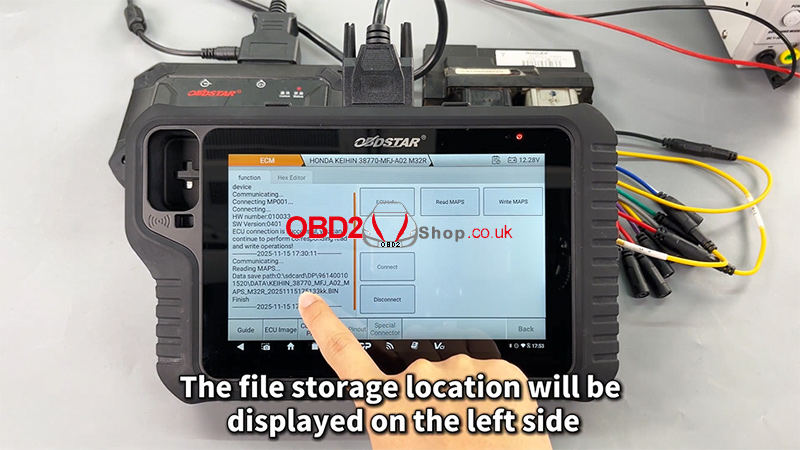
5. The file storage location will be displayed on the left side of the screen
Backing up original data ensures data safety and allows recovery if needed.
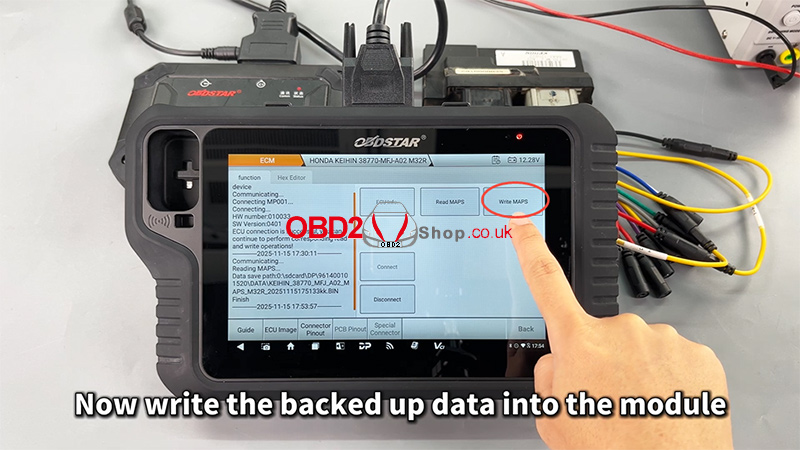
ECM Data Writing
1. Select the previously backed-up data file
2. Write the data into the ECM module
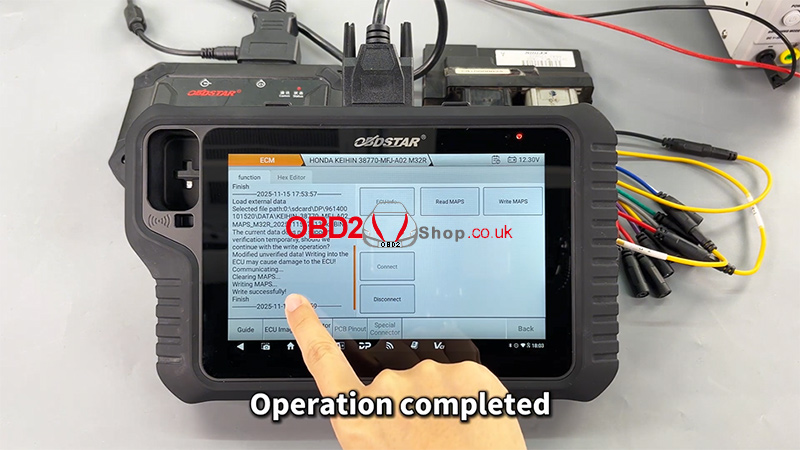
3. The file management system supports filtering by:
File name
Modification time
File size
4. Once writing is completed, the operation is finished successfully

Video Reference:
For a complete step-by-step demonstration, please watch the video below:
https://youtu.be/GvXZRYxD-Qk
For more professional automotive diagnostic tools and programming solutions, visit www.obd2shop.co.uk.
Oznake: obdstar motomaster
ponedjeljak, 15.12.2025.
Launch X431 IMMO Elite Toyota Camry Key Match Tutorial
This step-by-step guide explains how to use the Launch X431 IMMO Elite (or X431 IMMO PLUS) key programmer to match a new smart key for a Toyota Camry via OBD.
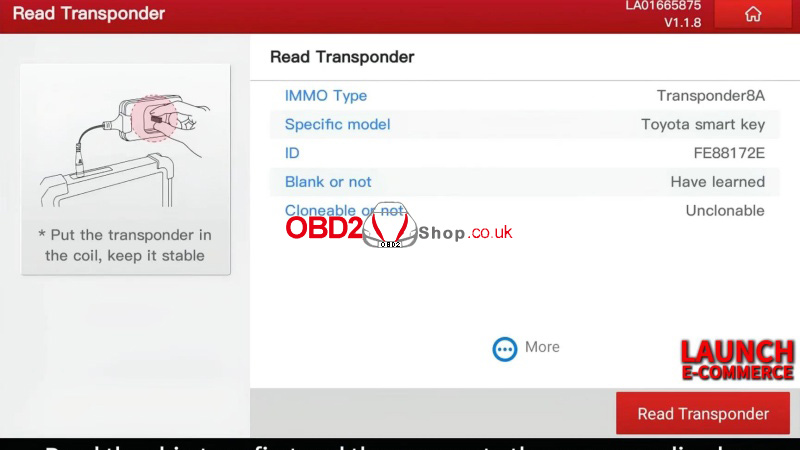
Step1. Read Transponder
Key programming >> Read Transponder
Identify the chip type before generating the new key.
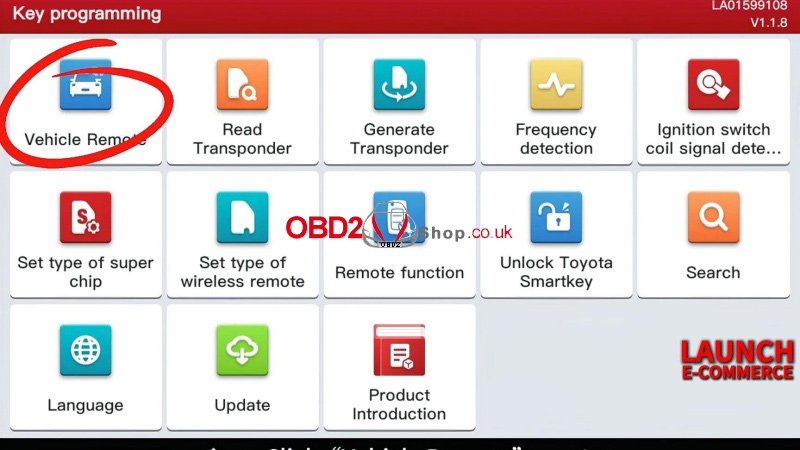
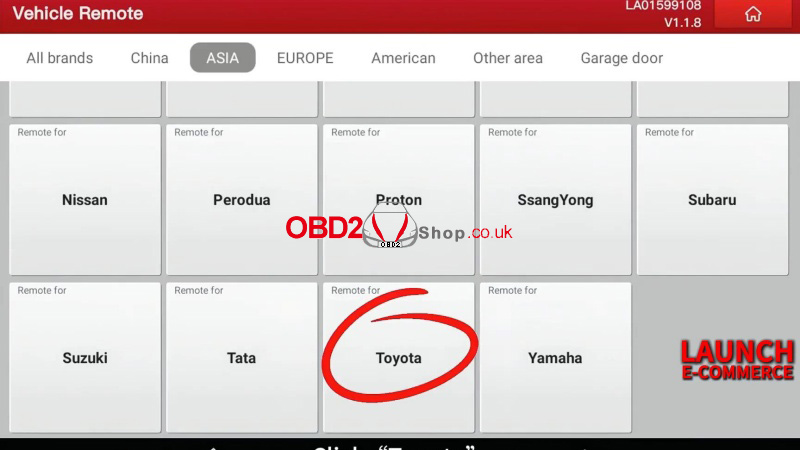
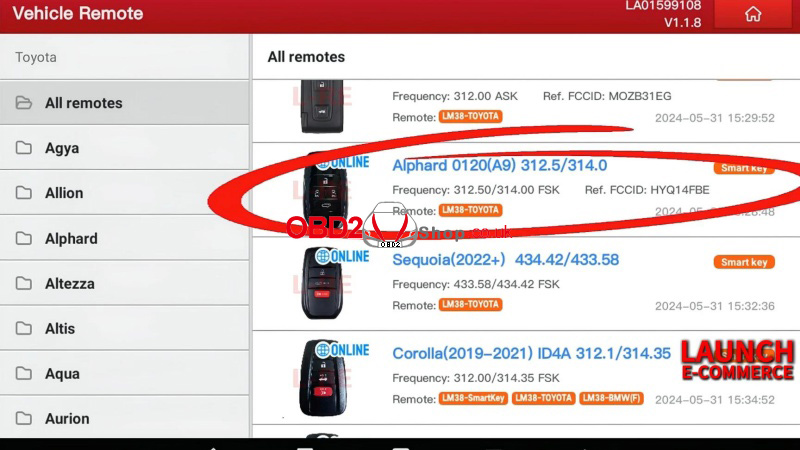
Step2. Generate Remote
Vehicle remote >> Toyota >> Alphard 0120(A9) 312.5/314.0
Burn the remote until completion.
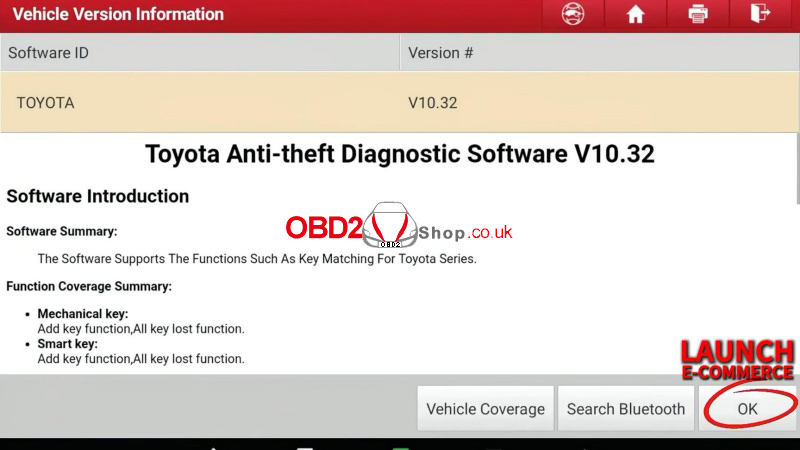
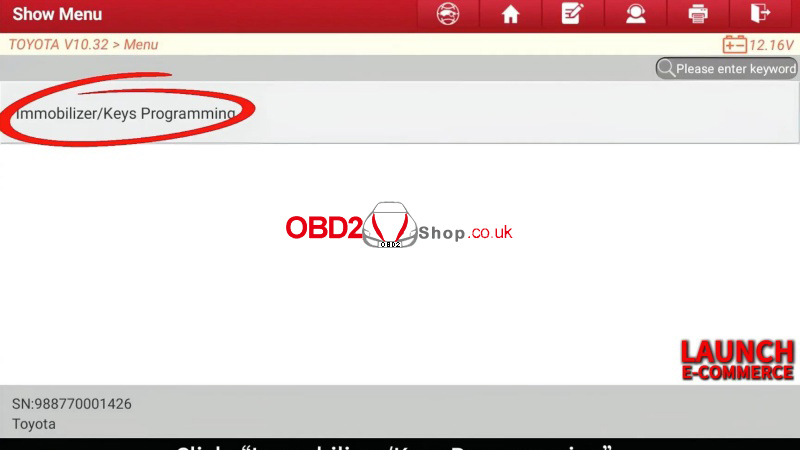
Step3. Program Key
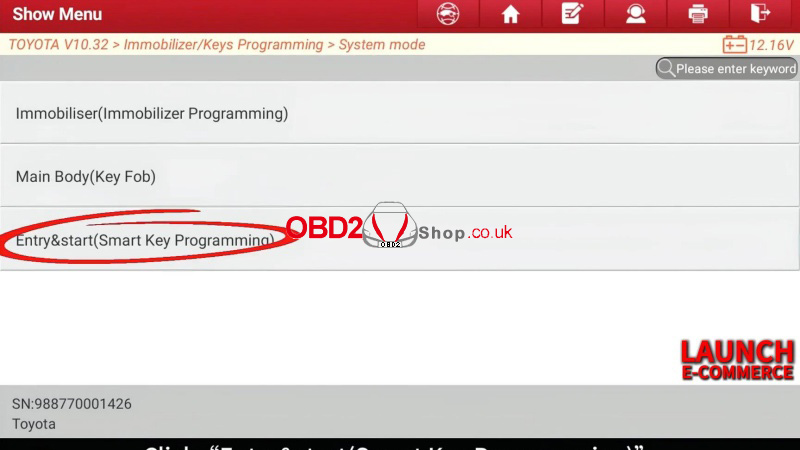
Toyota >> OK >> Immobilizer/Keys Programming >> System mode >> Entry & start(Smart Key Programming)
Number of current keys: 2
Whether to use the simulator key? No
Note:
Each step must be completed within the specified time.
Position used of match: 5
Keep a smart key to be matched close to the start button...
Successfully matched.

This X431 IMMO Elite Toyota Camry key programming tutorial is designed for quick, clear guidance. Compatible with smart key and immobilizer systems.
www.obd2shop.co.uk
Oznake: launch x431 immo elite
petak, 12.12.2025.
Adding a Key to 2023 Toyota Yaris with Lonsdor K518 PRO
This guide walks you through the process of programming a new smart key for a 2023 Toyota Yaris using the Lonsdor K518 PRO, even in an all-keys-lost situation.
Step 1: Connect the Device
Connect the OBD cable of the Lonsdor K518 PRO to the vehicle.

Step 2: Enter the Vehicle Menu
On the K518 PRO home screen, select:
[Immo & Remote] ’ [Toyota] ’ [Select from vehicle] ’ [Yaris] ’ [2021-] ’ [Smart key] ’ [PEPS (CAN)]
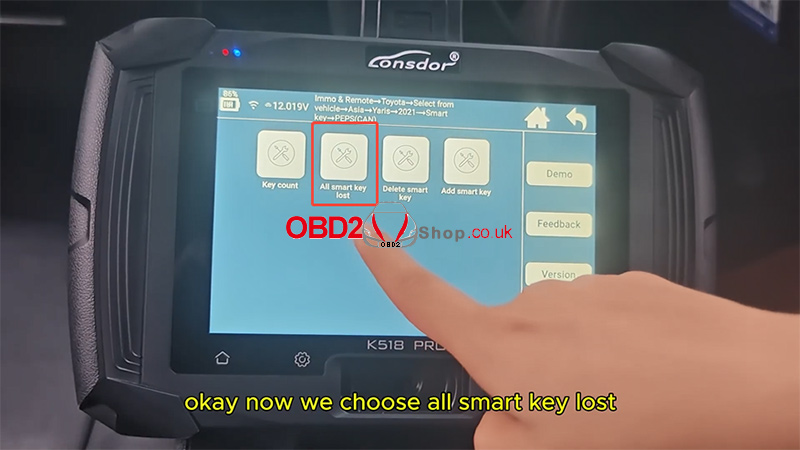
Choose [All smart key lost].
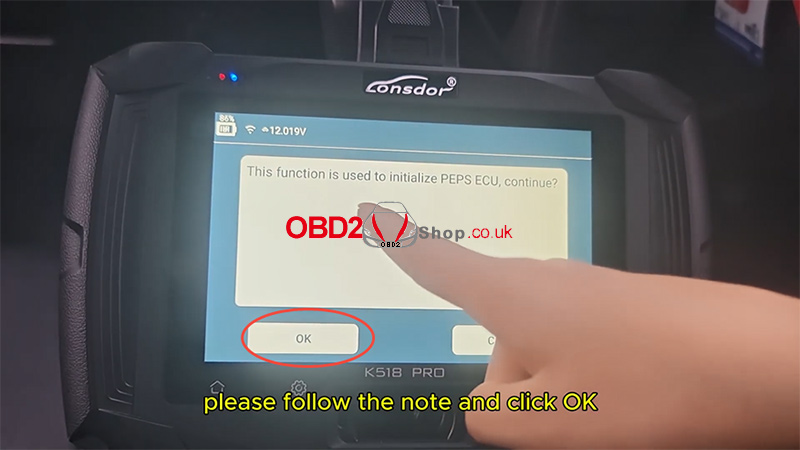
The tool will prompt:
“This function is used to initialize PEPS ECU, continue?”
Click OK.
The system will begin communication—please wait.
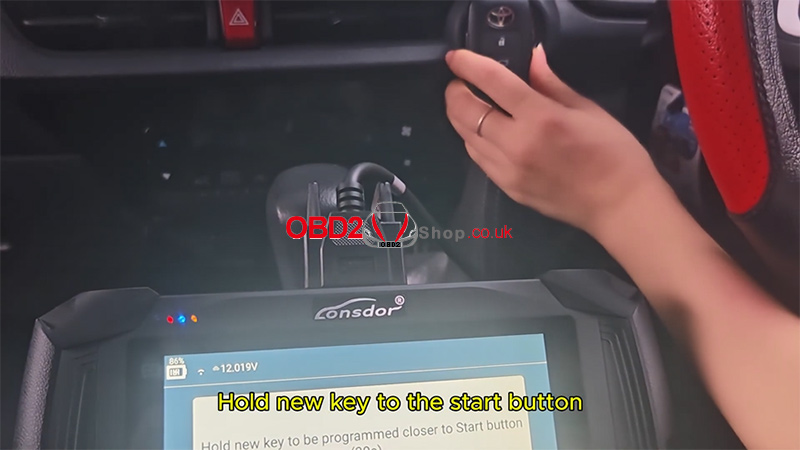
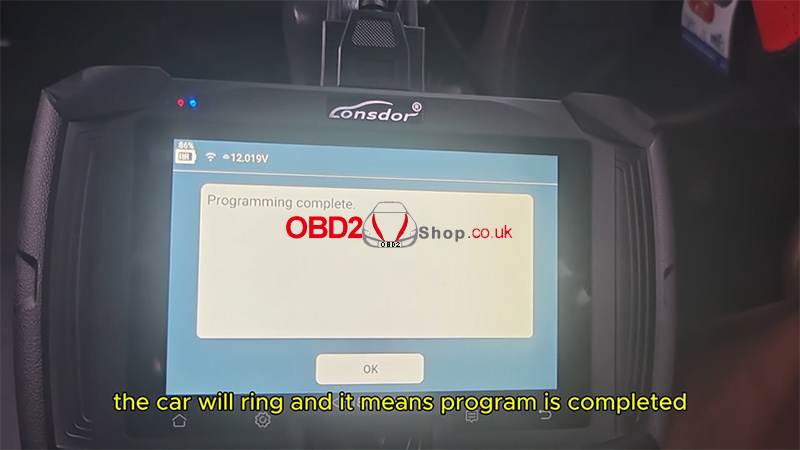
Step 3: Program the New Smart Key
When prompted:
Hold the new smart key close to the Start/Stop button for about 30 seconds.
You will hear the vehicle beep three times, which indicates the programming process has been completed.
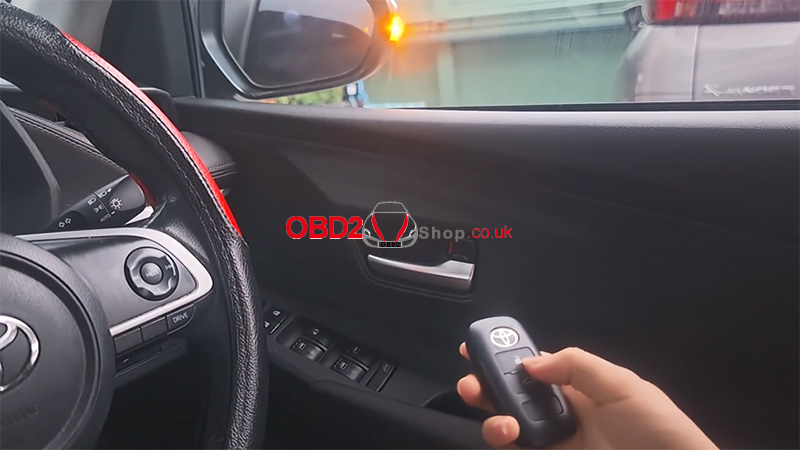
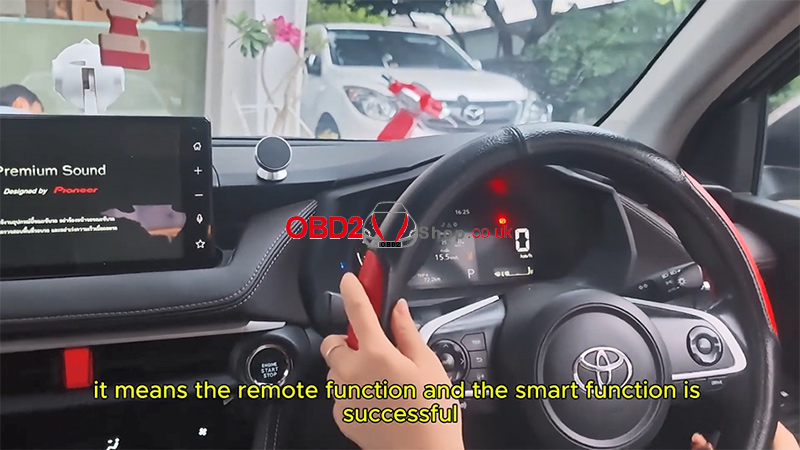
Step 4: Test the Key Functions
Test the remote functions (e.g., Lock/Unlock).
Test the smart key functions, such as keyless start.
If both work normally, it confirms that the new key has been successfully programmed.
Result
Using the Lonsdor K518 PRO, the 2023 Toyota Yaris all-keys-lost programming procedure is completed successfully.
Watch the full operation video here:
https://youtu.be/_hkWTSAuat4
For more tools and guides, visit:
www.obd2shop.co.uk
Oznake: lonsdor k518 pro
četvrtak, 11.12.2025.
Guide to Using the Lonsdor BDC03 Solder-Free Clip
The Lonsdor K518 PRO and K518 Series programmers are capable of copying both genuine BMW BDC3 keys and BCP keys. However, the method differs:
For genuine/OEM BDC3 keys, the Lonsdor BDC03 Solder-Free Clip is the required tool.
For BCP keys, the traditional soldering method is still necessary.
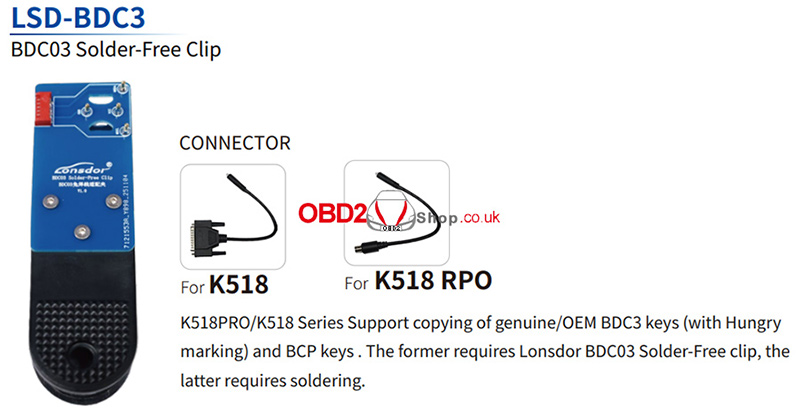
This guide focuses on cloning a genuine BMW BDC3 key using the solder-free clip.
Step-by-Step Instructions:
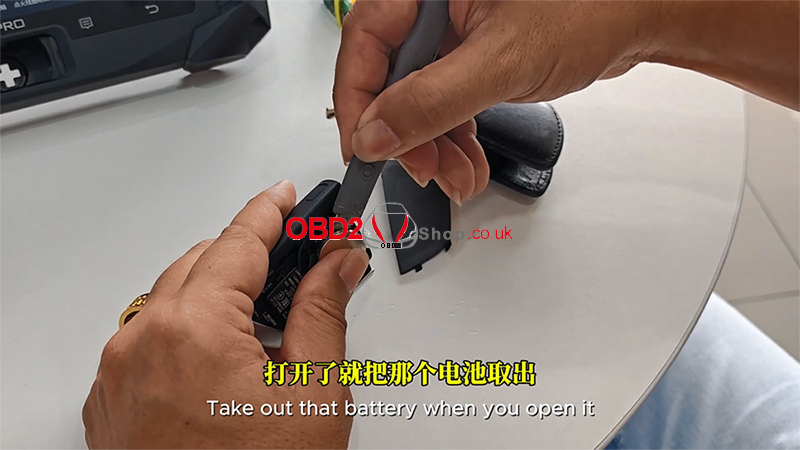
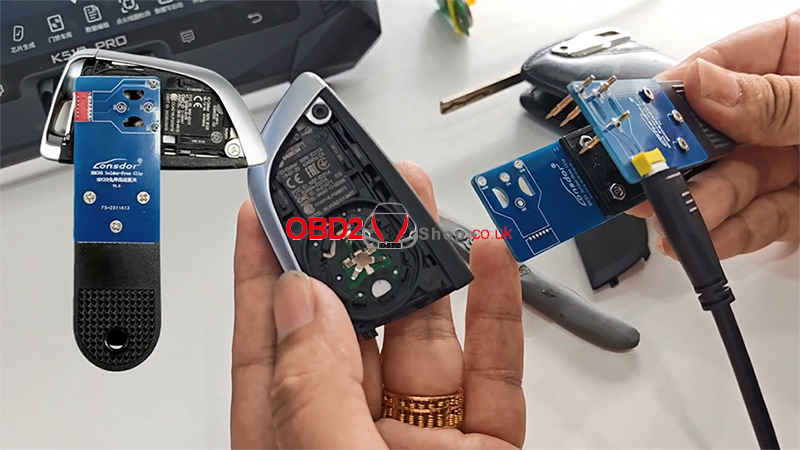
1. Disassemble the Original Key
Begin by taking apart the original car key. Open the back cover and remove the battery to access the internal circuit board.
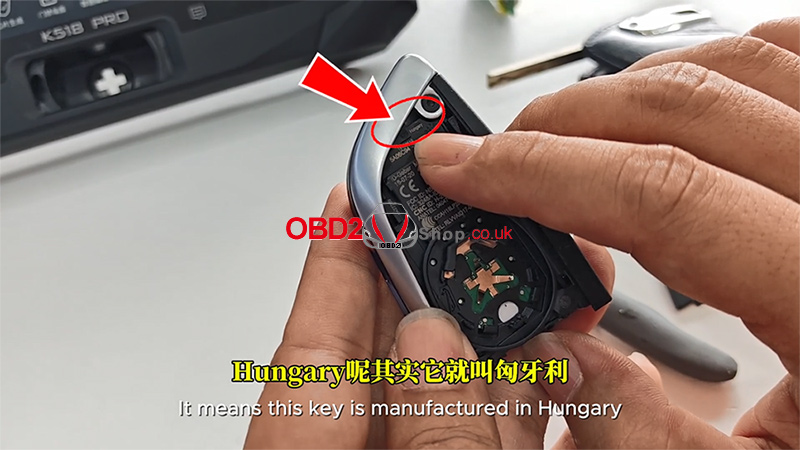
2. Identify a Genuine BMW BDC3 Key
Upon opening the key, look for the marking "Hungary" on the circuit board. This indicates the key is a genuine BMW BDC3 unit manufactured in Hungary.
Important: Only genuine BMW BDC3 keys with this "Hungary" marking are compatible with this cloning procedure.
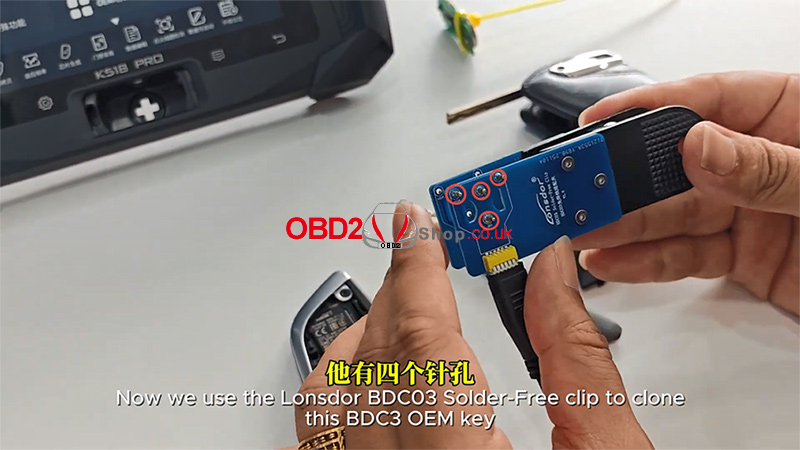
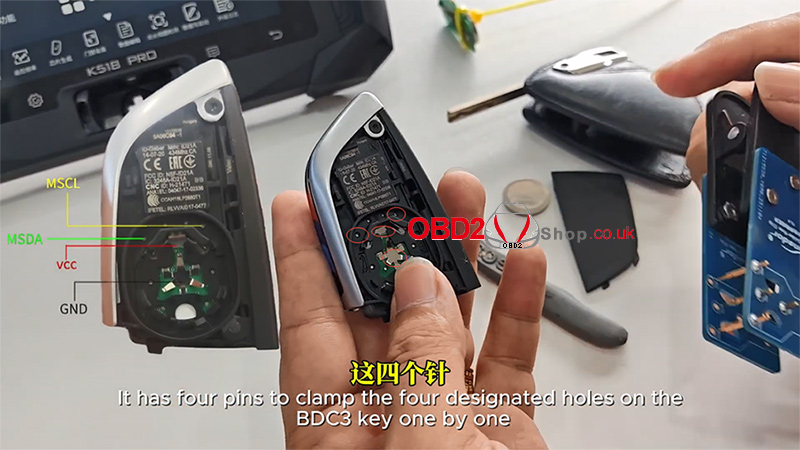
3. Connect the Solder-Free Clip
Take the Lonsdor BDC03 Solder-Free Clip. It features four pins designed to match four specific holes on the BDC3 key's circuit board.
Carefully align these four pins with the four designated holes on the key. Once aligned, clamp the clip securely onto the BMW BDC3 keyboard.
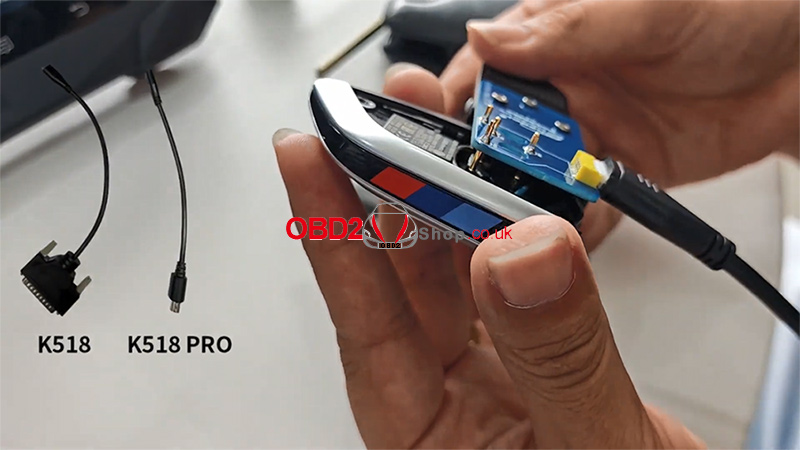
4. Connect to the Lonsdor Tool
Connect the other end of the solder-free clip to your Lonsdor K518 PRO or K518 device using the appropriate cable.
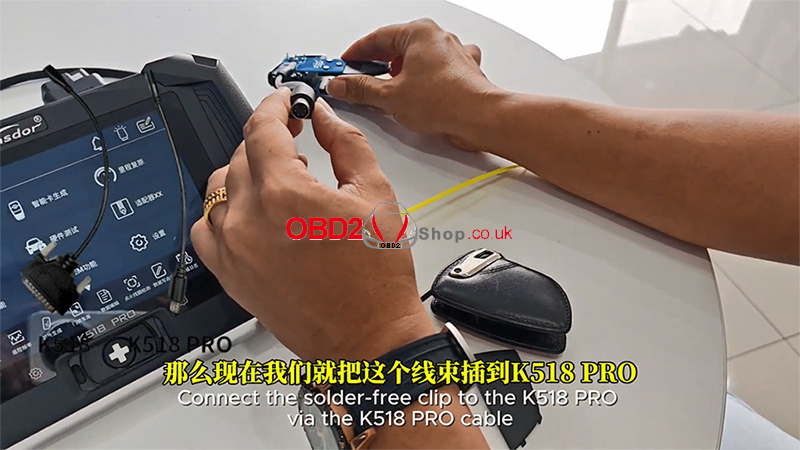
You are now ready to proceed with the cloning process via the Lonsdor device's software interface.
For more details, you can refer to this video:
https://youtu.be/AZv0E0rCYs4
www.obd2shop.co.uk
Oznake: lonsdor bdc03 solder-free clip
srijeda, 10.12.2025.
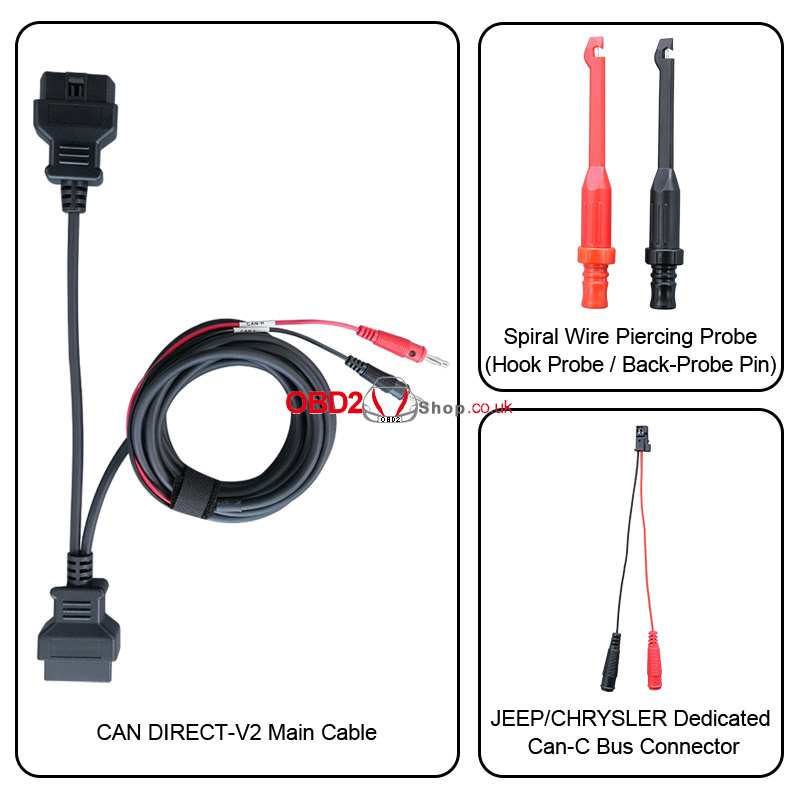
OBDSTAR New Arrival: CAN DIRECT-V2 Introducing
The OBDSTAR CAN DIRECT-V2 is a powerful tool designed to bypass gateway modules found in many modern vehicles, providing direct access to the CAN bus when standard OBD diagnostic ports are blocked. This direct connection allows technicians to perform proximity key programming, cluster calibration, CAN frame acquisition, and various automotive repair functions with ease. The device is also fully compatible with third-party diagnostic tools, making it an essential addition for automotive locksmiths and workshops.
Included Components:
1. CAN DIRECT-V2 Main Cable
2. Spiral Wire Piercing Probe (Hook Probe / Back-Probe Pin)
3. JEEP/CHRYSLER Dedicated CAN-C Bus Connector
IMMO:
TOYOTA/LEXUS (proximity key programming)
Support below (4A) models:
2019- TOYOTA COROLLA
2021- TOYOTA COROLLA CROSS
2021- TOYOTA COROLLA SPORT
2021- TOYOTA COROLLA SPORT HV
2021- TOYOTA COROLLA TOURING
2021- TOYOTA COROLLA TOURING HV
2021- TOYOTA COROLLA HV
2019- TOYOTA LEVIN
2021- TOYOTA LEVIN HV
2021- TOYOTA ALLION
2021- TOYOTA LEVIN
Support below (8A) model:
2021- TOYOTA Yaris Cross
Support below (8A-A8) models:
2018- TOYOTA PRADO
2018- TOYOTA LAND CRUISER
2018- TOYOTA CROWN
2018- TOYOTA HIGHLANDER
Support below (8A-A9) models:
2018- TOYOTA CAMRY
2018- TOYOTA C-HR
2018- TOYOTA IZOA
2018- TOYOTA PRIUS
2018- TOYOTA VELLFIRE
2018- TOYOTA ALPHARO
2018- LEXUS RX450H
2018- LEXUS LC
Support below (8A-AA) models:
2018- TOYOTA HIGHLANDER HV
2018- TOYOTA RAV4
2018- TOYOTA RAV4 HV
2018- TOYOTA AVALON
2018- TOYOTA CROWN KLUGER HV
2018- LEXUS ES
2018- LEXUS UX
2018- LEXUS RX
2018- LEXUS LS
Support model below:
2021- TOYOTA COROLLA CROSS HV
RENAULT
2020- RENAULT Clio 5
2020- RENAULT Captur
2020- RENAULT Arkana
2020- RENAULT Kangoo
2020 RENAULT Espace
2021- RENAULT Scenic
2020- RENAULT Zoe
2022- RENAULT Traffic
2021- RENAULT MEGANE 4 PH2
PSA
2023- PEUGEOT 308 Prox (For UDS+ systems)
2023- PEUGEOT 208 Prox (For UDS+ systems)
OPEL
2022- OPEL Astra L (For UDS+ systems)
FCA
2018- DODGE Charger
2019- DODGE Ram
2018- DODGE Challenger
2018- DODGE Durango
2018- DODGE Journey
2018- JEEP Renegade Prox
2019- JEEP Renegade
2019- JEEP Compass Blade
2018- JEEP Compass Prox
2018- JEEP CHEROKEE
2018- JEEP GRAND CHEROKEE
2018- JEEP WRANGLER
2018- JEEP RENEGADE
2017- CHRYSLER Pacifica Prox
2015- CHRYSLER 300/300C
2018- MASERATI models, including GHIBLI, LEVANTE, and QUATTROPORTE, etc.
2018- FIAT models, including 500, 500C, and 500X, etc.
2018- Alfa Romeo models, including GIULIA, STELVIO, and TONALE, etc.
Cluster Calibration Function:
Support below TOYOTA/LEXUS dashboard types:
2019- LEXUS ES S6J3001 DENSO
2023- LEXUS GX550 R7F701401 DENSO
2023- LEXUS LM350H R7F701401 DENSO
2019- LEXUS LS S6J3001 DENSO
2023- LEXUS LS500 R7F701401 DENSO
2022- LEXUS LX600 S6J3001 DENSO
2023- LEXUS NX R7F701441 DENSO
2023- LEXUS NX350 R7F701401 DENSO
2023- LEXUS RX R7F701441 DENSO
2023- LEXUS RX350 R7F701401 DENSO
2023- LEXUS RX450H R7F701401 DENSO
2023- LEXUS RX500H R7F701401 DENSO
2018- LEXUS UX S6J3001 DENSO
2019-TOYOTA 4RUNNER S6J3001 DENSO
2019-TOYOTA ALLION S6J3001 DENSO
2023-TOYOTA ALPHARD R7F701401 DENSO
2018-TOYOTA AVALON S6J3001 DENSO
2024-TOYOTA AVANZA R7F701442
2023-TOYOTA AVANZA VELOZ Q S6J3001 DENSO
2023-TOYOTA BX4 R7F701441 DENSO
2023-TOYOTA BZ4 R7F701441 DENSO
2023-TOYOTA BZ4X R7F701401 DENSO
2023-TOYOTA BZ4X R7F701441 DENSO
2024-TOYOTA CAMRY R7F701401 DENSO(80)
2018-TOYOTA CAMRY S6J3001 DENSO
2018-TOYOTA CH-R S6J3001 DENSO
2024-TOYOTA COROLLA R7F701442
2023-TOYOTA COROLLA R7F701401 DENSO
2018-TOYOTA COROLLA S6J3001 DENSO
TOYOTA COROLLA R7F701441 DENSO
2023-TOYOTA COROLLA CROSS R7F701401 DENSO
2021-TOYOTA COROLLA CROSS S6J3001 DENSO
2024-TOYOTA CROWN R7F701401 DENSO
2018-TOYOTA CROWN KLUGER S6J3001 DENSO
TOYOTA FRONTLANDER R7F701441 DENSO
2019-TOYOTA GRANACE S6J3001 DENSO
TOYOTA GRANVIA S6J3001 DENSO
2020-TOYOTA HARRIER R7F701401 DENSO
2016-TOYOTA HARRIER S6J3001 DENSO
2019-TOYOTA HIACE S6J3001 DENSO
2023-TOYOTA HIGHLANDER R7F701401 DENSO(70)
2018-TOYOTA HIGHLANDER S6J3001 DENSO
2018-TOYOTA KLUGER S6J3001 DENSO
2024-TOYOTA LEVIN R7F701401 DENSO
2019-TOYOTA LEVIN S6J3001 DENSO
TOYOTA LEVIN R7F701441 DENSO
2019-TOYOTA LINSHANG S6J3001 DENSO
2023 TOYOTA RAIZE S6J3001 DENSO
2023-TOYOTA RAV4 R7F701401 DENSO
2019-TOYOTA RAV4 S6J3001 DENSO
2022 TOYOTA SIENNA R7F701401 FULL TFT
2019-TOYOTA SIENNA S6J3001 DENSO
2018-TOYOTA TACOMA S6J3001 DENSO
2023-TOYOTA TACOMA IV R7F701401 DENSO
2022-TOYOTA TUNDRA R7F701401 DENSO
2023-TOYOTA VELLFIRE III R7F701401 DENSO
2023 TOYOTA VENZA R7F701401 DENSO
2019-TOYOTA VENZA S6J3001 DENSO
2023-TOYOTA VIOS S6J3001 DENSO
2020-TOYOTA WILDLANDER R7F701401 DENSO
2019-TOYOTA WILDLANDER S6J3001 DENSO
2024-TOYOTA YARIS R7F701442
2020-TOYOTA YARIS R7F701441 DENSO
2019-TOYOTA YARIS CROSS S6J3001 DENSO
2019-TOYOTA YARIS IV S6J3001 DENSO
www.obd2shop.co.uk
Oznake: obdstar can direcT-V2
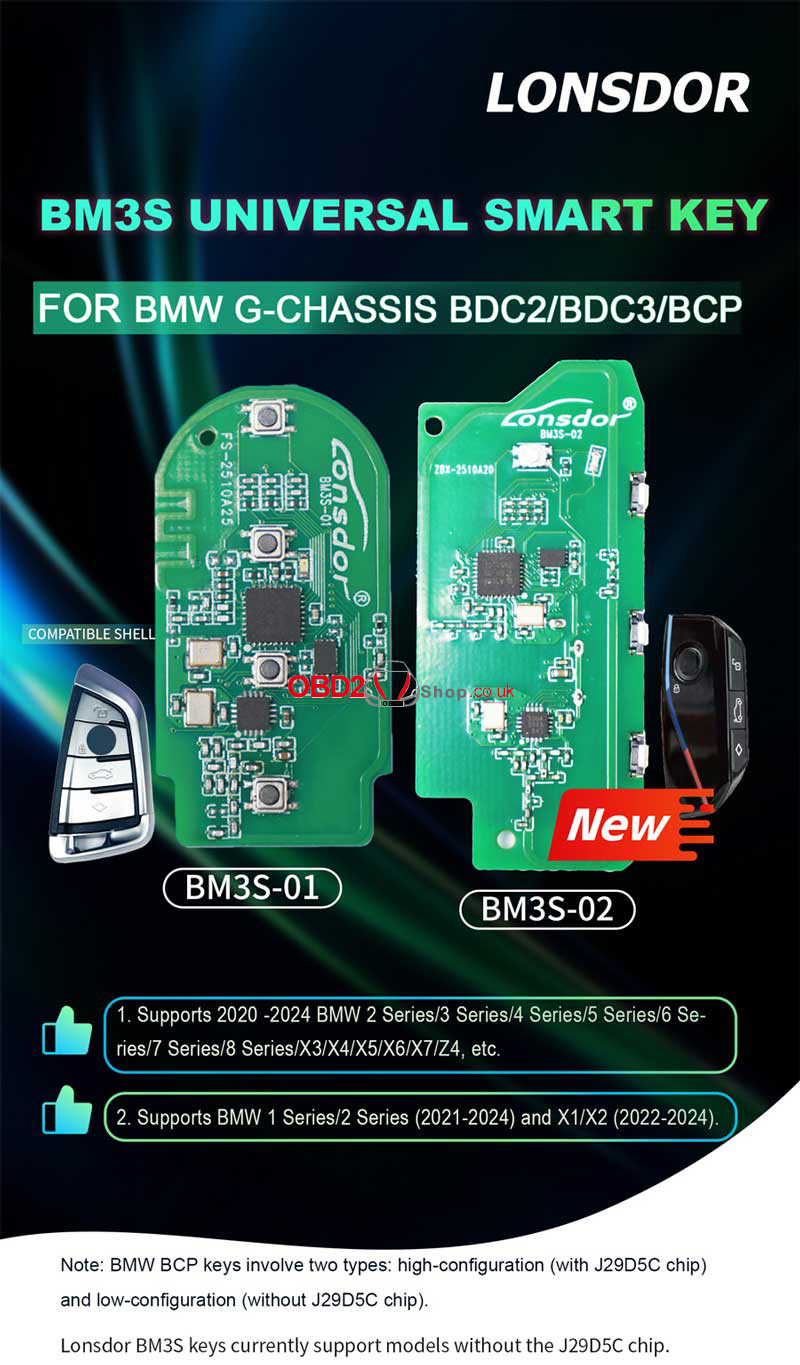
Lonsdor BM3S Smart Key: Unlock 2020-2024 BMW G-Chassis
Lonsdor introduces the next essential upgrade for every BMW owner - the BM3S Universal Smart Key. Designed for modern G-Chassis BMWs with BDC2, BDC3, and BCP system vehicles.
Wide Compatibility & Advanced Support
The Lonsdor BM3S seamlessly supports:
l2020-2024 BMW Models, including:
2, 3, 4, 5, 6, 7, 8 Series
X3, X4, X5, X6, X7
Z4 and more
l2021-2024 BMW 1 Series & 2 Series
l2022-2024 BMW X1 & X2
Core Advantages
1. Plug & Play Compatibility - Instantly works with mainstream 2020–2024 BMW models.
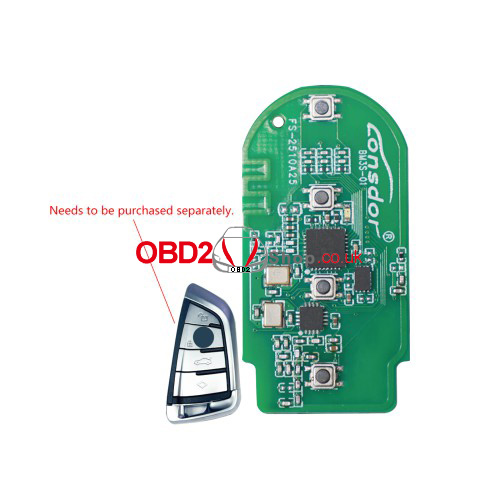
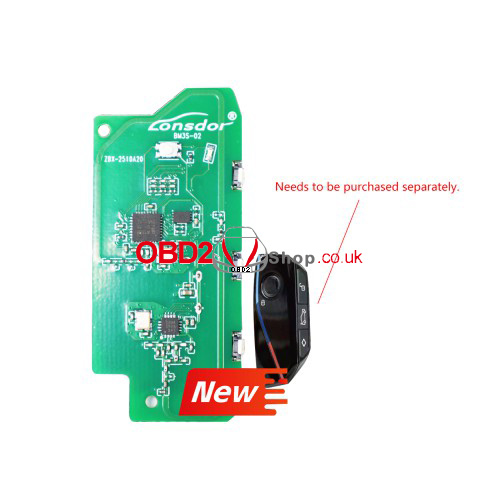
2. Two Circuit Board Options - Choose between BM3S-01 or BM3S-02 to match your style.
3. Targeted Performance - Engineered specifically for low-configuration BCP keys (without the J29D5C chip).
4. Professional Pairing - For seamless programming, pair it with the trusted Lonsdor K518 Key Programmer.
Who Is This For?
1. BMW owners who want a reliable spare or replacement smart key.
2. Anyone with a compatible 2020–2024 BMW model.
3. Those looking for a cost-effective and trusted alternative to dealership keys.
Ready to access more? Experience smarter control with Lonsdor.
www.obd2shop.co.uk
Oznake: lonsdor bm3s smart key
utorak, 09.12.2025.
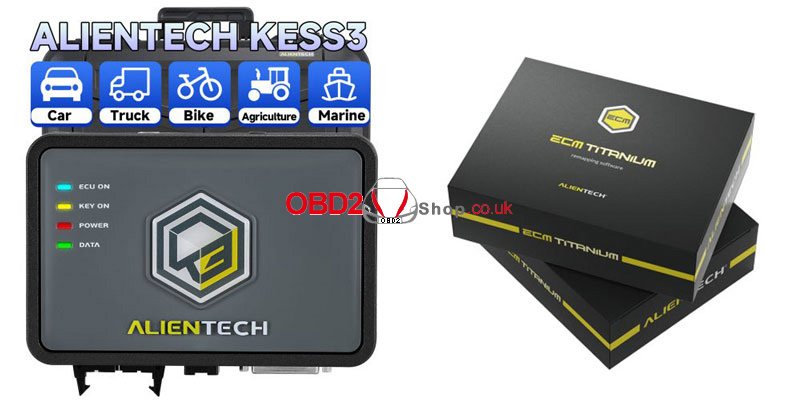
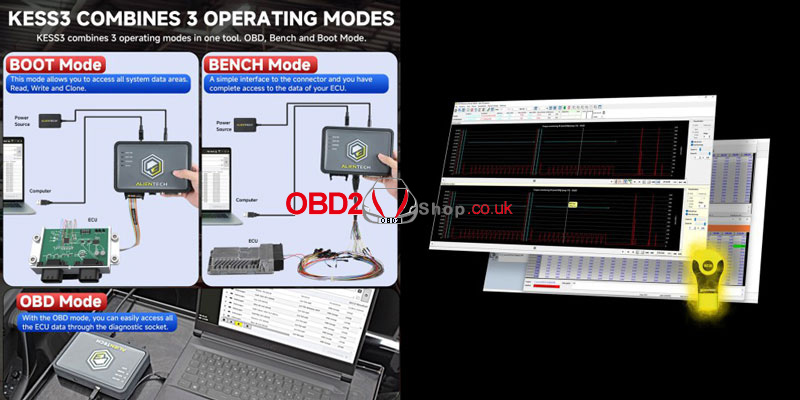
Alientech KESS V3 & ECU Titanium Up to 40% Off - 100 Units Only
Hurry! Only 100 Bundles Available. Sale Ends Jan 12, 2026. Tired of paying full price for premium diagnostics? This is your chance.
For a limited time only, Alientech's "Winter Special" slashes prices on the industry-leading KESS V3 tools and ECM Titanium software. Grab discounts of up to 40% before this exclusive offer disappears on January 12, 2026.
This offer is strictly limited to the first 100 redemption bundles. Don't miss out.
Flash Deal Highlights:

Why Buy Now?
1. Highest Discounts of the Year: This is the best pricing on Alientech products.
2. Limited Availability: Only 100 promotional bundles. First-come, first-served.
3. Universal Eligibility: Open to all - new customers, existing users, and even those with expired subscriptions.
4. Future-Proof Your Workshop: Acquire top-tier tools now, dominate the market tomorrow.
The clock is ticking. This offer vanishes on January 12, 2026, or when the 100-bundle limit is reached - whichever comes first.
Act Now. Upgrade Your Game. Dominate the Competition.
www.obd2shop.co.uk
Oznake: alientech kess v3
ponedjeljak, 08.12.2025.
ACDP (PC Version) – How to Quickly Find Saved Data
This guide explains how to locate saved vehicle data files in the ACDP PC Version.
Ensure your software is up to date before proceeding.
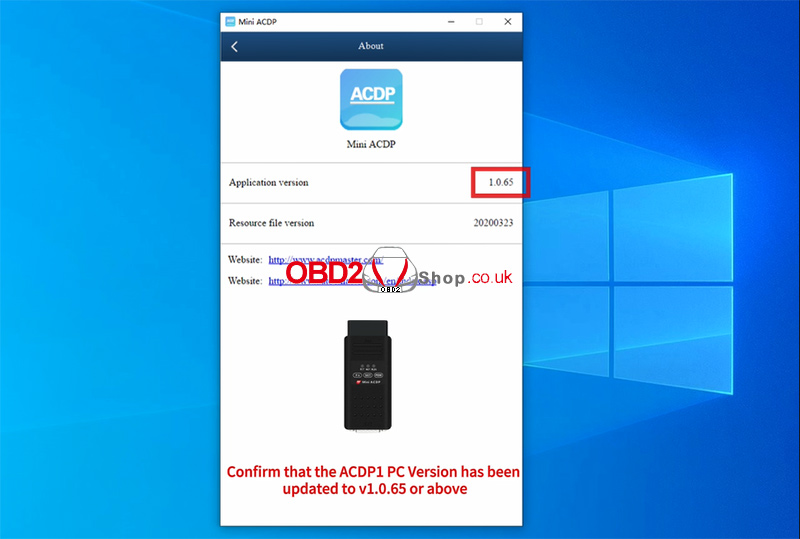
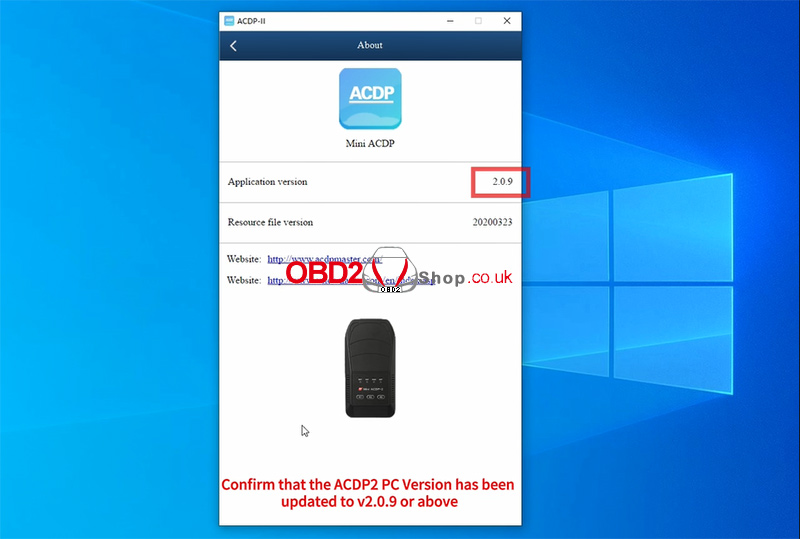
Software Version Requirements
To use this feature, ensure your ACDP software is updated to the following versions or above:
ACDP1 PC Version: V1.0.65+
ACDP2 PC Version: V2.0.9+
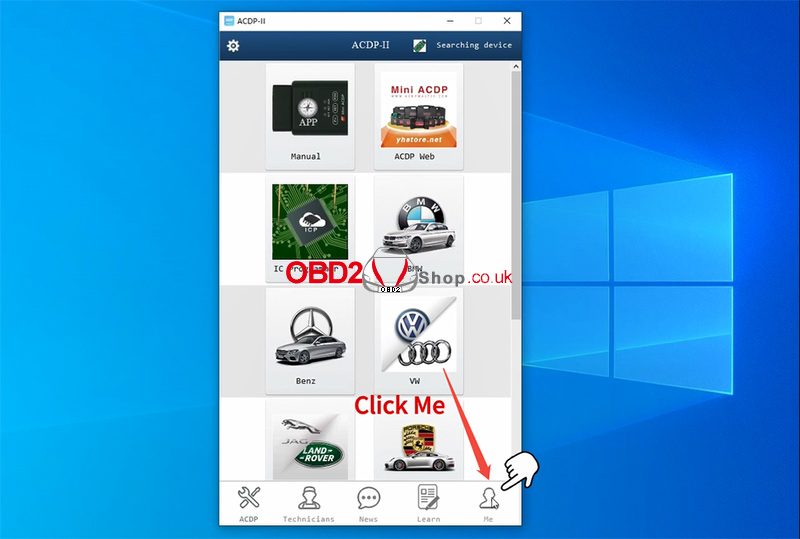
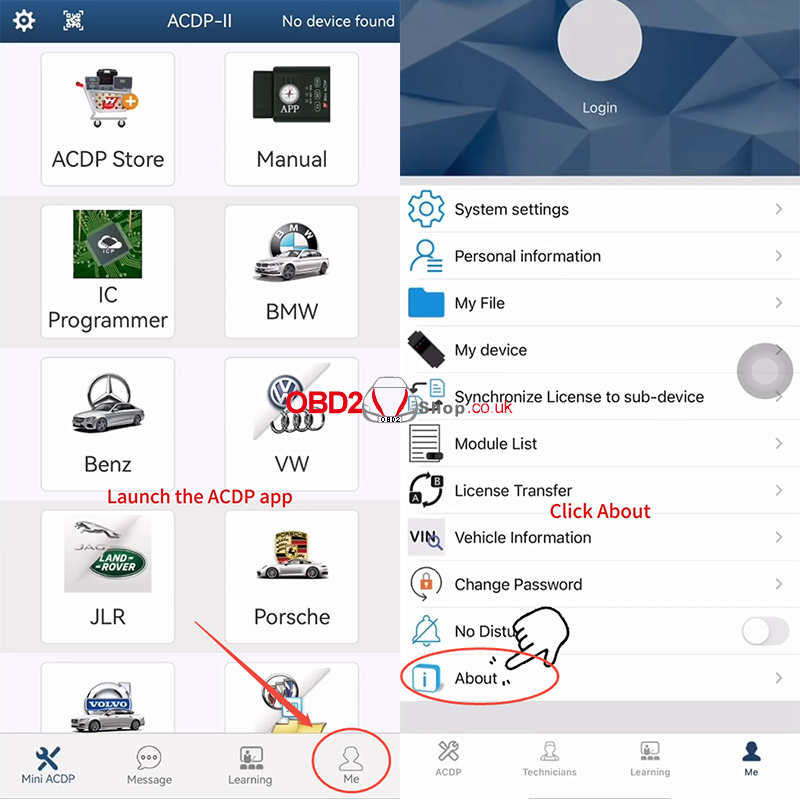
1. Launch the ACDP PC application.
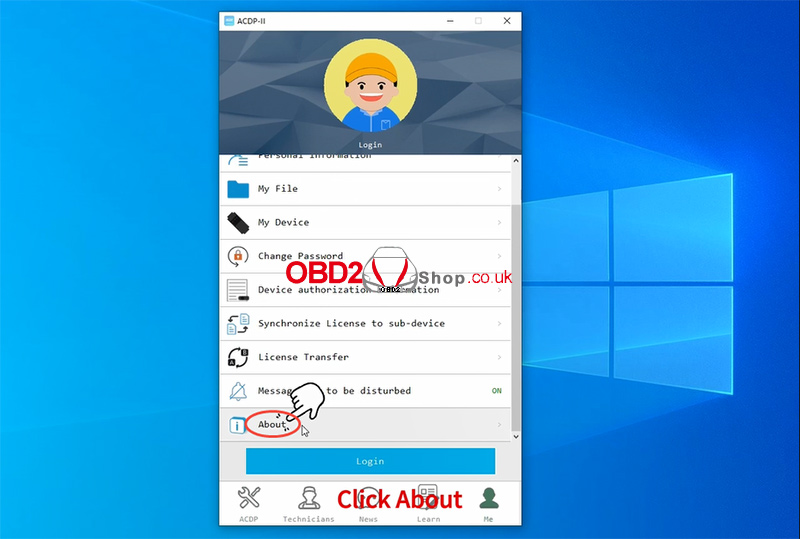
2. Go to [Me] ’ [About].
3. Confirm that your ACDP1 or ACDP2 PC version meets the required update level.
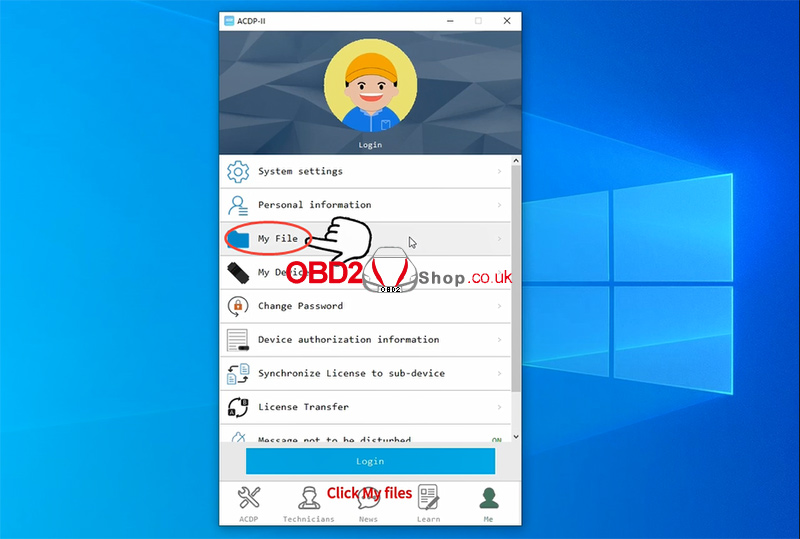
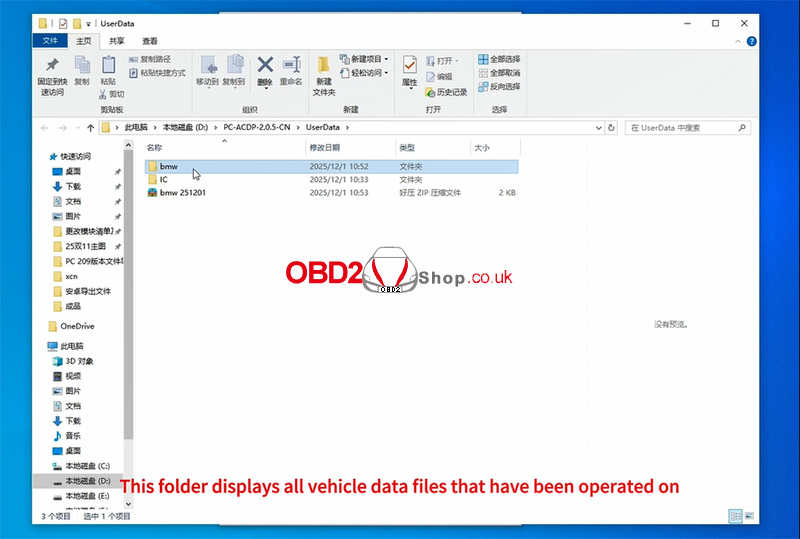
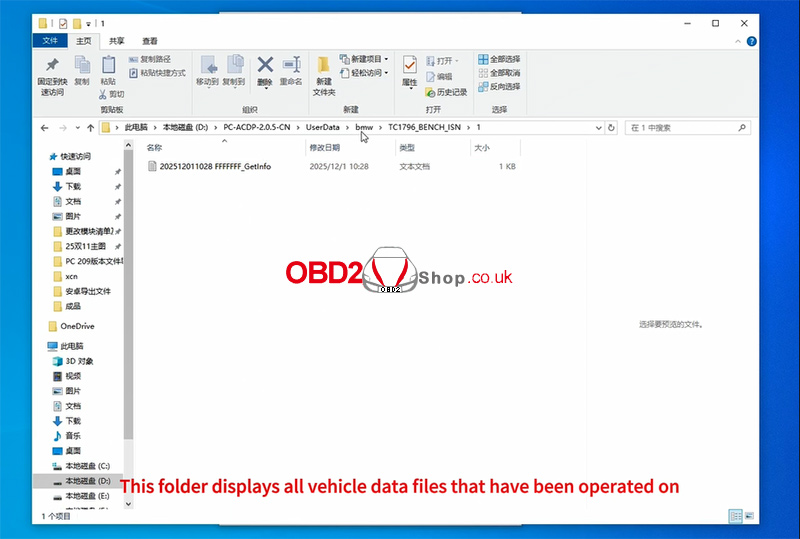
Locate Saved Vehicle Data Files
1. Click [My File].
2. The system will automatically open the UserData folder.
3. This folder contains all vehicle model data files generated during your operations.
4. Browse and select the file you need.
Watch the full tutorial here:
https://youtu.be/-SoisU-0_Pw
For tools, updates, and more guides, visit:
www.obd2shop.co.uk
Oznake: yanhua mini acdp
petak, 05.12.2025.
OBDSTAR DC706 Guide: Reading & Writing Data for ZOTYE 6DCT360 TCM
This guide demonstrates the procedure for reading and writing Transmission Control Module (TCM) data on the ZOTYE 6DCT360 using the OBDSTAR DC706 ECU Tool (also compatible with Keymaster G3).
Required Tools & Equipment:
OBDSTAR DC706 / Keymaster G3
High-power DC Regulated Power Supply
Main Cable
ECU Clone Jumper
MP001 Programmer
ZOTYE 6DCT360 TCM Unit

Step-by-Step Procedure:
1. Preparation & Software
Ensure your OBDSTAR DC706 device is updated with the latest software version.
Launch the ECU Flasher application and select the Passenger Car > TCM category.
Use the search function (top right) to quickly locate the ZOTYE 6DCT360 model.


2. Guided Instructions & Connection
Tap the Guide section. Carefully review the Warm Reminder, Menu Description, Operation Guide, Connection Methods, and Special Notes.
Tap Pinout and select BENCH mode. Verify that the displayed module matches your TCM's appearance.
Tap Connector Pinout and connect your cables to the TCM accordingly, following the diagram.


3. Reading & Writing Data
After completing the physical connections, tap Start.
The tool will now establish communication with the ECU.
First, create a data backup (READ): Always back up the original data first. You can customize the backup file name. The storage location is shown on the left side of the screen.
Write data (WRITE): Proceed to write the required data file into the module. The file management system allows you to filter files by name, modification time, or size.
Verification: If the data file has not been modified, verification is typically not required.
Completion: Once the process is finished, the operation is complete.


For a visual walkthrough, follow along with our video guide:
https://youtu.be/CoQ7MjJfdtM
www.obd2shop.co.uk
Oznake: obdstar dc706
četvrtak, 04.12.2025.
How to Download and Upgrade Launch CR HD V2 Software
Keeping your Launch CR HD V2 device updated ensures optimal performance, improved compatibility, and access to the latest diagnostic features. Follow the step-by-step guide below to download and upgrade the software using the official Launch upgrade tool.
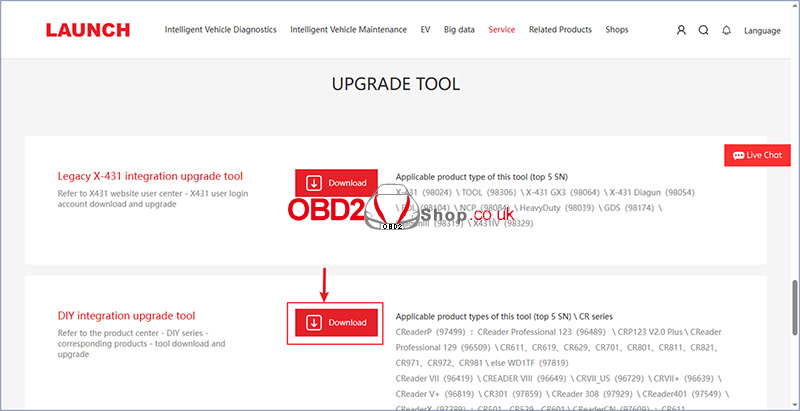
Step 1: Download the DIY Integration Upgrade Tool
Open your browser and go to the official Launch download page:
https://en.cnlaunch.com/download/
Locate the option labeled [DIY Integration Upgrade Tool].
Click [Download] to begin downloading the installer.
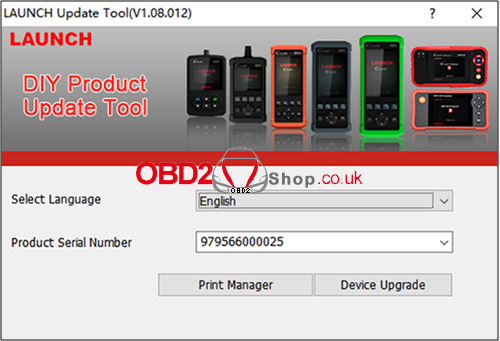
Step 2: Install and Open the Upgrade Tool
After the download is complete, install the software following the on-screen instructions.
Launch the client software.
Select your preferred language (English is set as the default).
Enter the serial number of your CR HD V2 device.
Click [Device Upgrade] to continue.
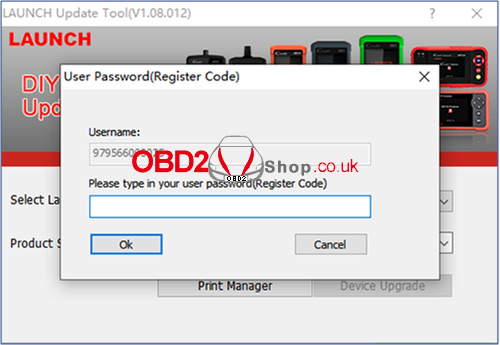
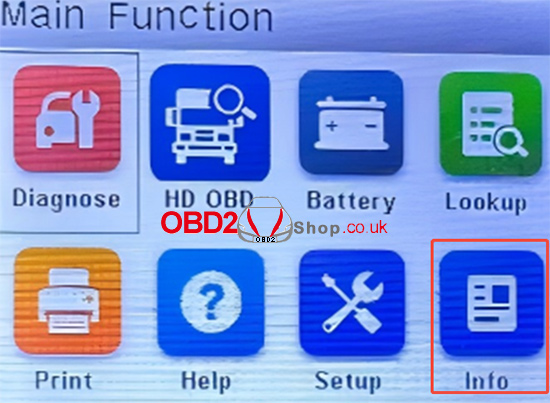
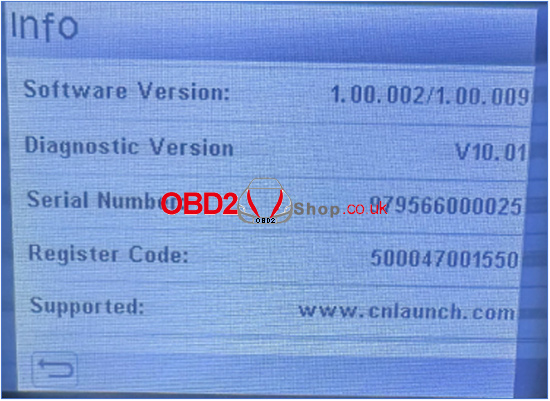
Step 3: Enter the Registration Code
The system will prompt you to enter the Registration Code.
On your CR HD V2 device, go to:
Function Homepage ’ Info ’ Register Code
Copy the registration code displayed on your device and enter it into the upgrade tool.
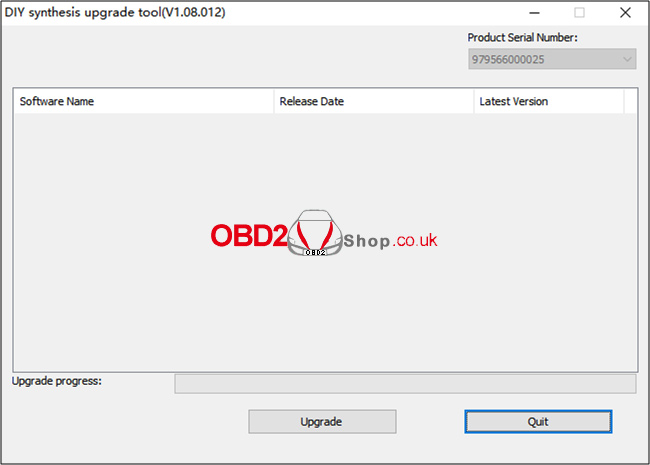
Step 4: Select and Install Available Updates
Once the registration code is verified, the available software versions will be displayed.
Select the updates you want to install.
If your device is already up to date, the software list will appear empty.
Click [Upgrade] to begin updating your device.
For more diagnostic tools and accessories, visit:
www.obd2shop.co.uk
Oznake: launch cr hd v2
ACDP Folder Export Tutorial on iOS (Version 3.6.5 and Above)
This guide will show you how to export folders from the Yanhua ACDP app on an iOS device. Before starting, make sure your ACDP app is updated to version 3.6.5 or above.
Step 1: Check Your App Version
Launch the ACDP app.
Go to [Me] ’ [About].
Confirm that your app version is 3.6.5 or higher.
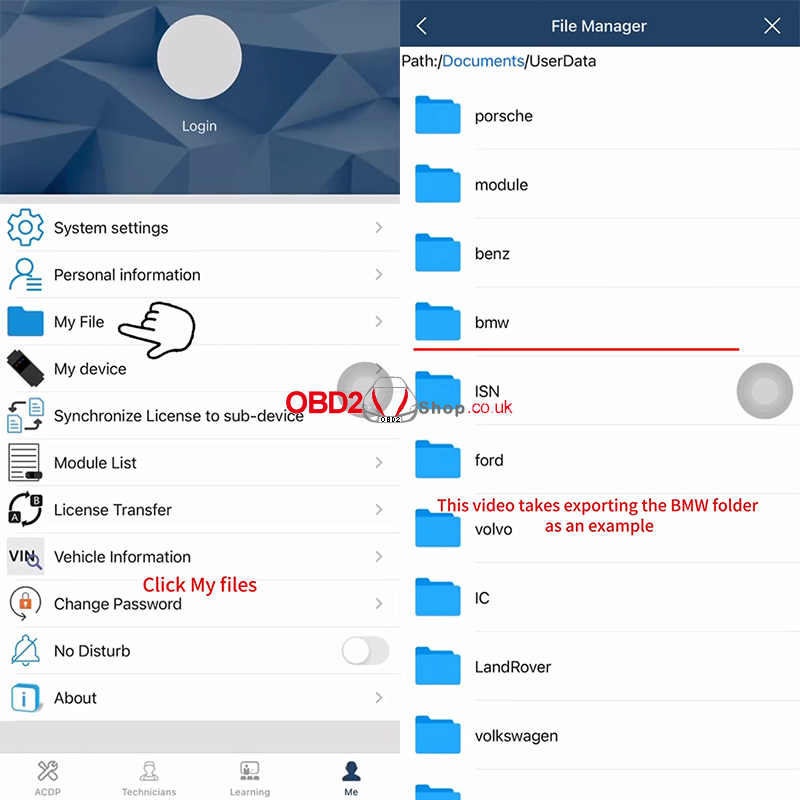
Step 2: Open “My File”
Tap [My File].
All vehicle model folders you have worked on will appear on this page.
Locate the folder you want to export and prepare to compress it.
In this tutorial, we use the BMW folder as an example.
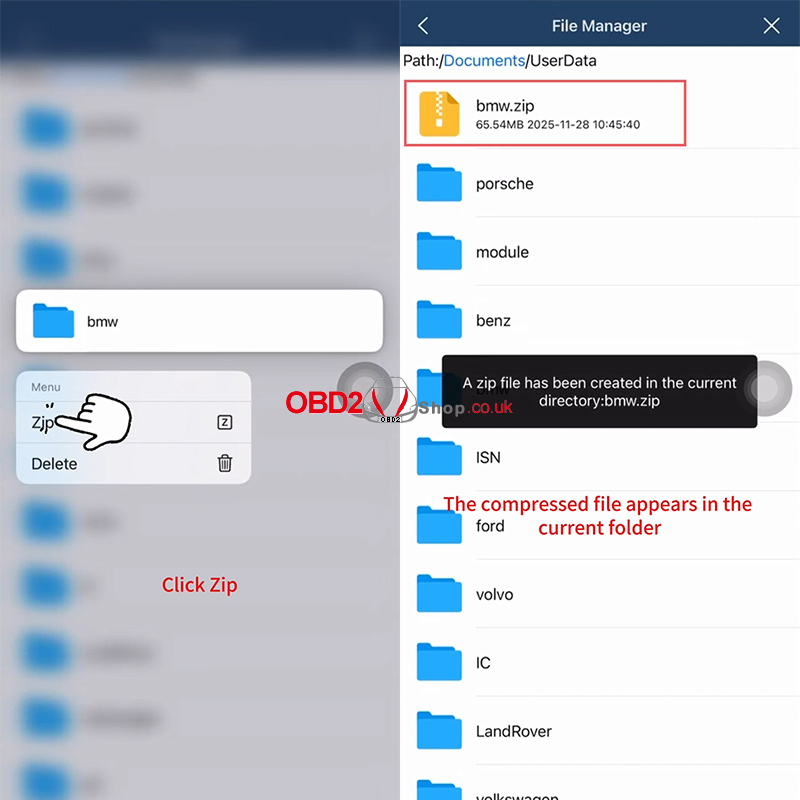
Step 3: Compress the Folder
Long-press the BMW folder.
Select [Zip].
A message will appear:
“A zip file has been created in the current directory: bmw.zip.”
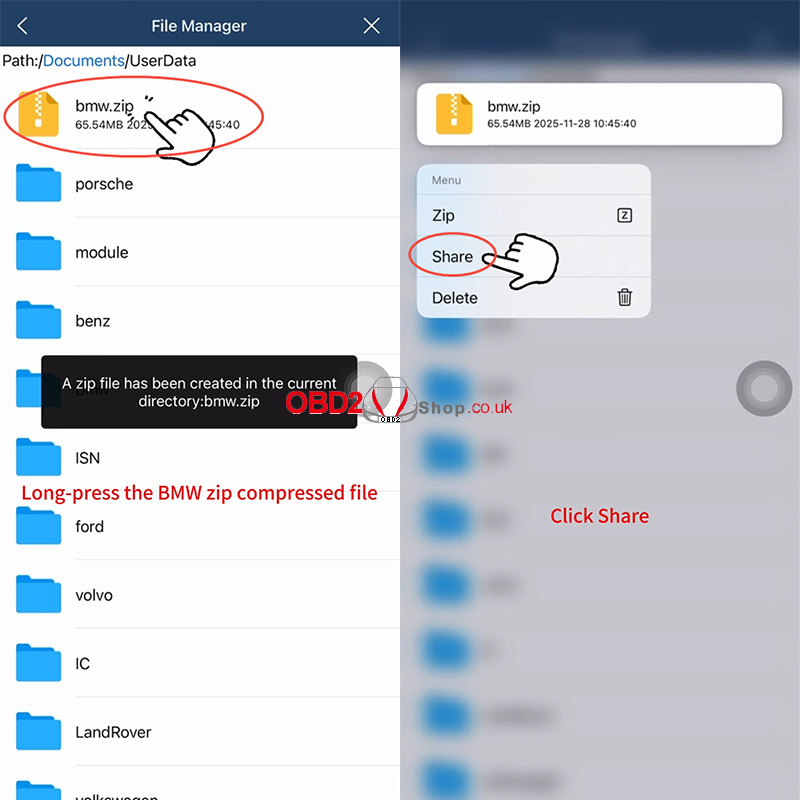
Long-press the newly created bmw.zip file and tap [Share].
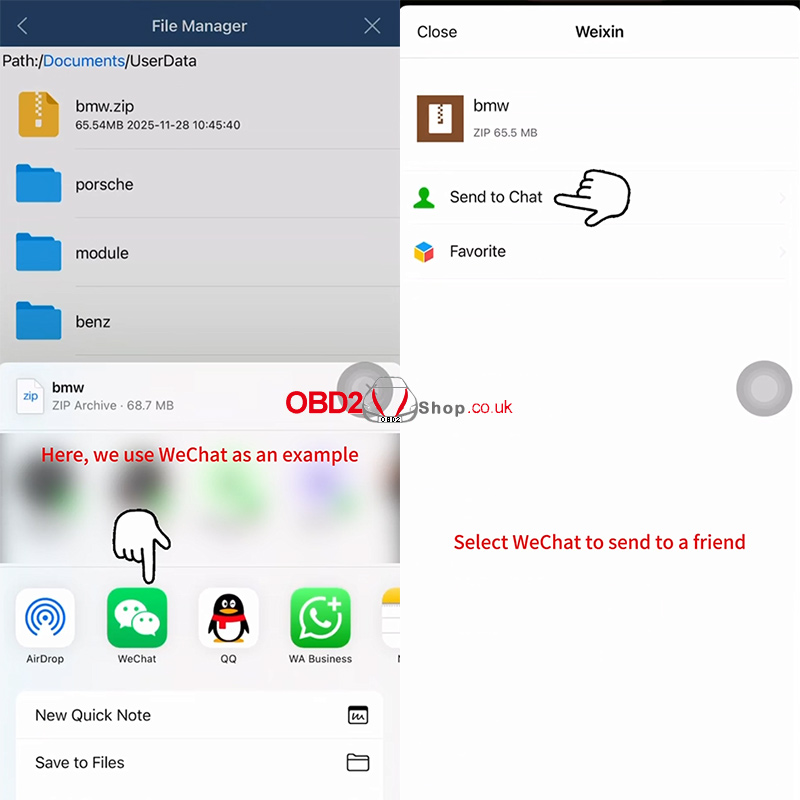
Step 4: Export Through Third-Party Software
Choose a third-party app for export.
In this example, we select WeChat.
Choose a contact and send the zipped file.
For a full demonstration, watch the video tutorial:
https://www.youtube.com/embed/NceJyQ56Bsk
www.obd2shop.co.uk
Oznake: yanhua acdp
srijeda, 03.12.2025.
Lonsdor K518 PRO Program 2024 Honda CR-V All Keys Lost OK
This tutorial guides you through programming a new smart key for the 2024 Honda CR-V when all keys are lost using the Lonsdor K518 PRO.
Tools Needed
Lonsdor K518 Key Programmer
OBD communication cable
Lonsdor Honda Smart Key
Step-by-Step Procedure
Step 1: Generate Smart Key
1. Connect K518 PRO to the OBD port, select: Generate Smart Key’ HONDA ’ CRV ’ CRV 4A
2. Place the new smart key in the card slot.
3. Click "Generate." Wait for "Generate successfully".


Step 2: Program All Keys Lost
1. Return to the main menu, choose: IMMO & Remote ’ HONDA ’ Select From Vehicle ’Asia ’ CR-V ’2023- ’ Smart Key’PUSH Button ’ All Smart Key Lost
2. Follow the on-screen prompts and click OK:
` Turn the ignition OFF.
a Place the new smart key inside the vehicle. Ensure no other keys are within 5 meters.
b Press the start button twice. Ignition will not turn on (all keys lost), press Cancel.
c Long-press the start button until ignition turns on.
d Click OK and enter the number of keys to program.
e Within 15 seconds, turn the ignition OFF, then back ON. Wait for the security light to go off, then click OK. Repeat the OFF/ON cycle within 15 seconds.
f The K518 tool will confirm: "Number of programmed keys."
The key programming is completed.


Step 3: Test the Key
1. Turn the ignition OFF and restart.
2. Test the key:
` Step on the brake and press the start button - the engine should start.
a Test remote lock/unlock - functions should work normally.


For more tutorials and automotive programming tips, stay tuned.
www.obd2shop.co.uk
Oznake: lonsdor k518 pro
utorak, 02.12.2025.
ACDP Folder Export Tutorial for Android (Version 3.0.142 and Above)
This guide explains how to export vehicle model folders from the ACDP Android app.
Step 1: Preparation
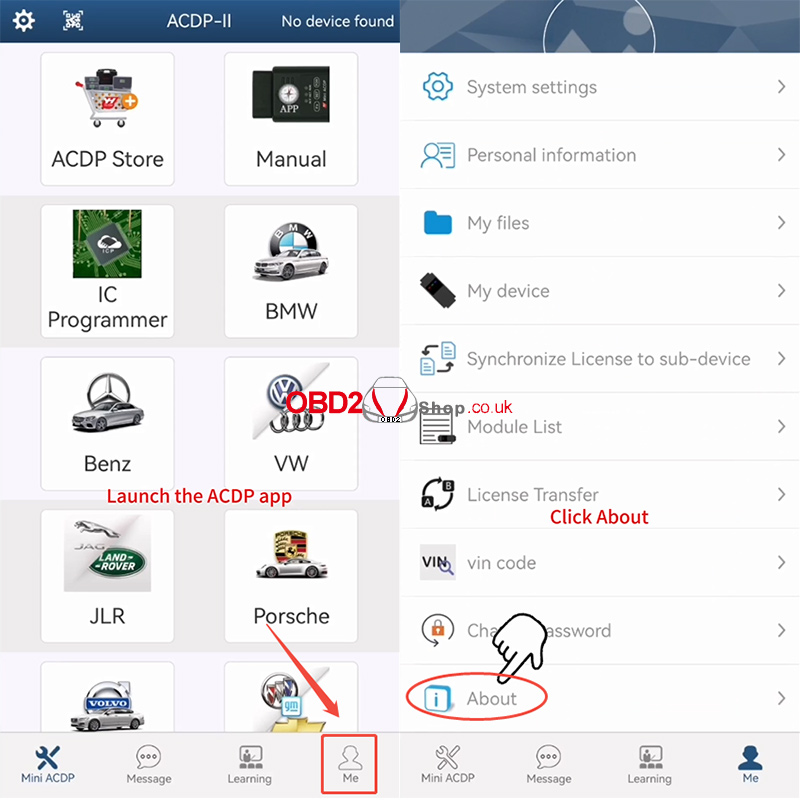
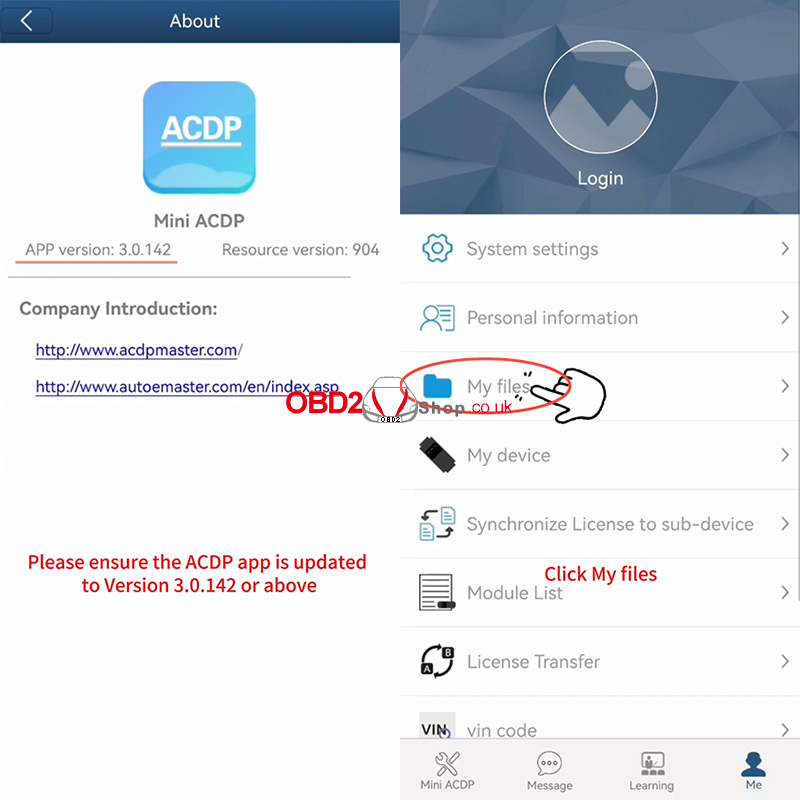
Ensure your ACDP application is updated to Version 3.0.142 or above. Launch the app and navigate to the [Me] tab, then tap [About] to verify your version.
Step 2: Access Your Files
From the [Me] section, tap [My files]. You will now see a list of all vehicle model folders you have previously worked on.
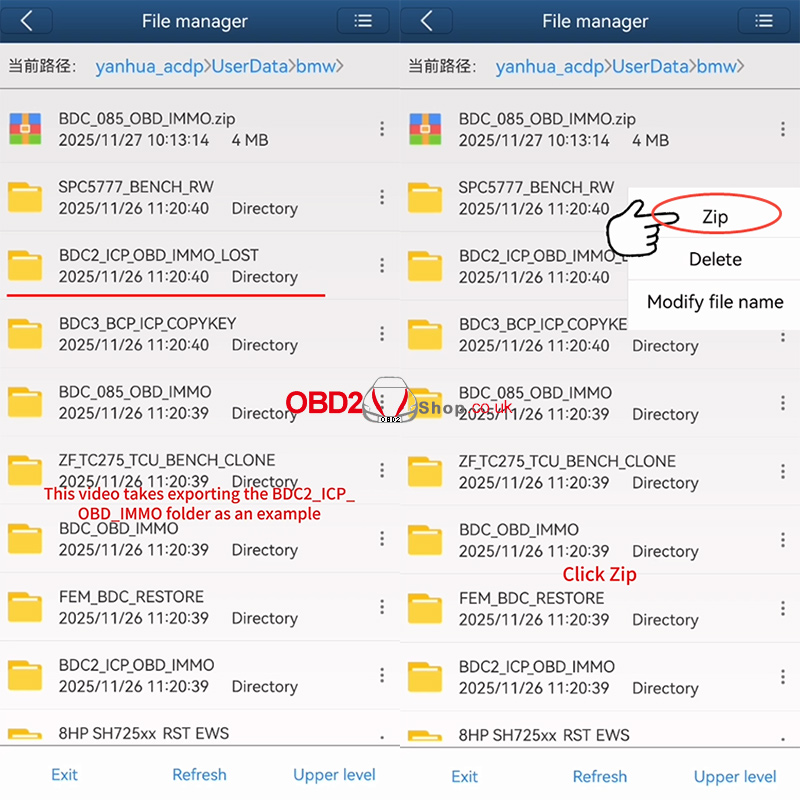
Step 3: Compress the Target Folder
Locate the specific folder you wish to export (e.g., BDC2_ICP_OBD_IMMO). Tap the icon on the right side of that folder and select the [Zip] option from the menu.
You can edit the name of the compressed file if needed. Confirm by tapping [OK].
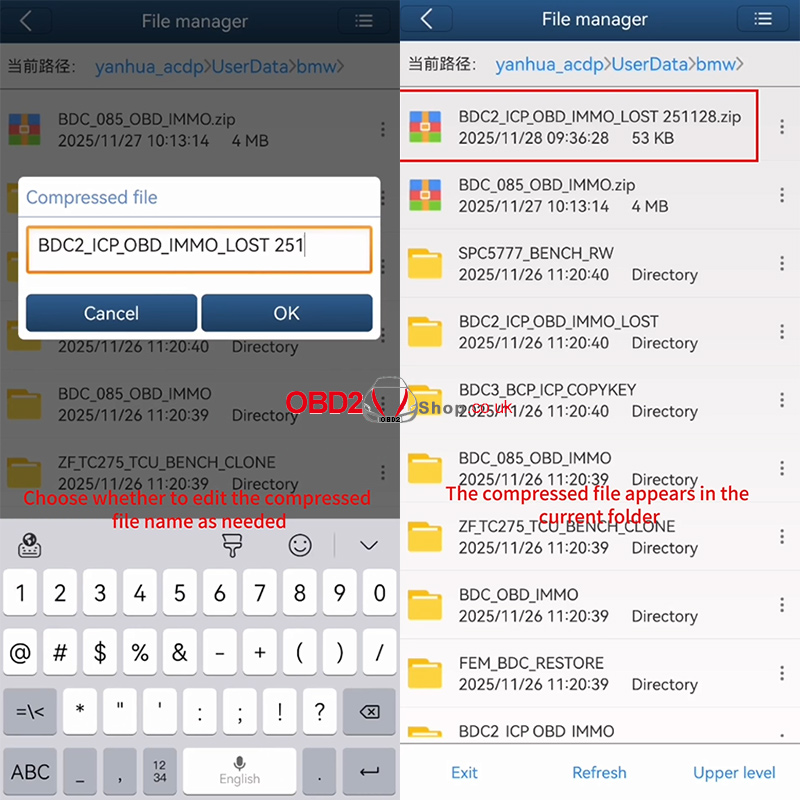
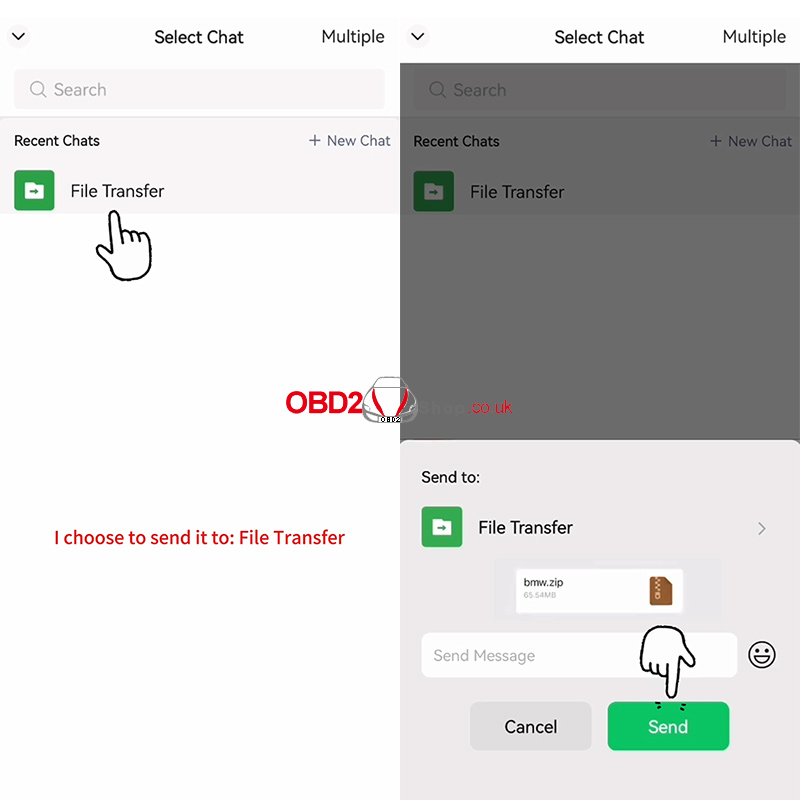
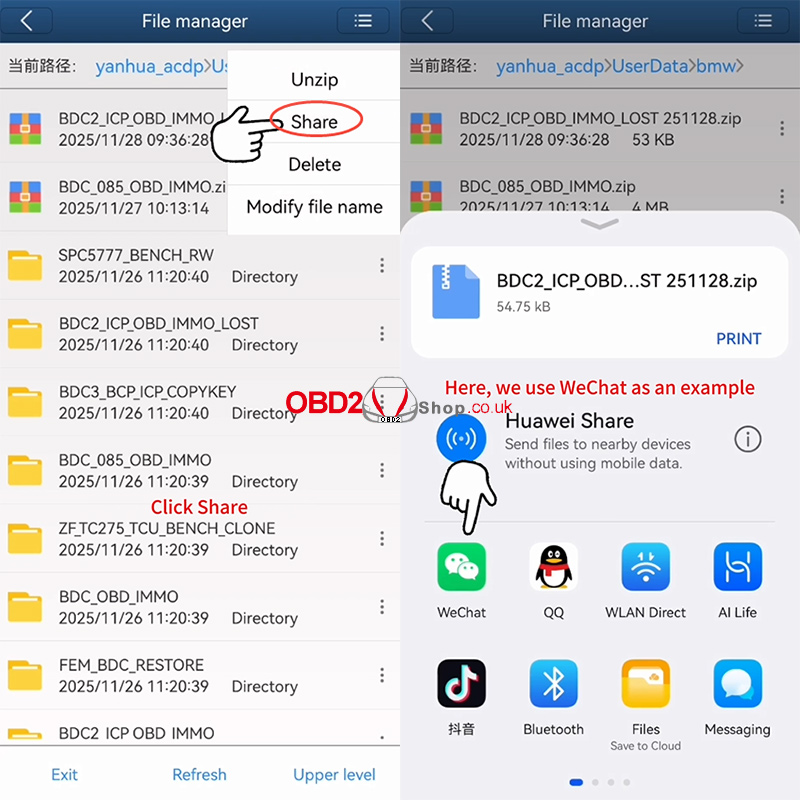
Step 4: Share and Export
Once the compressed .zip file appears in the folder list, tap the icon on its right side and choose [Share].
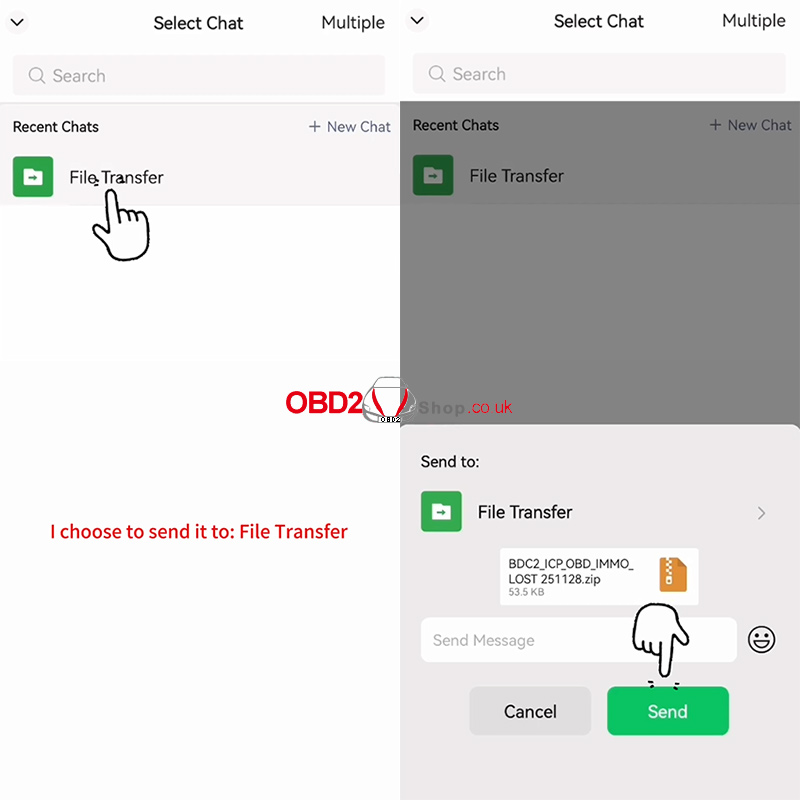
You can now export the file using any third-party application. This tutorial uses WeChat as an example—simply select WeChat and send the file to a contact or group.
Video Guide:
https://www.youtube.com/embed/14EzE4BipXk
For more information, please visit www.obd2shop.co.uk
Oznake: yanhua mini acdp
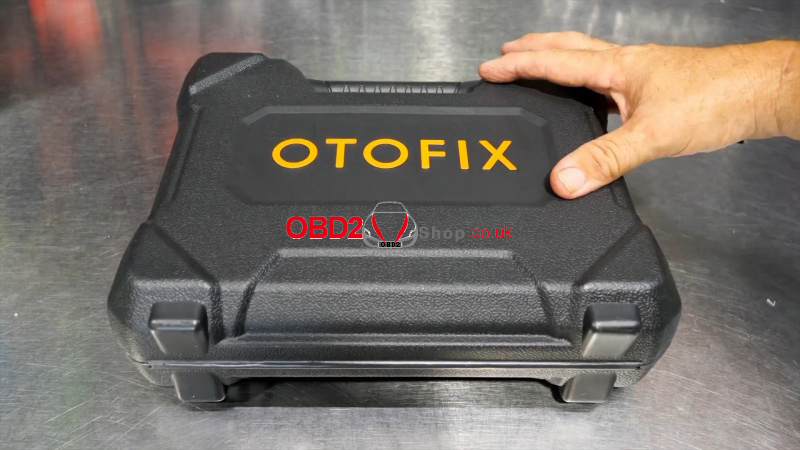
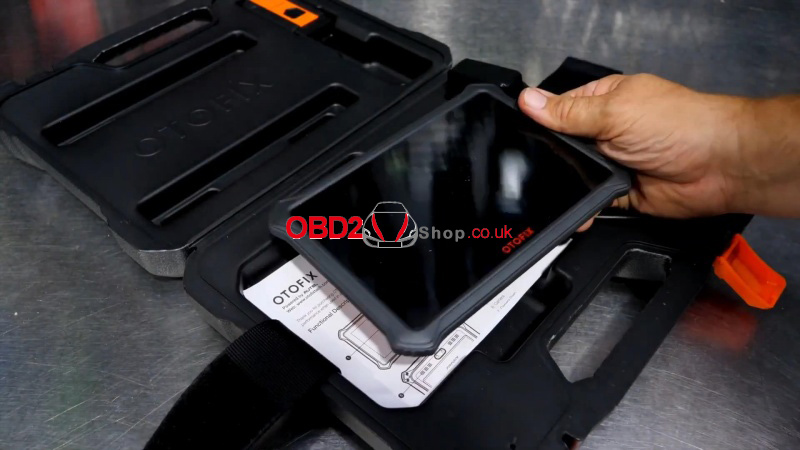
OTOFIX D1 Review: Powerful Diagnostics Meets Affordable Price
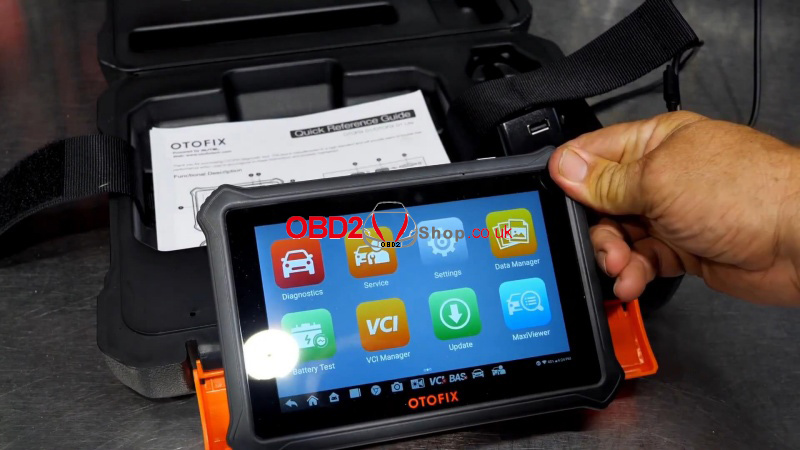
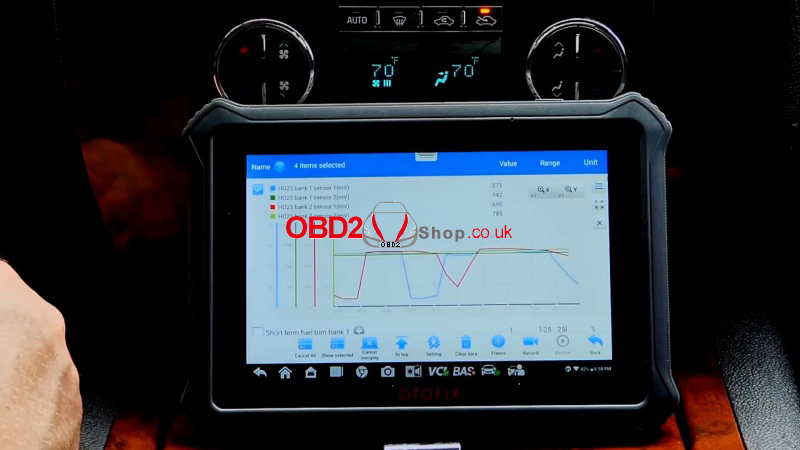
For technicians seeking a reliable diagnostic solution, the OTOFIX D1 delivers professional performance at an affordable price. Powered by AUTEL, this Android tablet boasts serious diagnostic capabilities in a compact design. The OTOFIX Diagnostic Tool brings shop-grade capabilities to your toolbox without the complexity.
Key Features at a Glance:
1. Bi-Directional Control: Perform active tests, reset modules, and verify repairs with precision.
2. AUTEL-Grade Performance: Built with trusted algorithms and protocols used by industry leaders.
3. Portable & Lightweight: A slim Android tablet that’s easy to handle and transport.
4. 2 Years of Free Updates: No hidden costs - stay current with regular software and vehicle coverage updates.
5. Broad Vehicle Coverage: Supports over 140 manufacturers, including GM, BMW, Aston Martin, and more.
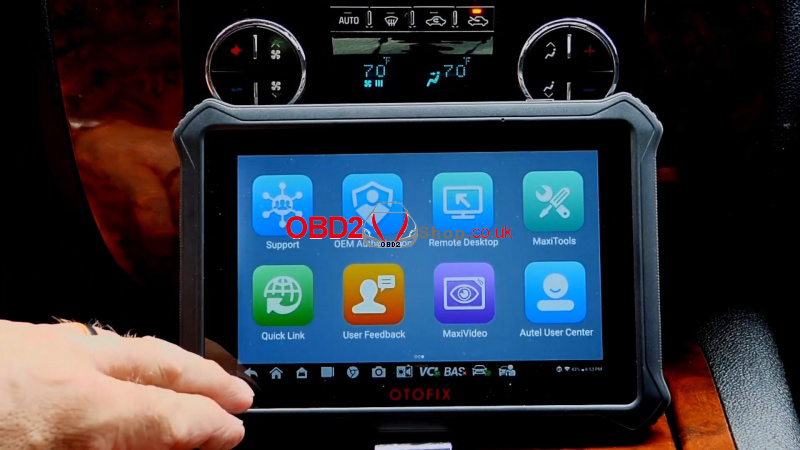
Real-World Performance:
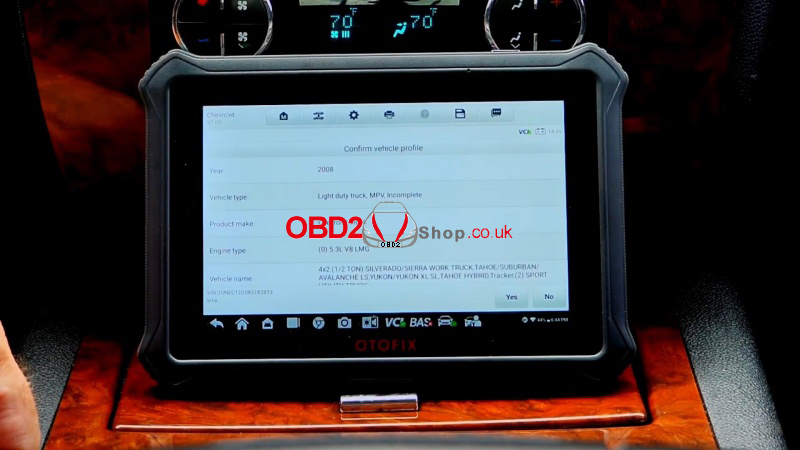
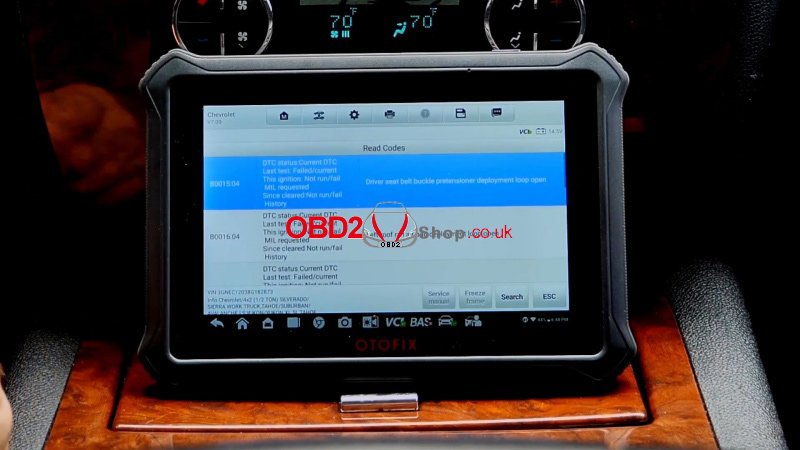
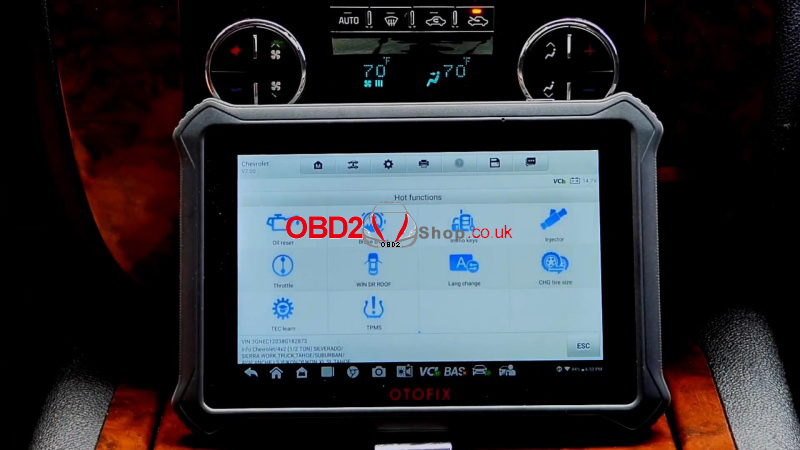
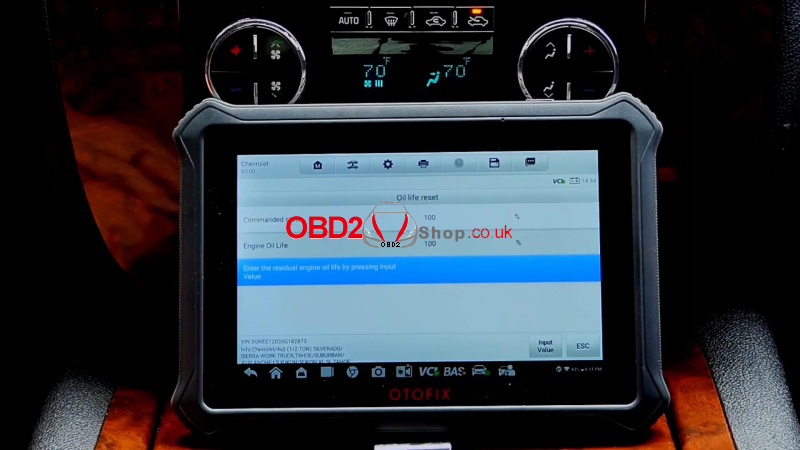
In a real-time test on a mid-2000s GM truck, the OTOFIX D1 quickly connected via Bluetooth, identified multiple fault codes (including airbag and TPMS issues related to a past rollover), and enabled live data streaming and module resets. Functions like oil life reset, injector testing, and tire size programming were easily accessible through the user-friendly interface.
Why We Recommend the OTOFIX D1:
lEasy Setup & Updates
Out of the box, the tablet is ready to use. Updates are straightforward and included for two years.
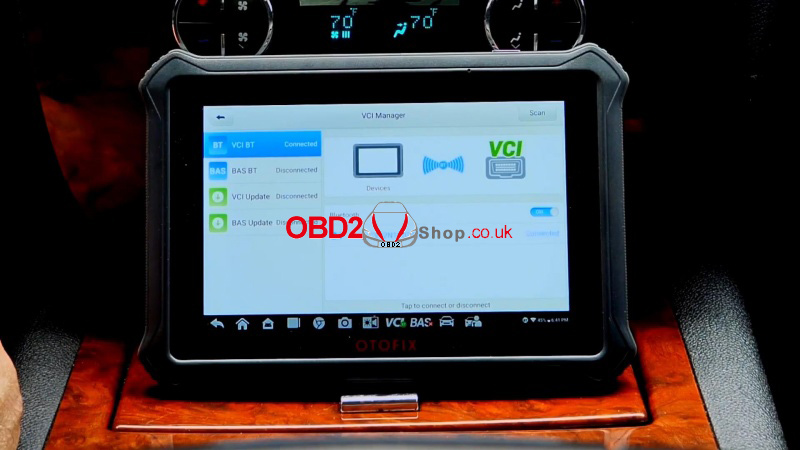
lVersatile Connectivity
Use the Bluetooth dongle for wireless diagnostics or connect via USB-C for a wired setup.
lHelpful Hot Functions
From brake bleeds to key programming, the D1 offers a range of special functions that save time and effort.
lClear Live Data & Graphing
Monitor sensor readings, misfire counts, O2 sensor data, and more - all in real time.

Conclusion:
The OTOFIX D1 delivers professional-level diagnostics in a portable, affordable package. Whether you're in a shop or on the go, this OTOFIX D1 Diagnostic Tool offers the power and reliability you need without the high price tag. With free updates for two years and broad vehicle support, it’s a smart investment for any automotive professional.
www.obd2shop.co.uk
Oznake: OTOFIX D1

| < | prosinac, 2025 | > | ||||
| P | U | S | Č | P | S | N |
| 1 | 2 | 3 | 4 | 5 | 6 | 7 |
| 8 | 9 | 10 | 11 | 12 | 13 | 14 |
| 15 | 16 | 17 | 18 | 19 | 20 | 21 |
| 22 | 23 | 24 | 25 | 26 | 27 | 28 |
| 29 | 30 | 31 | ||||
Svibanj 2026 (1)
Siječanj 2026 (19)
Prosinac 2025 (22)
Studeni 2025 (21)
Listopad 2025 (20)
Rujan 2025 (21)
Kolovoz 2025 (8)
Srpanj 2025 (13)
Lipanj 2025 (9)
Svibanj 2025 (12)
Travanj 2025 (10)
Ožujak 2025 (12)
Veljača 2025 (14)
Siječanj 2025 (8)
Prosinac 2024 (6)
Studeni 2024 (6)
Listopad 2024 (4)
Rujan 2024 (7)
Kolovoz 2024 (14)
Srpanj 2024 (12)
Lipanj 2024 (10)
Svibanj 2024 (13)
Travanj 2024 (12)
Ožujak 2024 (11)
Veljača 2024 (2)
Siječanj 2024 (10)
Prosinac 2023 (8)
Studeni 2023 (6)
Listopad 2023 (7)
Rujan 2023 (9)
Kolovoz 2023 (6)
Srpanj 2023 (10)
Lipanj 2023 (4)
Veljača 2023 (8)
Siječanj 2023 (14)
Prosinac 2022 (13)
Studeni 2022 (14)
Listopad 2022 (18)
Rujan 2022 (9)
Kolovoz 2022 (16)
Srpanj 2022 (11)
Lipanj 2022 (14)
Svibanj 2022 (13)
Travanj 2022 (12)
Ožujak 2022 (12)
Veljača 2022 (13)
Siječanj 2022 (10)
Srpanj 2021 (1)
Dnevnik.hr
Gol.hr
Zadovoljna.hr
Novaplus.hr
NovaTV.hr
DomaTV.hr
Mojamini.tv