OBD2 tools on OBD2shop.co.uk https://blog.dnevnik.hr/obd2shop
utorak, 31.01.2023.
(Fixed) Launch CRP123X Failed to access the VIN information
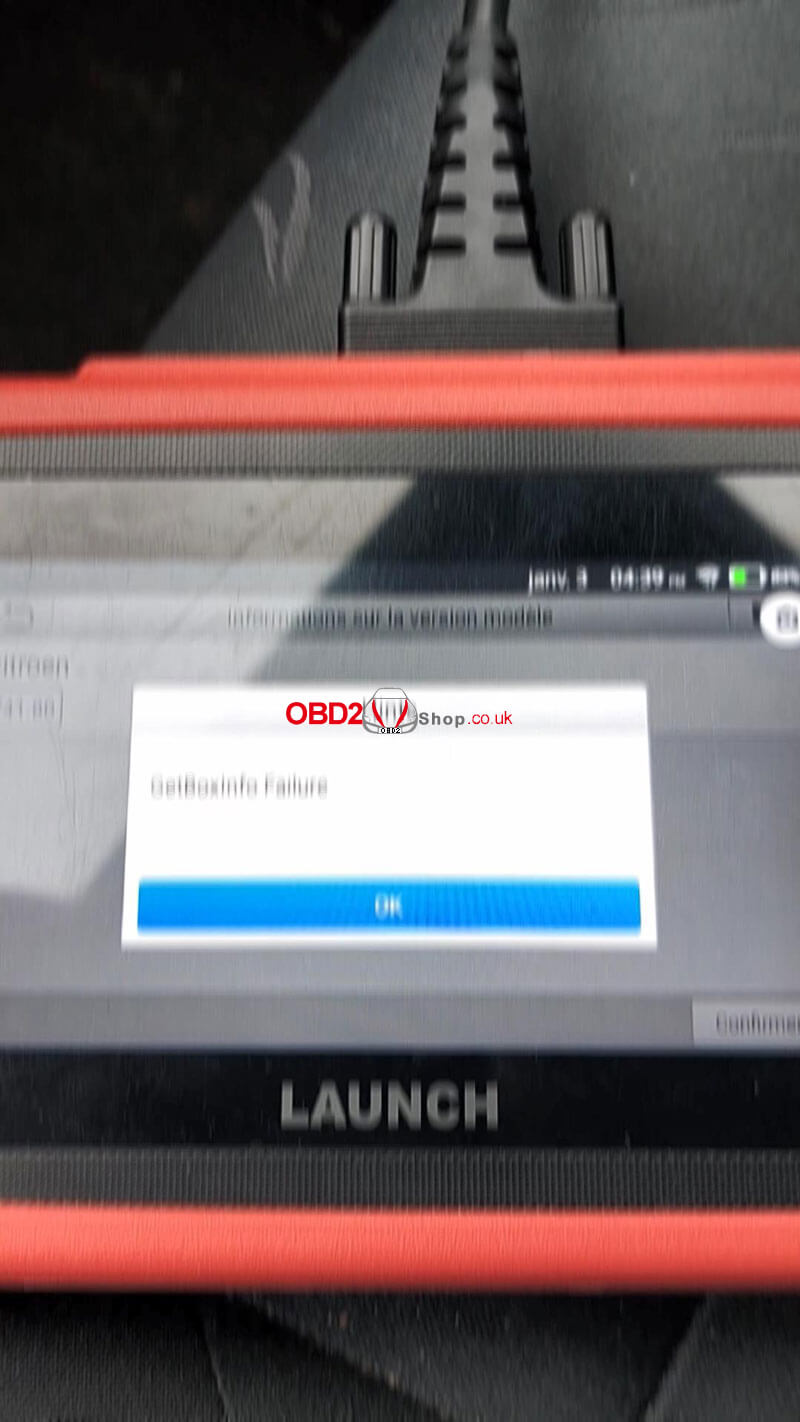
Customer Problem: My Launch CRP123X cannot recognize the VIN information and the screen displays as below:
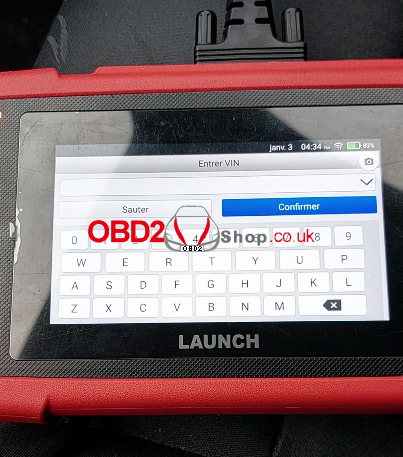
Solution: Find the settings, clear the cache, then try the update again. After the update, do a firmware repair in the data.
Note: To detect more and accurate VINs, a stable network connection is highly recommended.
For technical support of Launch X431 CRP123X Code Reader, please follow https://www.obd2shop.co.uk//launch-x431-crp123x-diagnostic-tool.html
Oznake: launch crp123x
ponedjeljak, 30.01.2023.
(Solution) Data lost with CAS4+ when using Yanhua Mini ACDP
Customer problem: I recently got data loss with cas3+ due to poor bluetooth transfer between android device and mini acdp, maybe this time I am lucky because this cas3+ is easy to fix and I wonder what I can do if I had a problem with cas4+ or female module...
Solution:
Situation 1. If CAS4/CAS4+ is interrupted in the middle and the coding is lost, the coding data can be restored and the vehicle can return to normal.
Steps:
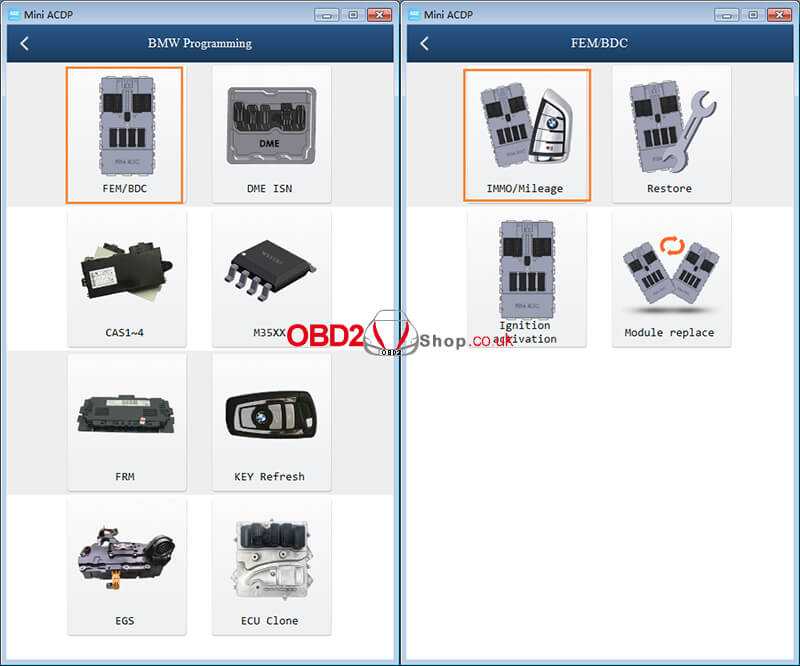
Select "BMW">>"CAS1-4">>"CAS4/CAS4+">>"OBD Mode">>"IMMO Mileage">>"Recover Coding data".
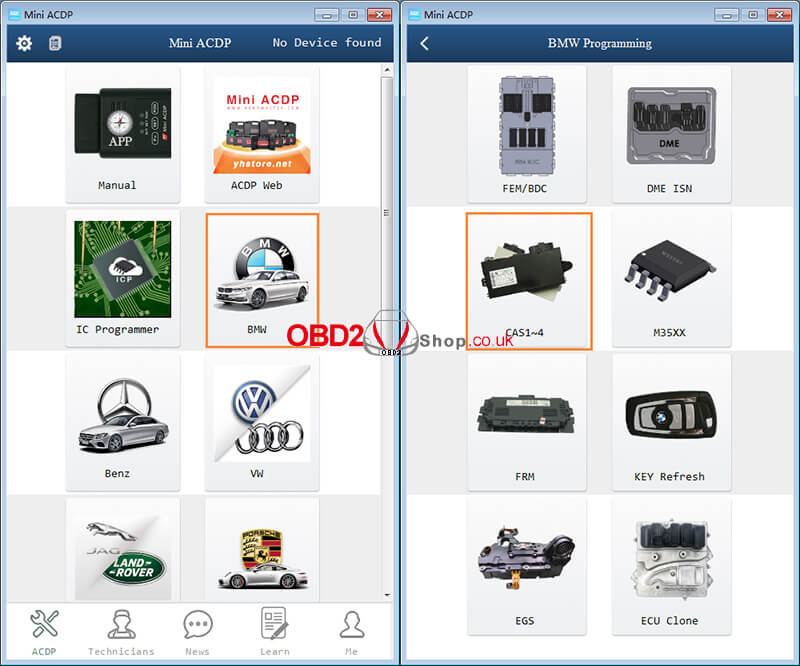
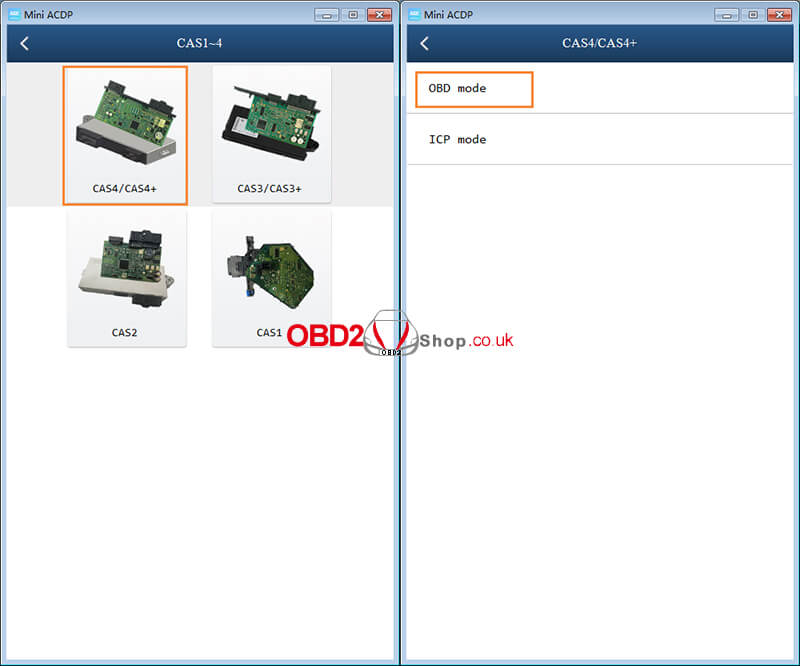
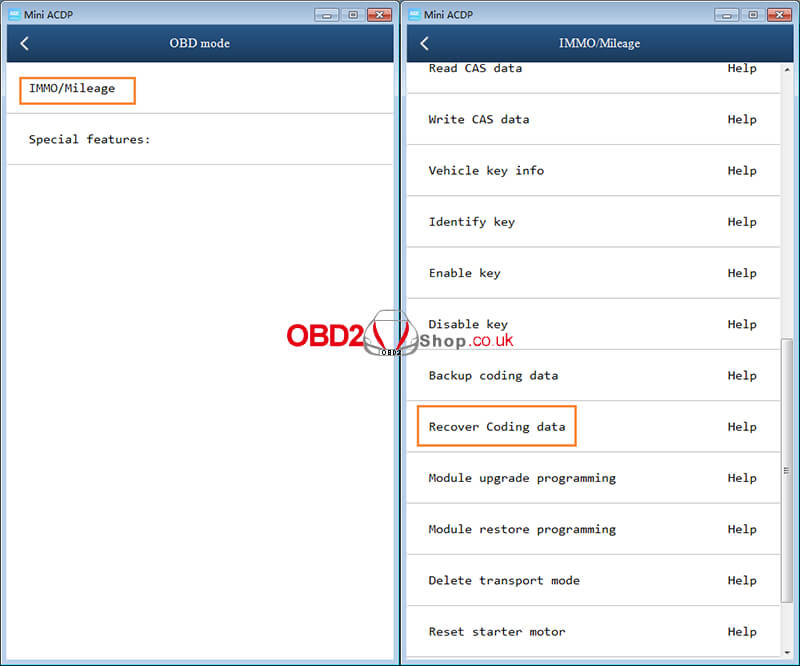
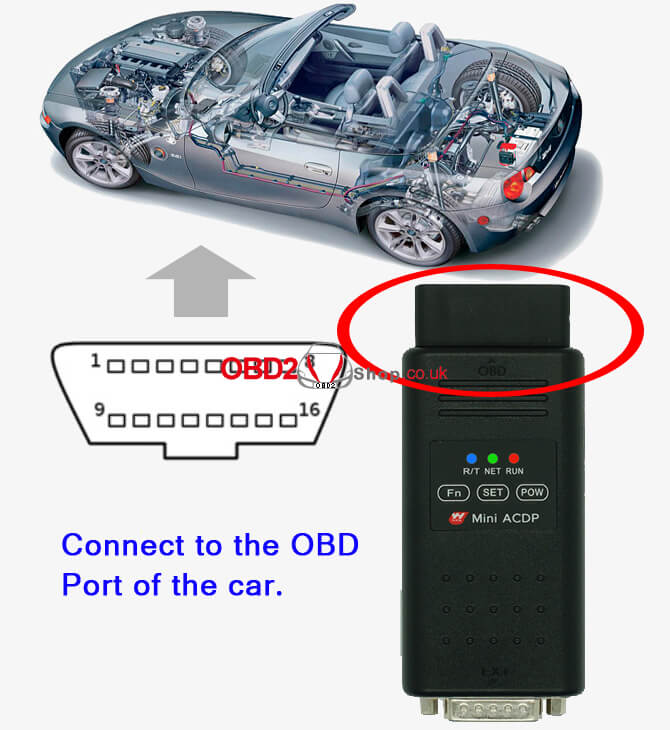
Note: Please connect ACDP to vehicle OBD port before recovering data.
Situation 2. If there is an interruption while running FEM or BDC, please do not quit midway, wait for about 15 minutes and the wallpaper will run automatically. If the code is lost, the EEPROM data and coding data on the mobile phone can be reset, and the vehicle can return to normal.
Steps:
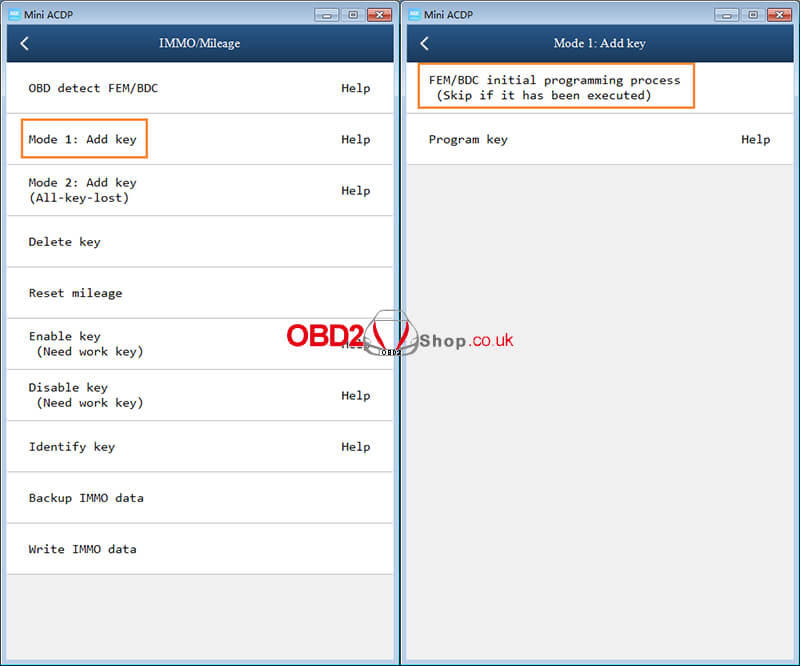
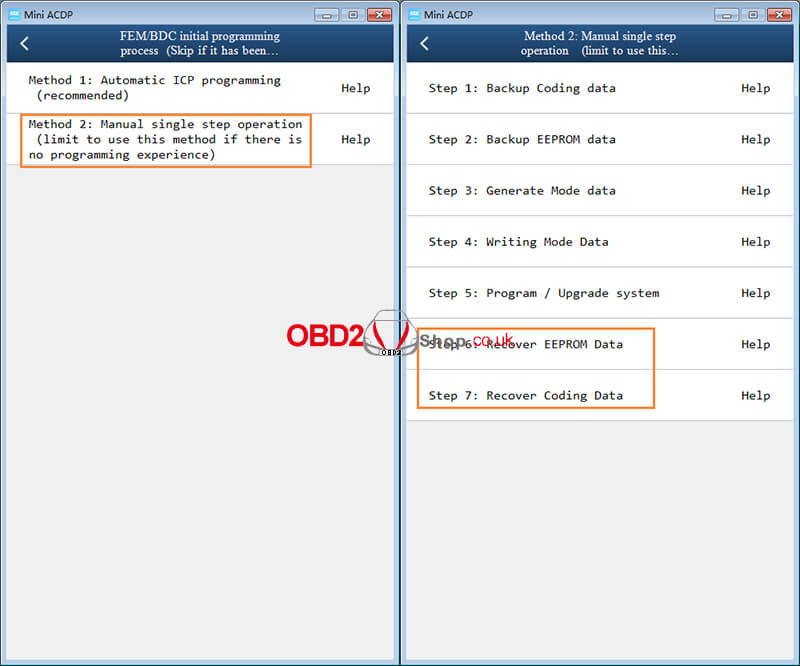
Select "BMW">>"FEM/BDC">>"IMMO Mileage">>"Mode 1: Add key">>"FEM/BDC initial programming process">>"Method 2: Manual single step operation".
Then choose "Step 6: Recover EEPROM Data" or "Step 7: Recover Coding Data" for data recovery.
For more technical services of Yanhua acdp, please pay attention to http://blog.obd2shop.co.uk/
Oznake: yanhua mini acdp
nedjelja, 29.01.2023.
Yanhua ACDP + Module 3 Read DME ISN for BMW MEVD172P(N20)
Customer question:
Hi, I use Yanhua Mini ACDP + Module 3 can't read ISN from MEVD172P(N20) F-series controller with (p can) in OBD/CAN mode. What can I do?
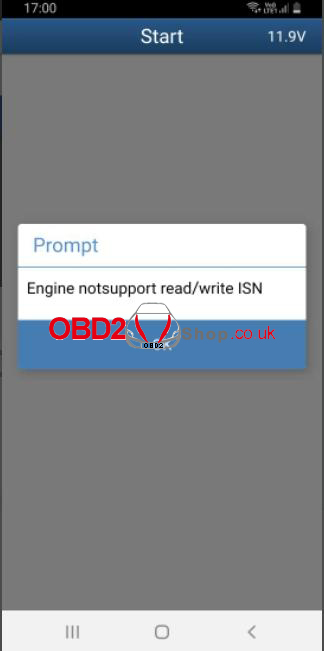
Solution:
You need to use BENCH mode to read the ISN for your car.
The following is the operation guide:
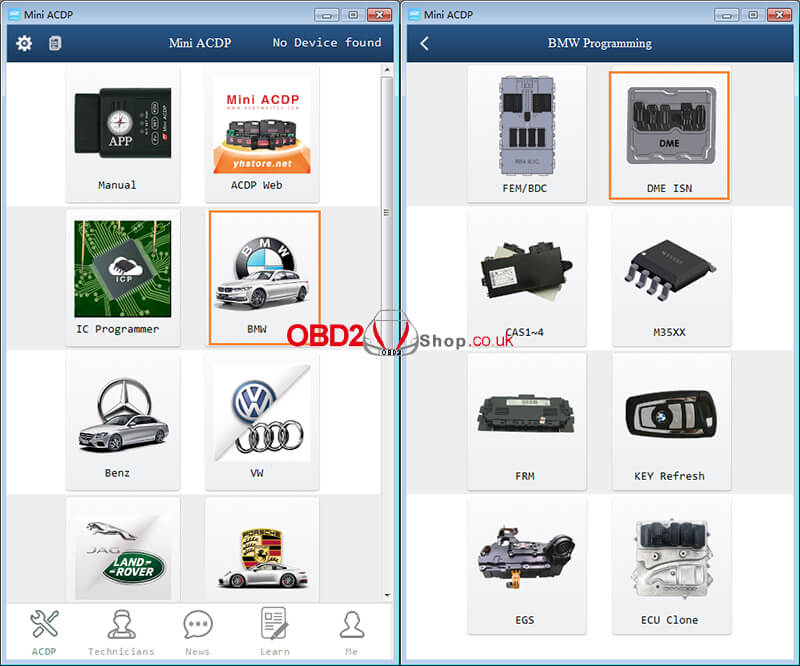
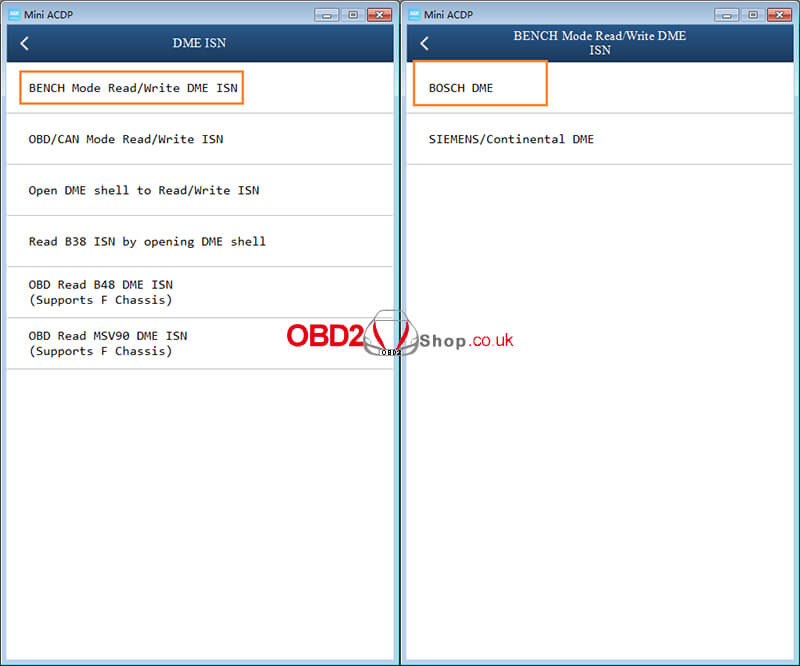
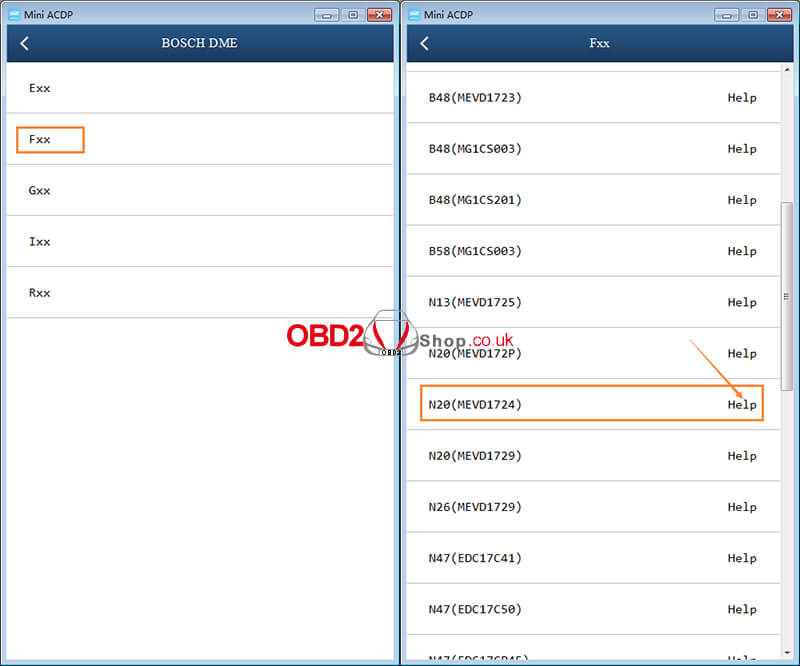
1. Select "BMW" >> "DME ISN" >> "BENCH Mode Read/Write DME ISN" >> "BOSCH DME" >> "Fxx" , then select "Help" in N20 (MEVD172P) to connect the device.
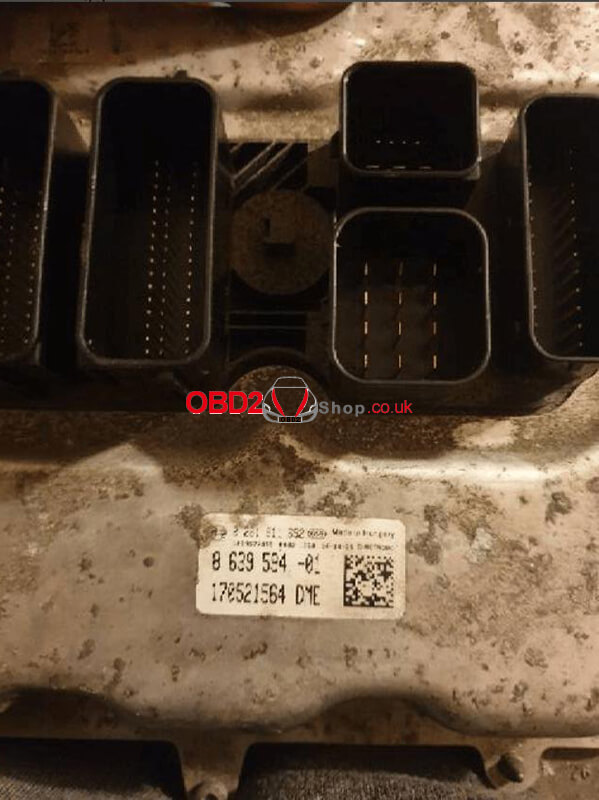
2. Please prepare ACDP, OBP+ICP adapter, interface board, and DME.
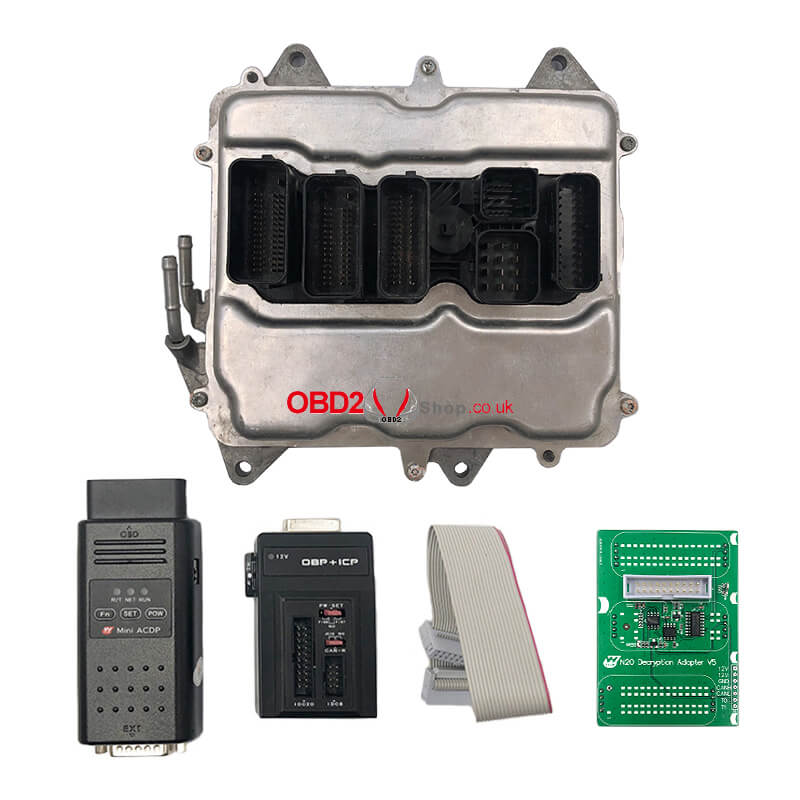
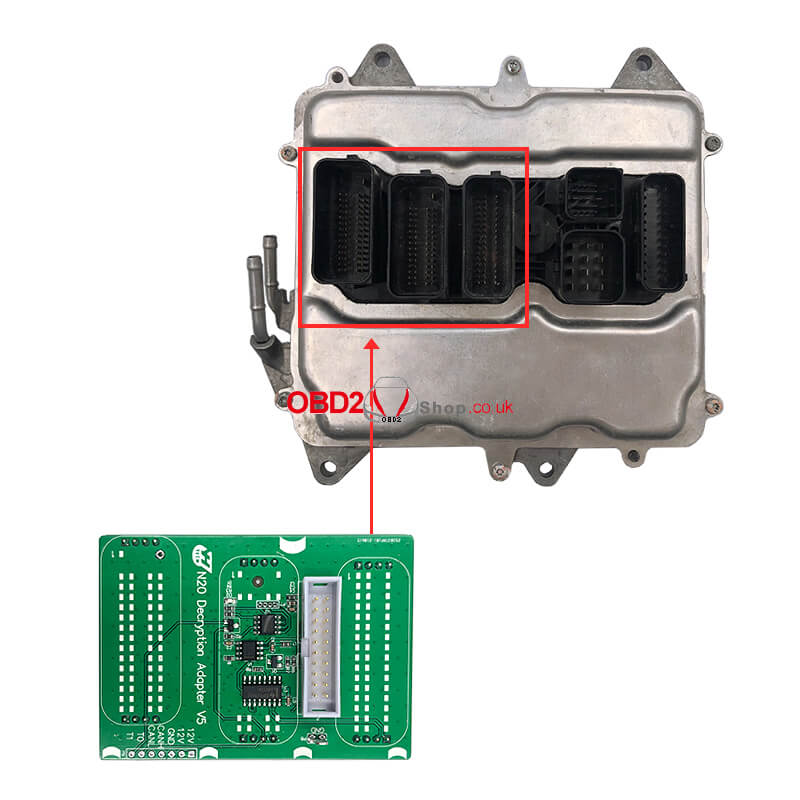
3. Connect the interface board correctly to the DME interface as shown.
4. Short the CAN resistor on the OBP + ICP adapter to the "CAN-R Join".

5. Connect ACDP, OBP+ICP adapter, interface board and DME.
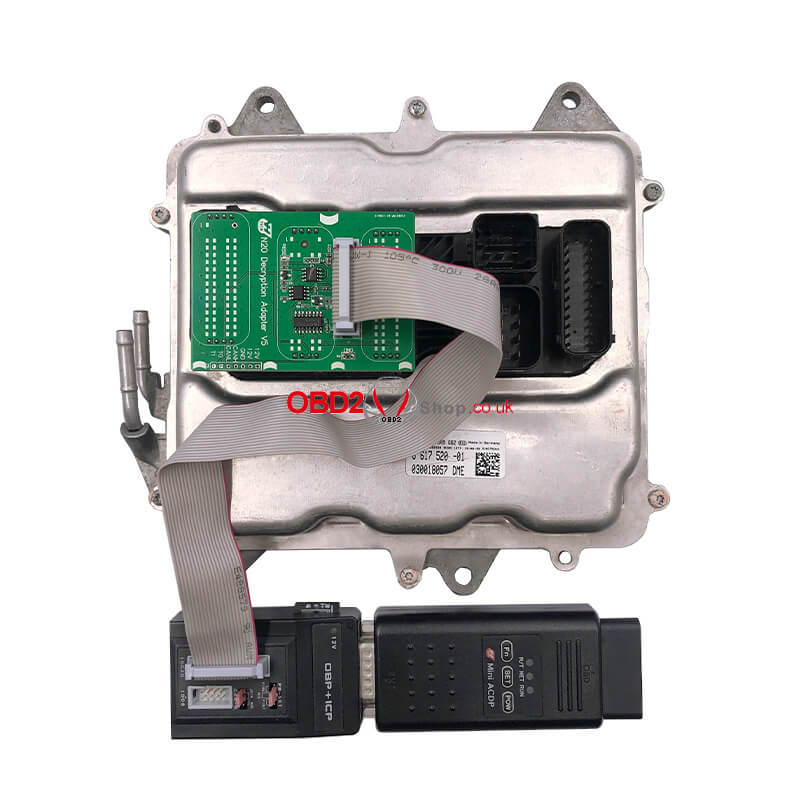
6. After the connection is completed, go back to the previous interface, select N20 (MEVD172P), and follow the prompts to read and write.
For more technical support on Yanhua Mini ACDP, please follow http://blog.obd2shop.co.uk/
Oznake: yanhua mini acdp
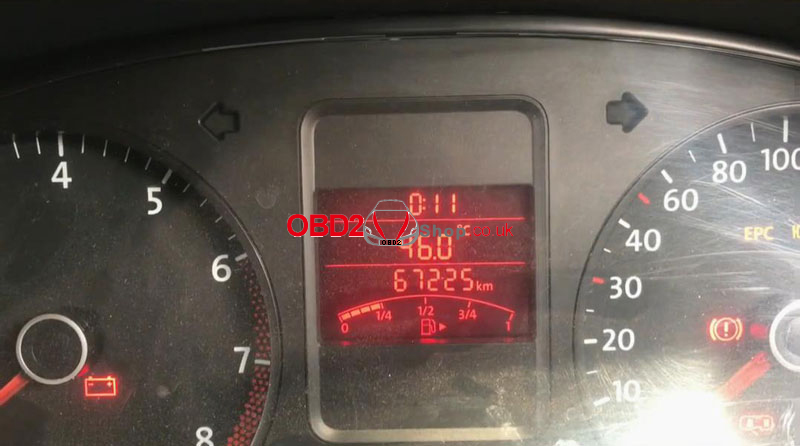
OBDSTAR X300M Tool is able to do mileage adjustments for the 2011 Volkswagen Polo by OBD successfully. The dash odometer now is 67225km. Next, I'm going to show you guys how easy to correct it.
Plug X300 main cable into OBD2 port,
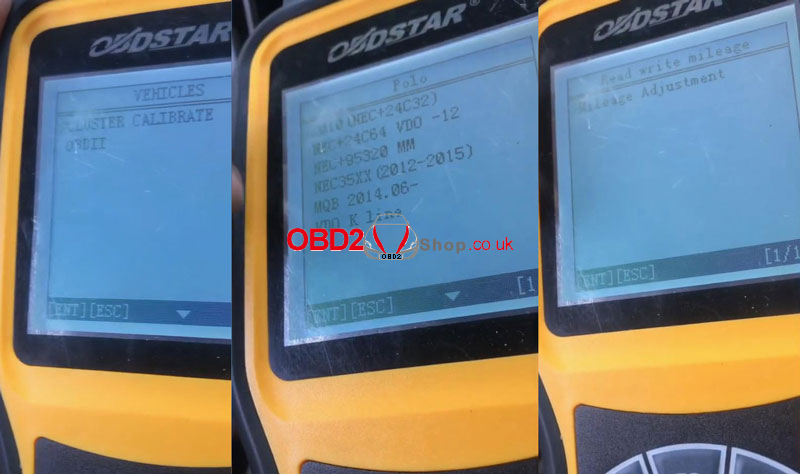
Vehicles >> Cluster Calibrate >> VW >> VW V31.74 >> Select from vehicle >> Polo >> 2010(NEC+24C32) >> Read write mileage >> Mileage Adjustment
Please turn the ignition on, and press ENT to continue.
Reading data...
Please enter a filename to save.
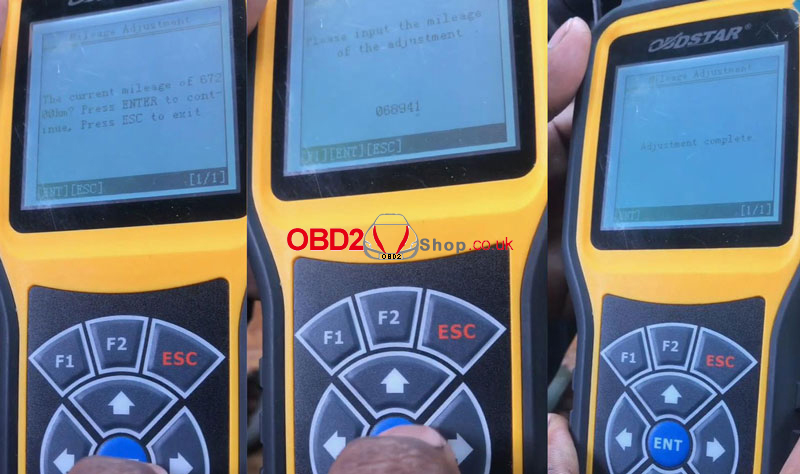
The current mileage of 67200km? Press ENTER to continue.
Please input the mileage of the adjustment: 68941km
Confirm the value.
Please turn the ignition on. Press ENT to continue.
Writing data...
Adjustment complete.
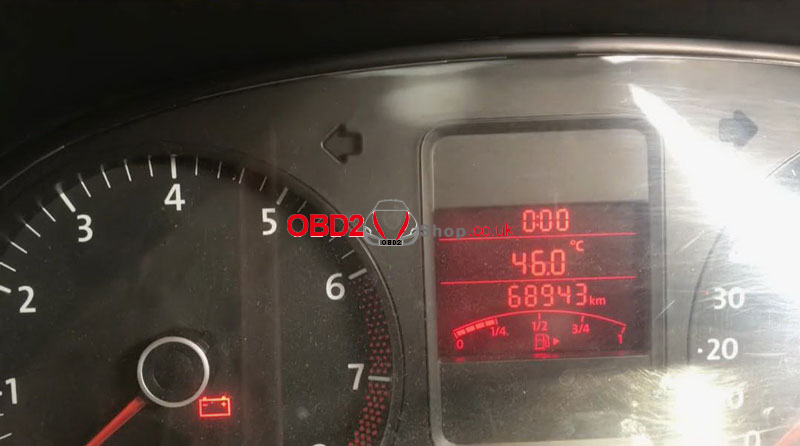
As you can see, the dash odometer has already changed.
OBDSTAR X300M Mileage Adjustment on the 2011 VW Polo was done! You may follow the procedure to correct mileage for other models.
Read also:
VW Passat B6/B7/CC Mileage Adjustment via Obdstar X300M
Benz ML Series W164 Mileage Correction via Obdstar X300M
Audi A6 2006 2.7D Mileage Correction via Obdstar X300M
Oznake: obdstar x300m
srijeda, 25.01.2023.
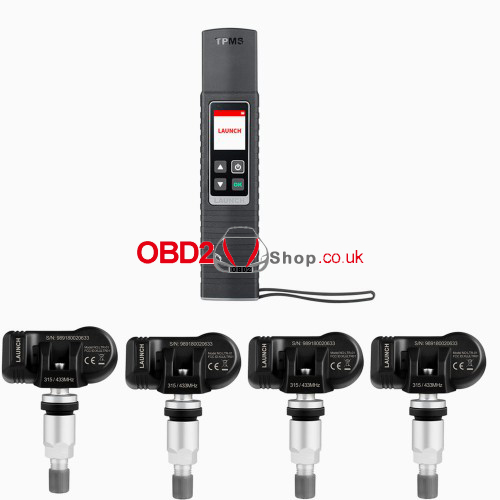
Launch X-431 TSGUN TPMS Tool Troubleshooting FAQs
Here we've collected Launch X-431 TSGUN TPMS Tire Pressure Detector the most frequently asked questions and answers.

Q: Why does my X-431 TSGUN always stay on the welcome screen?
A: if the device keeps displaying the welcome screen, it indicates that it is not in TPMS function mode. If the diagnostic tool is performing the TPMS function, the device will switch to the corresponding function mode.
Q: Why is my X-431 TSGUN always displayed in English even the system language of my diagnostic tool is set as non-English?
A: The system language of the device varies with the system language of the diagnostic tool that binds it. Currently only English and simplified Chinese are available on the device.
If the device detects the system language of the diagnostic tool is non-Chinese, it will change into English automatically no matter which language the diagnostic tool is set as.
Q: My X-431 TSGUN does not respond to the diagnostic tool.
A: In this case, please carefully check the following:
1. Whether the device is successfully bound to the diagnostic tool.
2. Whether the desired device is ticked in the Bound list.
3. Whether the device is powered on.
4. Whether the device is damaged of defective.
Q: Why does my X-431 TSGUN automatically power off?
A: Please check the following:
1. Whether the device is fully discharged.
2. If the device is not being charged and there is no operation on the device for 30 minutes, it will automatically power off to conserve battery power.
Q: My X-431 TSGUN can not trigger one or more of the sensors.
A: Please check the following:
1. Whether the device is damaged or defective.
2. Whether the sensor, module, or ECU itself may be damaged of defective.
3. The vehicle does not have a sensor even though a metal valve stem is present. Be aware of Schrader rubber-style snap-in stems used on TPMS systems.
4. Your device may require a firmware upgrade.
Q: What to do if my X-431 TSGUN encountered some unexpected bugs?
A: In this case, a firmware upgrade is required. On the TPMS version selection screen, tap "Firmware Update" to upgrade it.
www.obd2shop.co.uk
Oznake: launch x431 tsgun tpms tool
ponedjeljak, 23.01.2023.
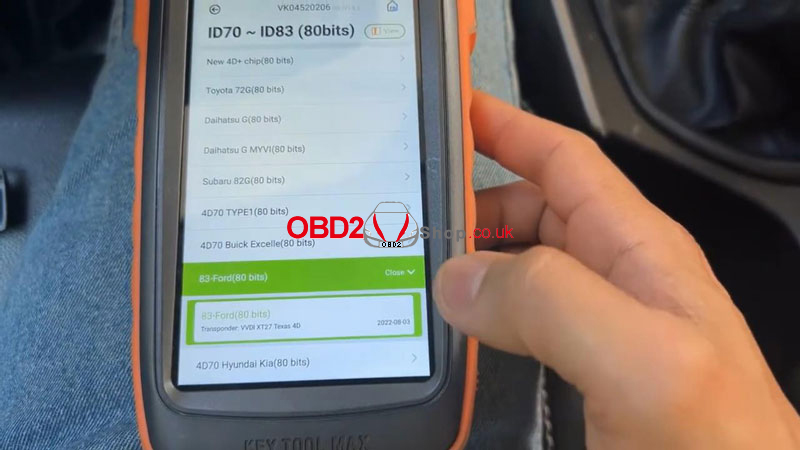
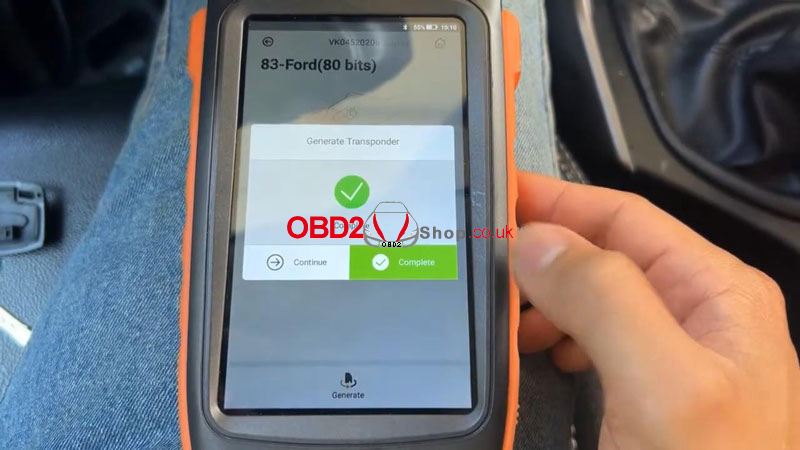
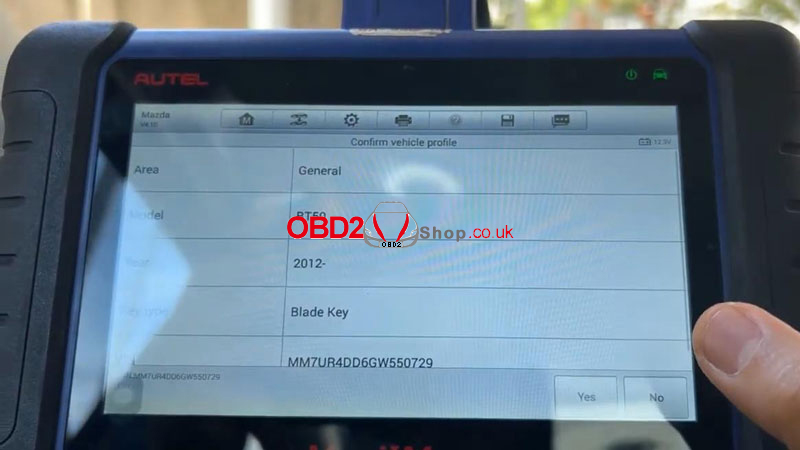
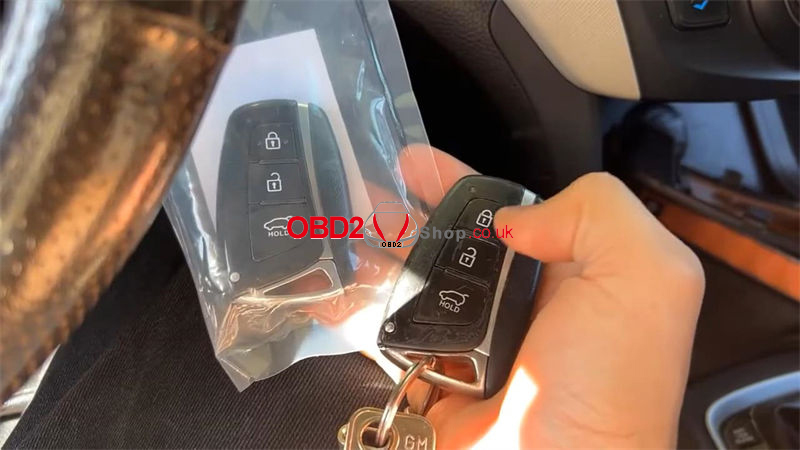
Xhorse Key Tool MAX + Autel IM508 Program 2012-2016 Mazda ID83 AKL
Today I'm gonna show how to use Xhorse VVDI Key Tool MAX + Autel MaxiIM IM508 to program 2012-2016 Mazda BT50 ID83 all keys lost. Let's take a look at how easy the job was.
Generate Remote via VVDI Key Tool Max
Generate transponder >> ID70 ~ ID83(80bits) >> 83-Ford(80 bits) >> 83-Ford(80 bits) >> Generate
Complete.
Learn Key via Autel IM508
IMMO >> Mazda >> Automatic selection >> Read >> OK >> Yes >> Immo status scan >> Quick erase DTC >> All keys lost(guided) >> Start
Note:
1.All keys will be erased.
2.At least 2 keys are required for key learning to complete.
Press "Yes".
Turn the ignition on.
Learned keys: 2
Current number of keys is 0.
Erasing successful.
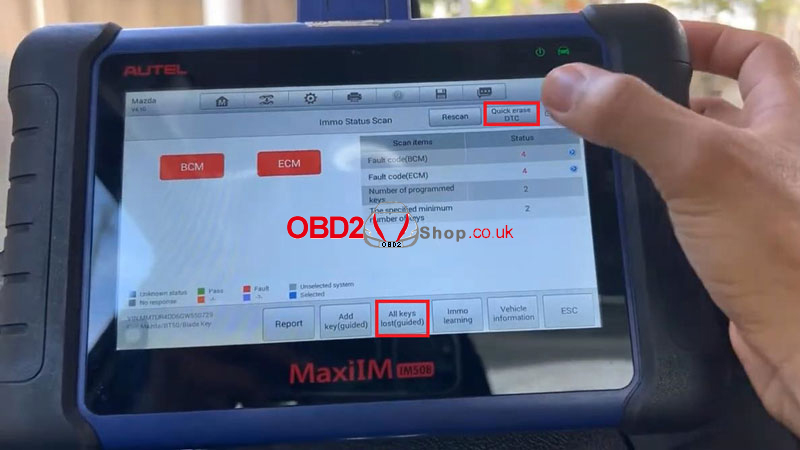

Note: All keys have been erased.
At least 2 keys are required for key learning to complete.
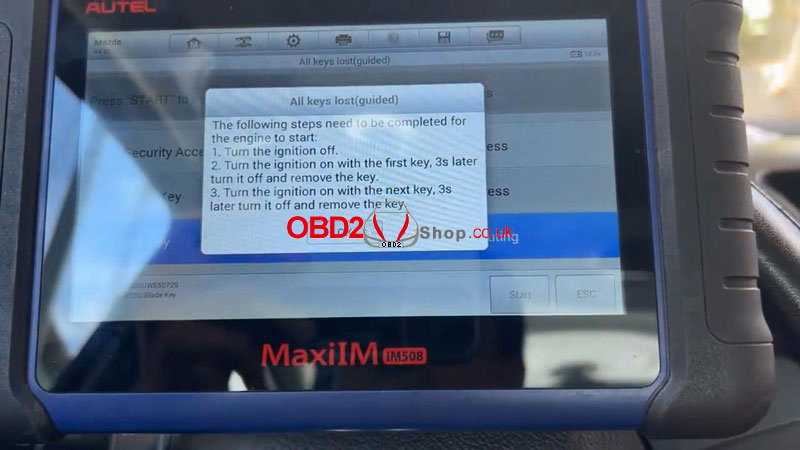
The following steps need to be completed for the engine to start:
1. Turn the ignition off.
2. Turn the ignition on with the first key, 3s later turn it off and remove the key.
3. Turn the ignition on with the next key, 3s later turn it off and remove the key.
Done.
www.obd2shop.co.uk
Oznake: vvdi key tool max, autel maxiim im508
srijeda, 18.01.2023.
Solved: Launch X431 Creader CRP123X Failed to Identify VIN
Problem: The Launch X431 Creader CRP123X failed to identify VIN. It keeps reading for a while but always fails in the end.
What's the problem, please advise.
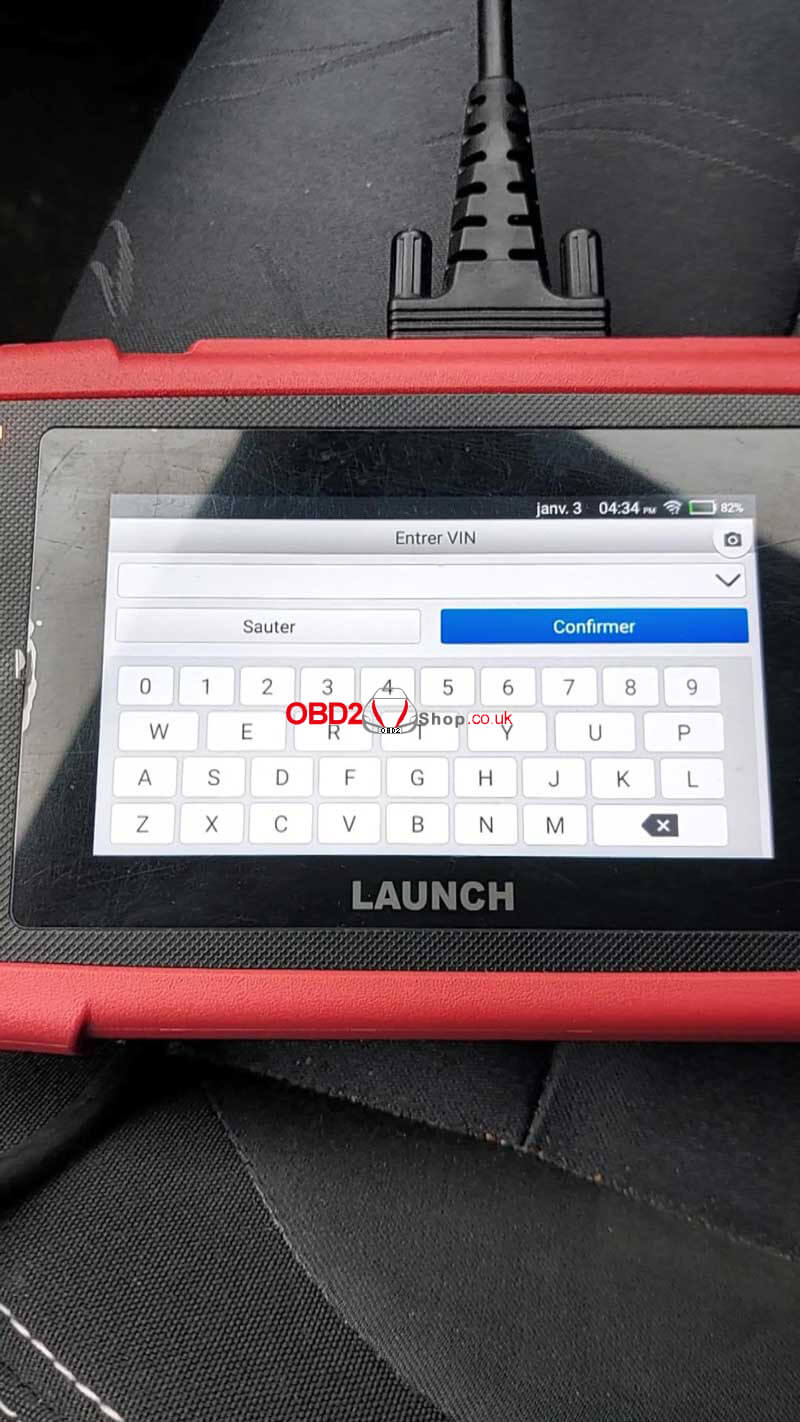
Solution
1. Settings >> Clear cache;
2. Go to re-upgrade;
3. Repair firmware in Data after a successful upgrade.
Hope this can help.
Technical Support
www.obd2shop.co.uk
Oznake: launch creader crp123x
ponedjeljak, 16.01.2023.
Autel IM508 Adds 2016 Hyundai Santafe ID46 Smart Key
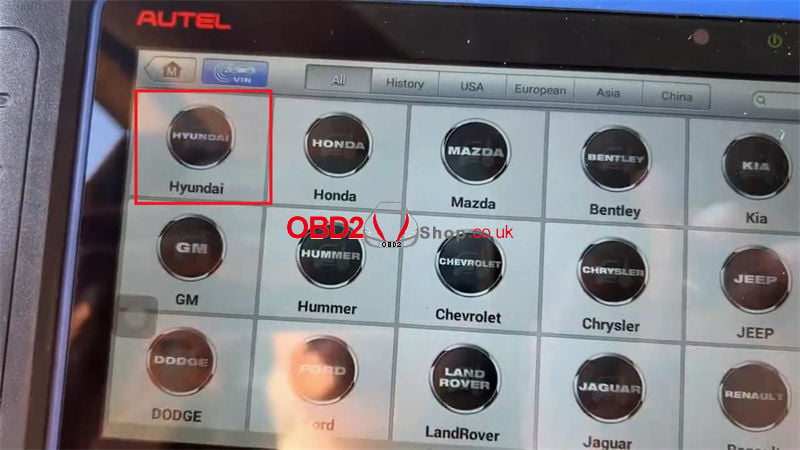
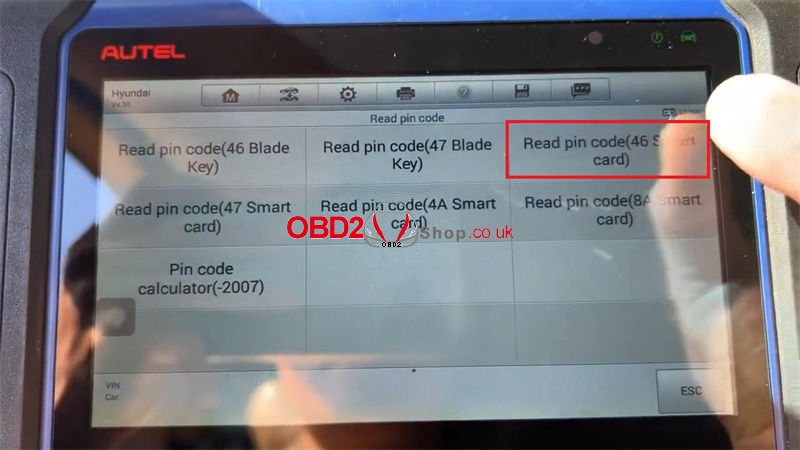
Autel MaxiIM IM508 Key Programming Tool can add 2016 Hyundai Santafe ID46 smart keys by OBD successfully. With free pin code reading, it can be used for programming all keys lost as well. Let's see how easy it is.
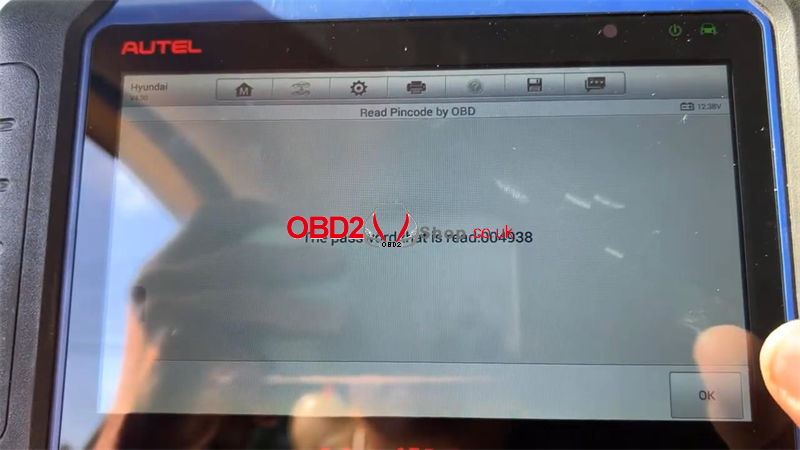
1. Read the Password
Plug IM508 cable into OBD,
IMMO >> Hyundai >> System selection >> Read pin code >> Read pin code(46 smart card) >> Read pincode by OBD
The function is only supported for vehicles with a 46-chip smart card, please confirm whether the type of the key is correct!
Press "OK".
Turn the Hazard warning light on.
Open and then close the driver's door once!
Reading the password, please wait until 100%...
Turn the ignition off(note: the instrument screen is black).
The password that is read: 004938
2. Learn Keys
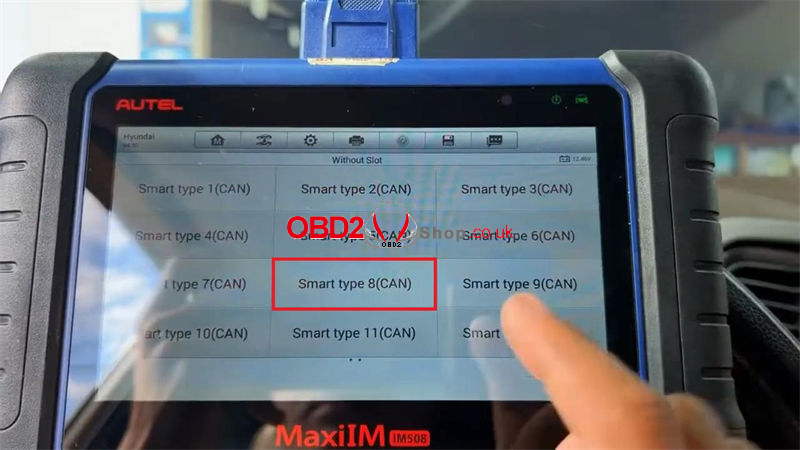
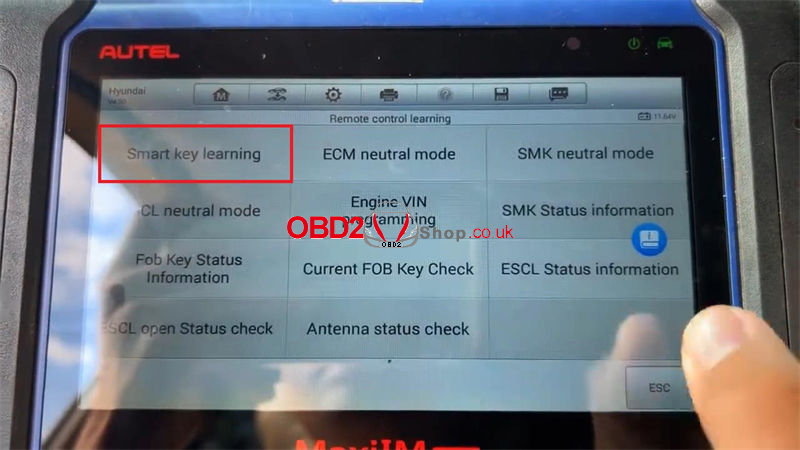
Smart key system >> Without slot >> Smart type 8(CAN) >> Remote control learning
Press the START button.
Press "Smart key learning".
This function supports adding key and all key lost;
Performing this function will erase all existing keys, all the old keys must be relearned again to be able to use normally.
Press "Yes" to continue.
Turn the ignition off.
(note: the instrument screen is black).
Open and then close the driver's door once!
Please enter the 6-digit security code: 004938
OK >> Yes

Note! Click "OK" to complete the following steps:
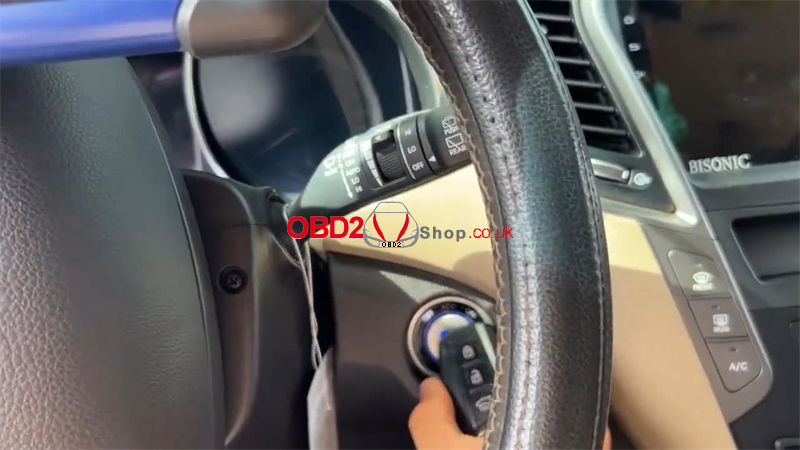
Within 5s after OK is pressed, use the back or top of the smart key to hold down the START button for 5s until the anti-theft lamps flash. (if the operation failed with the prompts, please remove the key case and re-execute the above steps so that the key chip can be successfully programmed.)
Programming succeeded.
Press "Yes" to program the next one, and "No" to complete.
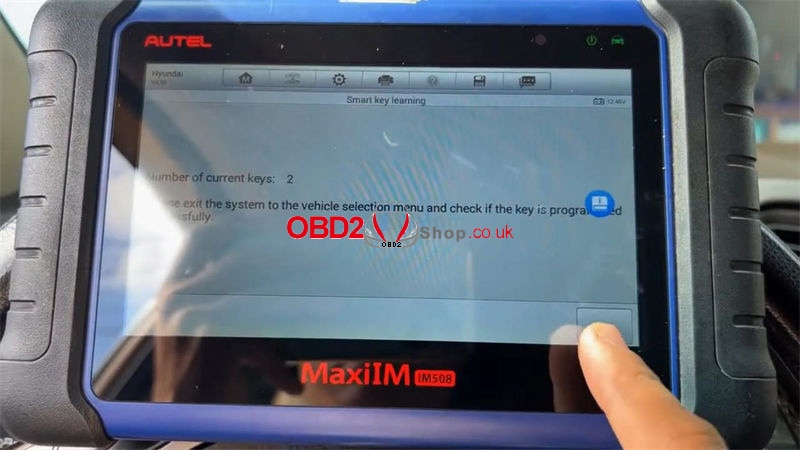
Number of current keys: 2
Exit the Autel IM508 system and check if the key is programmed successfully.
Test two keys.
Both can work well, perfectly done!
www.obd2shop.co.uk
Oznake: autel maxiim im508
subota, 14.01.2023.
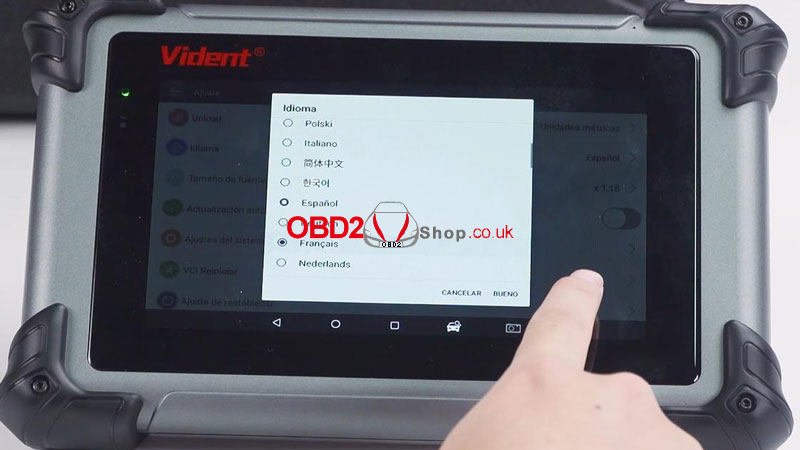
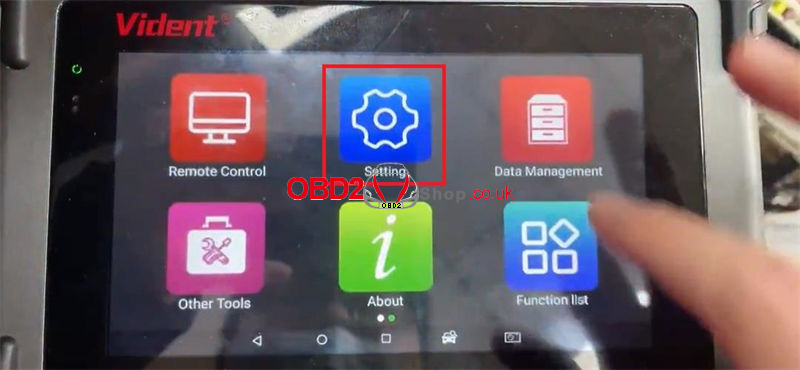
Vident iSmart800 Pro Highlights & Special Functions Instruction
Here we introduce Vident iSmart800 Pro automotive diagnostic analysis scanner highlights and special functions. Guide to use one-click translation, OBD charging, diagnose cars and reset settings for beginners.
lOne-click Translation
iSmart800 Pro supports 18 languages available & online one-click translation.
How to use One-click Translation?
1. Change the iSmart800 Pro tablet language to French in Settings.
2. Click on model diagnosis, here we can see that Auto Scan is still in English, not shown in Fresh. Click the second button above to translate with one-click.
After translation, we can find that it has become French.
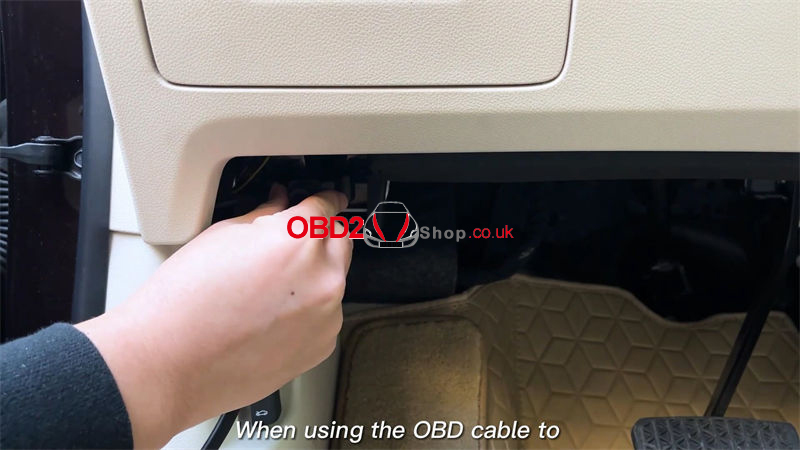
lOBD Charging
When using the OBD cable to connect car and iSmart800 Pro for testing, it can charge the tablet directly. It can also be used when the tablet is out of power.
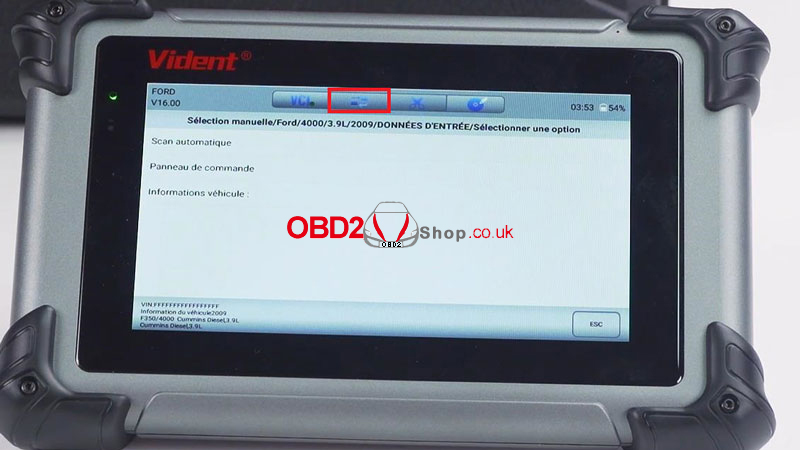
lDiagnose Cars with CAN FD Protocol
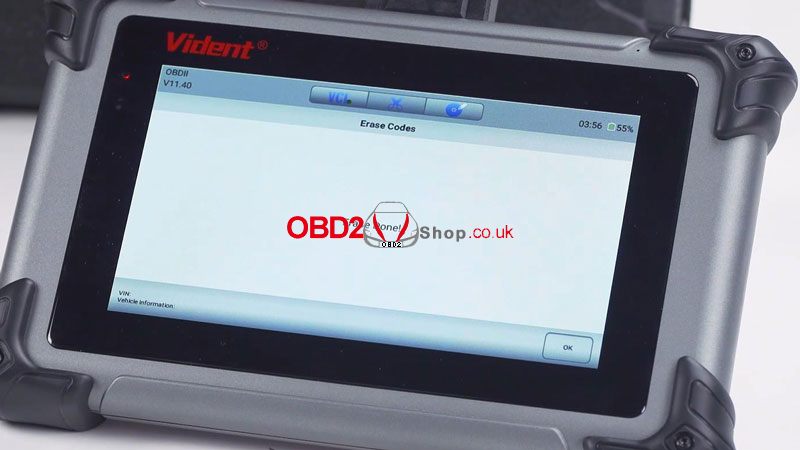
Click on Diagnostics, select OBD for Auto Scan. After entering, we can see the diagnostic menu: system status, read codes, erase codes, live data, freeze frame, I/M readiness, O2 monitor test.

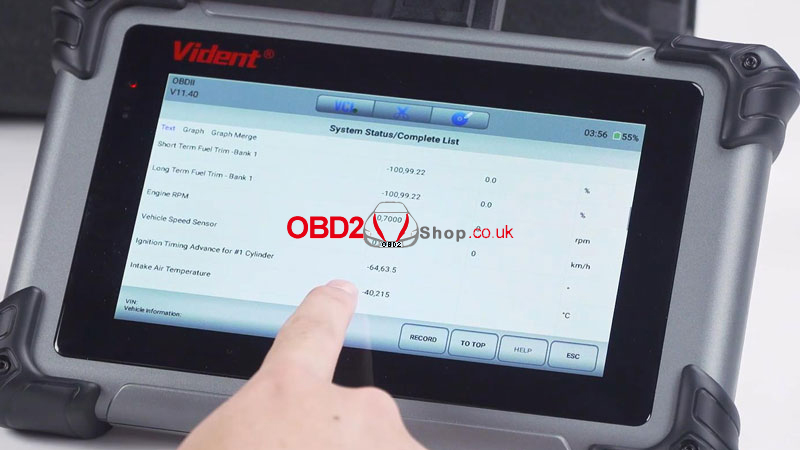
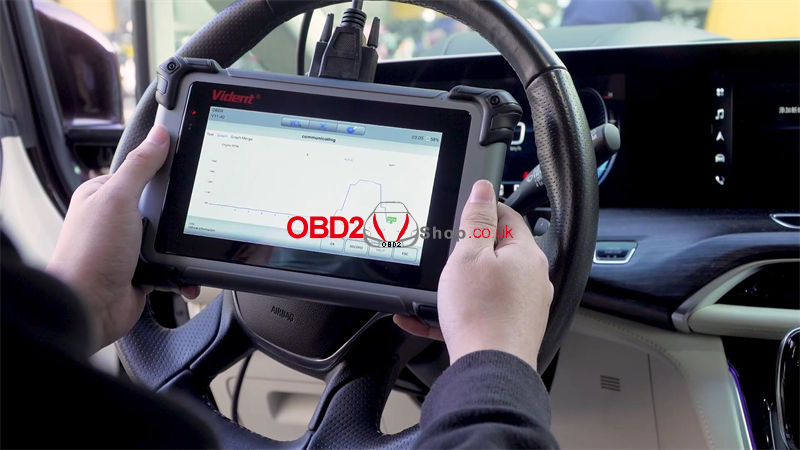
How to check real-time data waveform display?
Connect iSmart800 Pro with OBD cable for car.
Enter the Diagnostic >> Live Data >> Engine RPM >> Graph
When stepping on the accelerator, we can see the engine RPM waveform and its data changes.
Highlights and special features on Youtube:
https://www.youtube.com/watch?v=8_Q30qUaUzg
How to reset iSmart800 Pro settings?
Setting >> Reset Setting
Press the Reset button to reset all the settings.
iSmart will reset after resetting.
Press "OK".
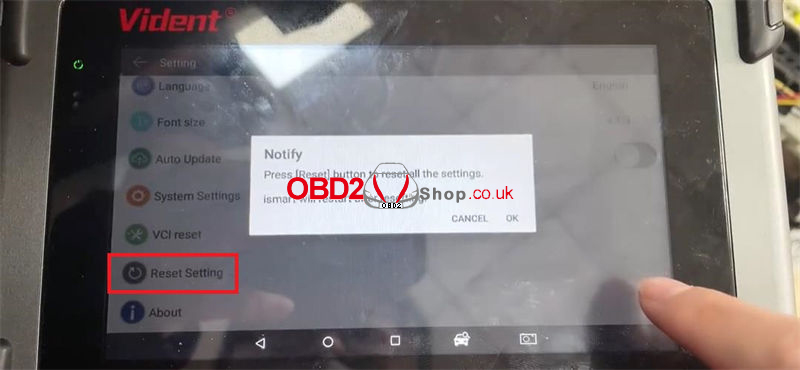
Reset setting display on Youtube:
https://www.youtube.com/watch?v=kfknSw5w-w0
Read also:
How to register and update Vident iSmart800 Pro?
petak, 13.01.2023.
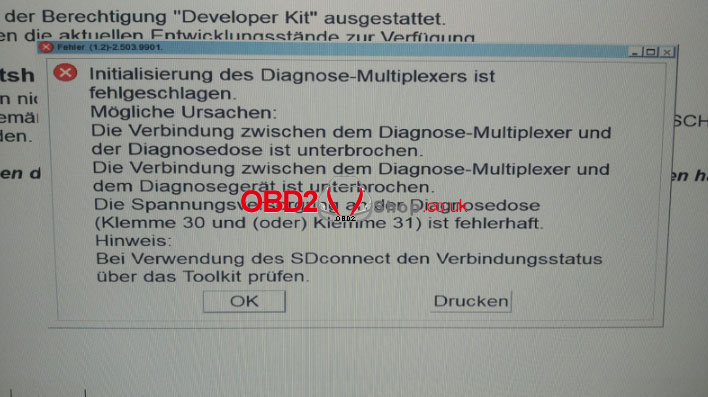
Solved: Super MB Pro M6 + SSD (749/701) Network Problem
Problem: Super MB Pro M6 + V2022.12 WIN10 SSD has met network problem, it gave the error as below:
"Initialisierung des Diagnose-Multiplexers ist fehlgeschlagen.
Mogliche Ursachen:
Die Verbindung zwischen dem Diagnose-Multiplexer und der Diagnosedose ist unterbrochen.
Die Verbindung zwischen dem Diagnose-Multiplexer und dem Diagnosegerat ist unterbrochen.
Die Spannungsversorgung an der Diagnosedose (Klemme 30 und (oder)Klemme 31) ist fehlerhaft.
Hinweis:
Bei Verwendung des SDconnect den Verbindungsstatus uber das Toolkit prufen".
(Initialization of the diagnostic multiplexer is failed.
Possible causes:
The connection between the diagnostic multiplexer and the diagnostic socket is interrupted.
The connection between the diagnostic multiplexer and the diagnostic device is interrupted.
The power supply at the diagnostic socket(terminal 30 and (or) terminal 31) is faulty.
Notice:
The connection status when using the SDconnect check via the toolkit.)
"Due to network problem, no connection to the SDconnect can be established(749)".
"No VCI found.(701)
No SDconnect is selected or the desired SDconnect cannot be selected".
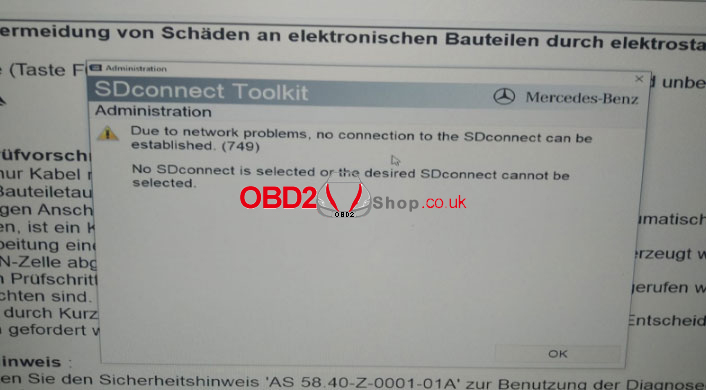
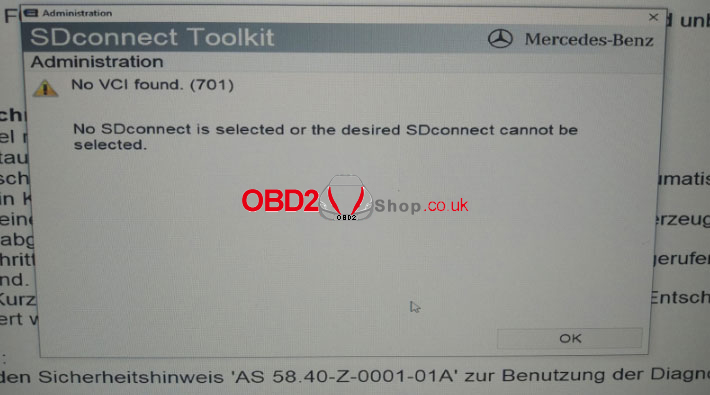
Solution
MB Star Diagnostic Tool needs to revise IP when connecting via network. Please follow the steps below to fix the problem.
Selected "Use the following IP address(S)"
IP Address(I): 172.29.127.113
Subnet mask(U): 255.255.255.0

Technical Support
www.obd2shop.co.uk
Oznake: super mb pro m6
četvrtak, 12.01.2023.
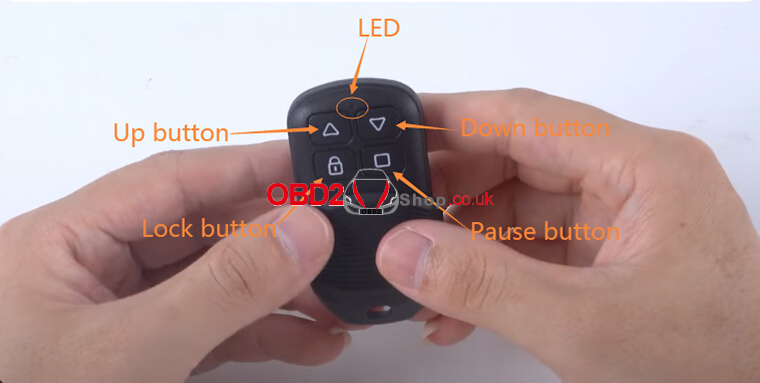
Xhorse Masker Garage Remote Manual: How to Delete Code and Clone Remote
Xhorse Masker Garage Remote supports code deleting, remote cloning, frequency setting, and data recovery.
And here is a tutorial on how to delete the code and clone the remote.
First, let's look at the basic structure of Masker Garage Remote:
Slide down the cover, and you can see the LED light, "Up" button, "Down" button, "Lock" button, and "Pause" button.
Next, let's do code deleting.
Before remote cloning, we need to check the status of the remote control to make sure the code has cleared.
Keep pressing any button, and the LED light is always on, which means the code has not been cleared.
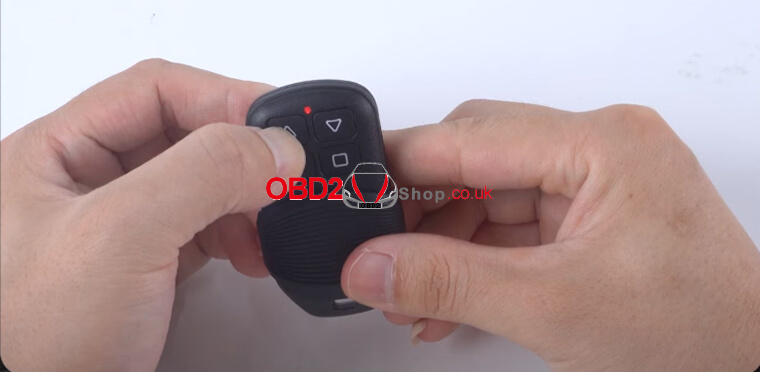
Then how to delete the code?
Press and hold the "Up" and "Down" buttons at the same time, and you can see the LED light turns on.
When the light turns off, release the buttons.
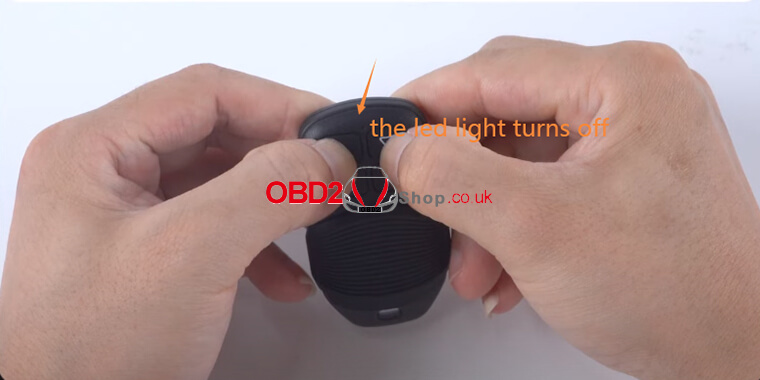
Press and hold the "Pause" button until the light goes off.
Then release the button.
Now the light will flash once and then go out quickly when we press any button on the remote.
It means the code is deleted.
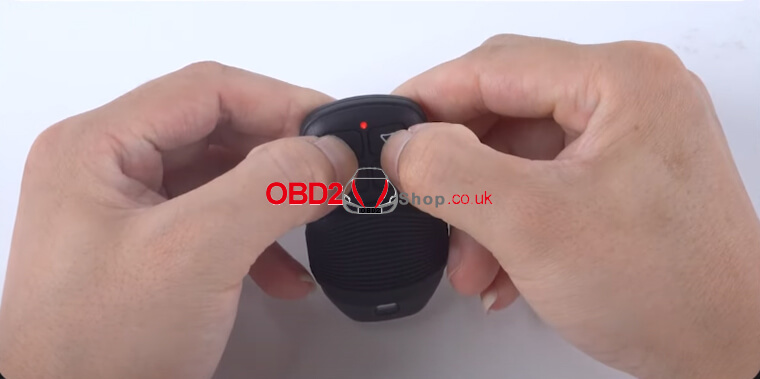
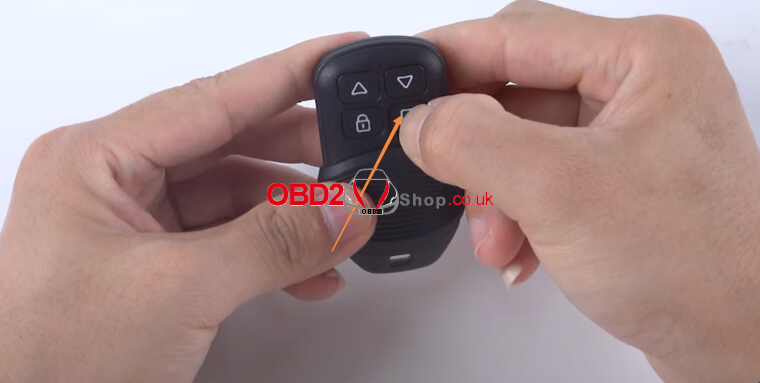
Then last, let's start remote cloning.
There are three steps.
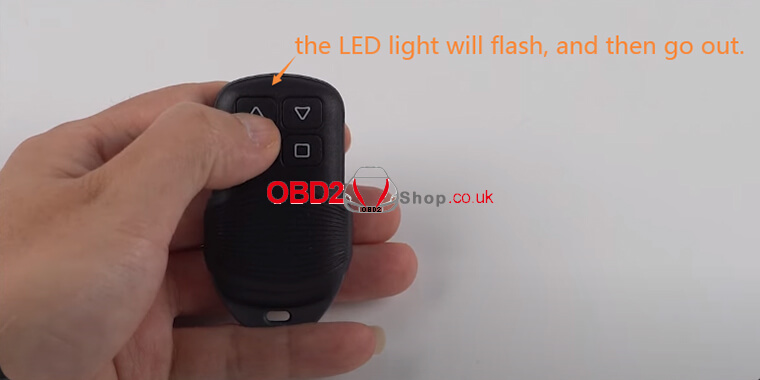
Press and hold the button, and the remote will enter the cloning mode.
The LED light will flash, and then go out.
Put the original remote next to the Masker garage remote.
Then press and hold the same button on both remotes.
Once the light is on, the current button is successfully cloned.
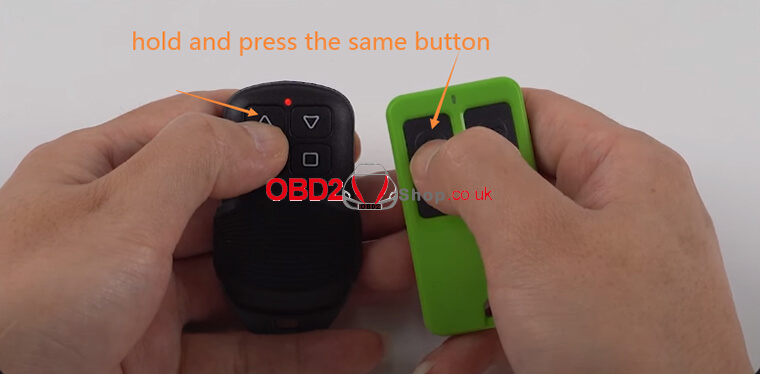
Follow the above steps to clone all buttons one by one.
Remote cloning is successful!
You can also click on the video below to view the tutorial:
https://youtu.be/pDkCF3PVuw0
For more information about Xhorse Masker Garage Remote, please follow: http://blog.obd2shop.co.uk/
Oznake: Xhorse Masker Garage Remote
petak, 06.01.2023.
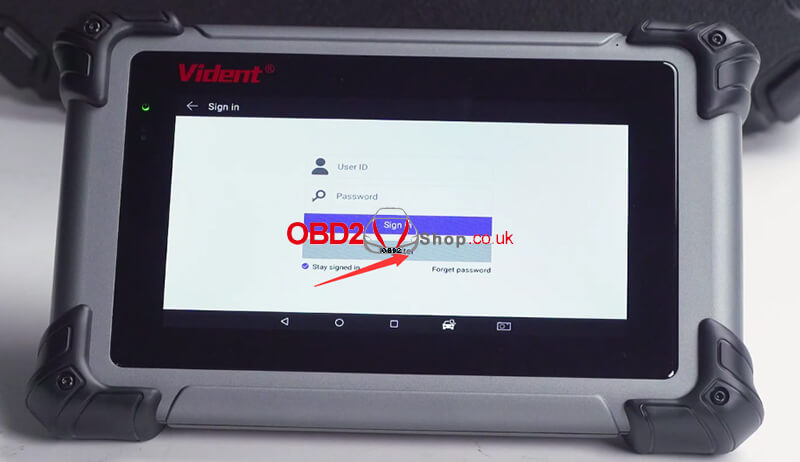
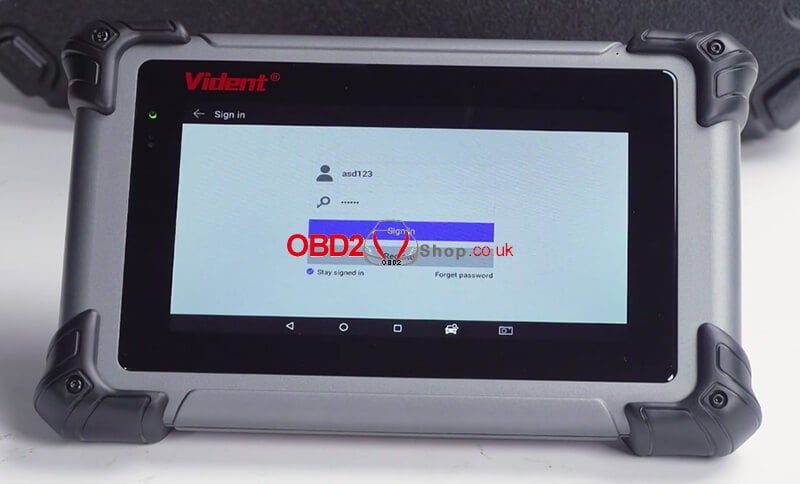
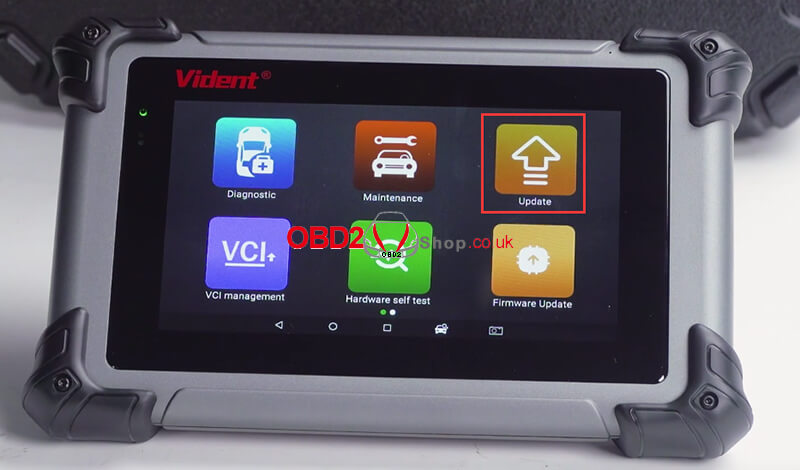
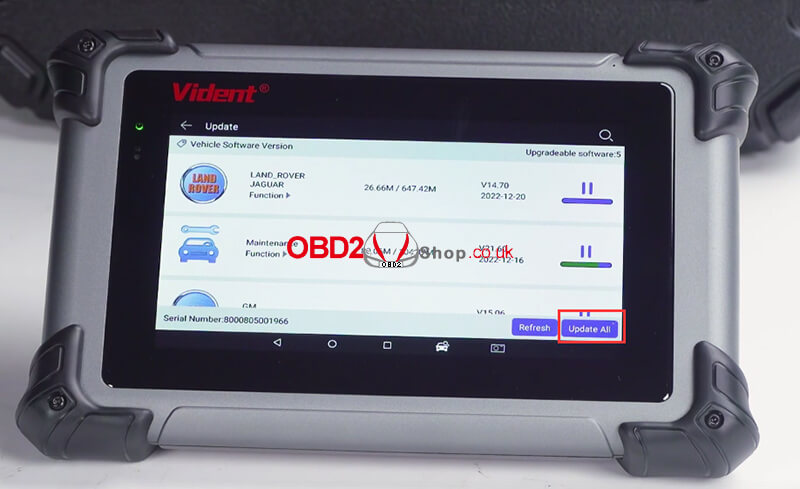
How to register and update Vident iSmart800 Pro
This post will guide you on how to register and update Vident iSmart800 Pro Automotive Diagnostic & Analysis Scanner.
First, we register.
Enter the name you want to set
Enter the password
Confirm password
Then enter your email address to continue
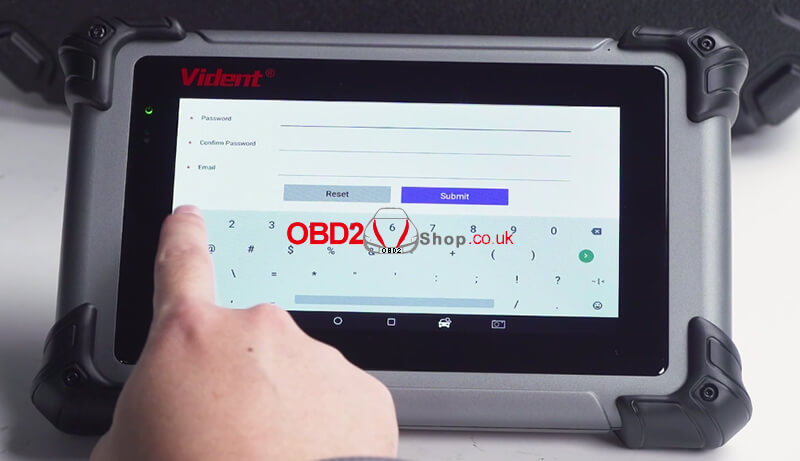
After completing the registration, log in
Then you can start updating the software
Update the OS Software first
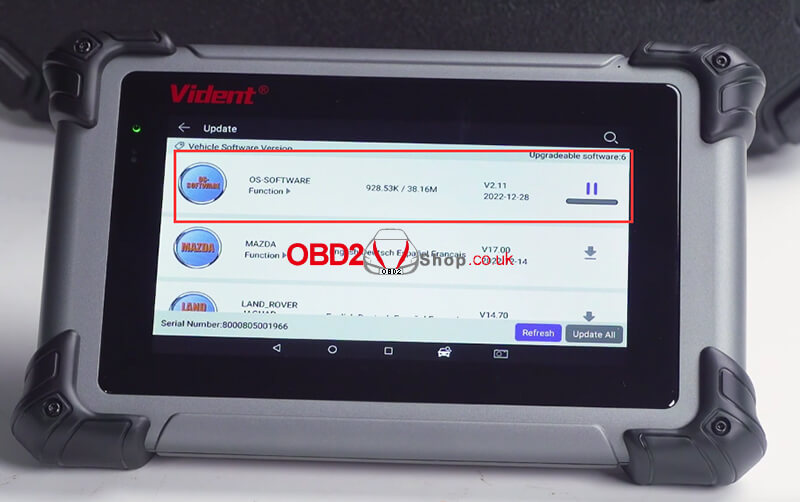
Then go back to the main interface and select the "Update" button to select the vehicle software you want to update, or you can also select "Update All".
You can also click the video below to view the tutorial:
https://youtu.be/Hheq0WuRxDI
For more information about Vident iSmart 800Pro, please follow https://www.obd2shop.co.uk//vident-ismart800-pro.html
Oznake: vident ismart800 pro
srijeda, 04.01.2023.
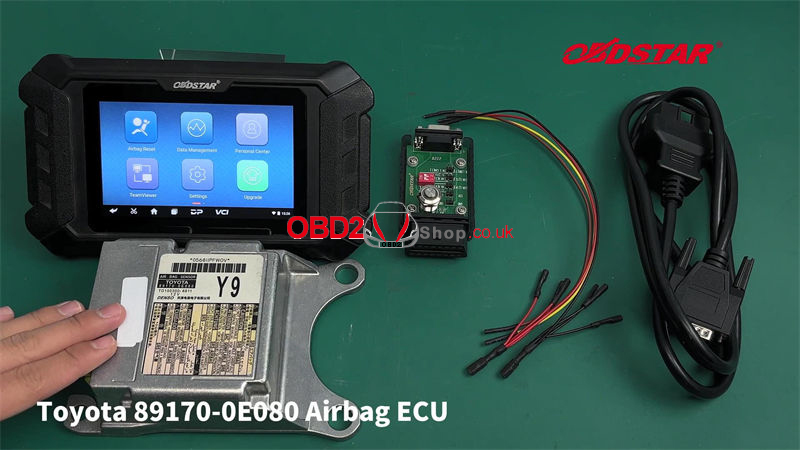
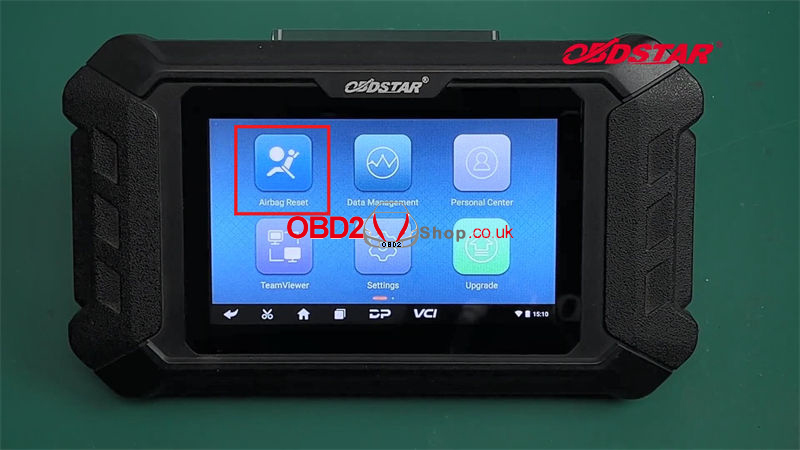
OBDSTAR P50 Reset Toyota 89170-0E080 Airbag on Bench
This is a tutorial on how to use OBDSTAR P50 Airbag Reset Tool on bench. Taking the Toyota 89170-0E080 airbag ECU as an example. Read this article to learn how it works.
Accessories Required
OBDSTAR P50
Toyota 89170-0E080 Airbag ECU
P004 Adapter
P004 Jumper
Main cable
Note: Please keep OBDSTAR P50 in charging and communication throughout the whole process.
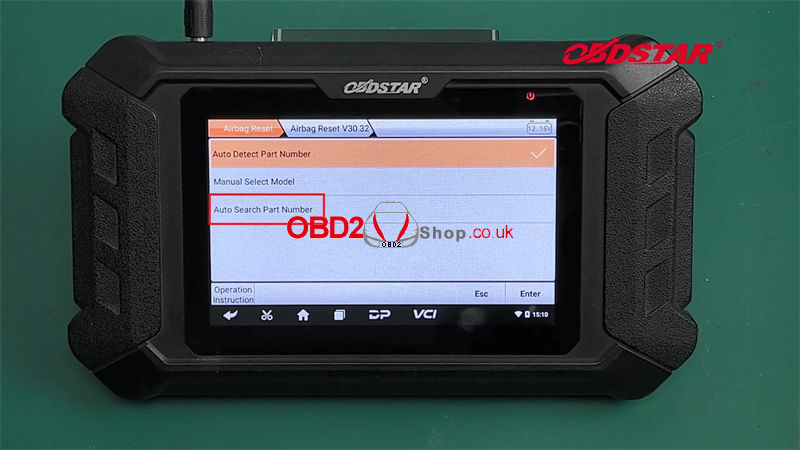
Airbag reset >> Latest version >> Auto Search part number
This function is available by connecting the server, please ensure the Internet connection is normal. Press "Enter".
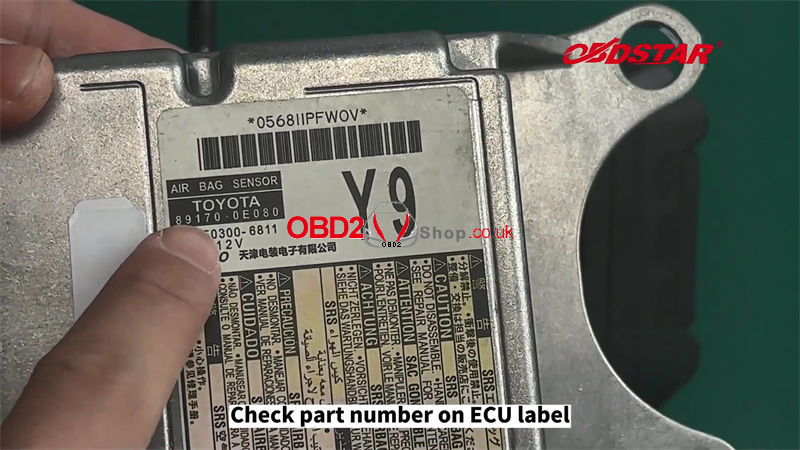
Check the part number on the ECU label to search for it.
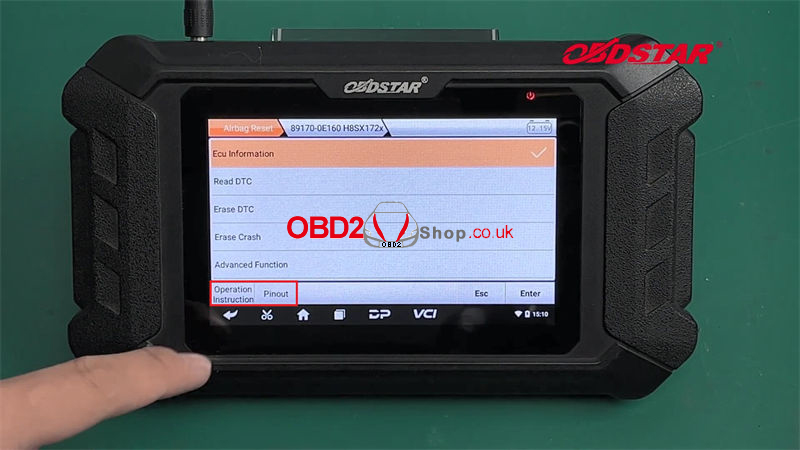
Note: before repairing the airbag computer, please carefully check "Operation Instructions" at the bottom left to check the best detection method.
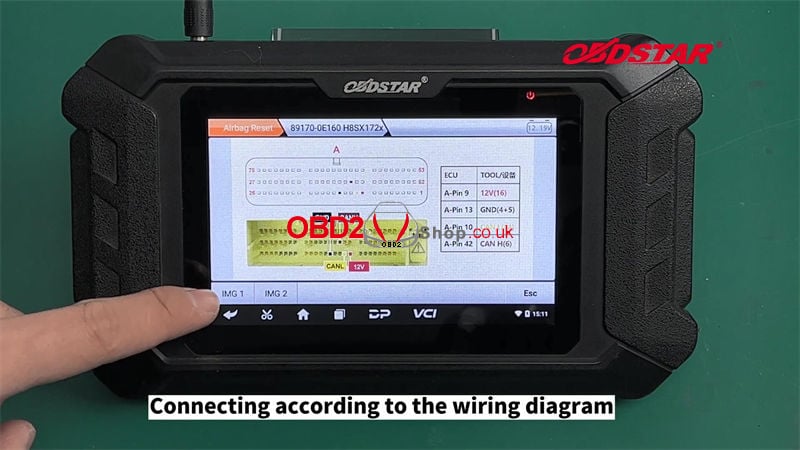
Connect according to the wiring diagram.
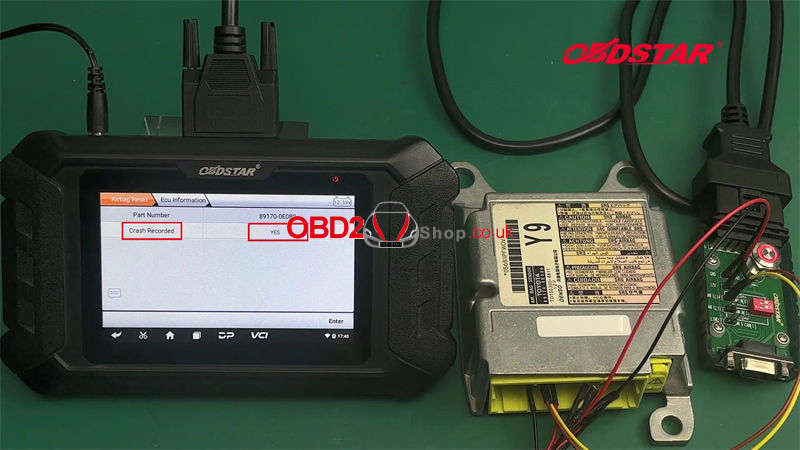
Turn on the P004 Adapter ignition switch to check ECU info.
We can see the "Crash Recorded" is YES.
Go to read DTC, there's a crash fault.
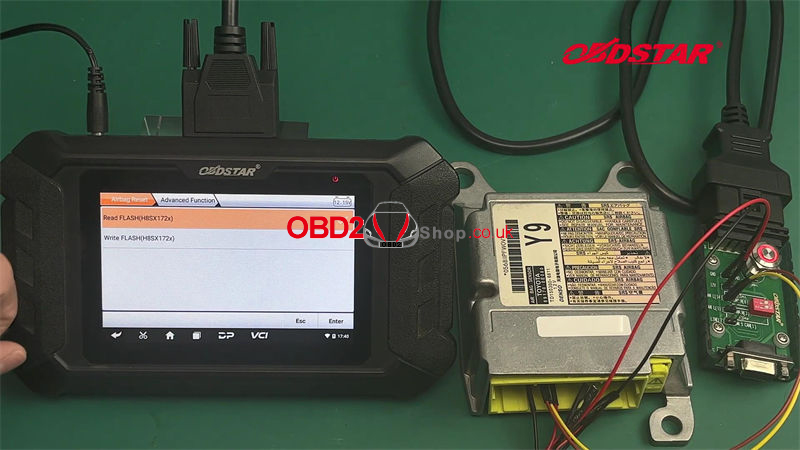
Read FLASH(H8SX172x) >> Start
Save the data file.
Click "Erase Crash".
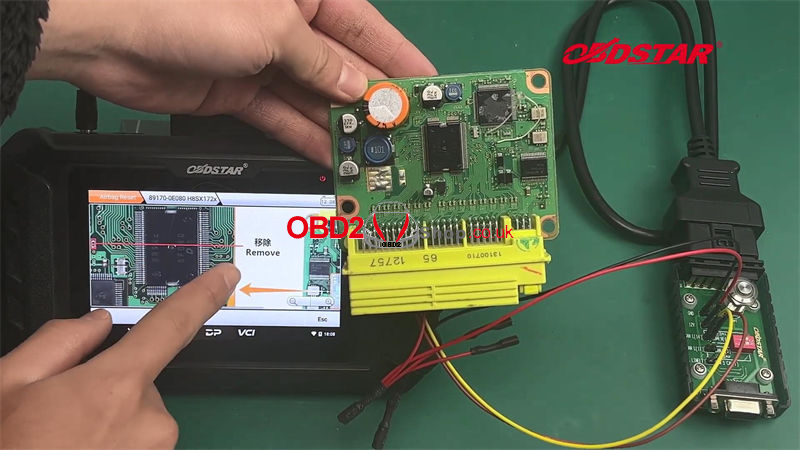
Executing the "Erase Crash" function will clear all flash data. Please ensure that the "Read FLASH" function has been executed. And open the cover to compare all write flash mode wiring diagrams in the "Operation Instructions". There is a picture that can correspond to your ECU.
Otherwise, after executing this function, flash data can only be recovered through the programmer.
Enter >> Enter
Erase crash success. Please follow the wiring diagram of write flash mode, and execute the "Write FLASH" function after removing/welding the resistance.

Turn on the P004 Adapter ignition switch again.
Advanced function >> write FLASH(H8SX172x)
Confirm that the "Write FLASH" operation has been performed after removing/welding the resistance according to the write flash mode wiring diagram.
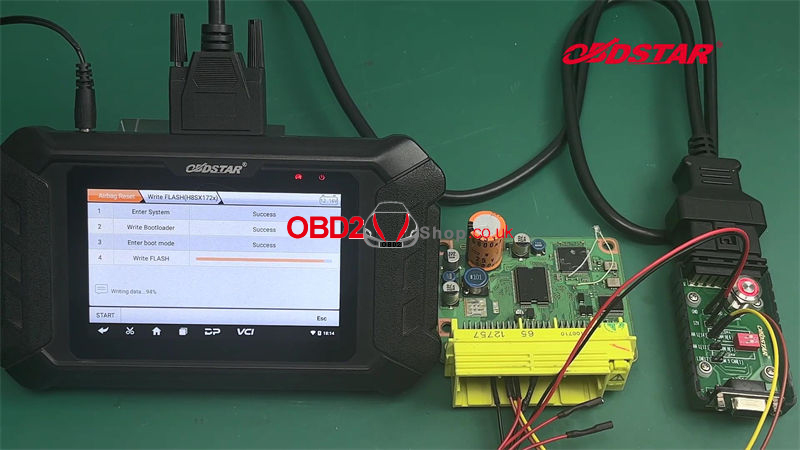
Enter >> Enter >> Selected data file >> Start
Writing data success.
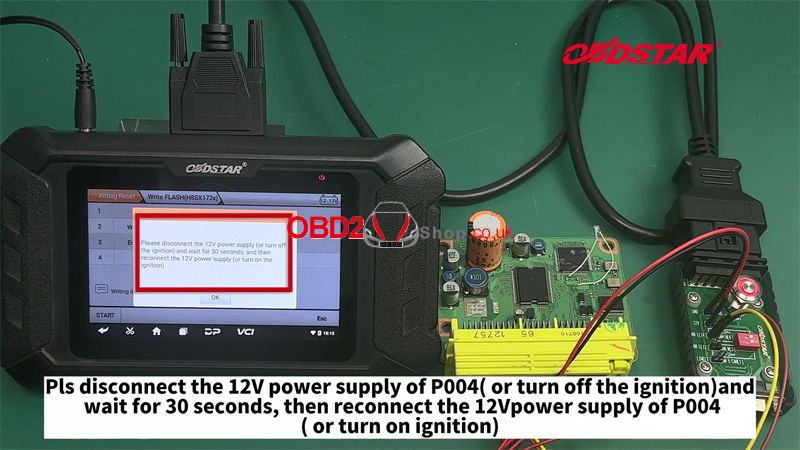
Please disconnect the 12V power supply of P004(or turn off the ignition) and wait for the 30s, then reconnect the 12V power supply of P004(or turn on the ignition).
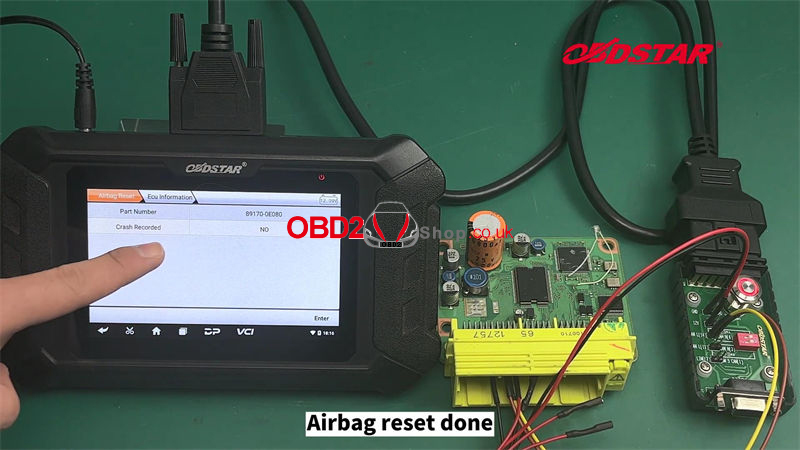
Go to erase DTC, then check ECU info again.
As we can see, the "Crash Recorded" has been changed to NO.
The crash fault has been cleared.
The airbag reset is done.
You can also click the video below to view the tutorial:
https://youtu.be/JJXGFLieFZE
You might be interested:
OBDSTAR P50 Reset Subaru 98221SG080 Airbag on Bench
https://youtu.be/EYhJtQ3C61M
OBDSTAR P50 Reset Toyota 89170-60460 Airbag on Bench
https://youtu.be/wHHDYPyl7gc
www.obd2shop.co.uk
Oznake: obdstar p50
ponedjeljak, 02.01.2023.
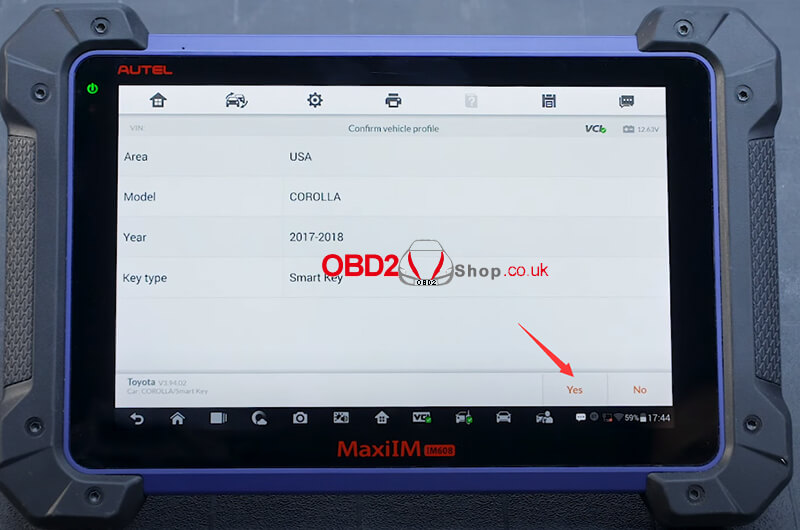
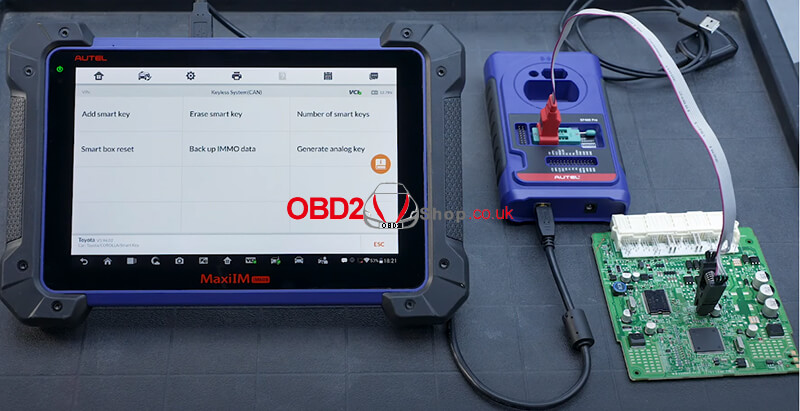
How to perform All Keys Lost on a Toyota Corolla with Autel IM608
This post will show you how to do all keys lost on a Toyota Corolla with Autel IM608 key programmer.
Tools you need:
IM608 key programmer
X400 Pro key programmer
APB112 smart key simulator
APA103 EEPROM clamp cable
A Smart Key Remote
Steps:
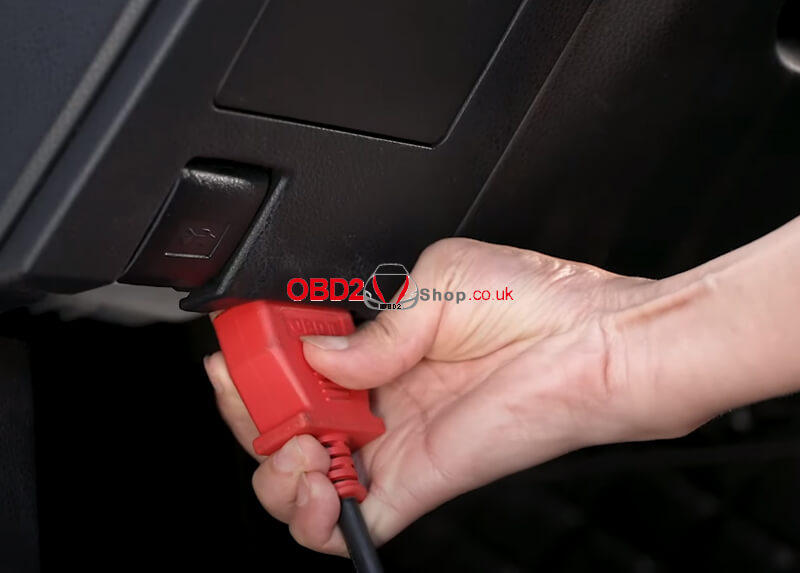
Connect the VCI to the vehicle's OBDII port
Turn on the vehicle ignition
Select IMMO and find your vehicle
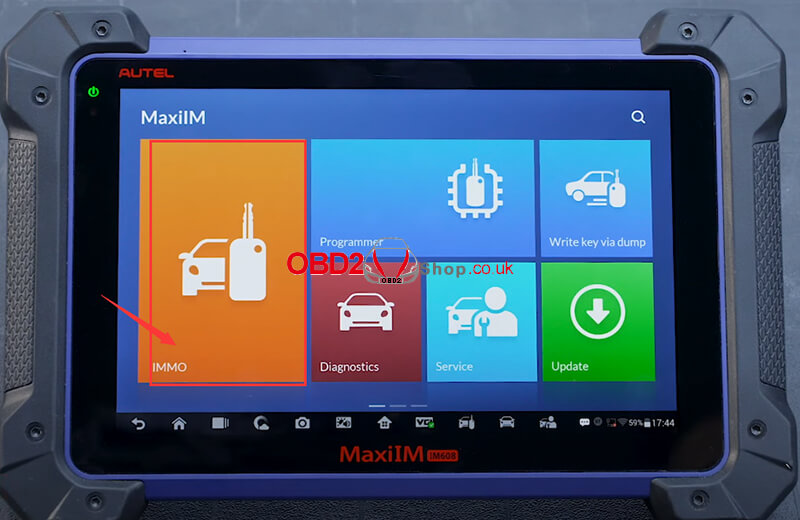
Select "Asia" >> "Toyota" >> "Manual selection" >> "USA" >> "COROLLA" >> "2017-2018" >> "Smart Key"
Confirm the vehicle profile, then click "Yes" to continue.
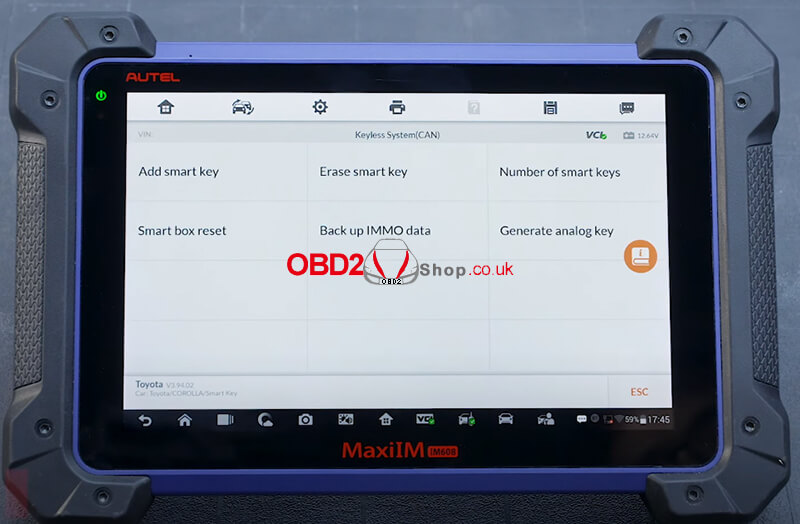
Next, we need to backup the vehicle's immobilizer data.
Choose "Control unit" >> "Keyless System(CAN)" >> "Back up IMMO data"
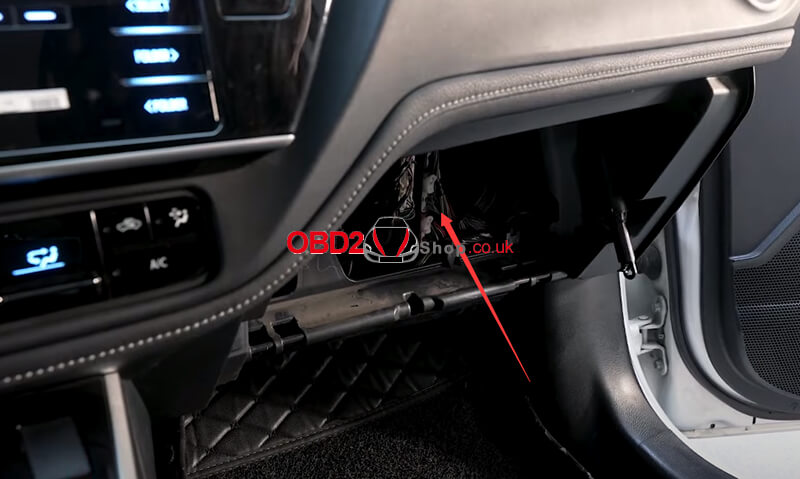
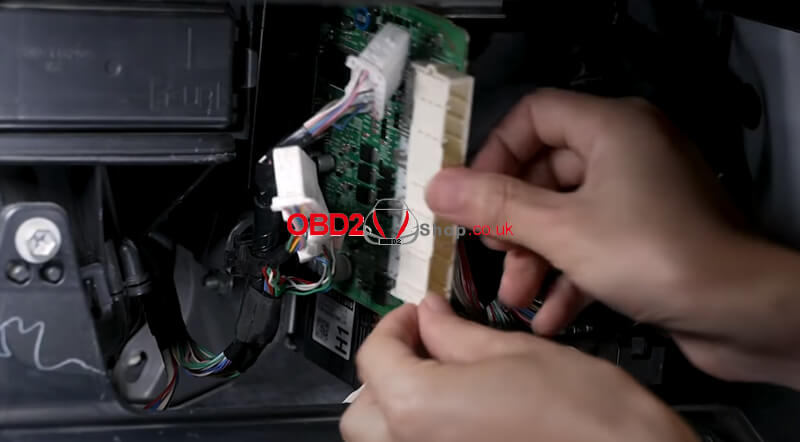
Take out the smart key module from the passenger side.
Connect the APA103 cable to the chip as shown.
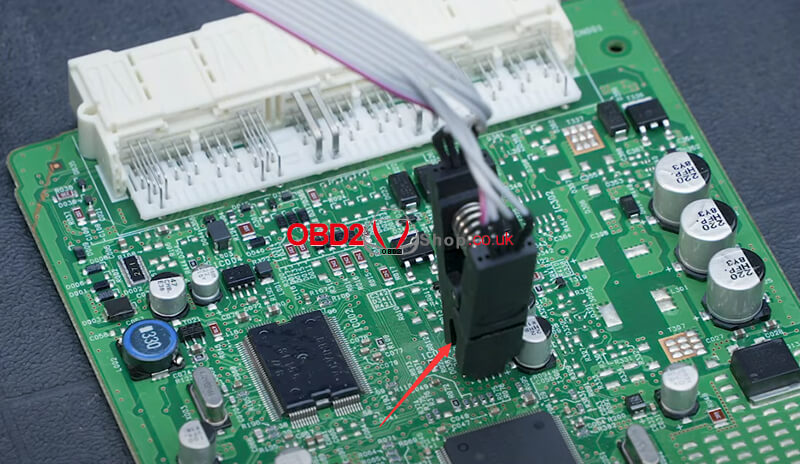
Connect the other end to the XP400 Pro programmer.
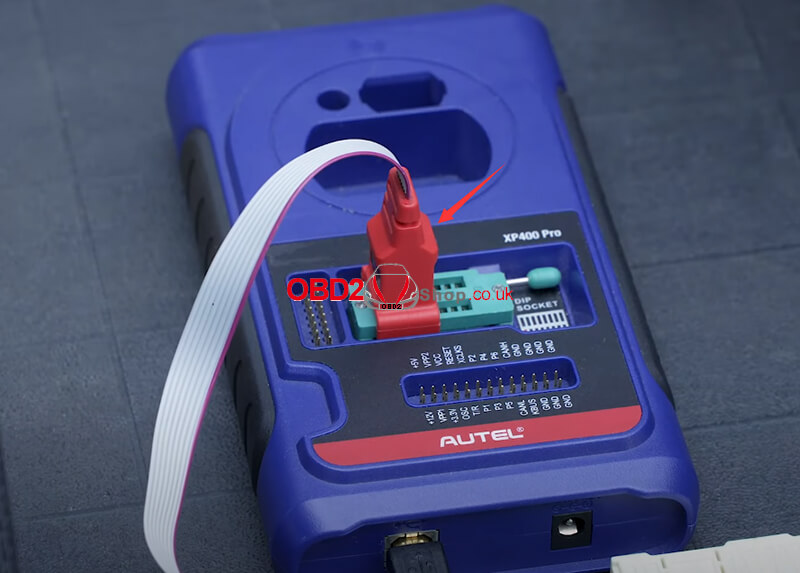
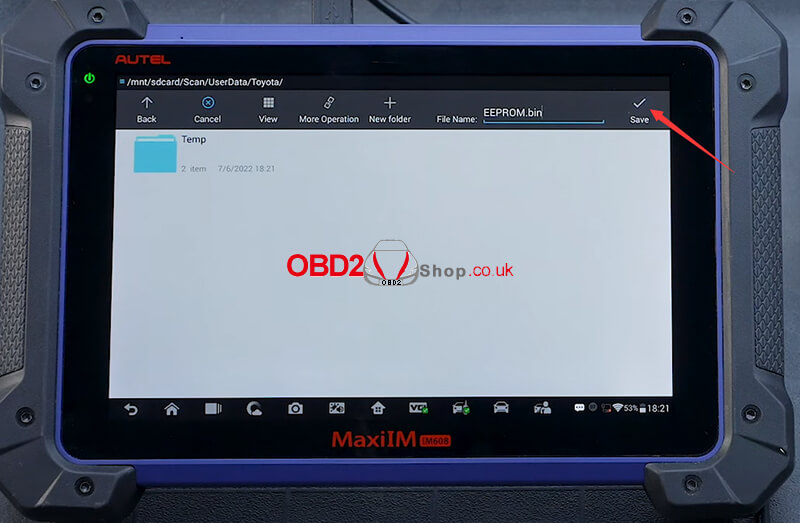
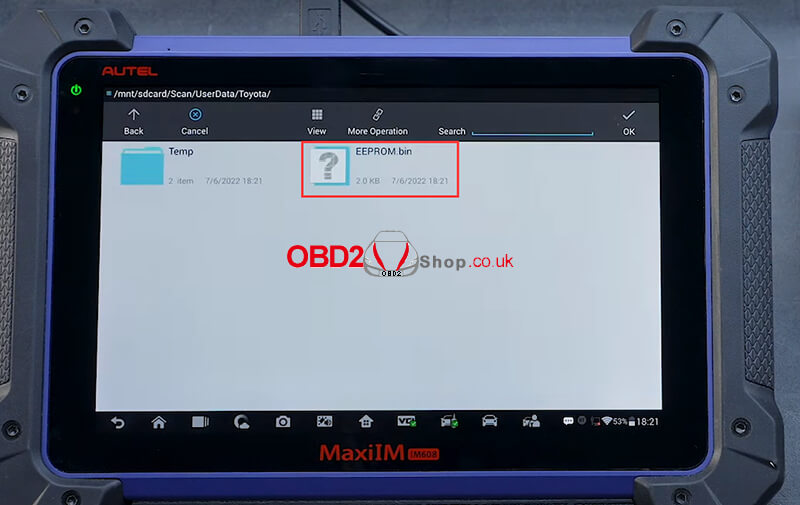
Continue to the previous step and select "Back up IMMO data (dump 93c86)".
Save the EEPROM data file.
After the EEPROM data backup is successful, go back to the previous page and select "Generate analog key".
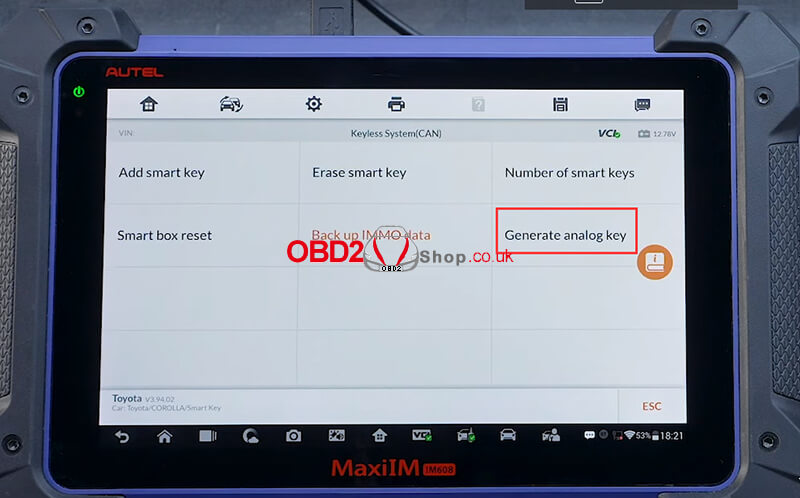
Select the back up data file you just saved.
Connect the APB112 Key Simulator cable to the IM608 and the XP400 Key Programmer.
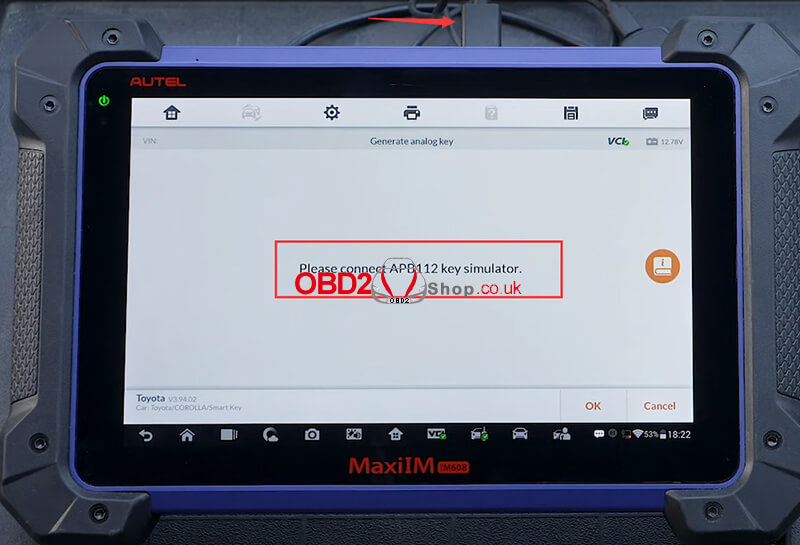
Then put the smart key module back.
Turn on the ignition with the analog key.
Select "Add Smart Key" and follow the prompts to perform the key learning process.
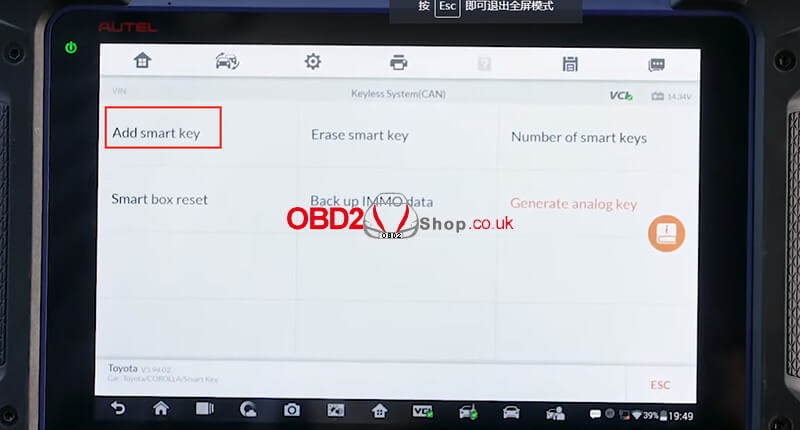
Then put the analog key(APB112) close to the START button.
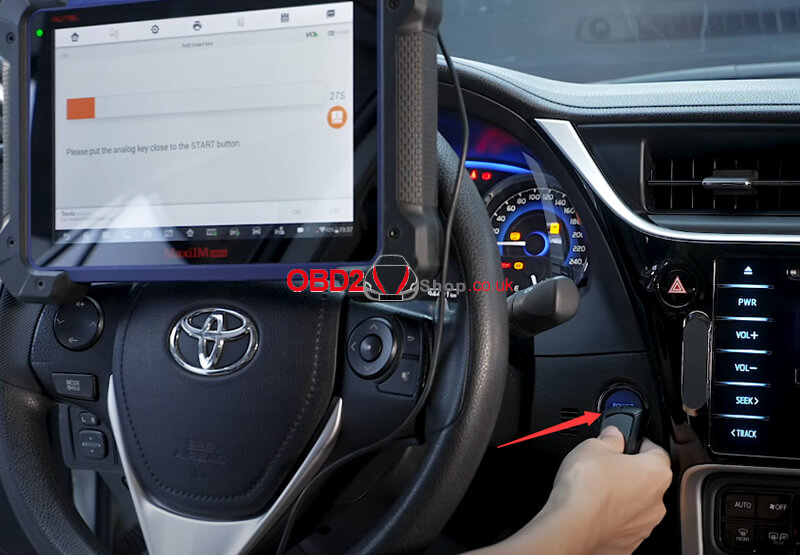
Then put a smart key to be learned close to the START button.
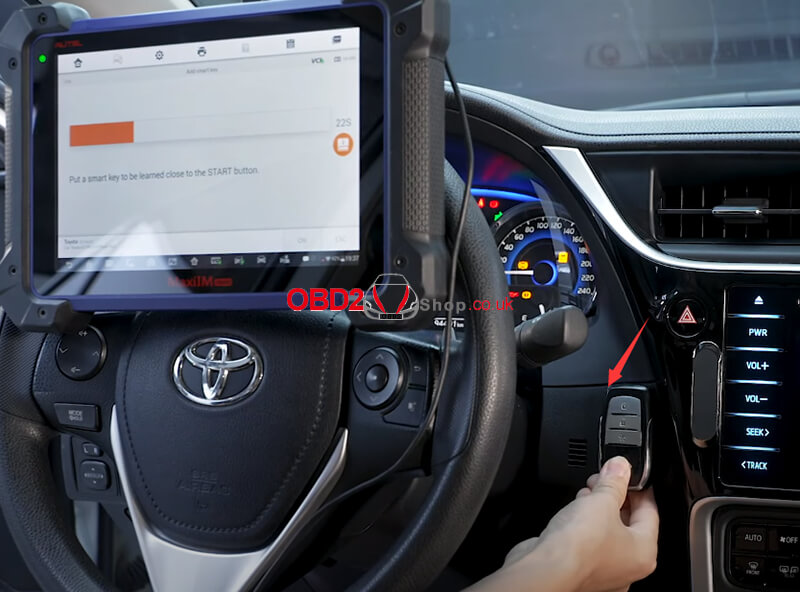
Learning succeeded.
Oznake: Autel MaxiIM IM608

| < | siječanj, 2023 | > | ||||
| P | U | S | Č | P | S | N |
| 1 | ||||||
| 2 | 3 | 4 | 5 | 6 | 7 | 8 |
| 9 | 10 | 11 | 12 | 13 | 14 | 15 |
| 16 | 17 | 18 | 19 | 20 | 21 | 22 |
| 23 | 24 | 25 | 26 | 27 | 28 | 29 |
| 30 | 31 | |||||
Svibanj 2026 (1)
Siječanj 2026 (19)
Prosinac 2025 (22)
Studeni 2025 (21)
Listopad 2025 (20)
Rujan 2025 (21)
Kolovoz 2025 (8)
Srpanj 2025 (13)
Lipanj 2025 (9)
Svibanj 2025 (12)
Travanj 2025 (10)
Ožujak 2025 (12)
Veljača 2025 (14)
Siječanj 2025 (8)
Prosinac 2024 (6)
Studeni 2024 (6)
Listopad 2024 (4)
Rujan 2024 (7)
Kolovoz 2024 (14)
Srpanj 2024 (12)
Lipanj 2024 (10)
Svibanj 2024 (13)
Travanj 2024 (12)
Ožujak 2024 (11)
Veljača 2024 (2)
Siječanj 2024 (10)
Prosinac 2023 (8)
Studeni 2023 (6)
Listopad 2023 (7)
Rujan 2023 (9)
Kolovoz 2023 (6)
Srpanj 2023 (10)
Lipanj 2023 (4)
Veljača 2023 (8)
Siječanj 2023 (14)
Prosinac 2022 (13)
Studeni 2022 (14)
Listopad 2022 (18)
Rujan 2022 (9)
Kolovoz 2022 (16)
Srpanj 2022 (11)
Lipanj 2022 (14)
Svibanj 2022 (13)
Travanj 2022 (12)
Ožujak 2022 (12)
Veljača 2022 (13)
Siječanj 2022 (10)
Srpanj 2021 (1)
Dnevnik.hr
Gol.hr
Zadovoljna.hr
Novaplus.hr
NovaTV.hr
DomaTV.hr
Mojamini.tv