OBD2 tools on OBD2shop.co.uk https://blog.dnevnik.hr/obd2shop
četvrtak, 29.01.2026.
CFMOTO BOSCH MED17.8.10 ECM Read/Write with MotoMaster
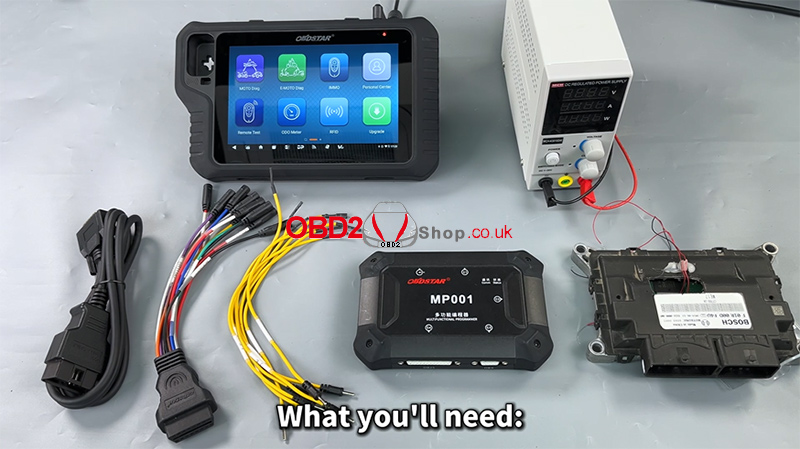
In this guide, we’ll demonstrate how to perform data read and write operations on the CFMOTO BOSCH MED17.8.10 ECM using the MotoMaster programming tool. This procedure is designed for professional users who need reliable and secure ECU data handling.
Required Equipment:
MotoMaster
High-power DC regulated power supply
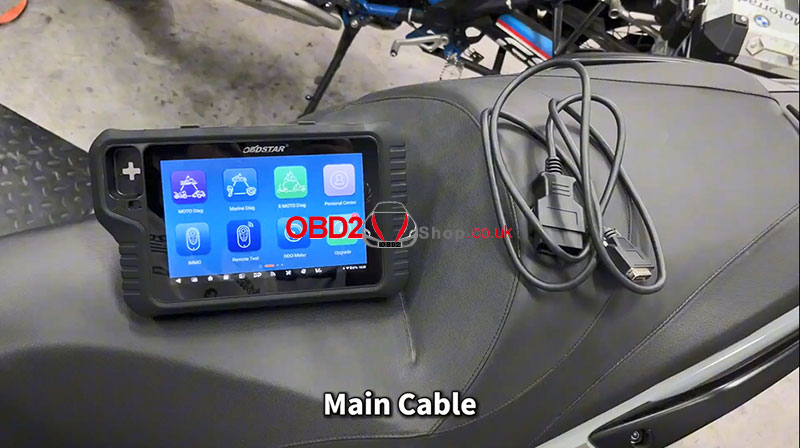
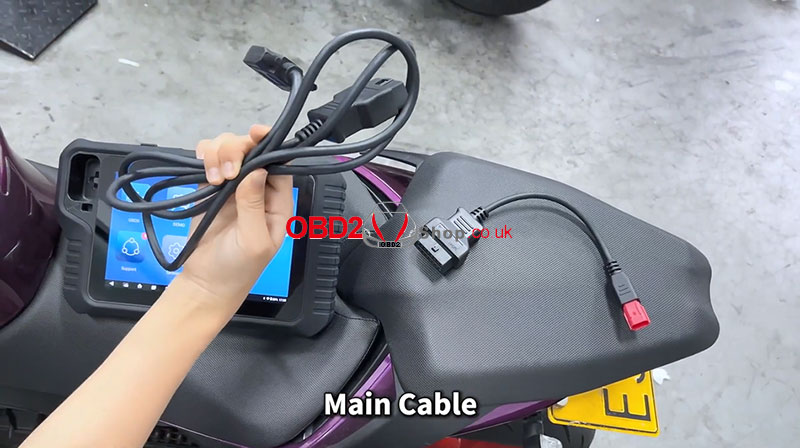
Main Cable
ECU clone jumper
MP001 programmer
BOSCH MED17.8.10 ECM
Step 1: Software Preparation
Ensure that the MotoMaster software is updated to the latest version to guarantee compatibility and stable operation.
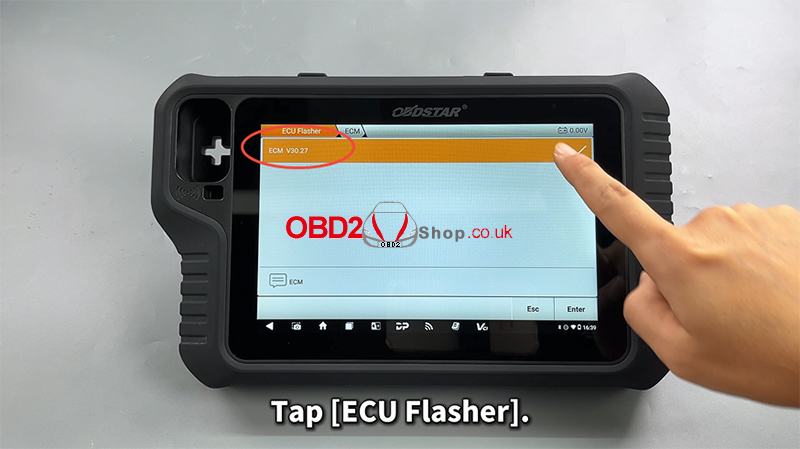
Power on the device
Tap [ECU Flasher] to enter the ECU programming function
Step 2: Locate the ECU Module
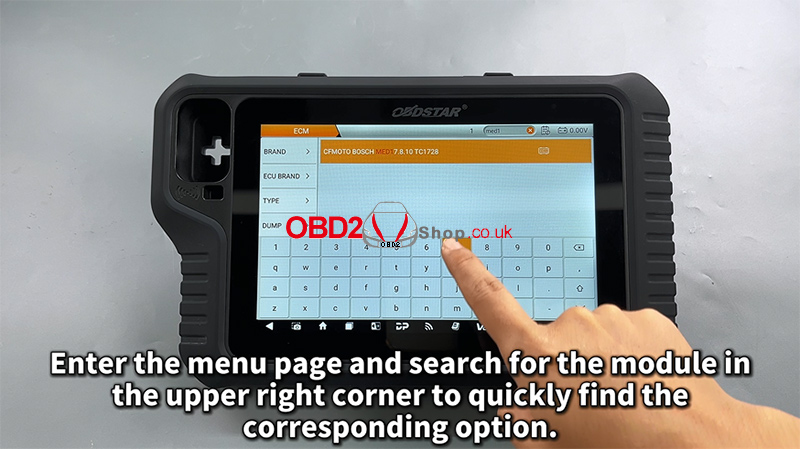
Once inside the ECU Flasher menu:
Use the search bar in the upper-right corner to quickly find the corresponding ECU module
Enter the module menu
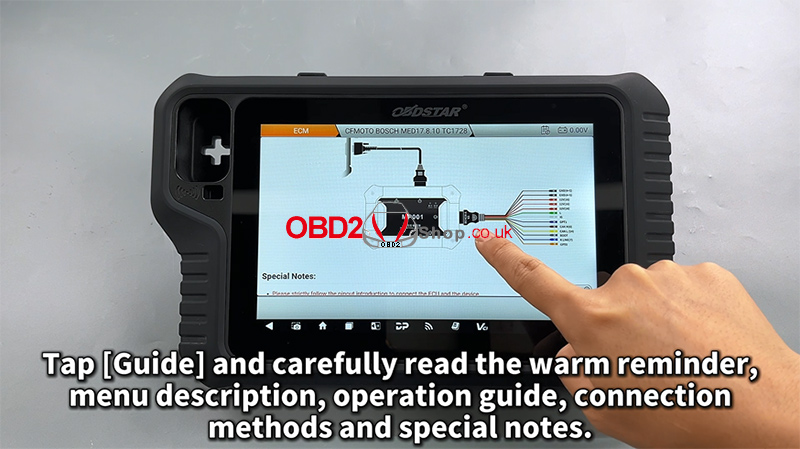
Step 3: Read the Operation Guide
Tap [Guide] and carefully review all provided information, including:
Warm reminders
Menu descriptions
Operation procedures
Connection methods
Special notes
This step is strongly recommended to avoid wiring or operation errors.
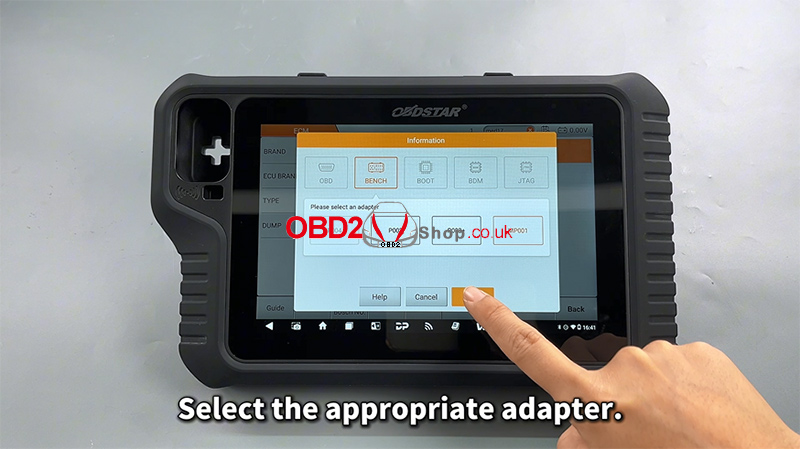
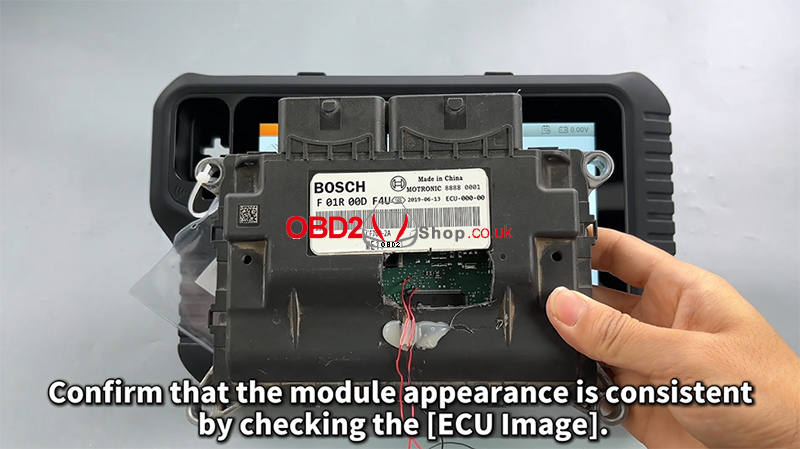
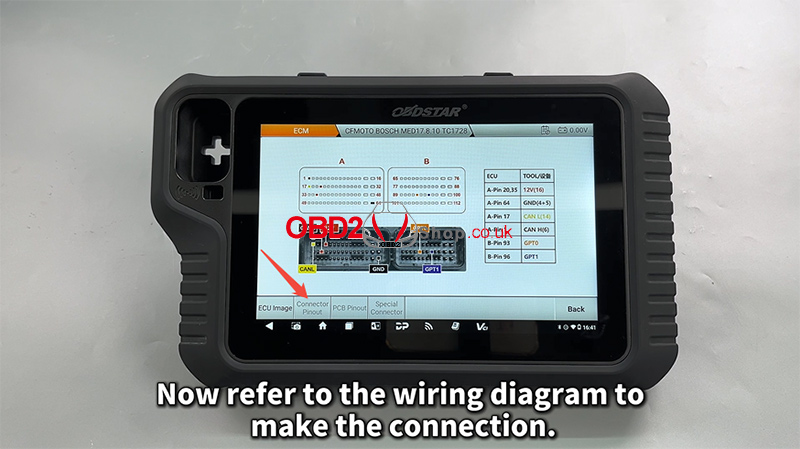
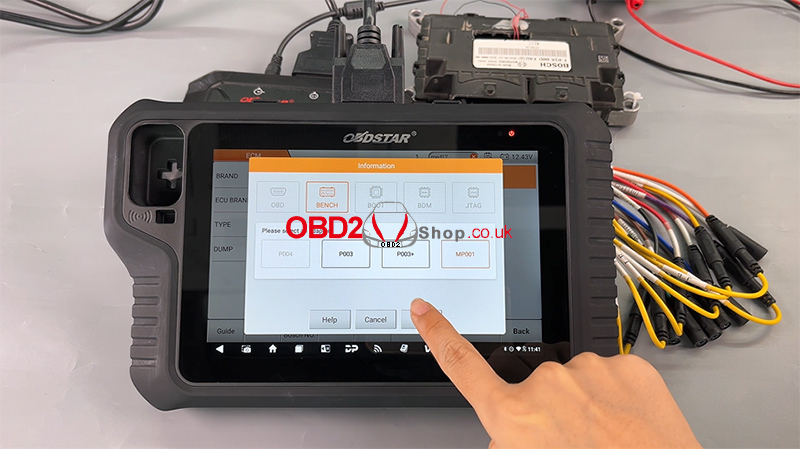
Step 4: Connection Setup
Select the appropriate adapter
Check the [ECU Image] to confirm the module appearance matches the target ECU
Tap [Connector Pinout]
Refer to the wiring diagram and complete the connection accordingly
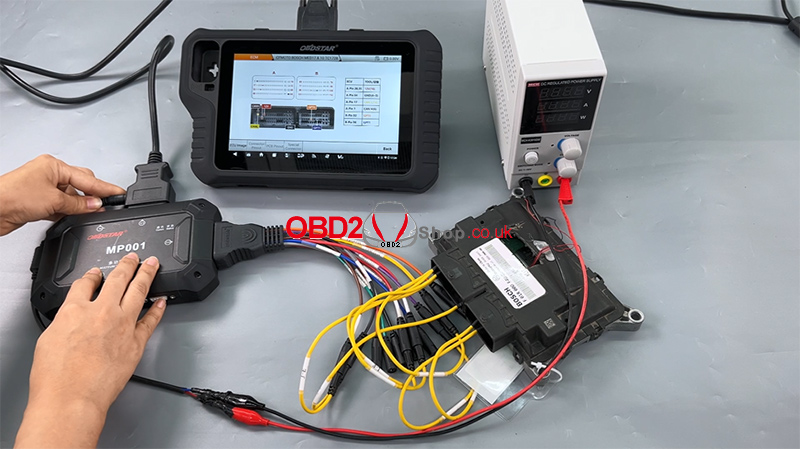
Step 5: Read and Back Up ECU Data
After confirming a successful connection:
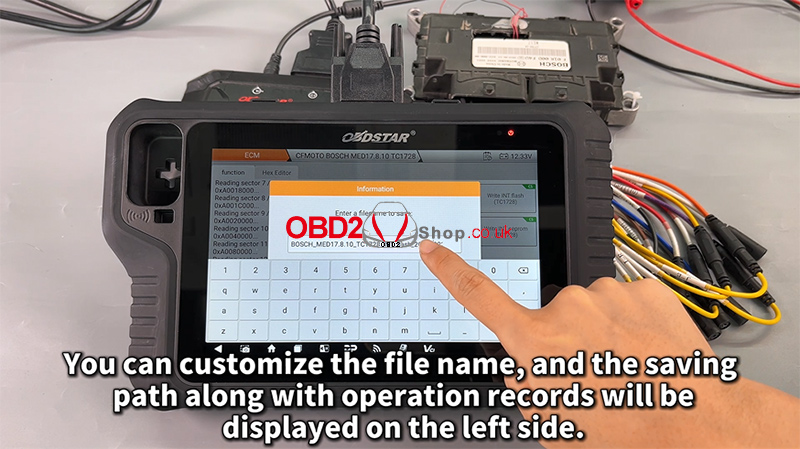
First, read and back up the original EEPROM/Flash data
Customize the file name and saving path as needed
All operation records will be displayed on the left-side log panel for easy tracking
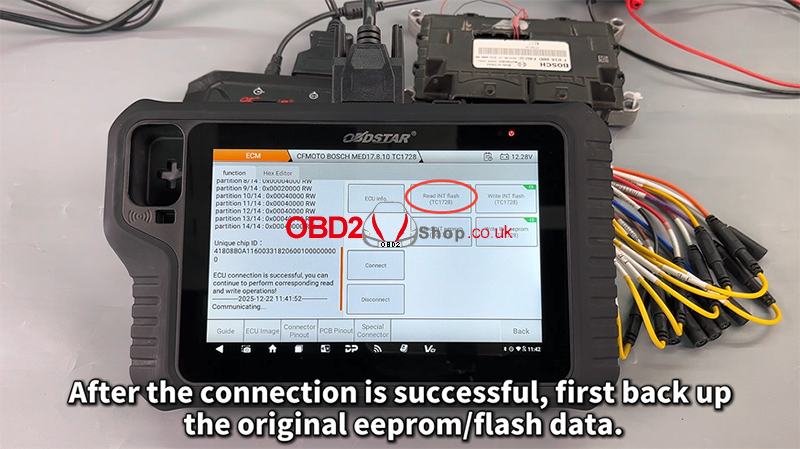
Backing up the original data is critical and should always be completed before any write operation.
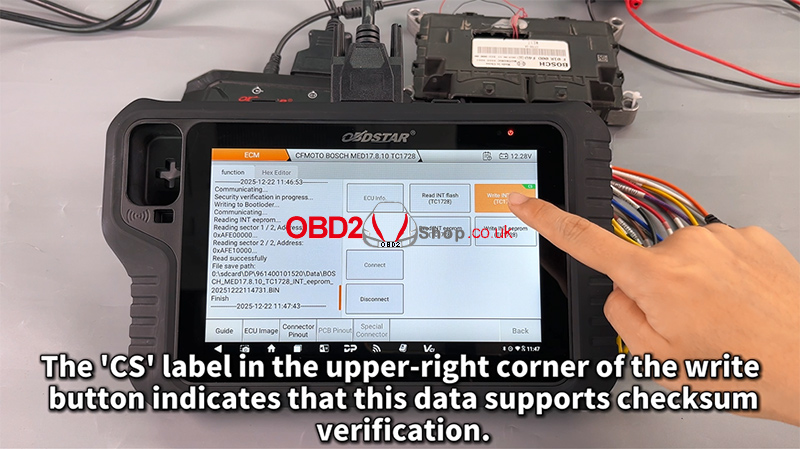
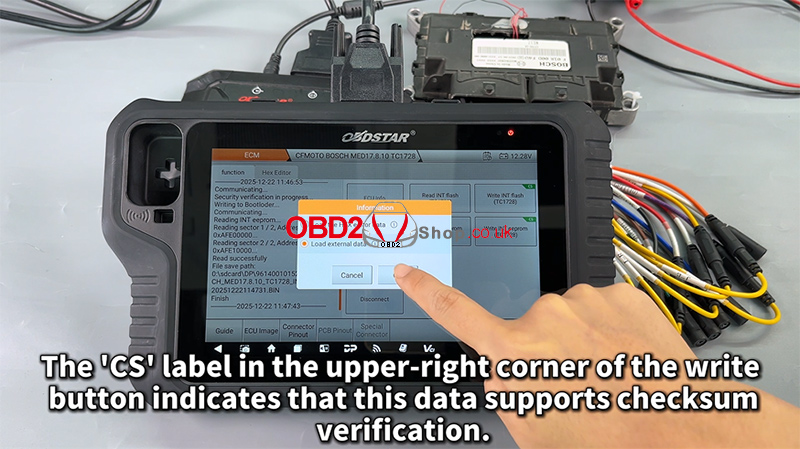
Step 6: Write Data to the ECU
Next, proceed with writing data to the module:
Select the desired file
Tap Write to start the process
The “CS” label in the upper-right corner of the write button indicates that the data supports checksum verification, ensuring data integrity and operational safety.
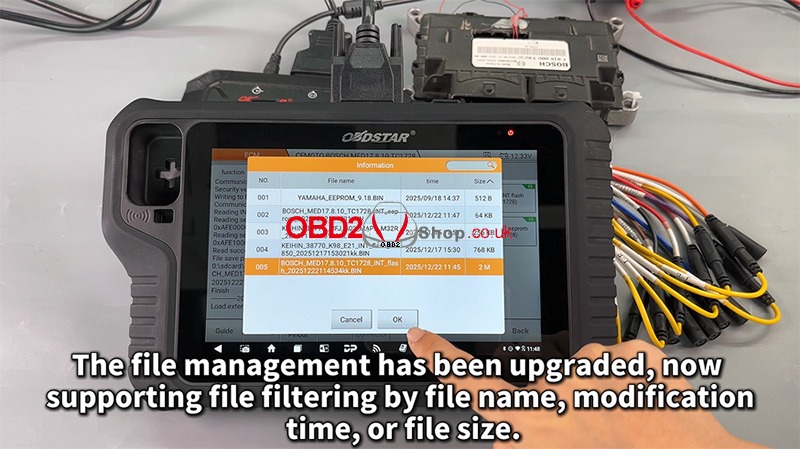
Step 7: File Management Improvements
The upgraded file management system now supports filtering by:
File name
Modification time
File size
This enhancement makes it easier to manage and locate ECU files efficiently.
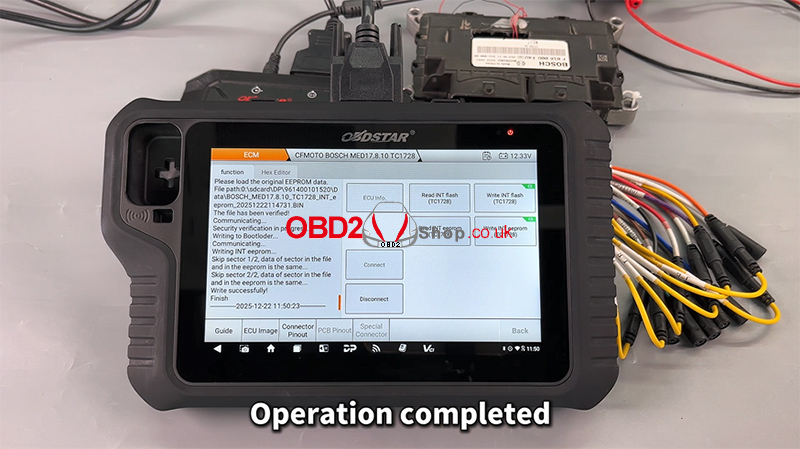
Completion
Once the process finishes, the operation is complete, and the ECU data has been successfully written.
Video Tutorial
For a full visual walkthrough, please watch the video guide:
https://youtu.be/hUSAVxfbtoc
More Information
Visit our website for more diagnostic tools and technical resources:
www.obd2shop.co.uk
Oznake: obdstar motomaster
ponedjeljak, 19.01.2026.
2020 Honda ADV750 Clutch Initialization Using OBDSTAR MotoMaster
In this guide, we will walk you through the clutch initialization (learning) procedure for a 2020 Honda ADV750 using the OBDSTAR MotoMaster diagnostic tool. This function is essential after clutch-related repairs or when transmission performance needs recalibration.
Follow the steps below carefully to complete the process successfully.
Required Tools:
OBDSTAR MotoMaster
Main cable
M041 dedicated cable
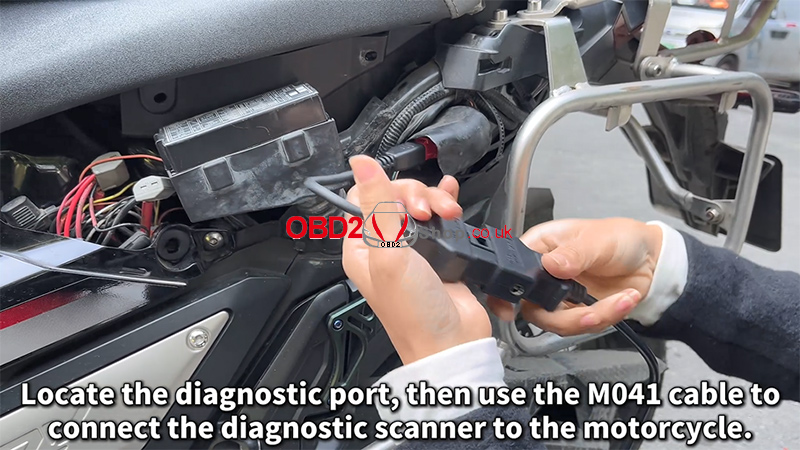
Connection Setup
1. Locate the motorcycle diagnostic port.
2. Use the M041 dedicated cable to connect the MotoMaster to the motorcycle.
3. Turn the ignition ON (engine OFF).
4. On the MotoMaster, navigate to: [MOTO Diag] ’ [HONDA]

Clutch Initialization Procedure
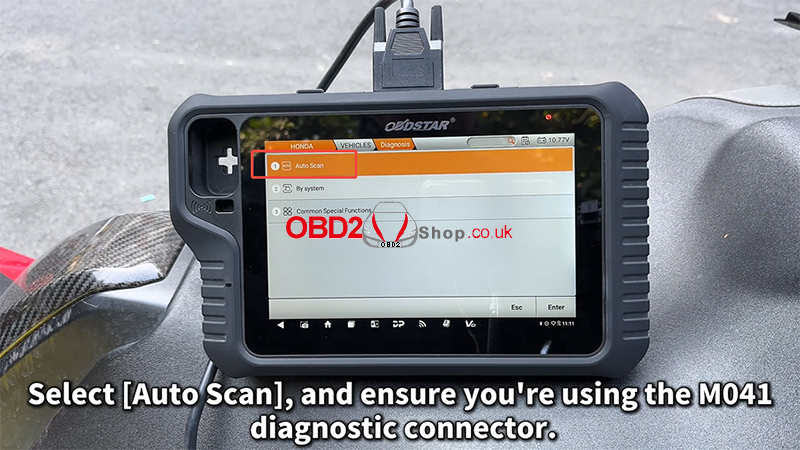
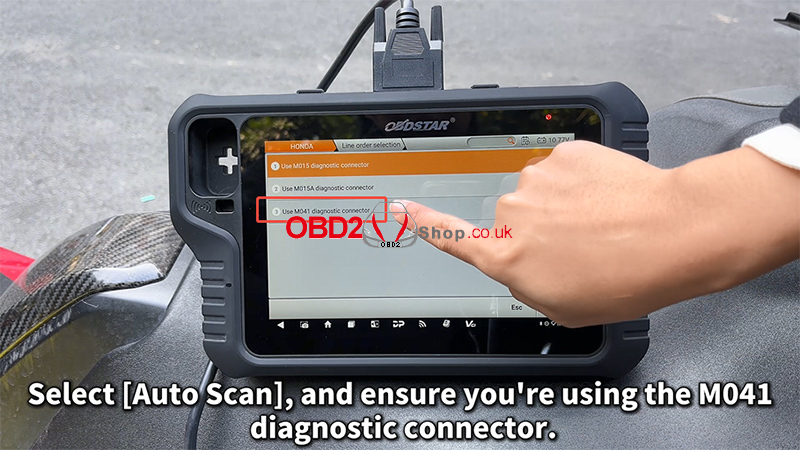
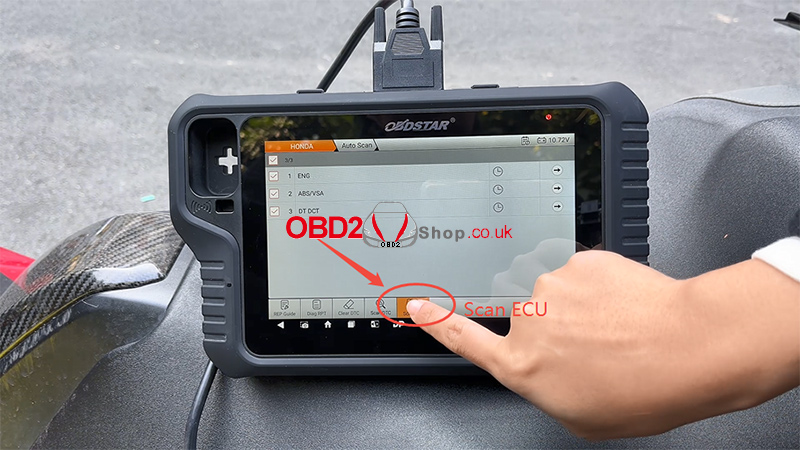
1. Select [Auto Scan] and confirm that the M041 diagnostic connector is in use.
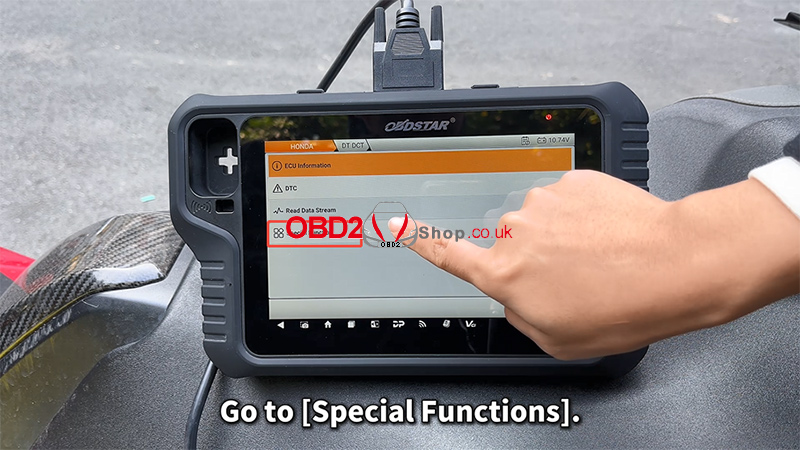
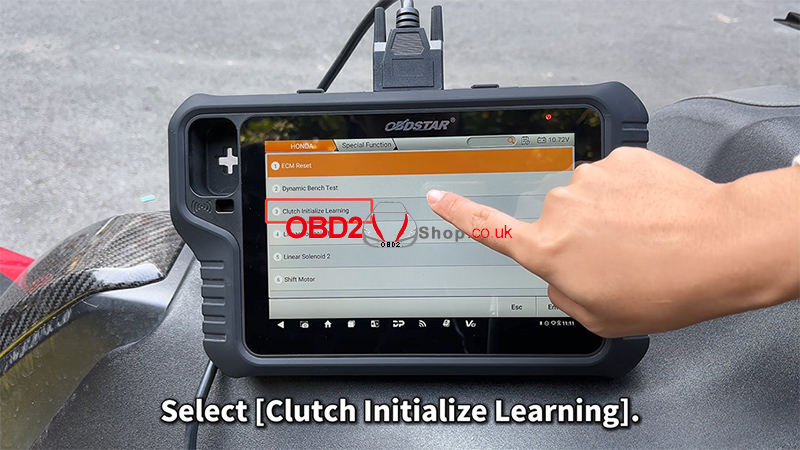
2. Enter [Special Functions].
3. Choose [Clutch Initialize Learning].
4. Carefully read the on-screen notes and confirm:
The engine is OFF
The transmission is in Neutral
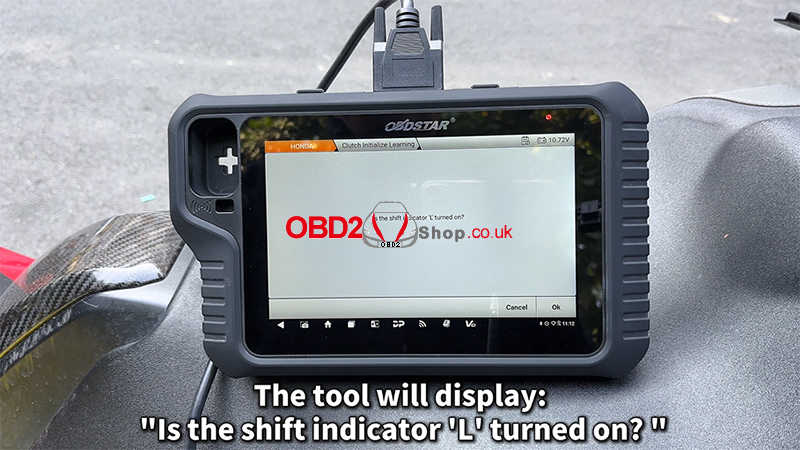
5. The tool will display the message: “Is the shift indicator ‘L’ turned on?” Tap [Cancel].
Ignition & Engine Operation
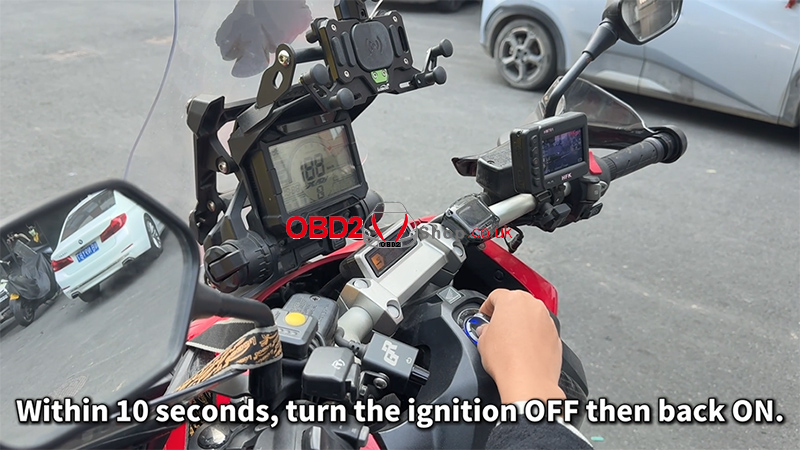
1. Within 10 seconds, turn the ignition OFF, then turn it ON again.
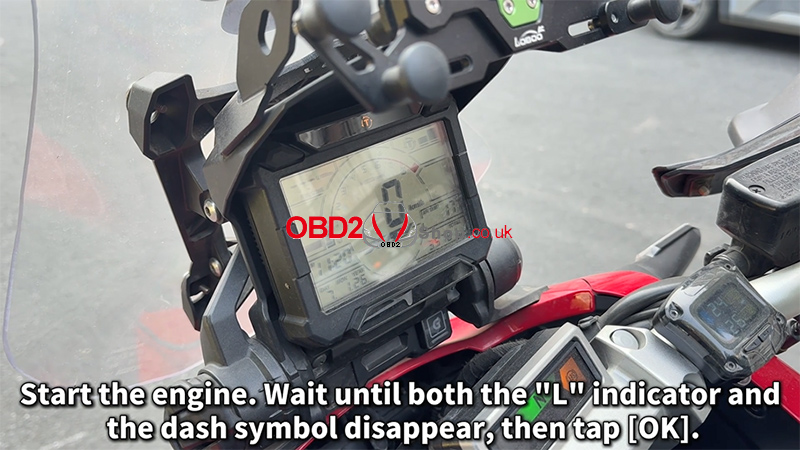
2. Start the engine.
3. Wait until both the “L” indicator and the dashboard symbol disappear.
4. Tap [OK] to continue.
Completion Steps
1. Once the clutch initialization completes successfully, tap [OK].
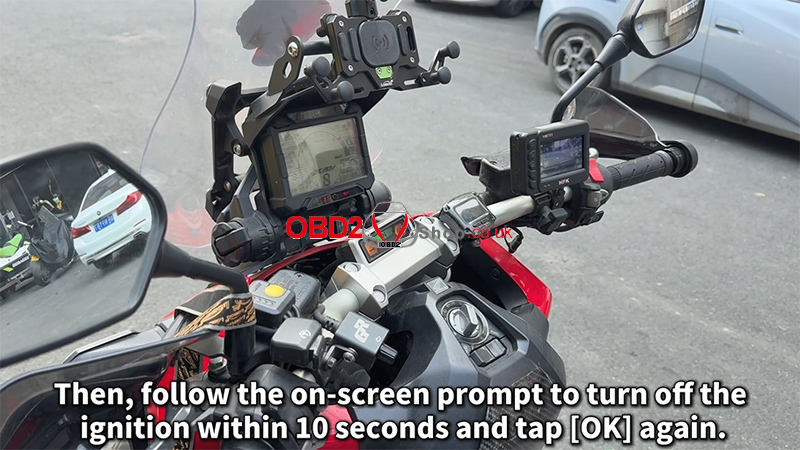
2. Follow the on-screen prompt to turn OFF the ignition within 10 seconds, then tap [OK] again.
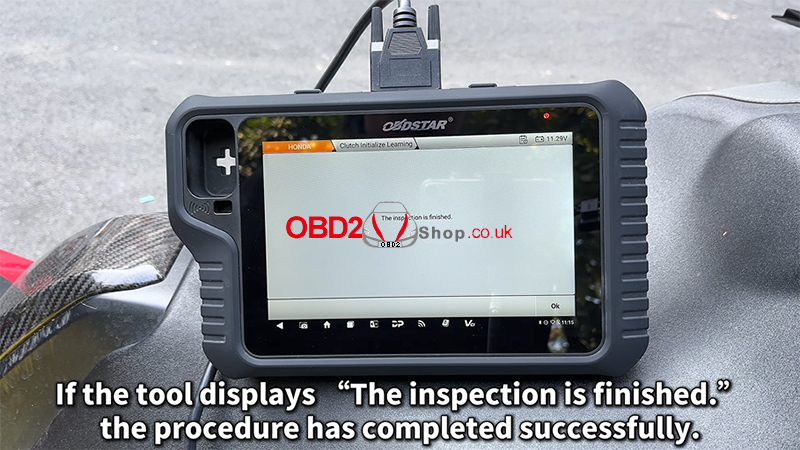
3. If the tool displays: “The inspection is finished,” the clutch initialization procedure has been completed successfully.

Video Tutorial
For a visual walkthrough of the entire process, watch the video guide below:
https://youtu.be/Tro-ux7Pwt8
For more motorcycle diagnostic guides and professional tools, visit: www.obd2shop.co.uk.
Oznake: obdstar motomaster
utorak, 16.12.2025.
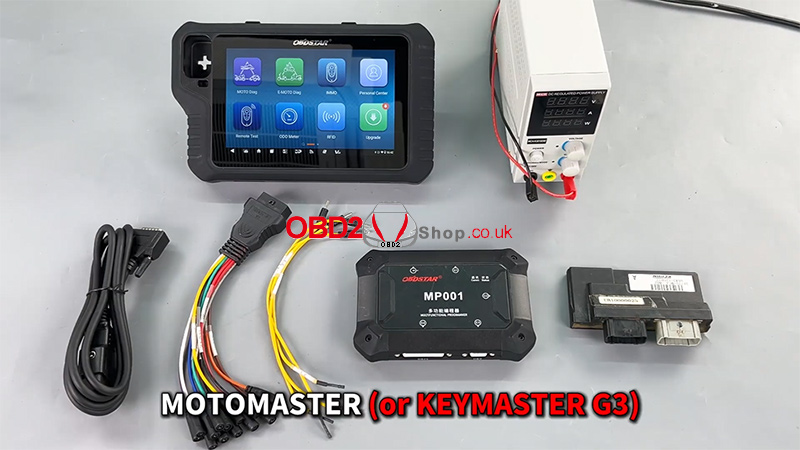
HONDA 38770-MFJ-A02 ECM Data Read & Write via MOTOMASTER
In this post, we’ll demonstrate how to perform ECM data read and write operations on the HONDA 38770-MFJ-A02 ECM using OBDSTAR MOTOMASTER. This procedure is suitable for technicians who need to back up, clone, or restore ECU data safely and efficiently.
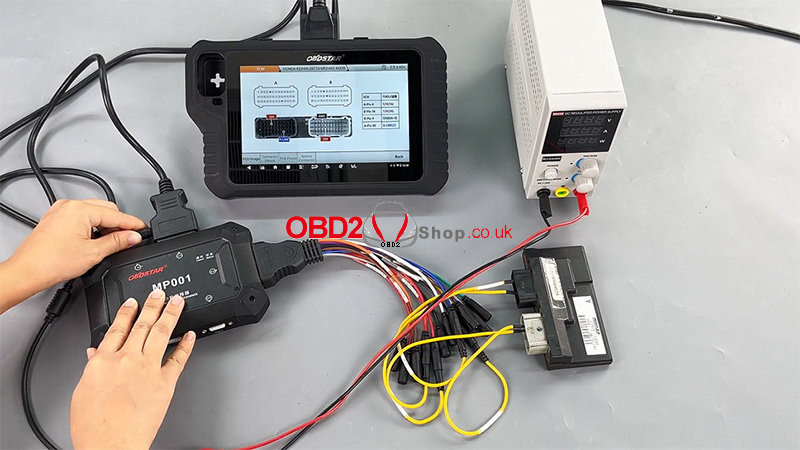
Required Tools:
MOTOMASTER (or KEYMASTER G3)
High-power DC regulated power supply
Main cable
ECU clone jumper
MP001 programmer
HONDA 38770-MFJ-A02 ECM
Software Preparation
Before proceeding, ensure that the device's software is up to date with the latest version.
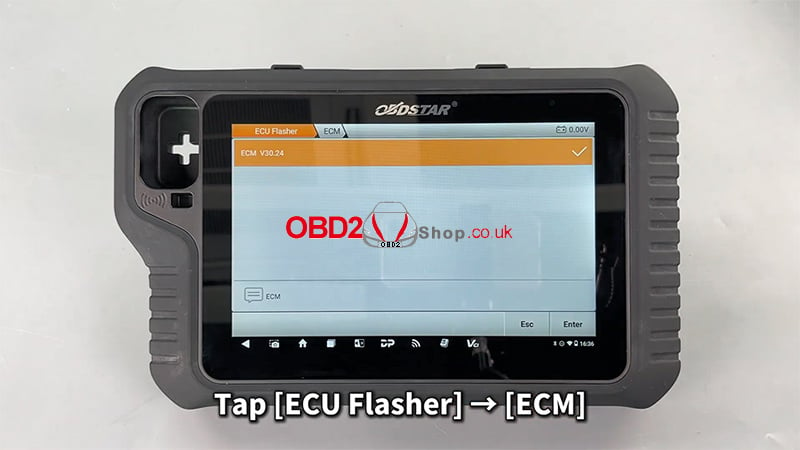
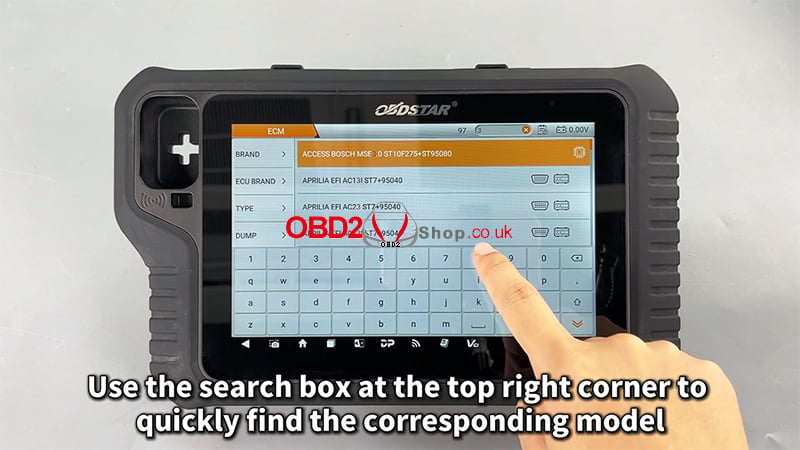
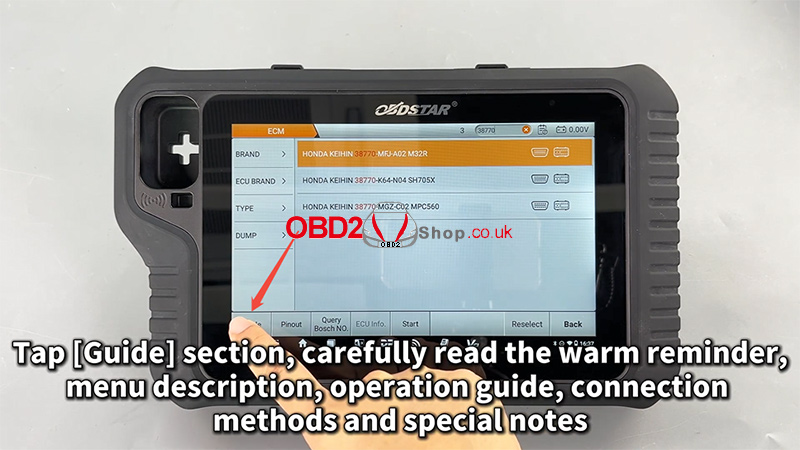
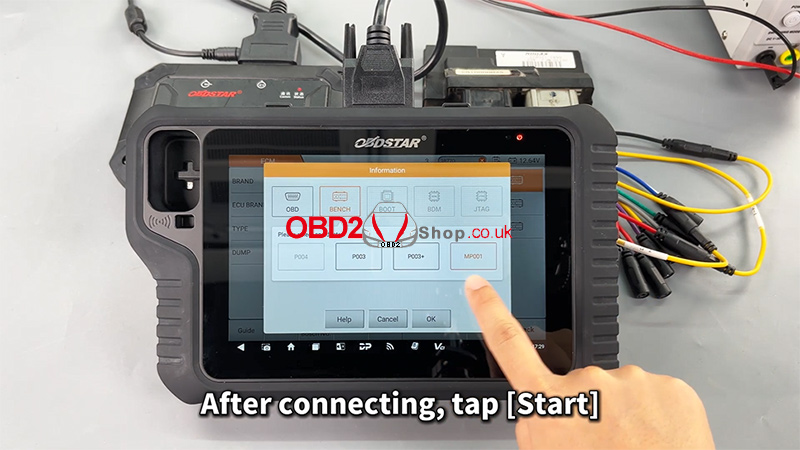
1. Tap [ECU Flasher] >> [ECM]
2. Use the search box in the top-right corner to quickly locate the corresponding ECM model
3. Enter the [Guide] section and carefully review:
Warm reminders
Menu descriptions
Operation steps
Connection methods
Special notes
This step ensures correct operation and helps avoid unnecessary risks.
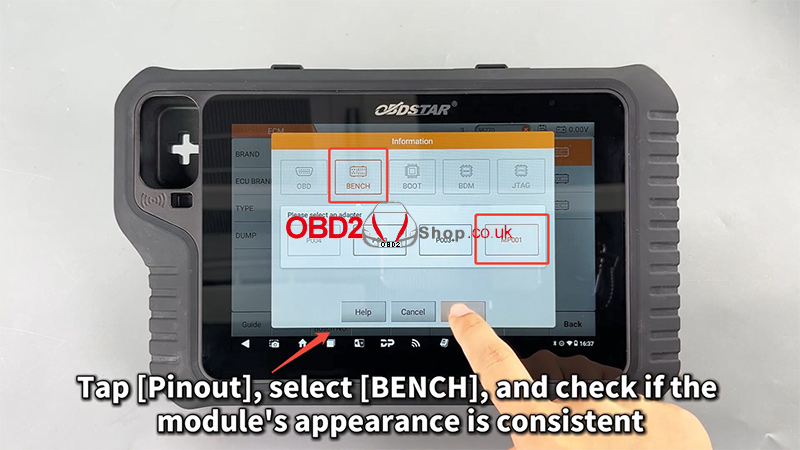
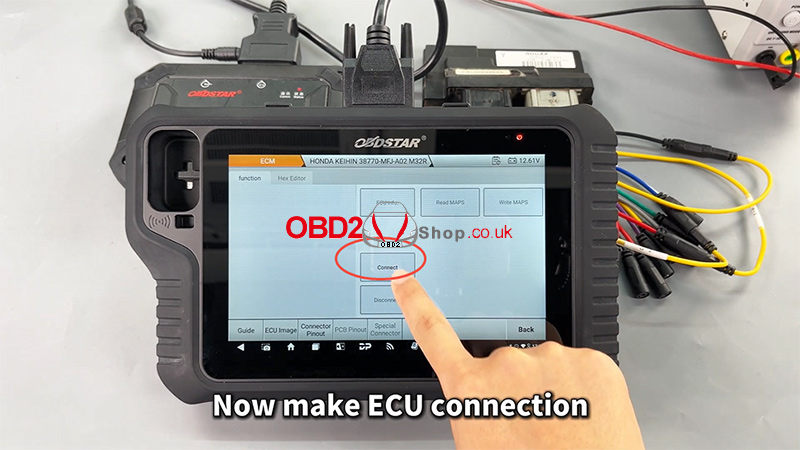
Pinout and Connection Setup
1. Tap [Pinout]
2. Select [BENCH] mode
3. Verify that the ECM appearance matches the displayed module
4. Tap [Connector Pinout] and connect all wires strictly according to the pinout diagram
Correct wiring is critical for stable communication and successful data operations.

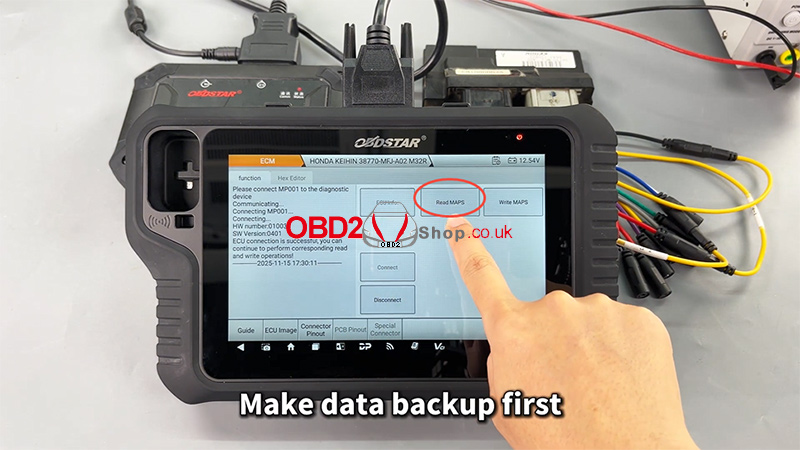
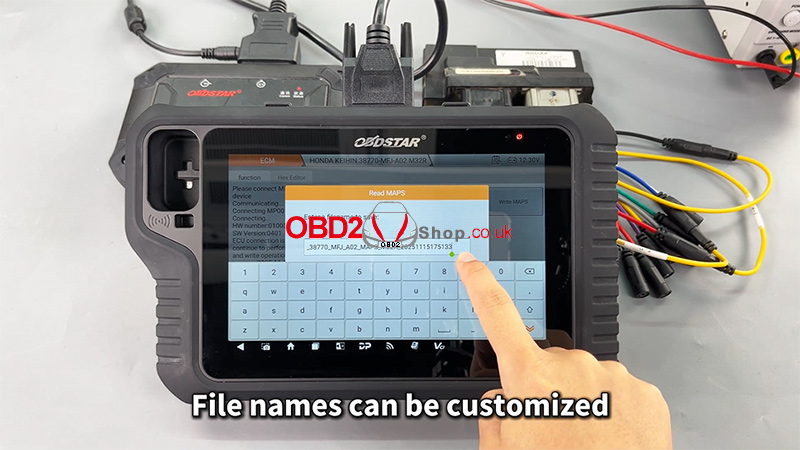
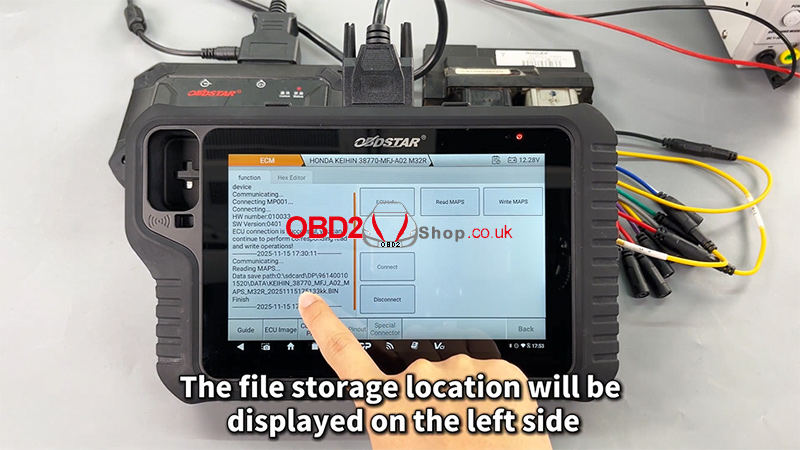
ECM Data Reading (Backup)
1. After completing all connections, tap [Start]
2. Establish the ECU connection
3. Perform a data backup first (strongly recommended)
4. Customize the file name as needed
5. The file storage location will be displayed on the left side of the screen
Backing up original data ensures data safety and allows recovery if needed.
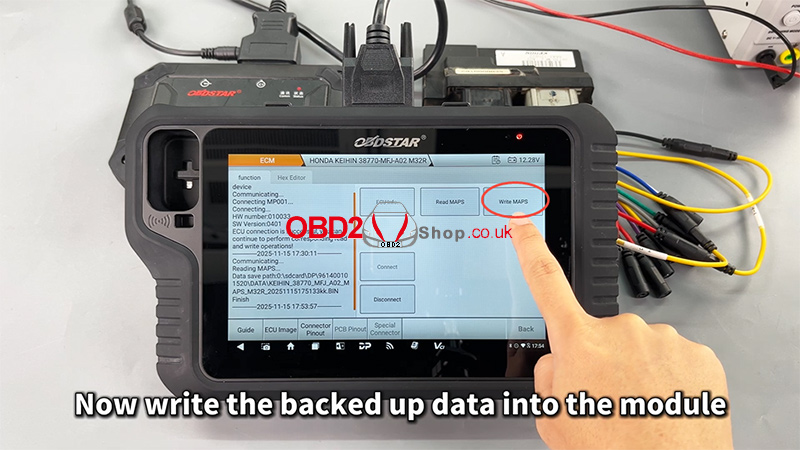
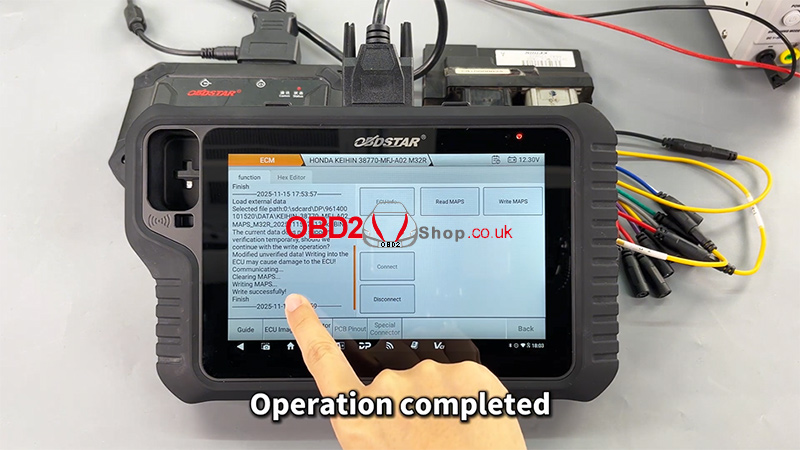
ECM Data Writing
1. Select the previously backed-up data file
2. Write the data into the ECM module
3. The file management system supports filtering by:
File name
Modification time
File size
4. Once writing is completed, the operation is finished successfully

Video Reference:
For a complete step-by-step demonstration, please watch the video below:
https://youtu.be/GvXZRYxD-Qk
For more professional automotive diagnostic tools and programming solutions, visit www.obd2shop.co.uk.
Oznake: obdstar motomaster
utorak, 25.11.2025.
2021 Harley-Davidson Key Programming with OBDSTAR MOTOMASTER
This guide walks you through the process of programming a new key for a 2021 Harley-Davidson motorcycle using the OBDSTAR MOTOMASTER diagnostic tool. Follow the steps below to complete the procedure smoothly and successfully.
Required Tools:
MOTOMASTER
Main Cable
M041 Cable
New Key
Step 1: Connect the Motorcycle
Locate the diagnostic port on your Harley-Davidson and connect it to the MOTOMASTER using the main cable and M041 cable.
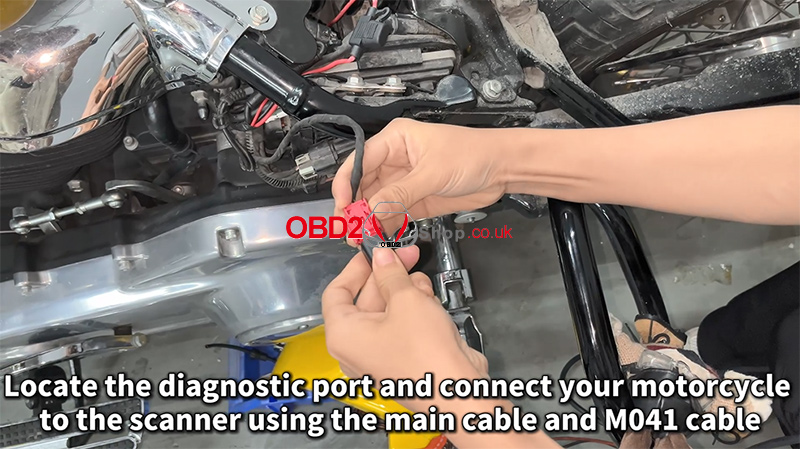
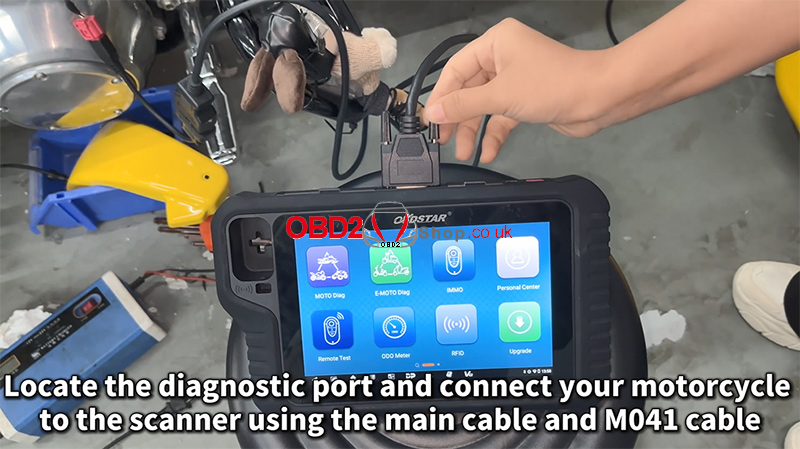
Turn on the ignition to power the system.
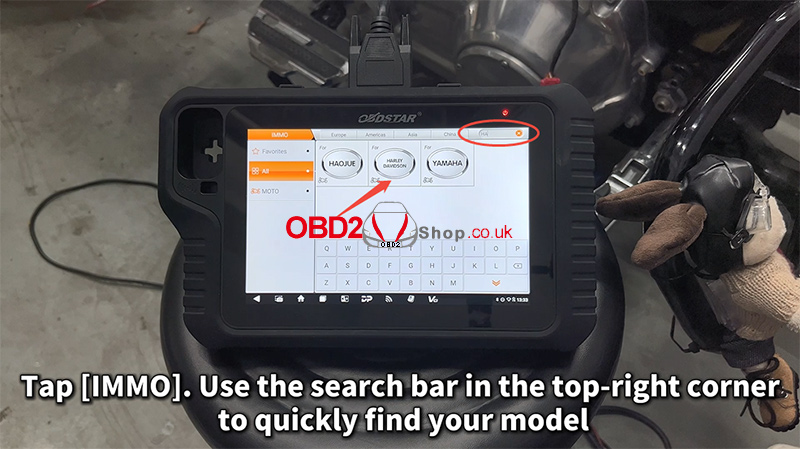
Step 2: Select the Vehicle Model
On the MOTOMASTER:
Tap IMMO.
Use the search bar in the top-right corner to quickly locate your model.
Navigate to:
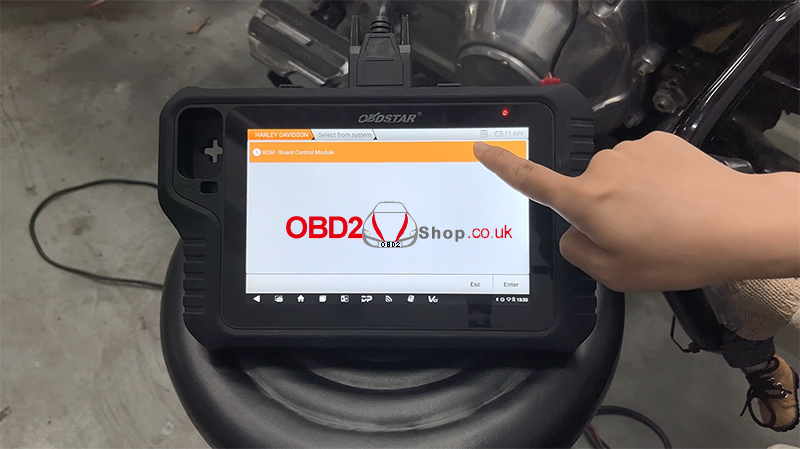
[HARLEY DAVIDSON] ’ [HARLEY DAVIDSON V40.32] ’ [BCM – Board Control Module]
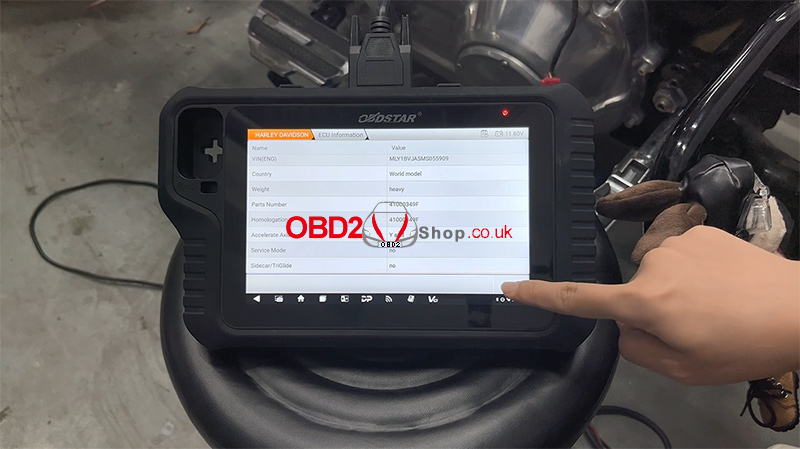
Tap [ECU Information] to view and verify module details.
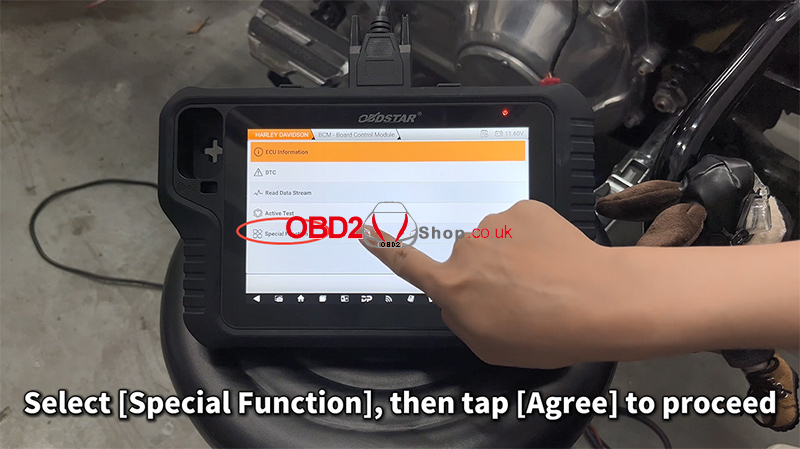
Step 3: Access Special Functions
Select [Special Function], then tap [Agree] to continue.
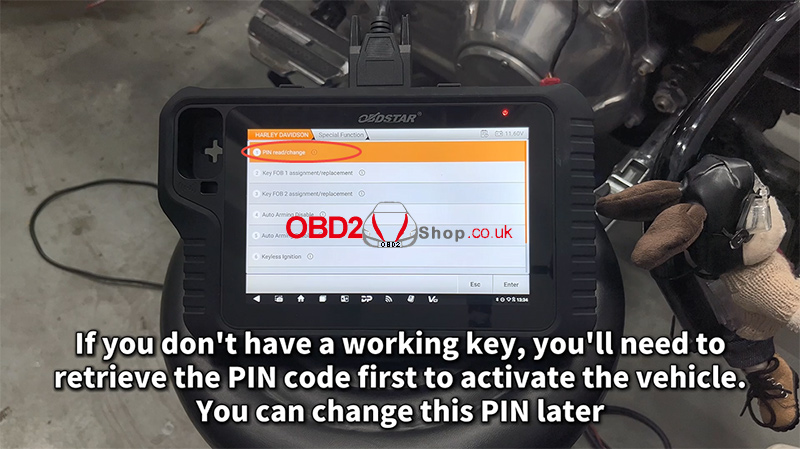
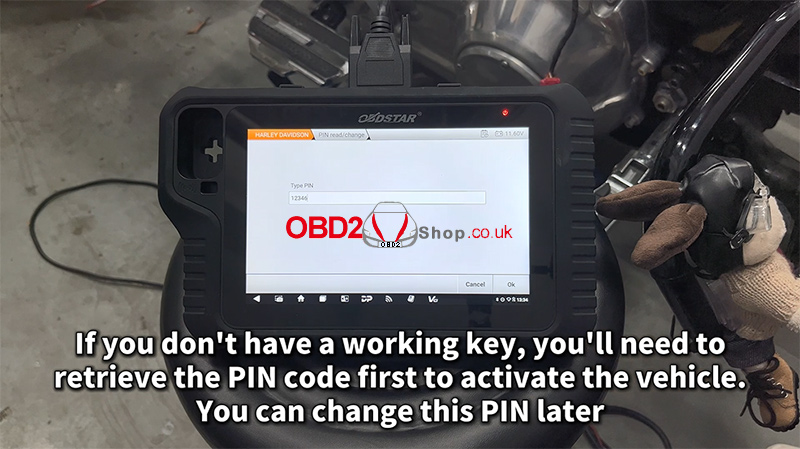
If you don’t have a working key, you must retrieve the PIN code first to activate the vehicle.
Choose [PIN read/change] if you wish to modify the PIN later.
Step 4: Program the New Key
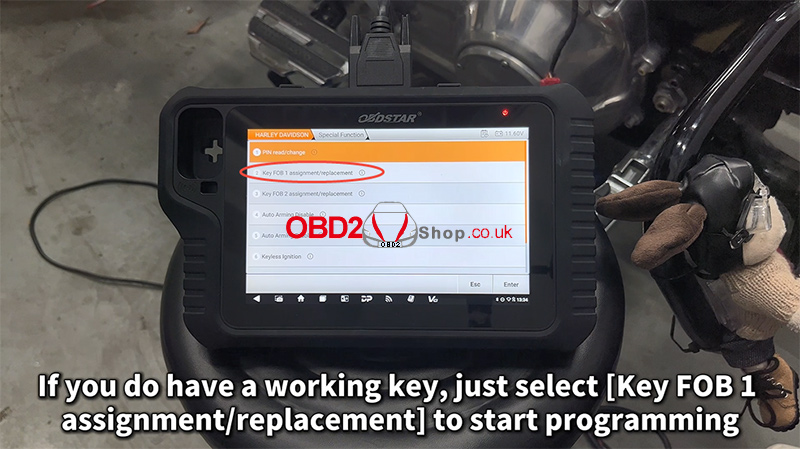
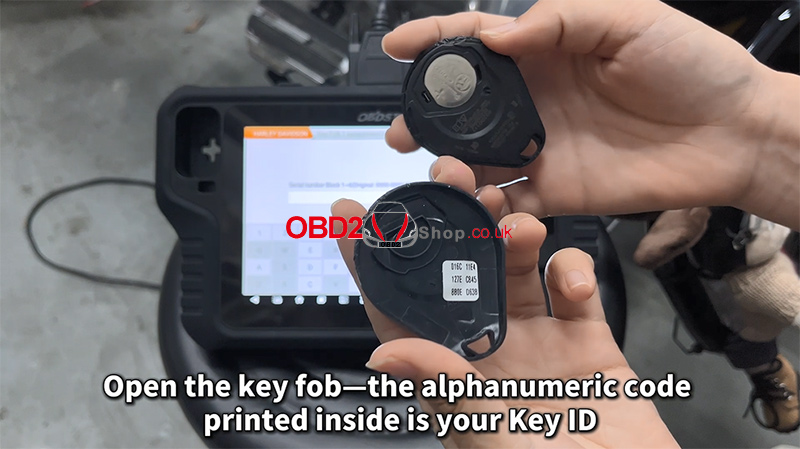
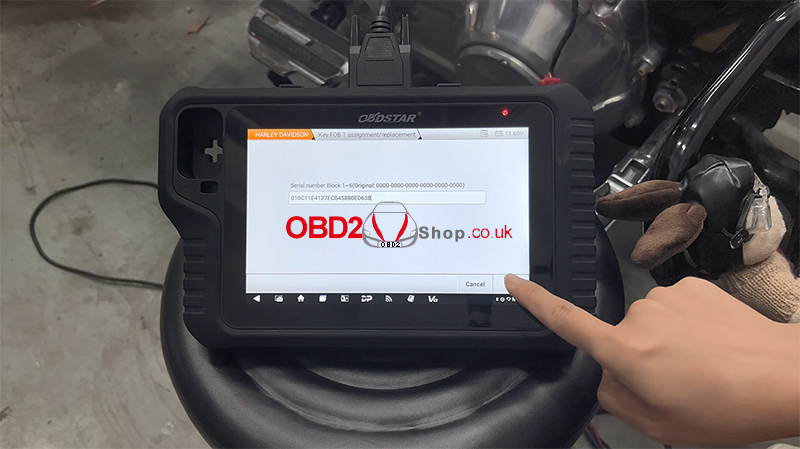
If you already have an available working key, choose [Key FOB 1 assignment/replacement] to begin programming.
The device will prompt you to enter the Key ID.
Open your new key fob—inside, you will find an alphanumeric code. This is your Key ID.
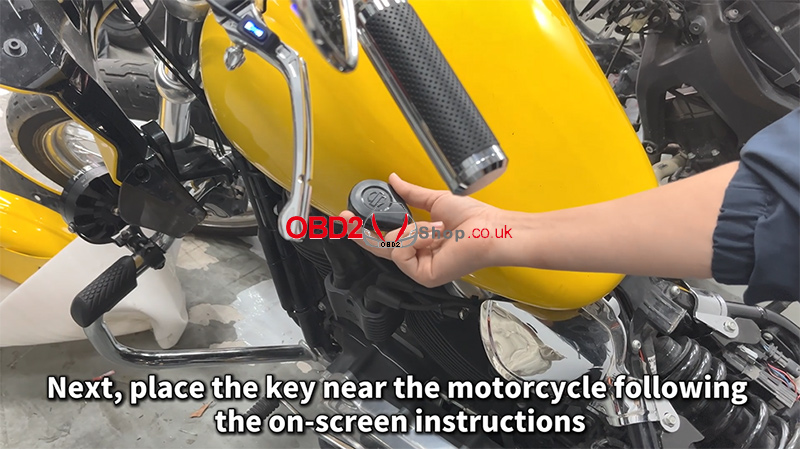
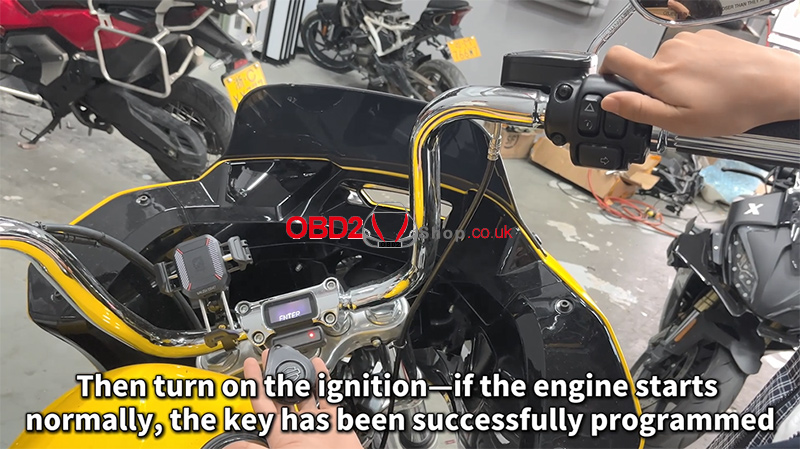
Step 5: Finalize Programming
Follow the on-screen instructions and place the key near the motorcycle as required.
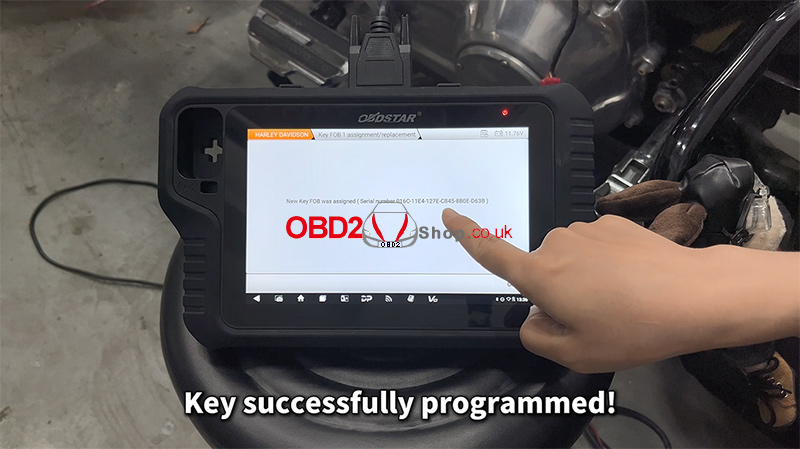
Once the device confirms the key has been successfully programmed, tap OK.
Turn on the ignition. If the engine starts normally, the new key has been successfully programmed.
Watch the full demonstration here:
https://youtu.be/e7bj68C3AXg
More tools available at:
www.obd2shop.co.uk
Oznake: obdstar motomaster
utorak, 11.11.2025.
OBDSTAR MOTOMASTER: New Data Stream Diagram Upgrade
The latest update of the OBDSTAR MOTOMASTER Motorcycle Scanner introduces a newly optimized "Data Stream Diagram" feature — now more intuitive, simpler, and easier to use. This improvement allows technicians and motorcycle enthusiasts to view and analyze real-time data more efficiently.
Step-by-Step Overview:
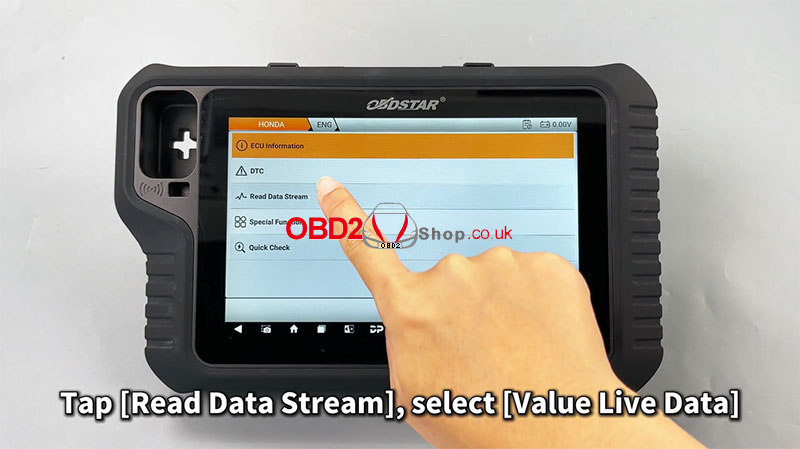
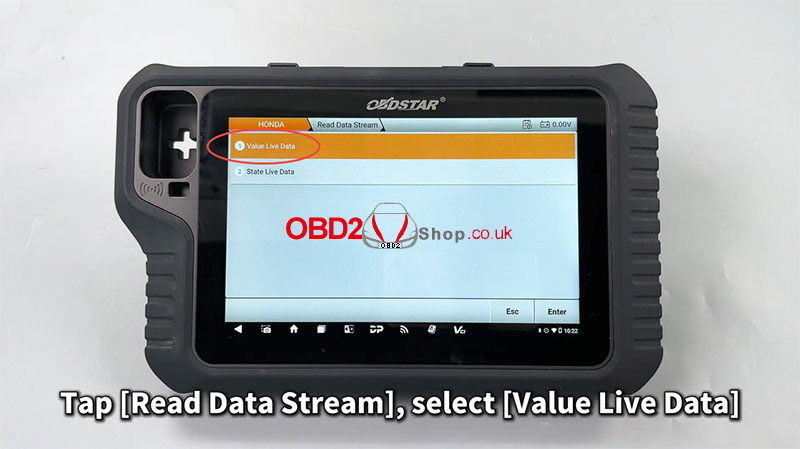
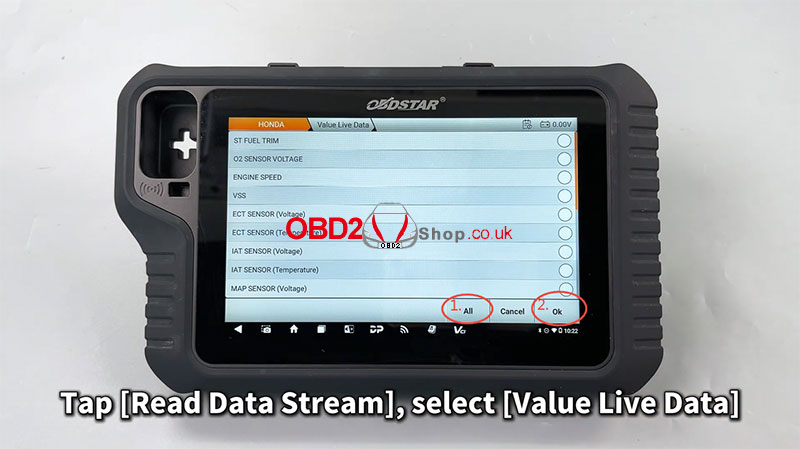
` Tap [Read Data Stream] ’ Select [Value Live Data]
This step allows you to enter the live data monitoring interface, where you can choose which vehicle parameters to observe in real time.
a Select the desired values and tap [Diagram]
The selected data will be visualized as a dynamic graph, helping you quickly understand performance trends and system behaviors.
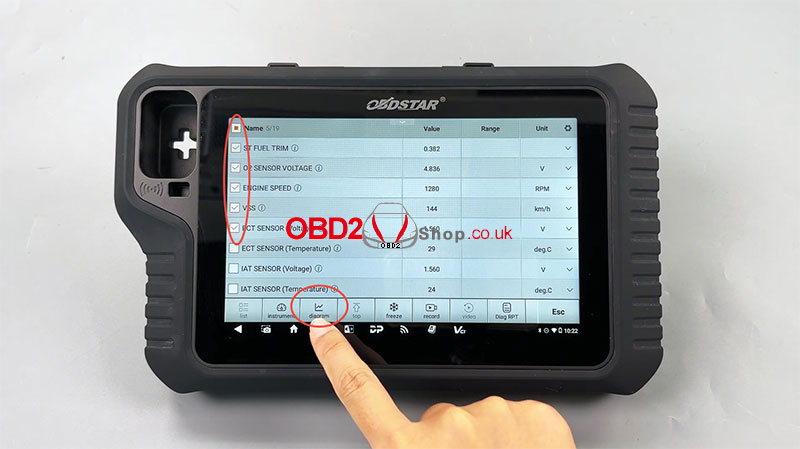
b Customize your viewing experience
You can easily edit the line display, adjust value intervals, and switch to full-screen mode for a clearer and more comprehensive view of the data.
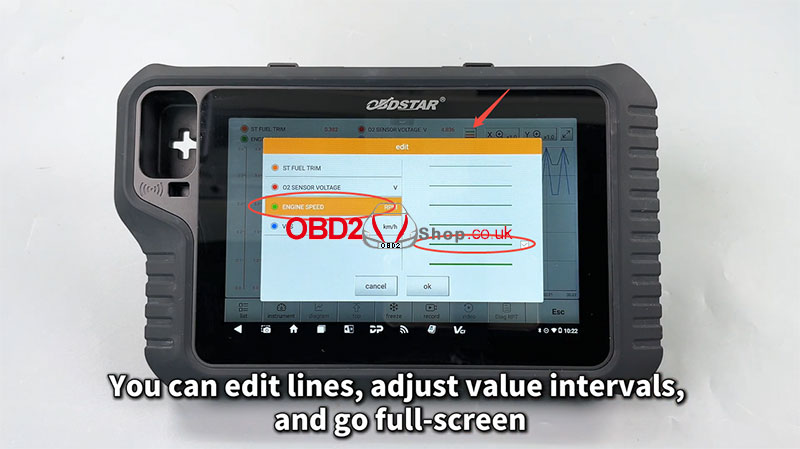
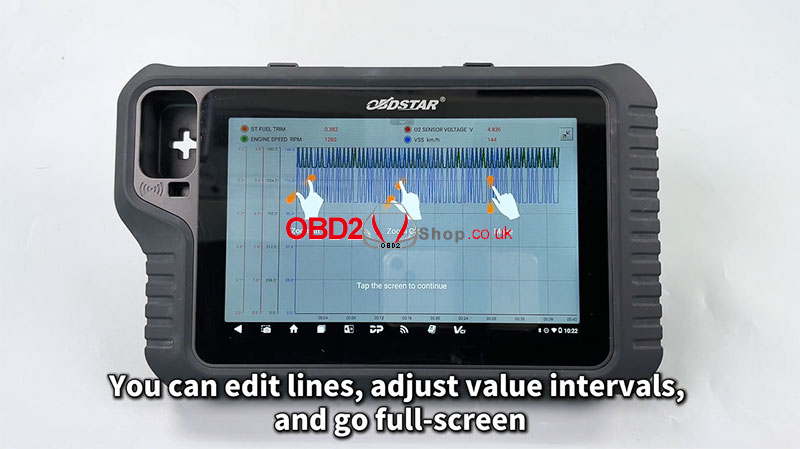
With this update, MOTOMASTER makes diagnostic visualization smoother and more professional — perfect for workshops and motorcycle service experts who demand precision and convenience.
Learn more or get your device at: www.obd2shop.co.uk
For more details, please refer to the video:
https://youtu.be/wv3kccgK9KU
Oznake: obdstar motomaster
petak, 10.10.2025.
How to Perform a Throttle Relearn on a 2024 Zongshen Aprilia APR250
This guide will walk you through the process of performing a throttle relearn procedure on a 2024 Zongshen Aprilia APR250 motorcycle using the OBDSTAR MOTOMASTER diagnostic tool.
Tools Required:
MOTOMASTER
Main Cable
OBDSTAR App (for reference)
Step-by-Step Procedure:
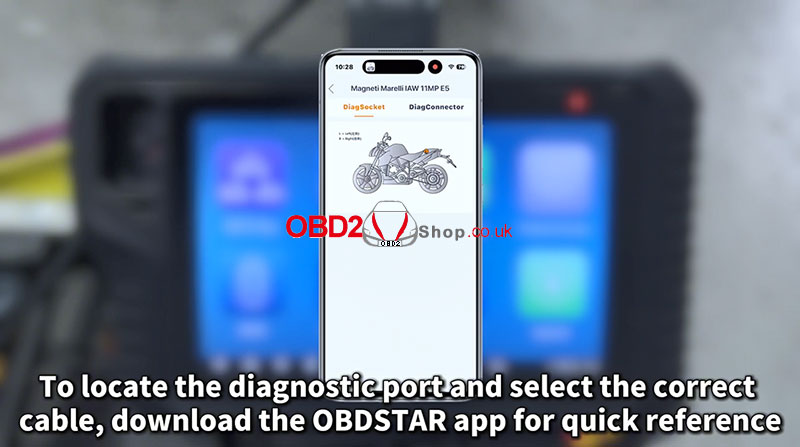
1. Locate the Diagnostic Port: On this motorcycle, the diagnostic socket is located in the front section of the bike. For quick reference to find the port and select the correct cable, you can use the OBDSTAR app.
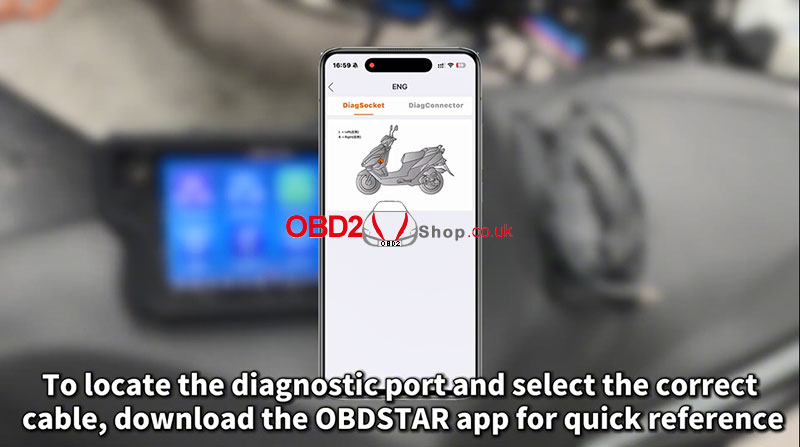

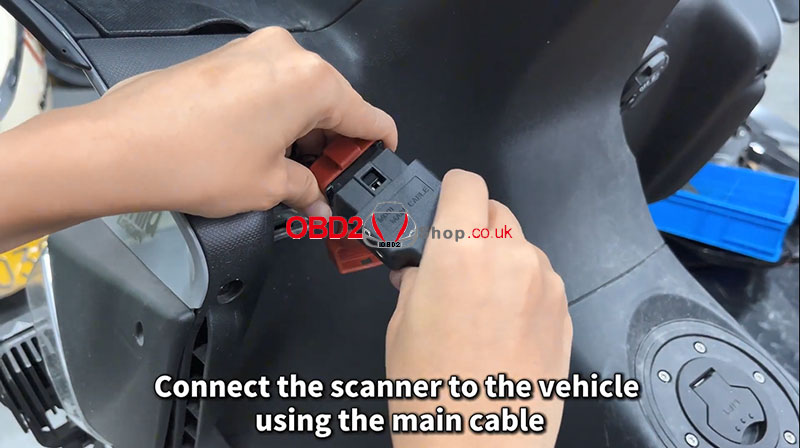
2. Connect the Scanner: Connect the OBDSTAR MOTOMASTER scanner to the vehicle's diagnostic port using the main cable.
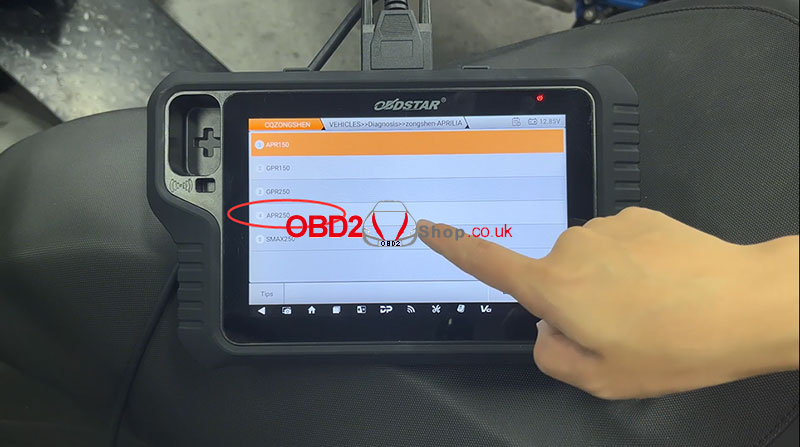
3. Power On and Select Menu: Turn the motorcycle's ignition key to the ON position. Then, on the scanner, navigate through the following menu:
Select [MOTO Diag] >> [CQZONGSHEN] >> [CQZONGSHEN V33.13] >> [Diagnosis] >> [zongshen-AOOILIA] >> [APR250]
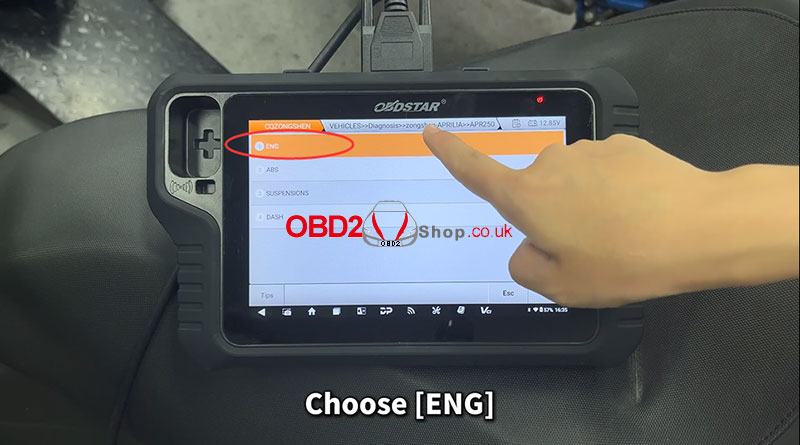
4. Access Engine Functions: From the main menu for your model, choose [ENG] (Engine). It is good practice to first read any Diagnostic Trouble Codes (DTCs). In this case, no fault codes were stored.
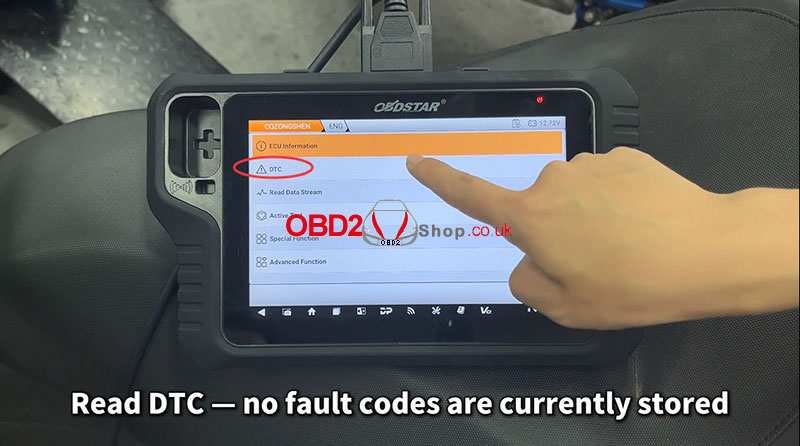
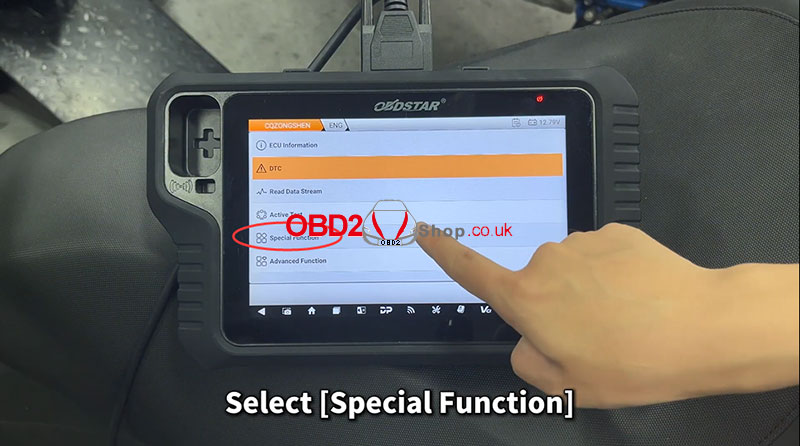
5. Enter Special Functions:
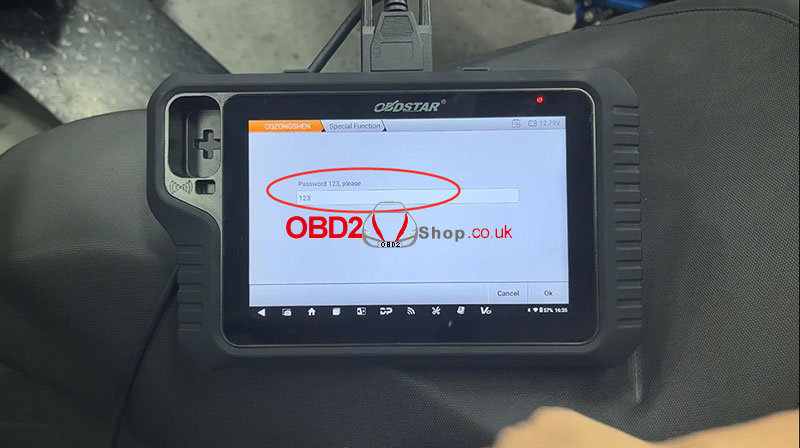
Select [Special Function] and then [Agree].
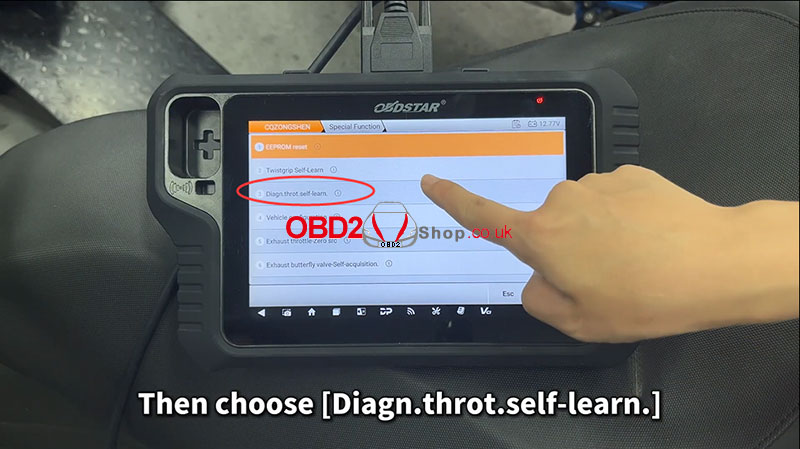
Choose the [Diagn.throt.self-learn.] function.
Press OK to continue.
6. Perform the Relearn Procedure:
The scanner will now instruct you to turn the dashboard off. Wait for the communication with the control unit to end.
Then, turn the ignition key back to the ON position.
The scanner will confirm that the "Regulation [was] carried out," indicating a successful throttle relearn.
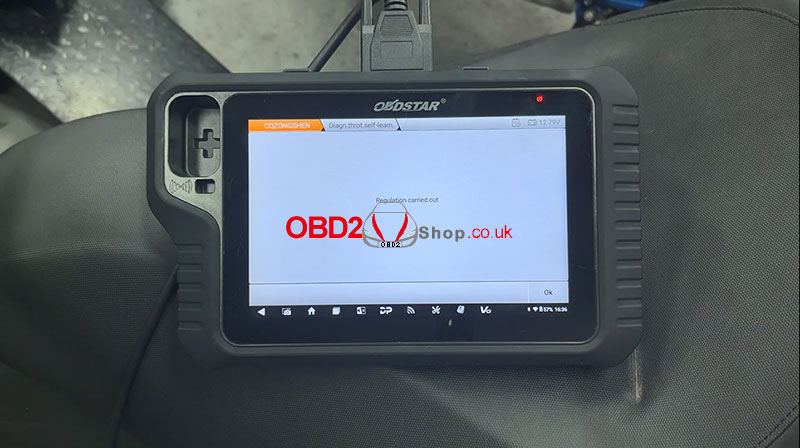
The procedure is now complete. You can disconnect the scanner and start the motorcycle to verify normal throttle operation.
Video guides:
https://youtu.be/BWCl2e7YDkU
www.obd2shop.co.uk
Oznake: obdstar motomaster
utorak, 30.09.2025.
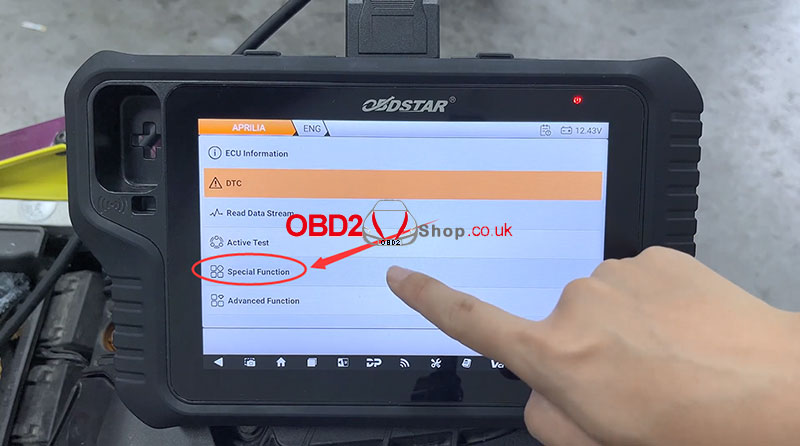
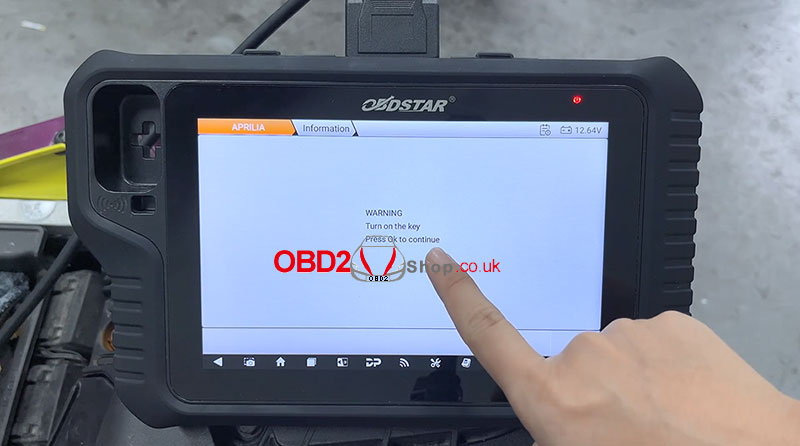
Guide: Writing VIN Code on a 2022 Aprilia RS660 Using OBDSTAR MOTOMASTER
This guide provides step-by-step instructions on how to write a new VIN code to the ECU of a 2022 Aprilia RS660 motorcycle using the OBDSTAR MOTOMASTER diagnostic tool.
Tools Required:
MOTOMASTER Scanner
M041 Cable
Main Cable
For cable selection and diagnostic port locations, you can also download the OBDSTAR App for quick reference: OBDSTAR App Download.
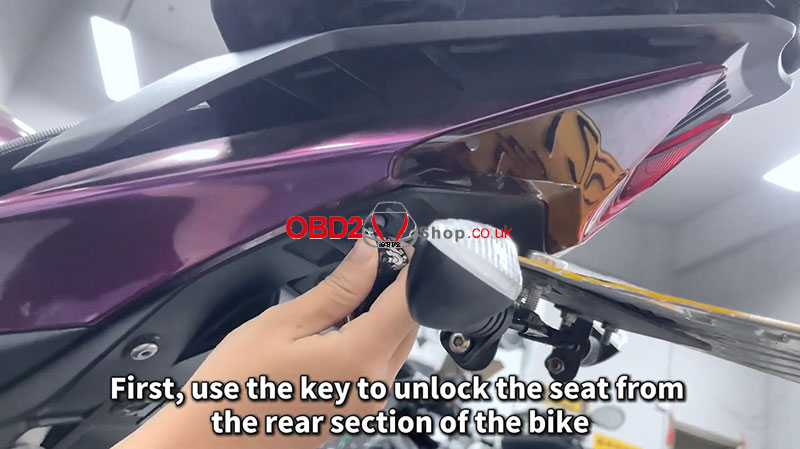
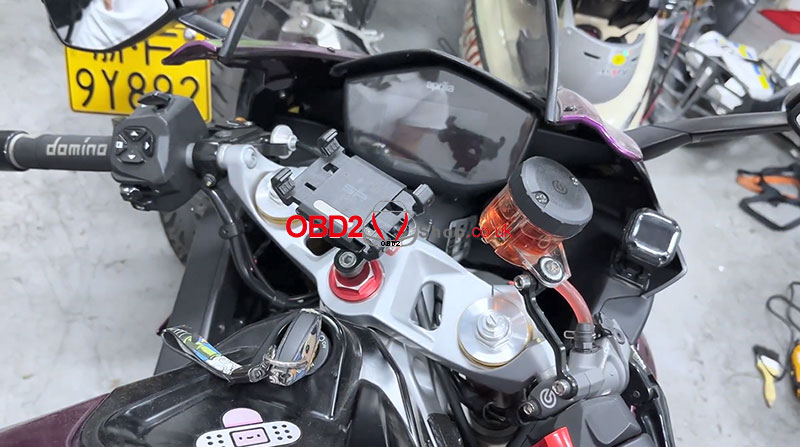
Step 1: Locate the Diagnostic Port
On the Aprilia RS660, the diagnostic port is located under the seat.
Use the ignition key to unlock and remove the seat from the rear section of the bike.
Step 2: Connect the Device
Connect the M041 cable and main cable to the diagnostic port.
Plug the other end into the MOTOMASTER scanner.
Turn the motorcycle key to the ON position.

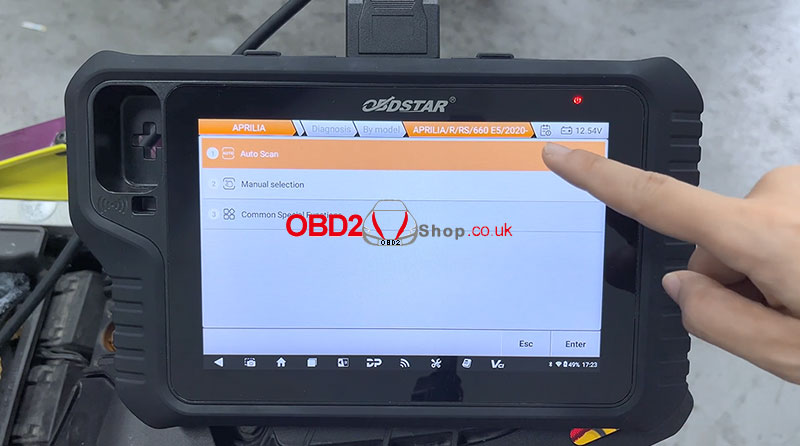
Step 3: Select Vehicle Model in MOTOMASTER
On the MOTOMASTER tablet:
Go to [MOTO Diag]
Select [APRILIA]
Choose [APRILIA V33.10]
Tap [Diagnosis] ’ [By Model]
Select [APRILIA / R / RS / 660 E5 / 2020-]
Perform [Auto Scan] ’ [Scan ECU]
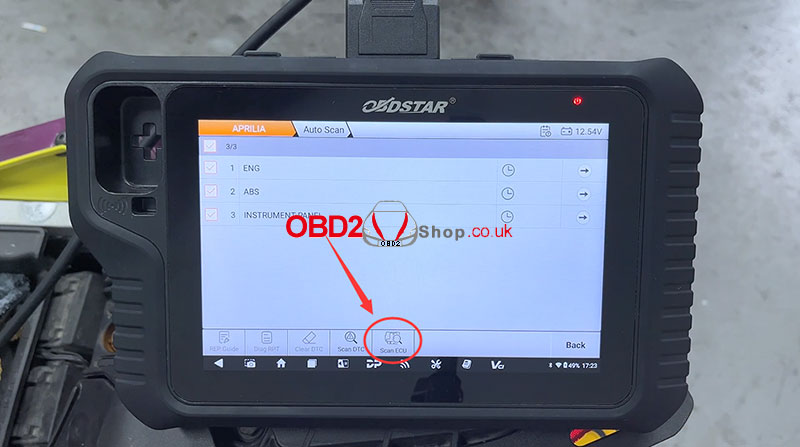
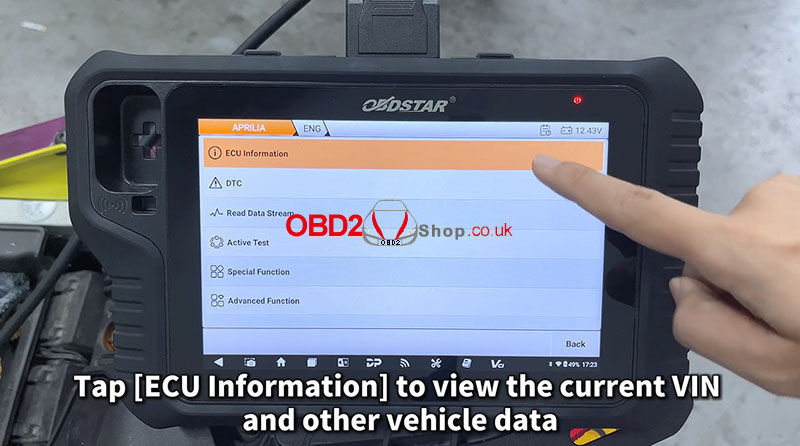
Step 4: Access ECU Information
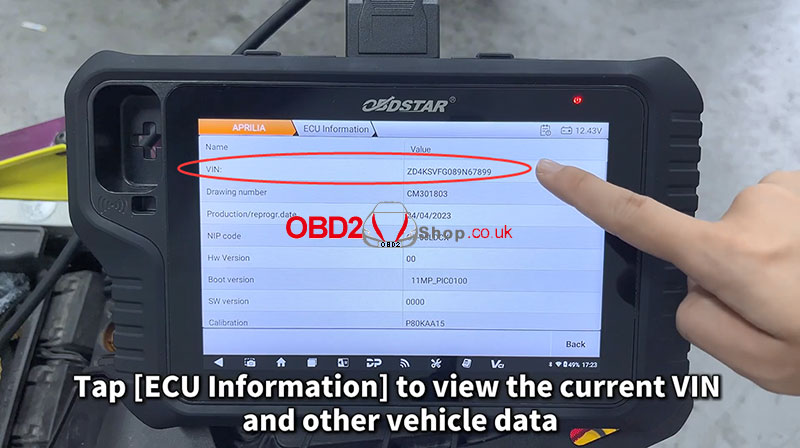
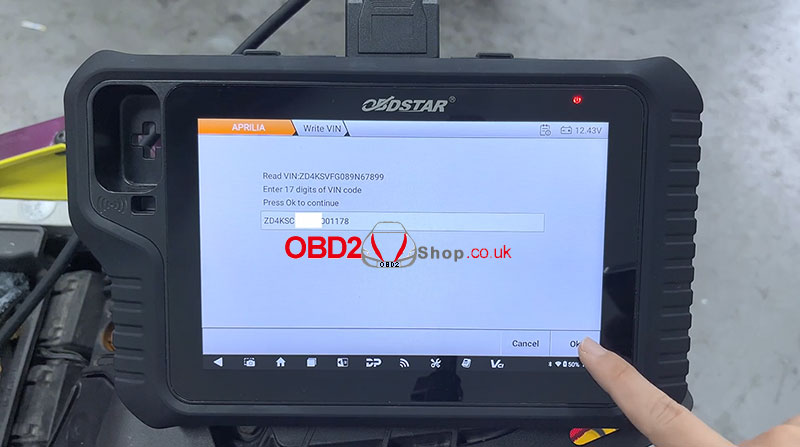
Tap [ECU Information] to view the existing VIN and other vehicle data.
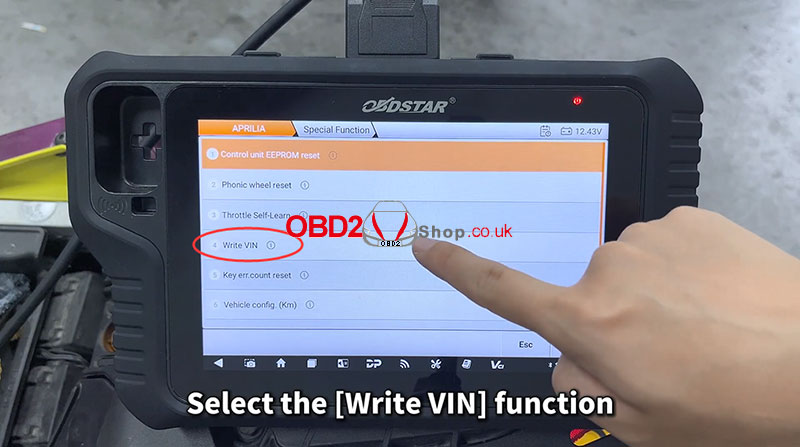
Step 5: Write the VIN Code
Select [Special Function] ’ [Agree]
Choose [Write VIN] ’ [OK]
Warning: This function overwrites the VIN. Proceed with caution.
Enter the 17-digit VIN code and press OK.
Step 6: Complete the Process
Turn off the dashboard and wait until communication with the ECU ends, then press OK.
Turn the key back ON and press OK to continue.
The system will confirm that the procedure has been completed.
Step 7: Verify the VIN Update
Go back to [ECU Information] to confirm that the VIN has been updated correctly.
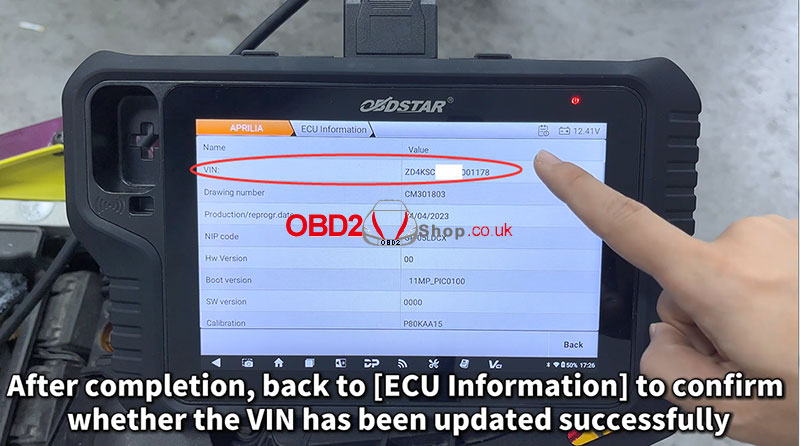
You have now successfully written the VIN code on a 2022 Aprilia RS660 using OBDSTAR MOTOMASTER.
For more tools and solutions, visit: www.obd2shop.co.uk.
Oznake: obdstar motomaster

| < | siječanj, 2026 | |||||
| P | U | S | Č | P | S | N |
| 1 | 2 | 3 | 4 | |||
| 5 | 6 | 7 | 8 | 9 | 10 | 11 |
| 12 | 13 | 14 | 15 | 16 | 17 | 18 |
| 19 | 20 | 21 | 22 | 23 | 24 | 25 |
| 26 | 27 | 28 | 29 | 30 | 31 | |
Svibanj 2026 (1)
Siječanj 2026 (19)
Prosinac 2025 (22)
Studeni 2025 (21)
Listopad 2025 (20)
Rujan 2025 (21)
Kolovoz 2025 (8)
Srpanj 2025 (13)
Lipanj 2025 (9)
Svibanj 2025 (12)
Travanj 2025 (10)
Ožujak 2025 (12)
Veljača 2025 (14)
Siječanj 2025 (8)
Prosinac 2024 (6)
Studeni 2024 (6)
Listopad 2024 (4)
Rujan 2024 (7)
Kolovoz 2024 (14)
Srpanj 2024 (12)
Lipanj 2024 (10)
Svibanj 2024 (13)
Travanj 2024 (12)
Ožujak 2024 (11)
Veljača 2024 (2)
Siječanj 2024 (10)
Prosinac 2023 (8)
Studeni 2023 (6)
Listopad 2023 (7)
Rujan 2023 (9)
Kolovoz 2023 (6)
Srpanj 2023 (10)
Lipanj 2023 (4)
Veljača 2023 (8)
Siječanj 2023 (14)
Prosinac 2022 (13)
Studeni 2022 (14)
Listopad 2022 (18)
Rujan 2022 (9)
Kolovoz 2022 (16)
Srpanj 2022 (11)
Lipanj 2022 (14)
Svibanj 2022 (13)
Travanj 2022 (12)
Ožujak 2022 (12)
Veljača 2022 (13)
Siječanj 2022 (10)
Srpanj 2021 (1)
Dnevnik.hr
Gol.hr
Zadovoljna.hr
Novaplus.hr
NovaTV.hr
DomaTV.hr
Mojamini.tv