OBD2 tools on OBD2shop.co.uk https://blog.dnevnik.hr/obd2shop
petak, 30.01.2026.
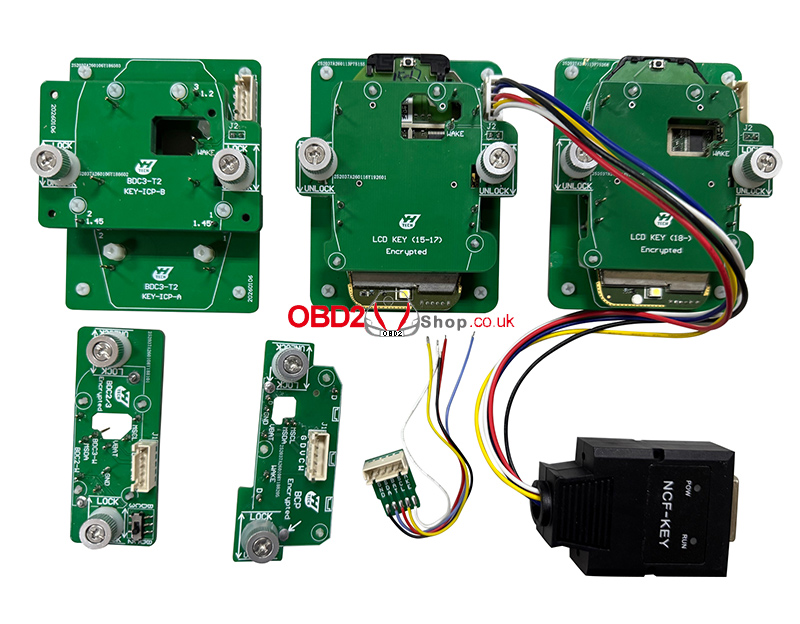
New Arrival: Yanhua ACDP BMW BDC2–LCD Encrypted Key Copy Kit
The Yanhua Mini ACDP BMW Encrypted Chip Key Copy Interface Board Kit is a professional solution designed for copying and writing BMW encrypted key data safely and efficiently. With a no-soldering, no-risk design, this kit significantly simplifies BMW key programming operations while minimizing the possibility of damage.
Note: This kit must be used together with the ACDP Module 38 license, and is compatible with ACDP and ACDP2 devices.
Key Features:
No soldering required – plug-and-play operation
No risk of damage to the original key or board
Supports BMW BDC2, BDC3, BCP, and LCD encrypted chip keys
Works seamlessly with Yanhua Mini ACDP / ACDP2
Designed for professional locksmiths and automotive technicians
Supported Functions
The interface board kit supports flexible key data writing across multiple BMW key types:
1. The BCD2 working key data can be written to original BDC2, BDC3, BCP, and LCD keys.
2. The BCD3 working key data can be written to original BDC2, BDC3, BCP, and LCD keys.
3. The LCD working key data can be written to the original BDC2, BDC3, BCP, and LCD keys.
4. The BCP (without UWB) working key data can be written to the original BDC2, BDC3, BCP, and LCD keys.
5. The BCP (with UWB) working key data can only be written to the original BCP (with UWB) keys.
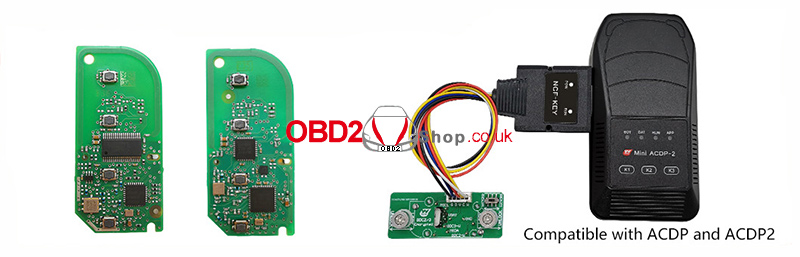
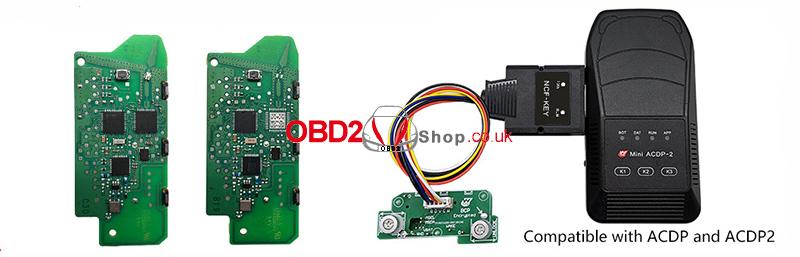
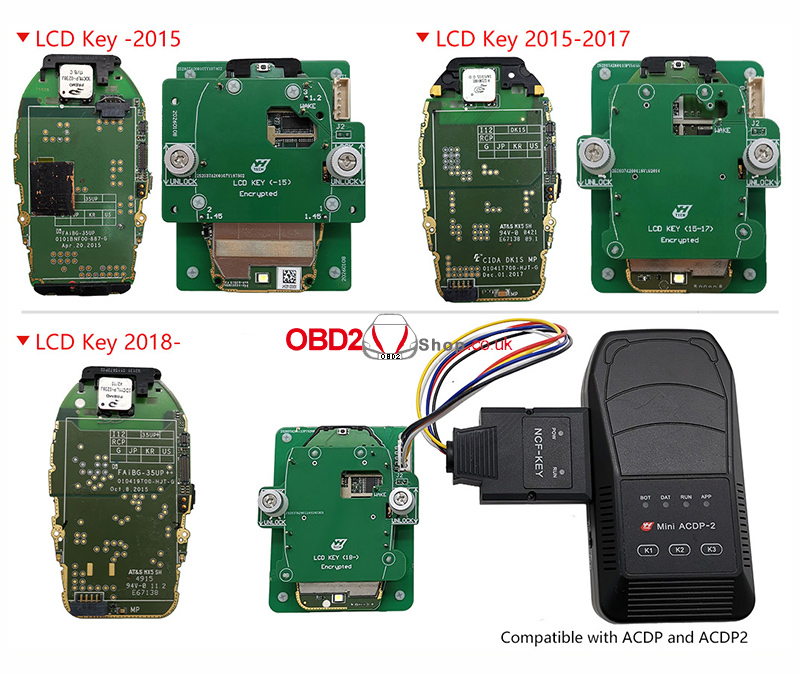
Supported BMW Encrypted Key Types
BMW BDC2 / BDC3 Encrypted Chip Keys
The kit supports secure data copying for BMW BDC2 and BDC3 encrypted chip keys using the interface board and ACDP device.
BMW BCP Encrypted Chip Keys
Both BCP keys without UWB and BCP keys with UWB are supported, with a clear distinction to ensure correct and safe data writing.
BMW LCD Encrypted Chip Keys
Compatible with multiple generations of BMW LCD keys, including:
LCD Key (before 2015)
LCD Key (2015–2017)
LCD Key (2018 and later)
Conclusion
The Yanhua Mini ACDP BMW BDC2/BDC3/BCP/LCD Encrypted Chip Key Copy Interface Board Kit is a reliable and efficient tool for modern BMW key programming. Its no-soldering design, wide compatibility, and precise key data handling make it an essential solution for professionals working with BMW encrypted keys.
For best results, ensure the ACDP Module 38 license is activated before use.
www.obd2shop.co.uk
Oznake: yanhua acdp bmw
četvrtak, 29.01.2026.
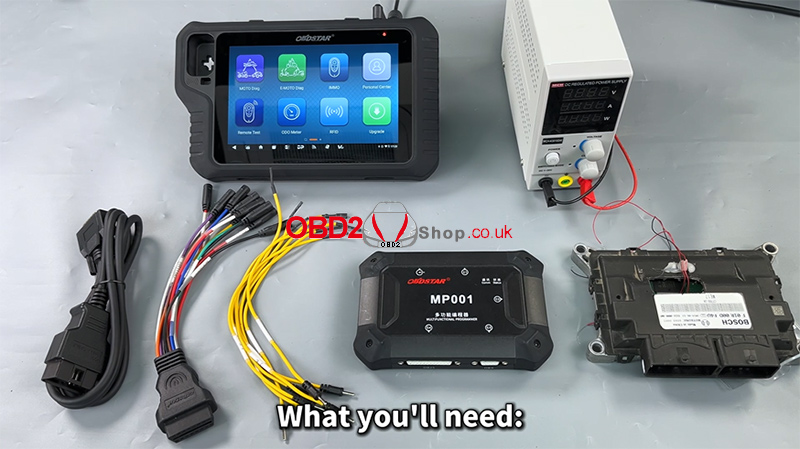
CFMOTO BOSCH MED17.8.10 ECM Read/Write with MotoMaster
In this guide, we’ll demonstrate how to perform data read and write operations on the CFMOTO BOSCH MED17.8.10 ECM using the MotoMaster programming tool. This procedure is designed for professional users who need reliable and secure ECU data handling.
Required Equipment:
MotoMaster
High-power DC regulated power supply
Main Cable
ECU clone jumper
MP001 programmer
BOSCH MED17.8.10 ECM
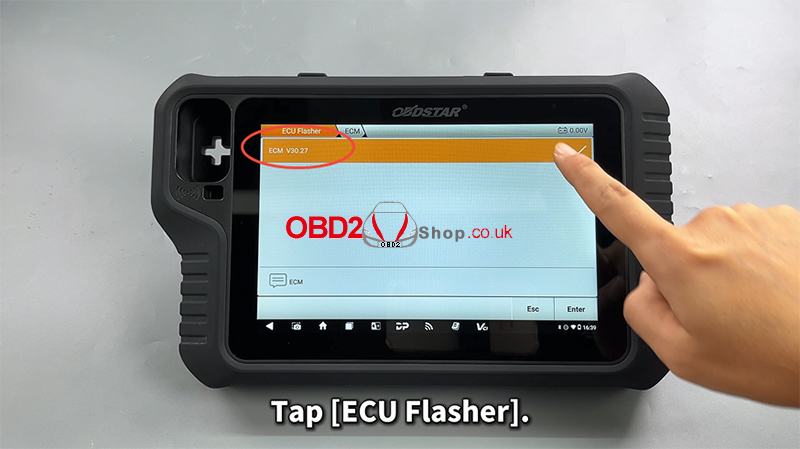
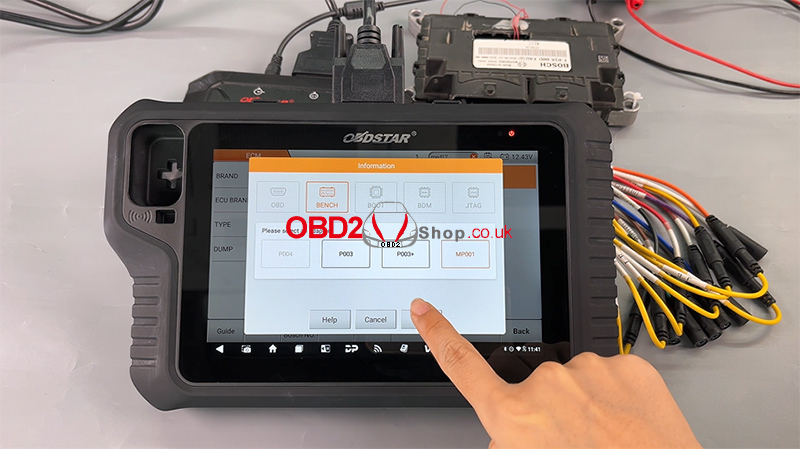
Step 1: Software Preparation
Ensure that the MotoMaster software is updated to the latest version to guarantee compatibility and stable operation.
Power on the device
Tap [ECU Flasher] to enter the ECU programming function
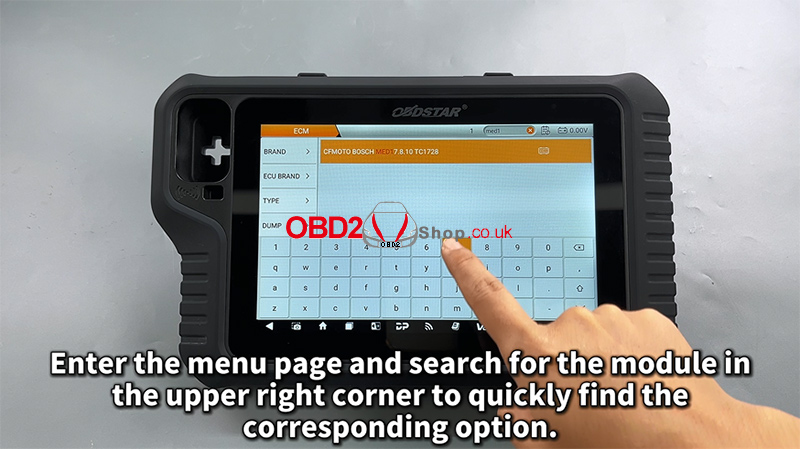
Step 2: Locate the ECU Module
Once inside the ECU Flasher menu:
Use the search bar in the upper-right corner to quickly find the corresponding ECU module
Enter the module menu
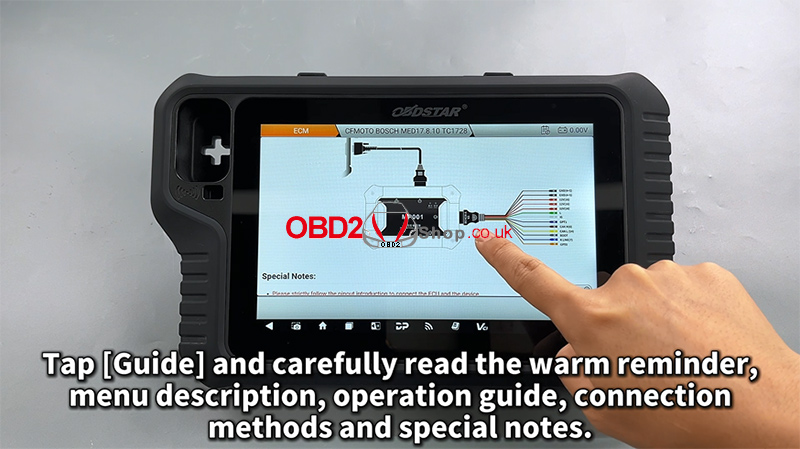
Step 3: Read the Operation Guide
Tap [Guide] and carefully review all provided information, including:
Warm reminders
Menu descriptions
Operation procedures
Connection methods
Special notes
This step is strongly recommended to avoid wiring or operation errors.
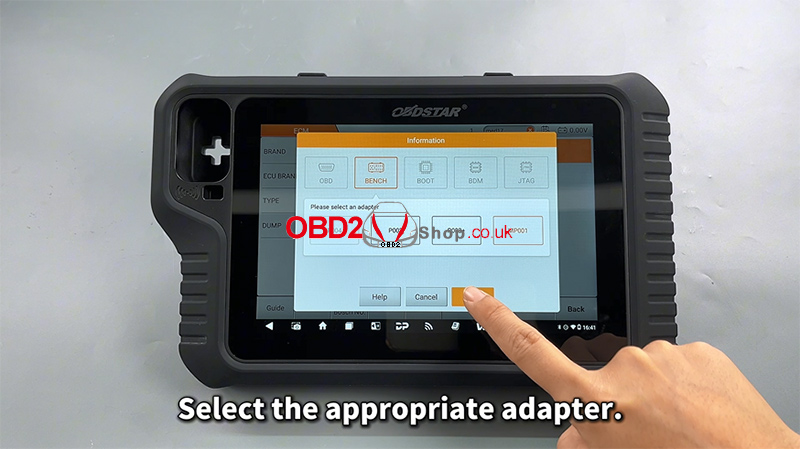
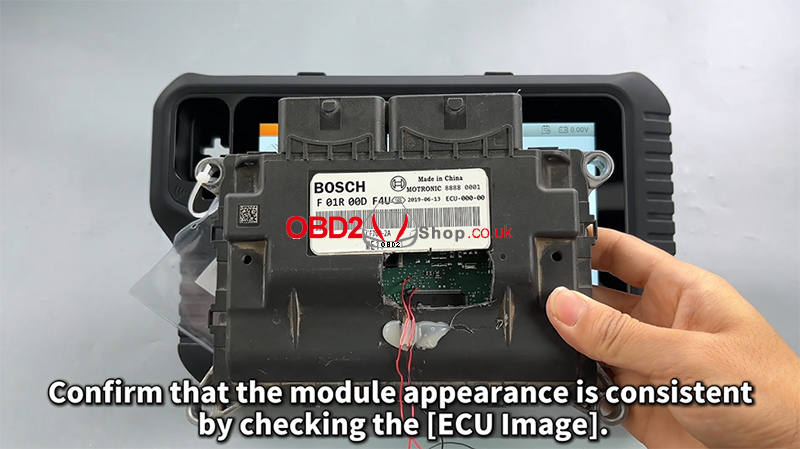
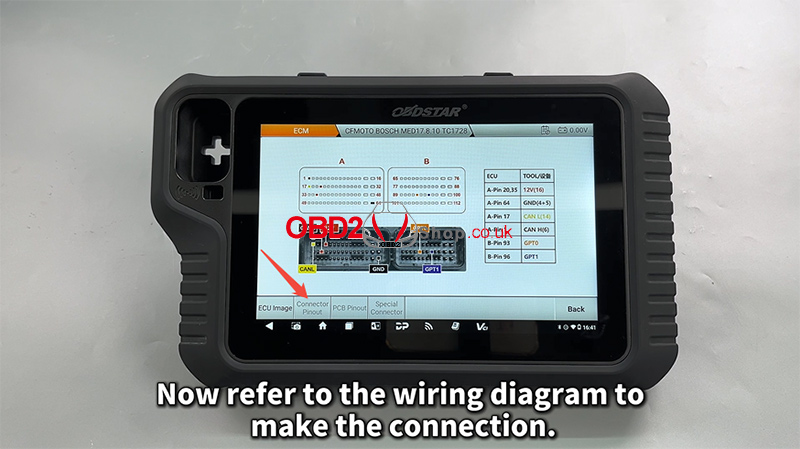
Step 4: Connection Setup
Select the appropriate adapter
Check the [ECU Image] to confirm the module appearance matches the target ECU
Tap [Connector Pinout]
Refer to the wiring diagram and complete the connection accordingly
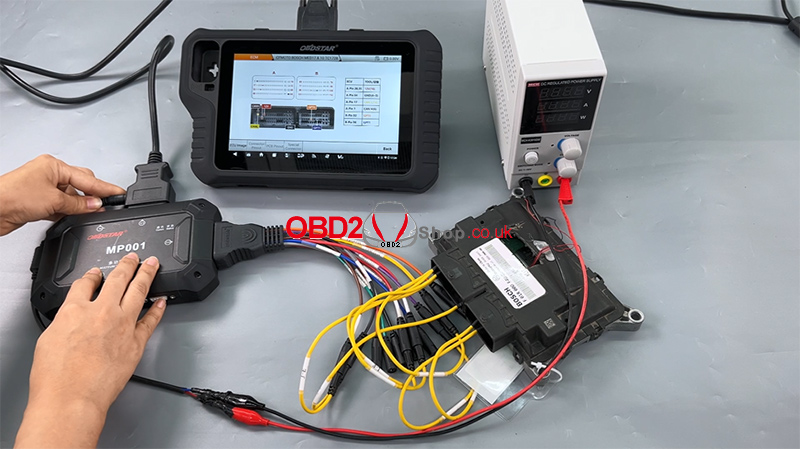
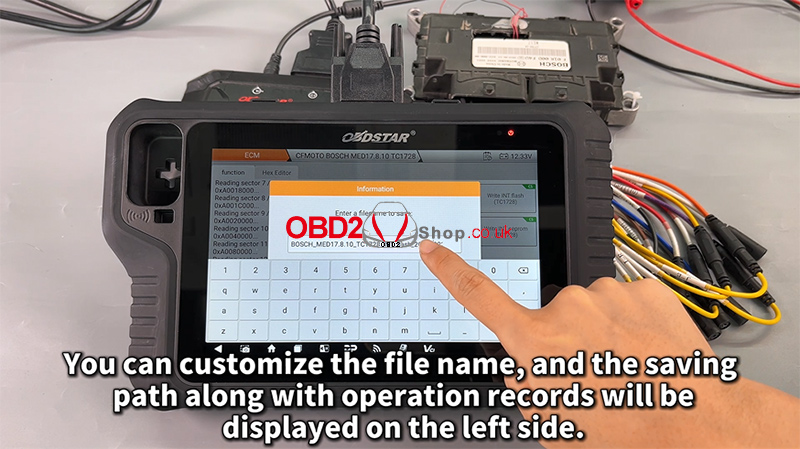
Step 5: Read and Back Up ECU Data
After confirming a successful connection:
First, read and back up the original EEPROM/Flash data
Customize the file name and saving path as needed
All operation records will be displayed on the left-side log panel for easy tracking
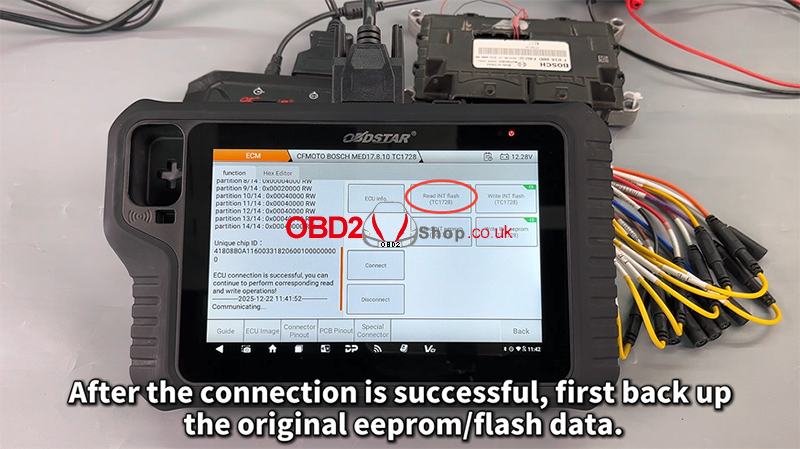
Backing up the original data is critical and should always be completed before any write operation.
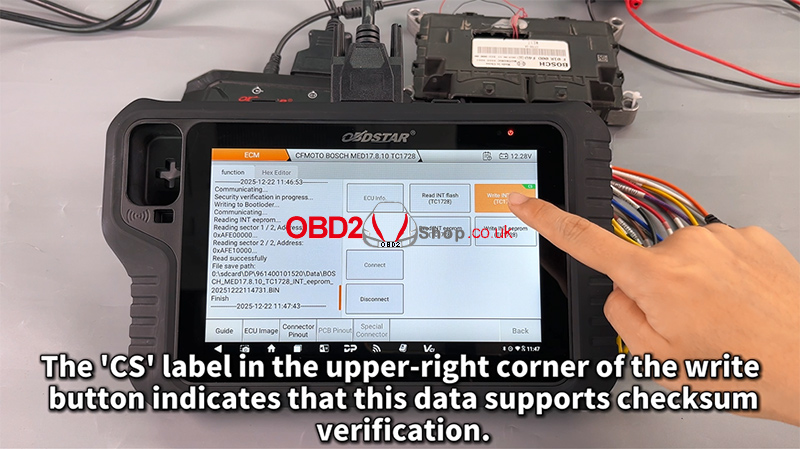
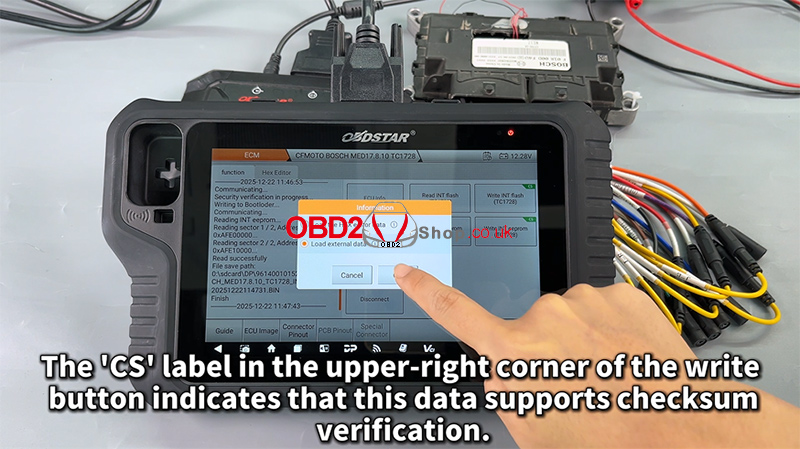
Step 6: Write Data to the ECU
Next, proceed with writing data to the module:
Select the desired file
Tap Write to start the process
The “CS” label in the upper-right corner of the write button indicates that the data supports checksum verification, ensuring data integrity and operational safety.
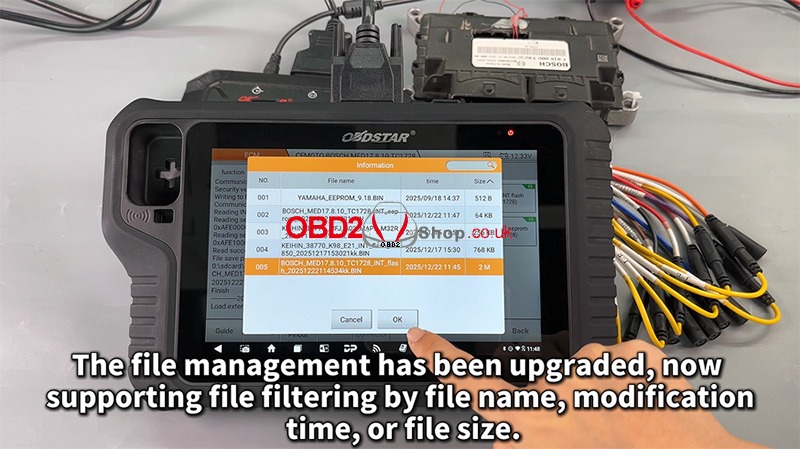
Step 7: File Management Improvements
The upgraded file management system now supports filtering by:
File name
Modification time
File size
This enhancement makes it easier to manage and locate ECU files efficiently.
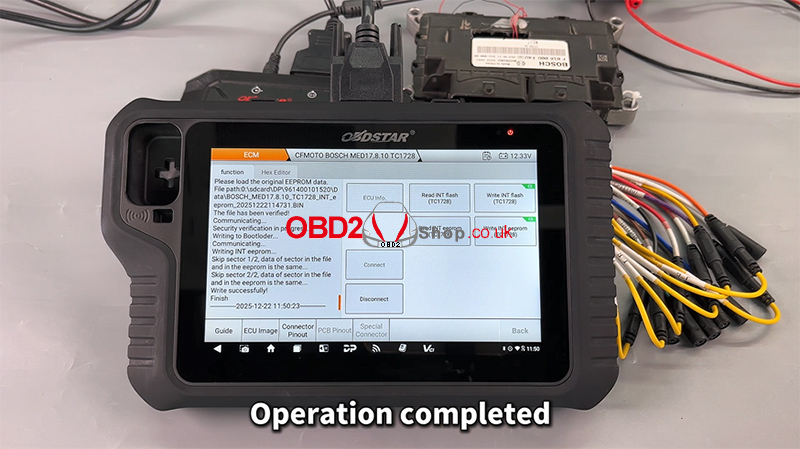
Completion
Once the process finishes, the operation is complete, and the ECU data has been successfully written.
Video Tutorial
For a full visual walkthrough, please watch the video guide:
https://youtu.be/hUSAVxfbtoc
More Information
Visit our website for more diagnostic tools and technical resources:
www.obd2shop.co.uk
Oznake: obdstar motomaster
srijeda, 28.01.2026.
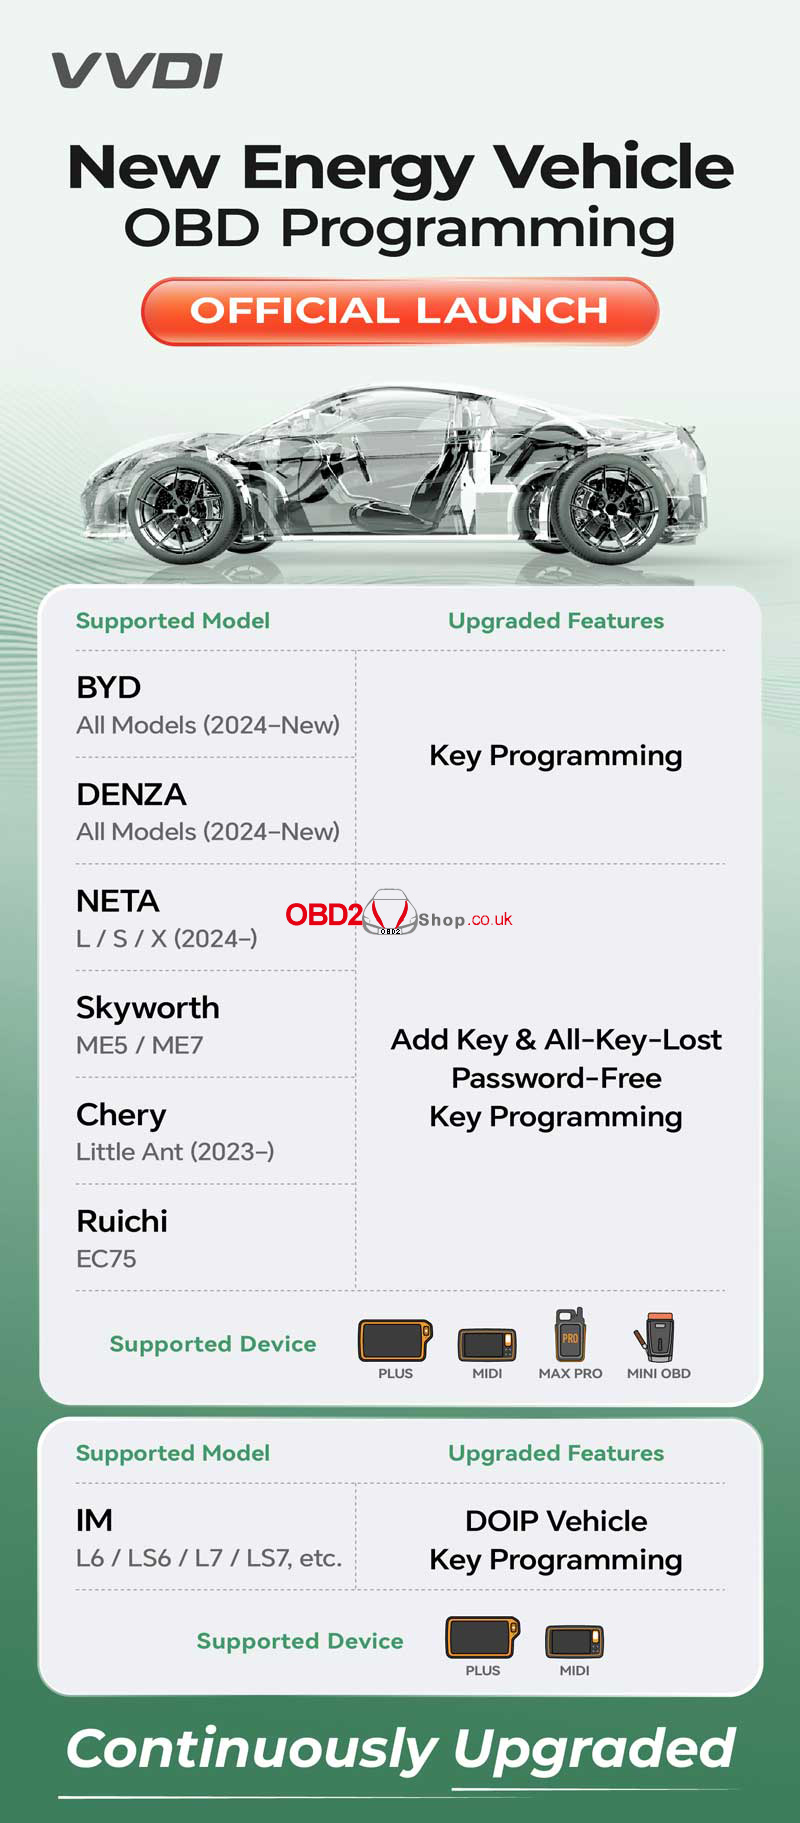
Xhorse 2026 Update: BMW BDC3/U, EV OBD & Motorcycle Support
Stay ahead of the competition with the latest Xhorse VVDI 2024–2026 software updates. This massive rollout enhances key programming capabilities for New Energy Vehicles (NEVs), luxury BMW systems, and popular motorcycle brands like Honda and Yamaha.
Whether you use the Key Tool Plus, Key Tool MIDI, Key Tool Max Pro, or Mini OBD, these new features are designed to streamline your workflow and expand your service offerings.
New Energy Vehicle (NEV) & EV Upgrades
Xhorse is leading the charge in EV key programming with official OBD support for top electric vehicle brands.


Motorcycle OBD Programming
Tired of removing hardware for motorcycle keys! You can now program keys for Honda and Yamaha motorcycles directly via the OBD port.
lFaster Workflow: Perform OBD programming without removing any hardware.
lHardware Required: Works with the VVDI Motorcycle Cable (PN. XDKP92GL) and Programmer.
lCompatible Tools: Key Tool Plus, Key Tool MIDI, and Key Tool Max Pro.

BMW BDC3/U/BCP System Support(G&U Chassis)
This high-end upgrade adds robust support for the latest BMW security systems, specifically targeting BDC3, BDC-U, and BCP modules.
lUWB Key Support: Now supports high-end UWB keys (original U-type required).
lRemote Compatibility: Supports Xhorse remotes, original blade-type, and U-type remotes.
lDevice Support: Key Tool Plus, MIDI, and VVDI2 (with programmer).
lNote: Support for Key Tool Max/Max Pro is pending in an upcoming app update.

Mazda Password-Free Updates
Forget searching for codes. The latest update brings Password-Free Key Programming to modern Mazda models.
lSupported Models: Mazda 6A, CX-30, Axela, etc. (2021-).
lCompatible Devices: Key Tool Plus, Key Tool MIDI, and Key Tool Max Pro.
Upgrade Your Workshop Today!
Don't miss out on these powerful new features. Ensure your Xhorse tools are up to date and equipped with the right cables to handle the latest 2024+ vehicle models.
Shop the full range of Xhorse tools and accessories at: www.obd2shop.co.uk.
FAQ: Quick Help for Xhorse Users
Q: Does Key Tool Max Pro support the new BMW BDC3 update?
A: Support for Max Pro is currently pending and will be available in a future app update. For now, please use Key Tool Plus or VVDI2.
Q: Do I need a special cable for Honda motorcycle programming?
A: Yes, you will need the VVDI Motorcycle Cable (PN. XDKP92GL) to perform OBD programming.
Q: Which Xhorse tool supports IM L6 DOIP programming?
A: You should use Key Tool Plus or Key Tool MIDI for DOIP-based vehicle programming.
Oznake: xhorse vvdi
petak, 23.01.2026.
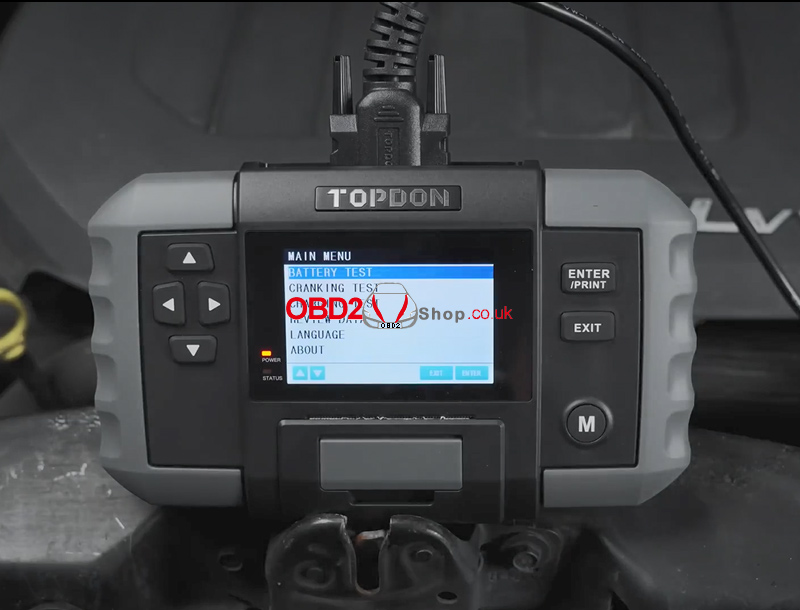
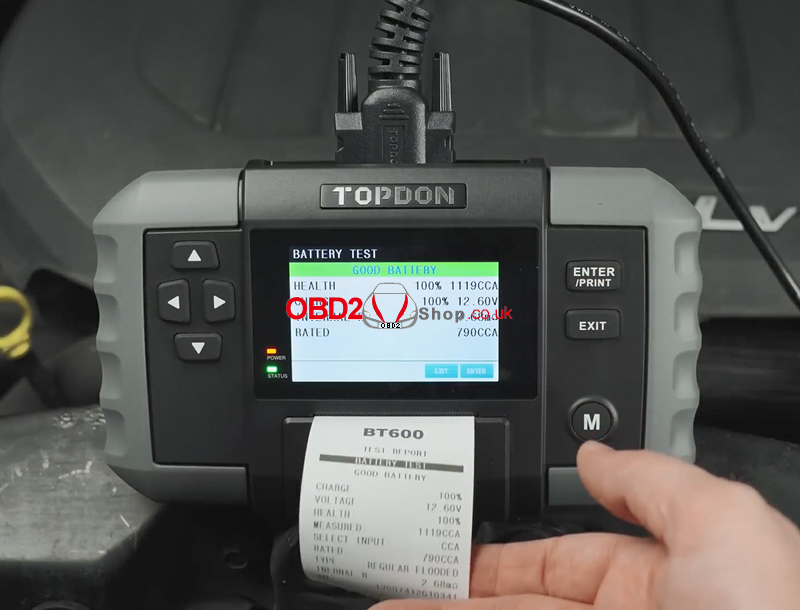
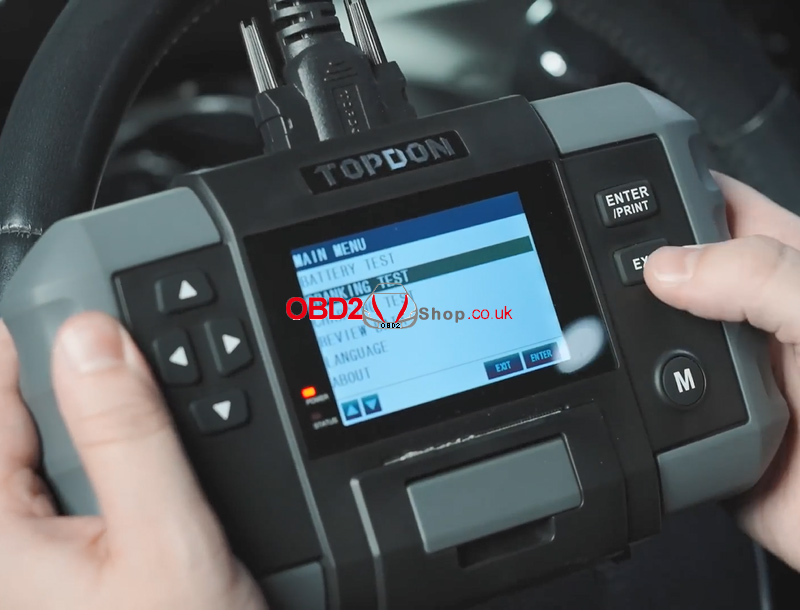
How to Use the TOPDON BT600 Battery Tester
This guide explains how to properly use the TOPDON BT600 Battery Tester to perform battery tests, cranking tests, and charging system tests. Follow the steps below to ensure accurate and reliable results.
Before starting, connect the tester correctly:
Red clamp ’ Battery positive (+) terminal
Black clamp ’ Battery negative (–) terminal
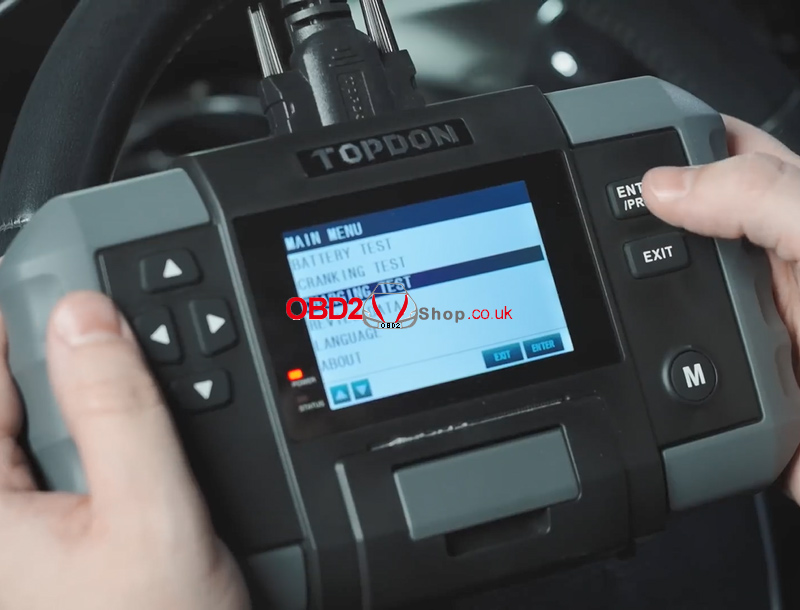
Once connected, the BT600 will display the battery voltage and automatically enter the main menu, where you can choose Battery Test, Cranking Test, or Charging Test.
1. Battery Test
Warning:
Before testing, ensure the engine is off and all electrical accessories are turned off.
The battery test function supports 12V lead-acid batteries only (24V batteries are not supported).
Step-by-Step Instructions
` Select BATTERY TEST from the main menu and press [ENTER / PRINT].
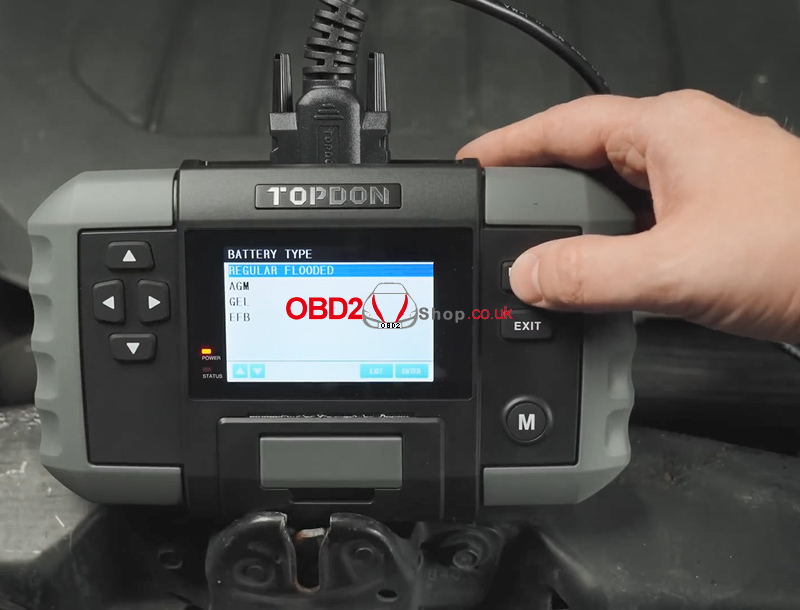
a Select the appropriate battery type and press [ENTER / PRINT].
The battery type can be found on the battery label.
b Select the correct battery standard and press [ENTER / PRINT].
The standard is also listed on the battery label.
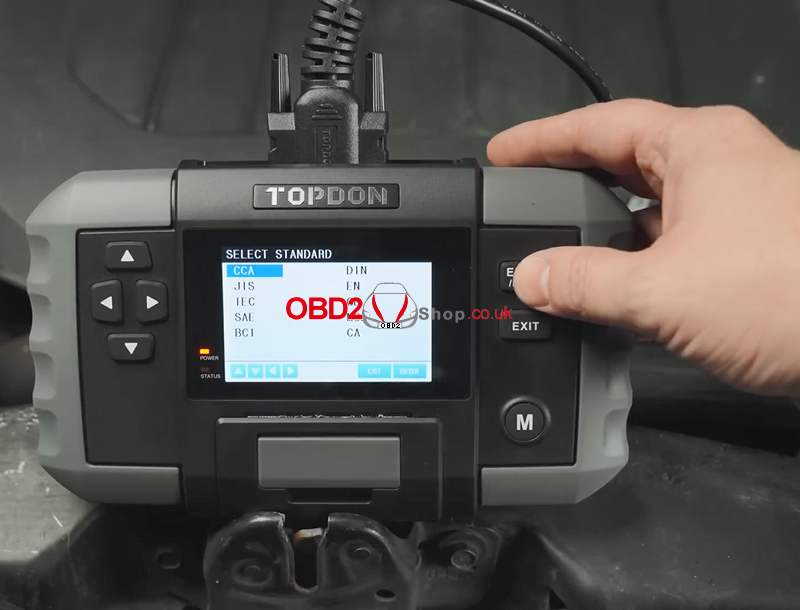
Refer to the table below for battery standards and corresponding test ranges.

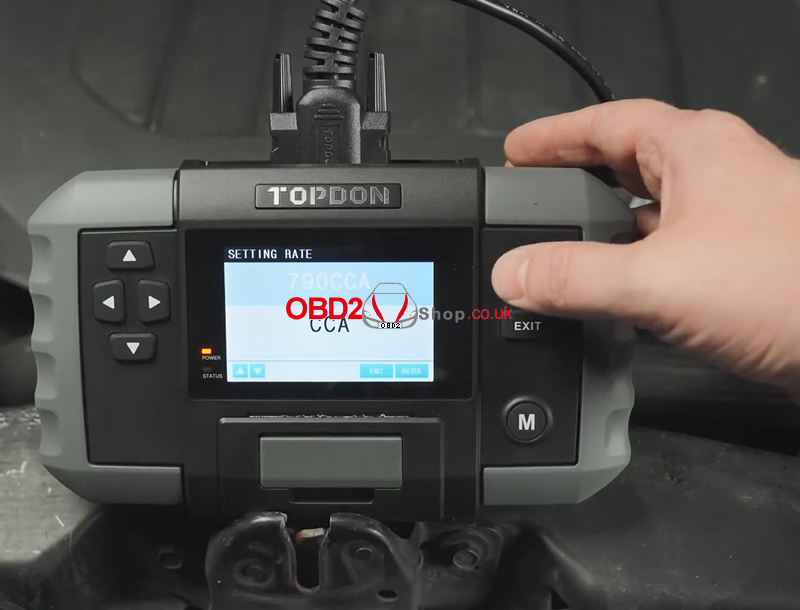
c Input the CCA (Cold Cranking Amps) value using the Up / Down arrow keys, then press [ENTER / PRINT] to start the test.
Short press: adjust by ±5
Long press: continuous adjustment
d The battery test result will be displayed shortly.
You can press PRINT to generate a test report, which can be printed and shared with your customer for reference.
Battery Test Terminology
Common test result definitions are explained in the table.

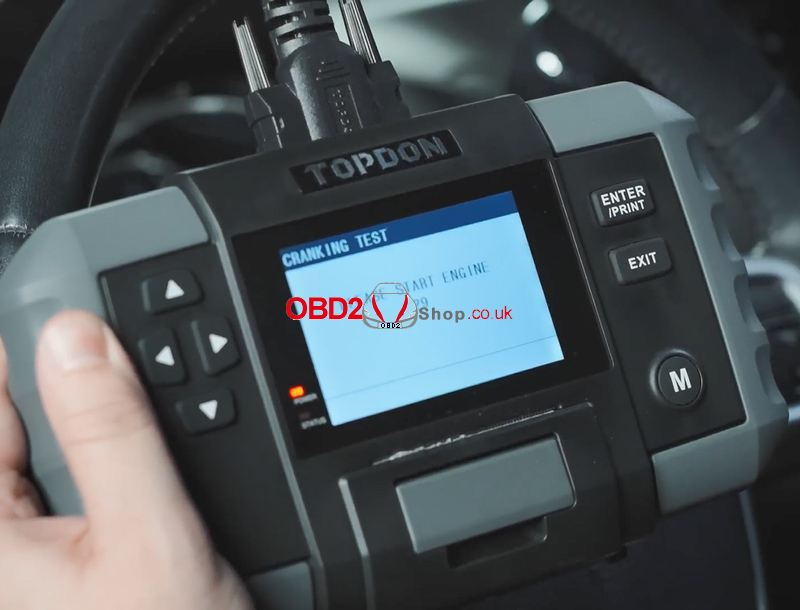
2. Cranking Test
Warning:
Before performing the cranking test, ensure the engine and all accessories are OFF.
This test supports both 12V and 24V lead-acid batteries.
Step-by-Step Instructions
` Select CRANKING TEST and press [ENTER / PRINT].
a The tester will prompt you to start the engine. Follow the on-screen instructions and crank the engine.
b The test results will be displayed automatically.
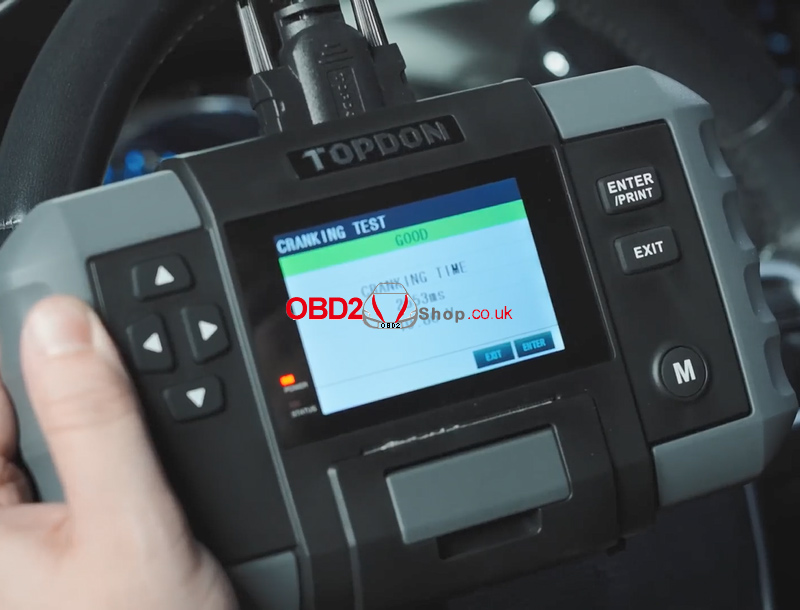
Cranking Test Parameters
Cranking Time: The time required for the engine to start
Cranking Voltage: Battery voltage during engine start
Passenger vehicles: e 9.6V
Commercial vehicles: e 19.2V
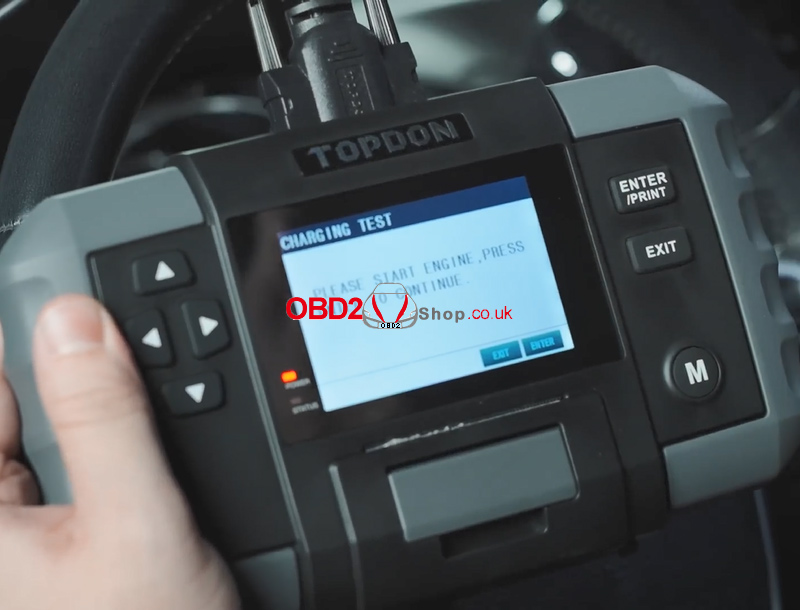
3. Charging Test
Warning:
Always start the engine before performing the charging test.
This test supports both 12V and 24V lead-acid batteries.
Step-by-Step Instructions
1. Select CHARGING TEST and press [ENTER / PRINT].
2. Confirm the engine is running, then press [ENTER / PRINT].
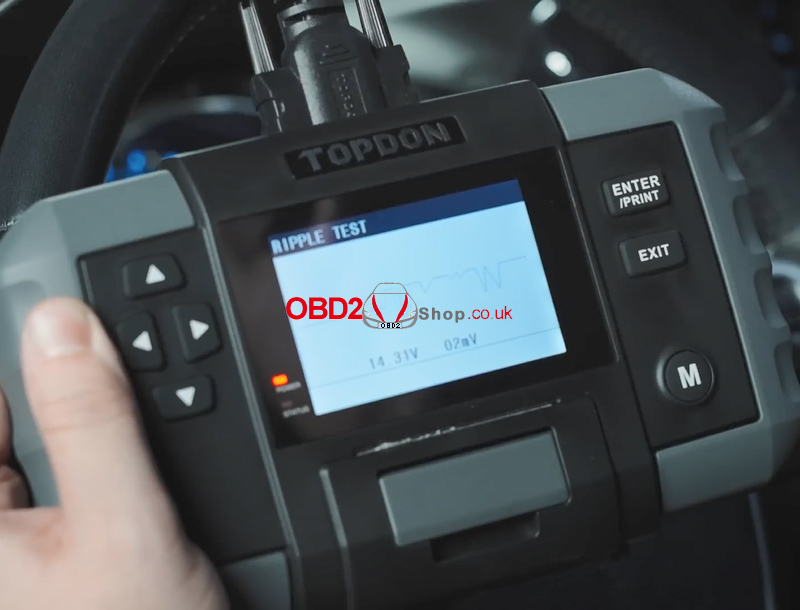
3. A ripple test will be performed first.
The result is shown as a graph, and the tool will automatically proceed after 5 seconds.
4. Increase the engine speed to 2500 RPM and hold it for 5 seconds as instructed, then press [ENTER / PRINT].
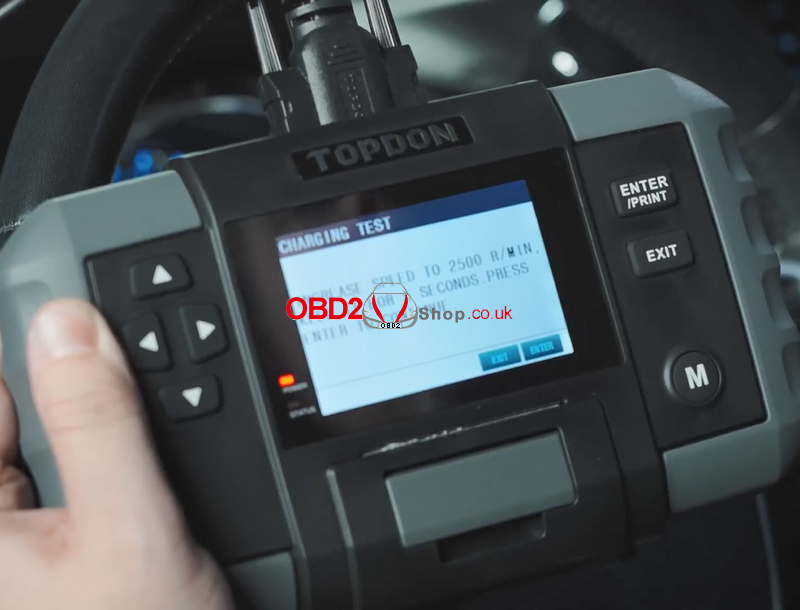
5. The charging system test results will be displayed on the screen.
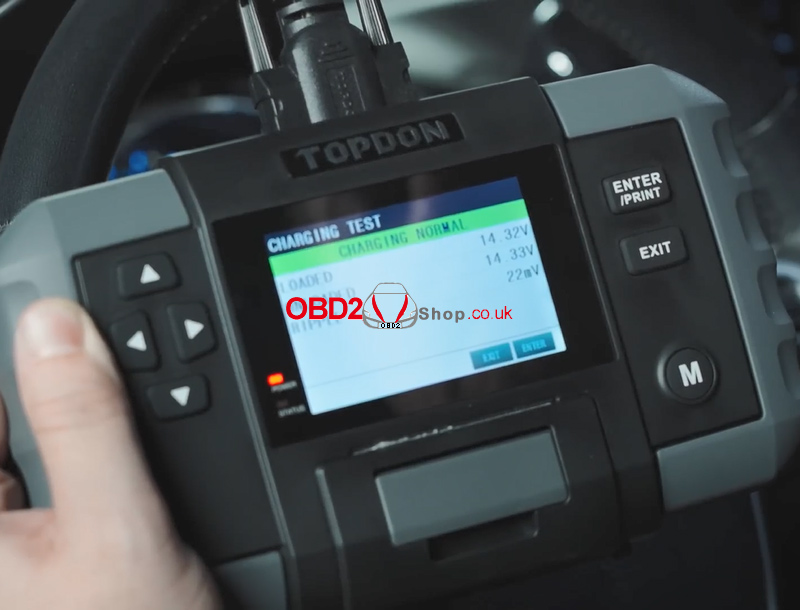
Charging Test Parameters Explained
Loaded Voltage: Voltage measured when electrical loads are ON
Unloaded Voltage: Voltage measured when electrical loads are OFF
Ripple:
Vehicle batteries operate on DC power, while alternators generate AC power. The diode rectifier converts AC to DC, and voltage fluctuations during this process are known as ripple. Excessive ripple may indicate alternator or diode issues.
For more automotive diagnostic tools and accessories, visit:
www.obd2shop.co.uk
Oznake: topdon bt600
četvrtak, 22.01.2026.
TopScan Moto vs. ArtiDiag Moto vs. UltraDiag Moto
Which Motorcycle Diagnostic Tool Is Right for You?
Choosing the right motorcycle diagnostic tool depends on your budget, technical needs, and the types of vehicles you service. TOPDON offers three popular motorcycle diagnostic solutions—TopScan Moto, ArtiDiag Moto, and UltraDiag Moto—each designed for different user scenarios, from DIY riders to professional workshops.
This article provides a clear comparison to help you decide which tool best fits your requirements.
Product Comparison Overview

1. Hardware & Design
TopScan Moto is a compact, lightweight Bluetooth OBD2 scanner designed to work with Android and iOS smartphones. It has no built-in screen or battery, making it extremely portable.
ArtiDiag Moto features a 5-inch touchscreen, a quad-core 1.8GHz processor, and a built-in battery. It connects via a main diagnostic cable and is ideal for workshop environments.
UltraDiag Moto is the most advanced model, featuring a large 8-inch display, a high-capacity 10,000mAh battery, a rear camera, and both VCI and Bluetooth connectivity.
2. Diagnostic Capabilities
All three tools support:
Full system diagnostics
AutoVIN
ECU information reading
Reading and clearing DTCs
Live data stream
Bi-directional control / active tests
Standard OBD diagnostics
However, their special function coverage differs significantly:
TopScan Moto supports only Oil Reset.
ArtiDiag Moto and UltraDiag Moto both offer full service functions, such as ABS bleeding, throttle and idle relearn, clutch initialization, ECU reset, VIN writing, BMS reset, TPMS reset, personalization, and more (as supported by the vehicle).
3. Vehicle Coverage
TopScan Moto supports 7 major motorcycle brands, including Harley-Davidson, BMW, Ducati, Honda, Yamaha, Suzuki, and Kawasaki.
ArtiDiag Moto expands coverage to 15 vehicle makes, adding brands such as KTM, Piaggio, Triumph, Indian, Victory, Polaris, and Benelli.
UltraDiag Moto offers the broadest compatibility, supporting 81 motorcycle brands, making it suitable for multi-brand professional service centers.
4. Connectivity & Updates
All models support Wi-Fi software updates with one year of free updates.
Remote desktop support is available on ArtiDiag Moto and UltraDiag Moto, enabling professional technical assistance when needed.
Final Summary
TopScan Moto
Best for motorcycle owners and DIY users who need a lightweight, affordable solution for basic diagnostics and oil reset on mainstream brands.
ArtiDiag Moto
Ideal for independent repair shops and advanced users who require full service functions, a dedicated touchscreen device, and broader vehicle coverage.
UltraDiag Moto
Designed for professional workshops and dealers that service multiple brands daily and need the most comprehensive diagnostics, maximum coverage, and premium hardware.
In short, TopScan Moto focuses on portability, ArtiDiag Moto balances performance and value, and UltraDiag Moto delivers full professional-grade capability. Choose the one that matches your diagnostic needs and workload.
www.obd2shop.co.uk
Oznake: topdon diagnostic tool
srijeda, 21.01.2026.
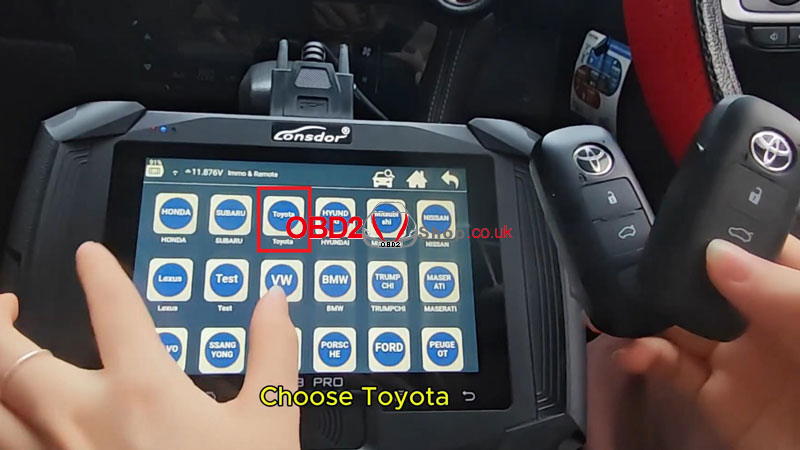
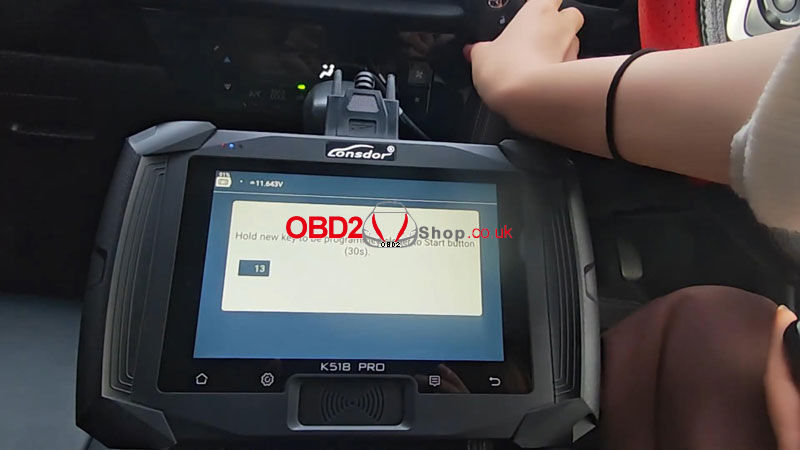
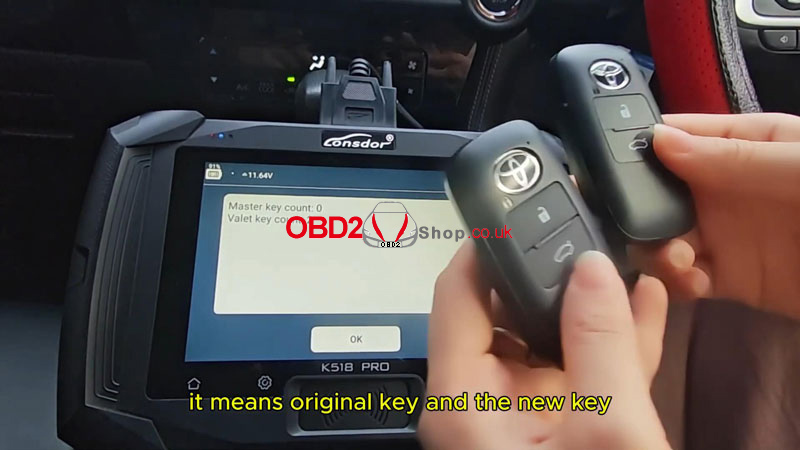
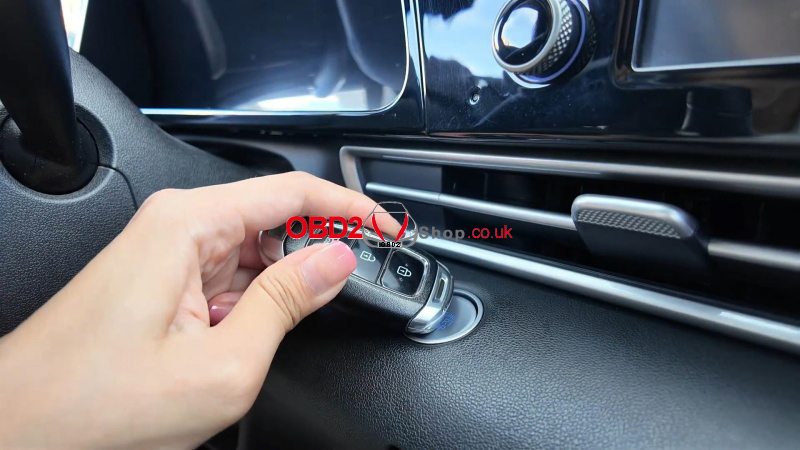
How to Add a 2023 Toyota Yaris Smart Key with Lonsdor K518 Pro?
This guide explains how to program a new smart key for a 2023 Toyota Yaris using the Lonsdor K518PRO. The process involves detecting existing keys, programming a new key, and testing all functions.
Tools Required:
Lonsdor K518PRO Key Programmer
OBD cable
Original key
New smart key
Step-by-Step Instructions:
1. Connect Device:
Plug the OBD cable into the vehicle's diagnostic port.
2. Select Vehicle:
Turn on the K518PRO and select "Immo& Remote’Toyota’ Select from vehicle ’Yaris’2021- ’Smart Key’ PEPS(CAN)"
3. Detect Existing Keys:
Select "Key count", follow on-screen prompts to place the original key near the ignition:
Open the driver's door and turn the ignition ON.
The device will detect the original key.
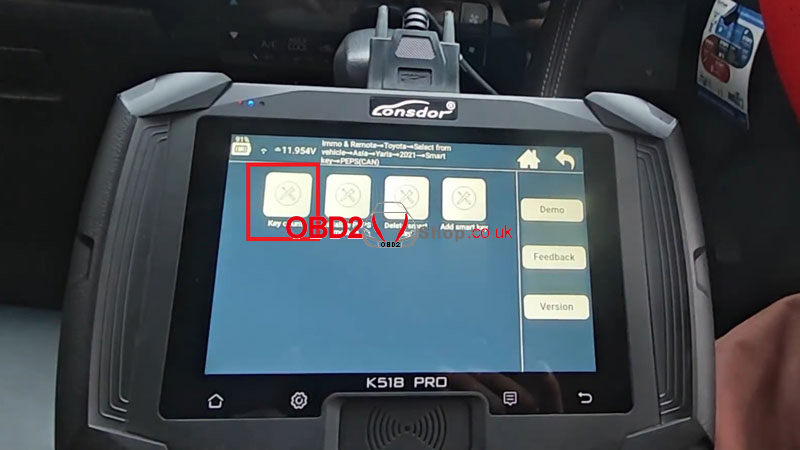

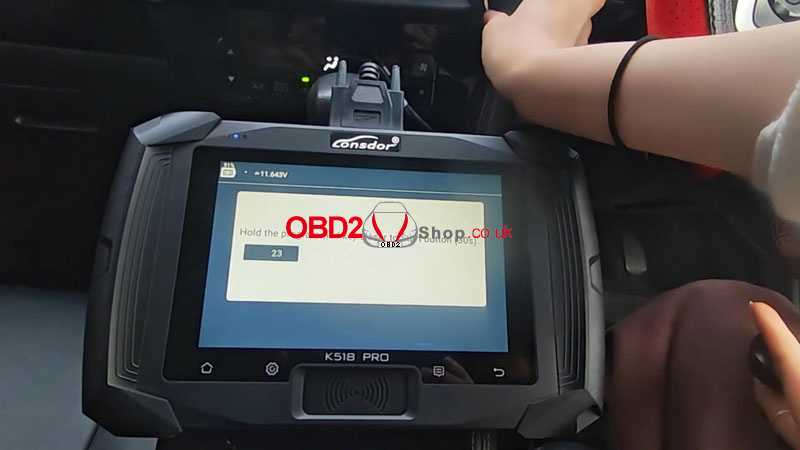
4. Add New Key:
Select "Add Smart Key" on the device.
Keep the door open and ignition ON.
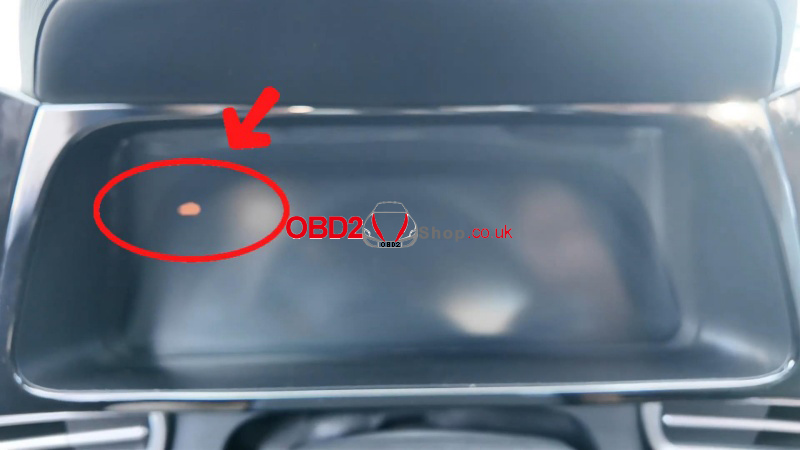
When prompted, hold the original key to the immobilizer coil until you hear two beeps.
Then place the new key near the coil until you hear three beeps.
5. Confirm Programming:
Select "Key count" again. Both keys should now show as recognized.
6. Test Functions:
Remote Test: Use both keys to lock/unlock doors remotely.
Smart Function Test: Leave one key inside, take the other outside, and start the ignition.
Ignition Test: Start the vehicle with the new key.

Result:
Both keys should operate all remote, smart, and ignition functions normally.
Notes:
lEnsure the vehicle battery is stable during programming.
lThis procedure is confirmed for the 2023 Toyota Yaris.
lKeep original keys accessible throughout the process.
www.obd2shop.co.uk
Oznake: lonsdor k518 pro
TopScan Moto Wireless Diagnostic Tool – Quick User Guide
This quick user guide walks you through the basic setup and operation of the TopScan Moto wireless diagnostic tool. For the best user experience, please read and follow all instructions and warnings carefully before using this product.
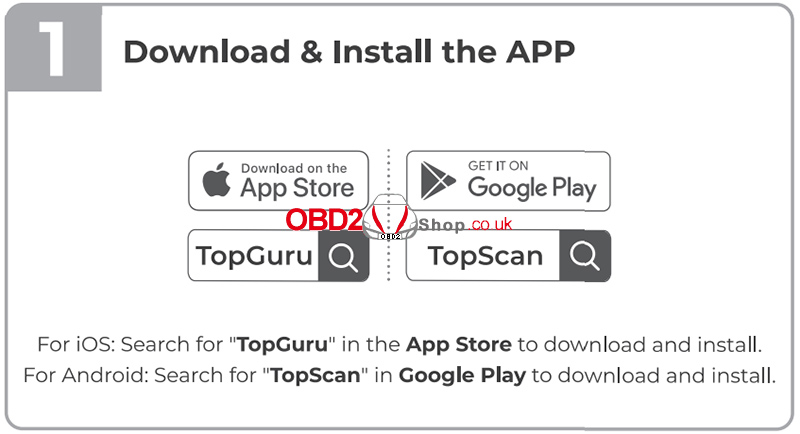
1. Download and Install the APP
To begin, download the official app according to your mobile device:
iOS: Search for "TopGuru" in the Apple App Store and download the app.
Android: Search for "TopScan" in Google Play and install the app.
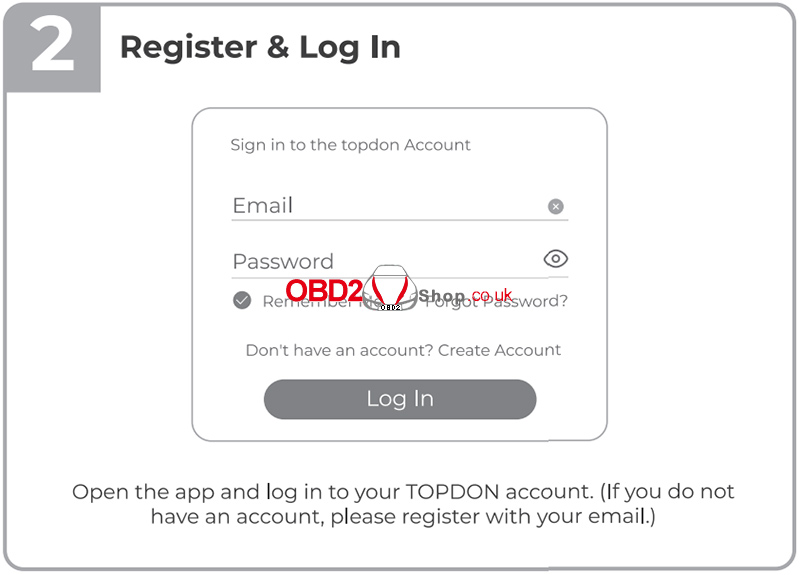
2. Register and Log In
Open the app and log in using your TOPDON account.
If you do not already have an account, tap Register and sign up using your email address.
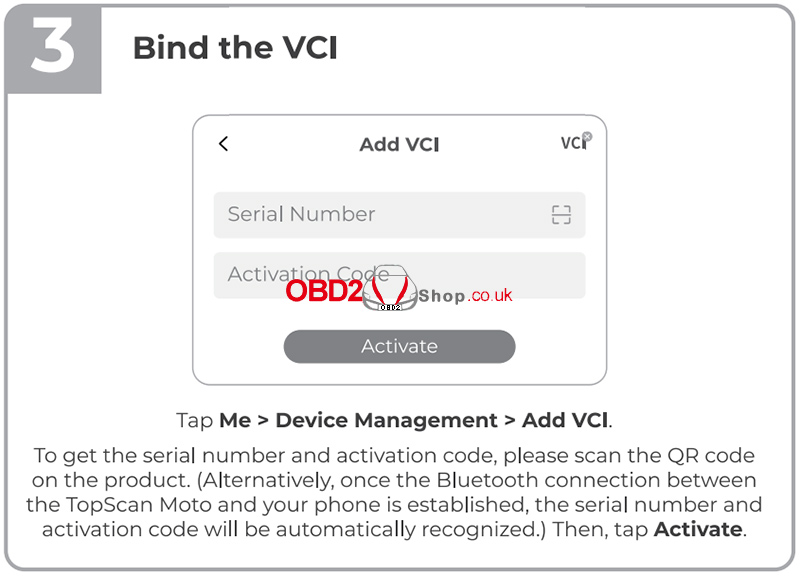
3. Bind the VCI
To bind the TopScan Moto VCI (Vehicle Communication Interface):
` Tap Me > Device Management > Add VCI.
a Scan the QR code on the product to obtain the serial number and activation code.
Alternatively, once Bluetooth is connected, the app will automatically recognize the serial number and activation code.
b Tap Activate to complete the binding process.
4. Download the Diagnostic Software
When using the diagnostic function for the first time, you must download the motorcycle-specific software:
Tap Diagnostics on the home screen.
Select your motorcycle brand and download the required diagnostic software.

5. Connect the TopScan Moto to the Motorcycle
Plug the TopScan Moto into the Data Link Connector (DLC) of your motorcycle.
The DLC is usually located under the seat or near the engine.
If your motorcycle does not have a standard OBD-II port, a compatible adapter cable** (not included) is required.

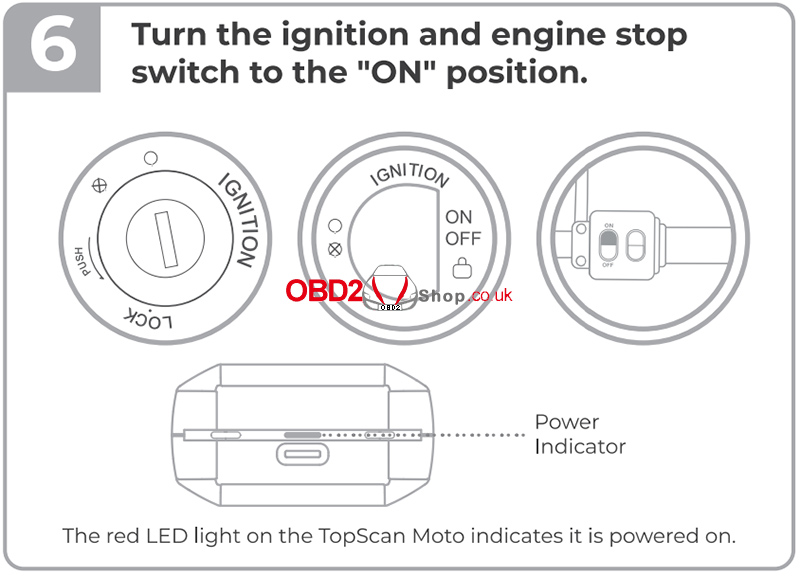
6. Turn the Ignition ON
Turn the ignition switch and the engine stop switch to the ON position.
The red LED on the TopScan Moto indicates that the device is powered on.
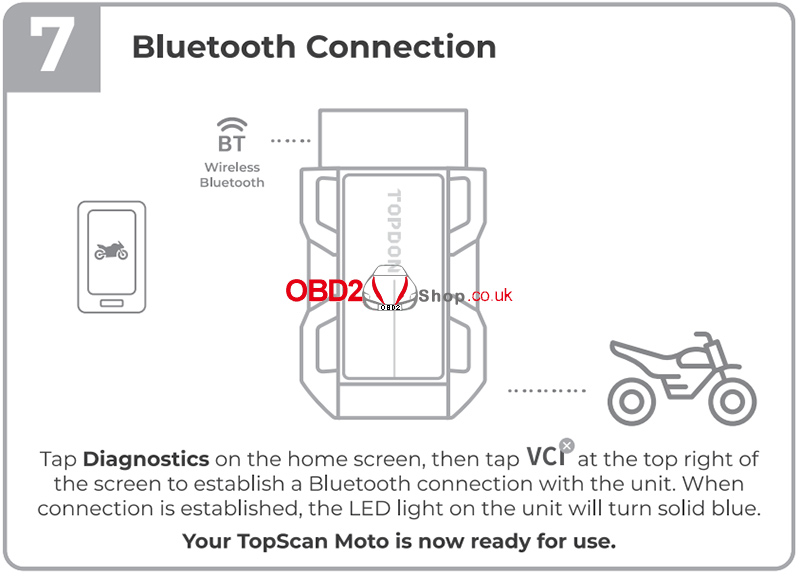
7. Establish Bluetooth Connection
To connect the device via Bluetooth:
` Tap Diagnostics on the home screen.
a Tap VCI in the top-right corner to connect to the TopScan Moto.
b Once the connection is successful, the LED on the unit will turn solid blue.
Your TopScan Moto is now ready for use.
For more information, please visit:
www.obd2shop.co.uk
Oznake: topscan moto
ponedjeljak, 19.01.2026.
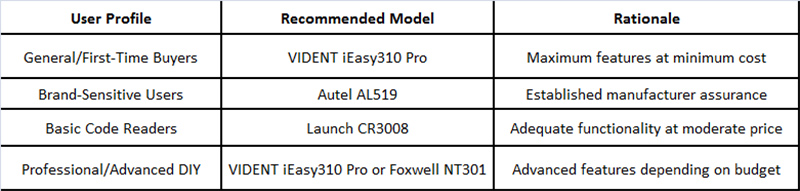
2026 Buying Guide: 5 Best OBD2 Scanners Compared & Ranked
This report compares five mainstream OBD2 scanners: VIDENT iEasy310 Pro, Foxwell NT301, KW850, Launch CR3008, and Autel AL519. Based on feature analysis and pricing, the VIDENT iEasy310 Pro offers the best value, providing premium features at the lowest price point (Ł31).
1. Price & Features Comparison
Table 1: Complete Feature Comparison Across Five OBD2 Scanners
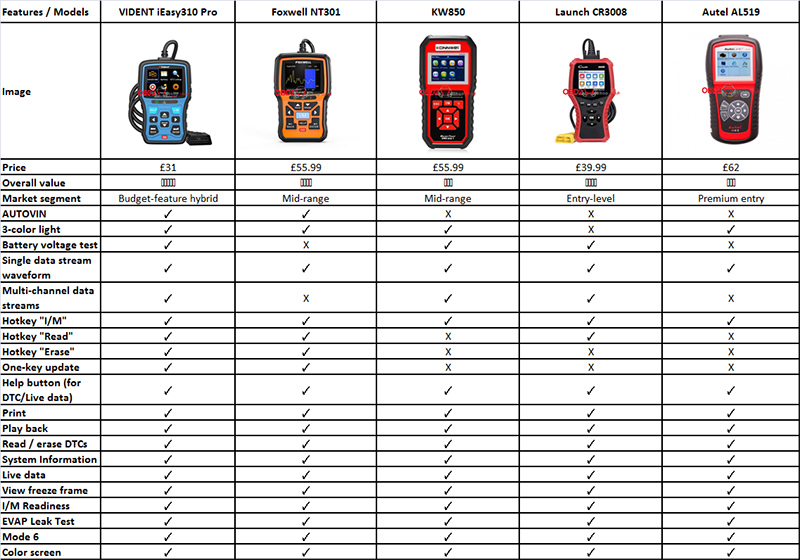
lCommon Functions(All 5 Models)
Allscanners include: read/clear DTCs, live data, freeze frame, I/M readiness, EVAP test, Mode 6, color display, and print/playback.
2. Primary Recommendation: VIDENT iEasy310 Pro
lTechnical Rationale
The VIDENT iEasy310 Pro combines several features typically segmented across higher price points:
` AUTOVIN Technology (shared only with Foxwell NT301)
a Multi-Channel Streaming (shared with KW850 & Launch CR3008)
b One-Key Updates (shared only with Foxwell NT301)
c Three Hotkeys (most in comparison)
lValue Proposition
At Ł31.00, it offers approximately 90% of the functionality found in Ł55-Ł62 models, representing the highest feature density per pound in this comparison.
3. Alternative Considerations
lBy Priority Need
Budget-Conscious Users: Launch CR3008 (Ł39.99) offers solid basics
Brand-Oriented Buyers: Autel AL519 (Ł62.00) provides trusted reliability
Balanced Choice: Foxwell NT301 (Ł55.99) combines AUTOVIN with mid-range pricing
4. Selection Guidelines
5. Concluding Assessment
The VIDENT iEasy310 Pro delivers the strongest value among the five compared scanners, offering the most features at the lowest price (Ł31). While each competitor serves specific needs, objective analysis confirms the iEasy310 Pro as the optimal choice for users prioritizing capability per pound.
For selection, focus on three key differentiators: AUTOVIN automation, multi-channel data streaming, and update convenience. Match these features against your budget and diagnostic requirements to make an informed decision.
www.obd2shop.co.uk
Oznake: obd2 scan tool
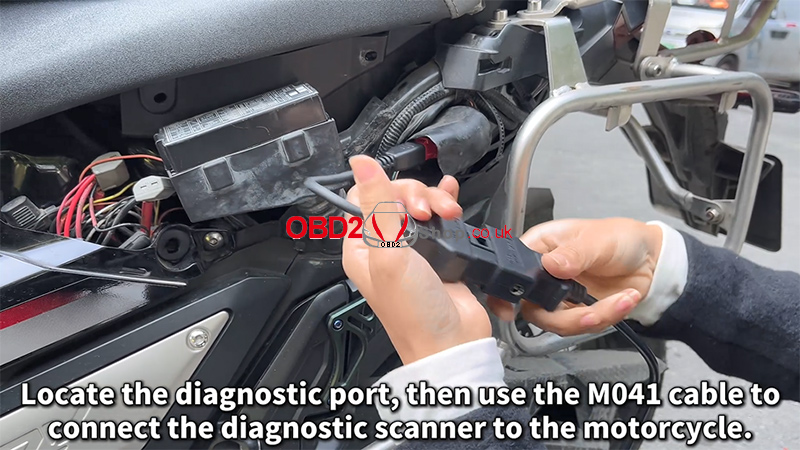
2020 Honda ADV750 Clutch Initialization Using OBDSTAR MotoMaster
In this guide, we will walk you through the clutch initialization (learning) procedure for a 2020 Honda ADV750 using the OBDSTAR MotoMaster diagnostic tool. This function is essential after clutch-related repairs or when transmission performance needs recalibration.
Follow the steps below carefully to complete the process successfully.
Required Tools:
OBDSTAR MotoMaster
Main cable
M041 dedicated cable
Connection Setup
1. Locate the motorcycle diagnostic port.
2. Use the M041 dedicated cable to connect the MotoMaster to the motorcycle.
3. Turn the ignition ON (engine OFF).
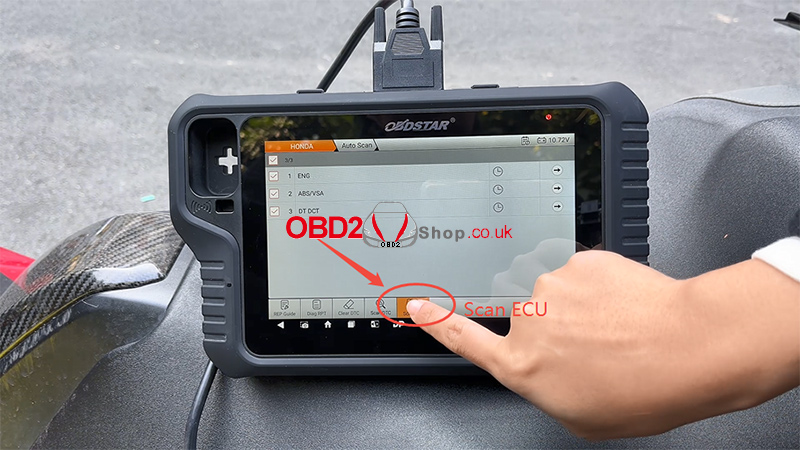
4. On the MotoMaster, navigate to: [MOTO Diag] ’ [HONDA]

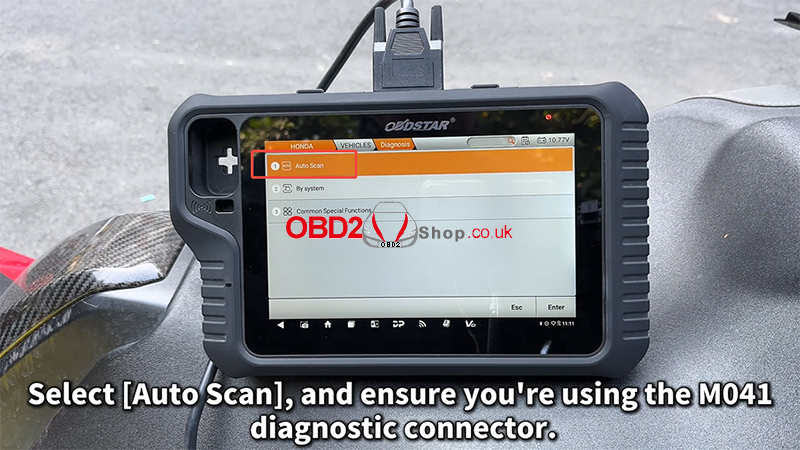
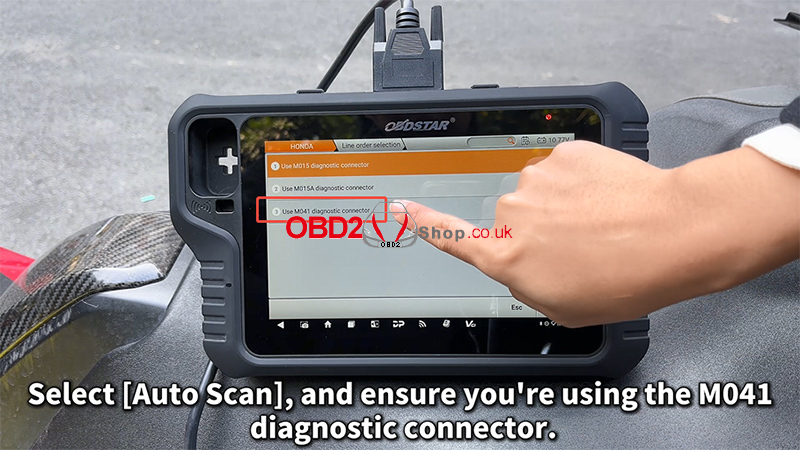
Clutch Initialization Procedure
1. Select [Auto Scan] and confirm that the M041 diagnostic connector is in use.
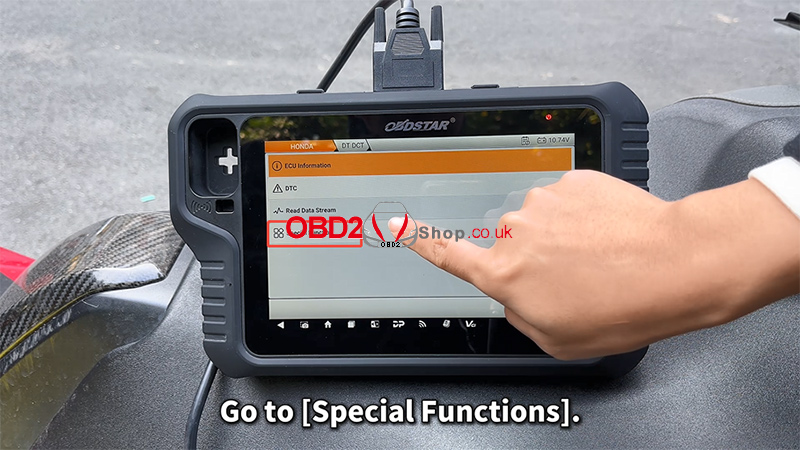
2. Enter [Special Functions].
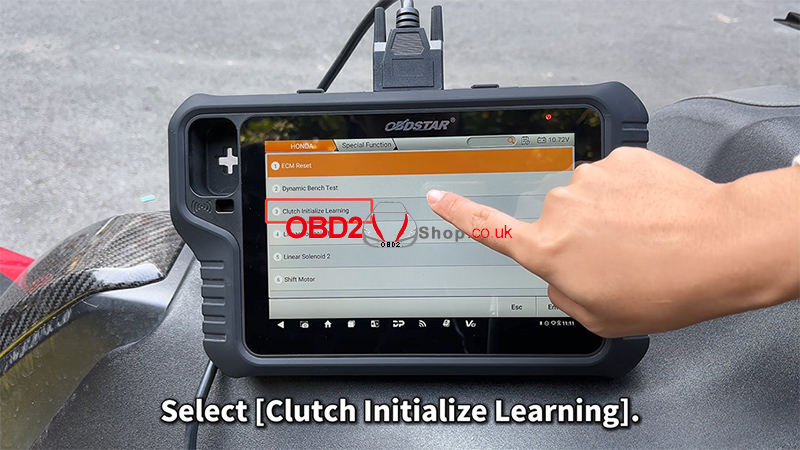
3. Choose [Clutch Initialize Learning].
4. Carefully read the on-screen notes and confirm:
The engine is OFF
The transmission is in Neutral
5. The tool will display the message: “Is the shift indicator ‘L’ turned on?” Tap [Cancel].
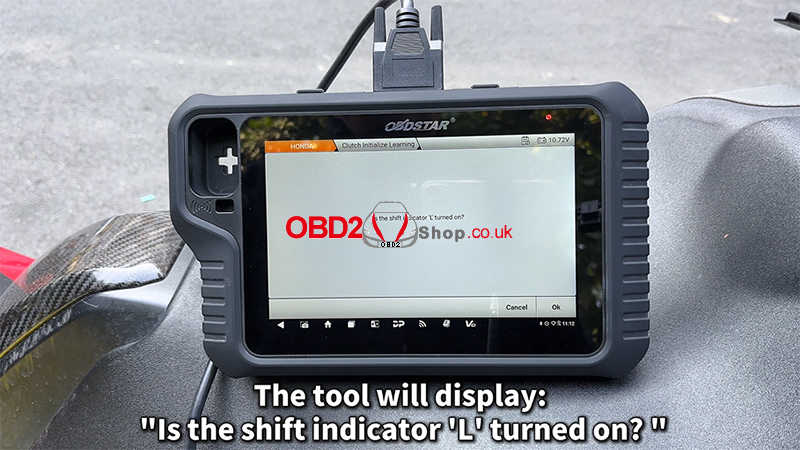
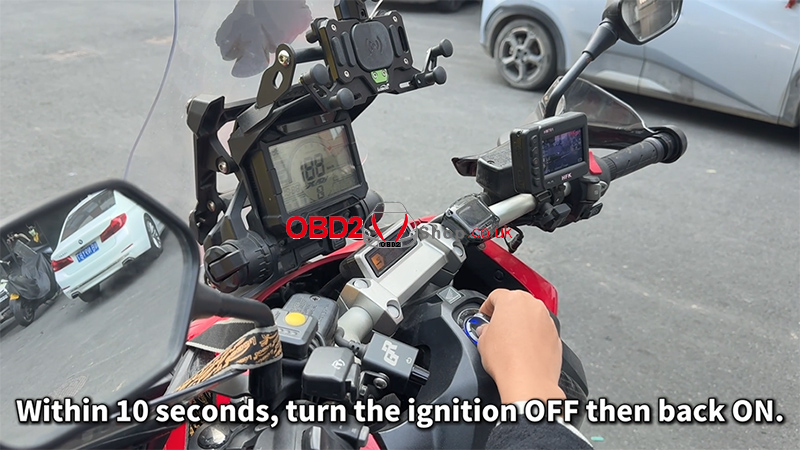
Ignition & Engine Operation
1. Within 10 seconds, turn the ignition OFF, then turn it ON again.
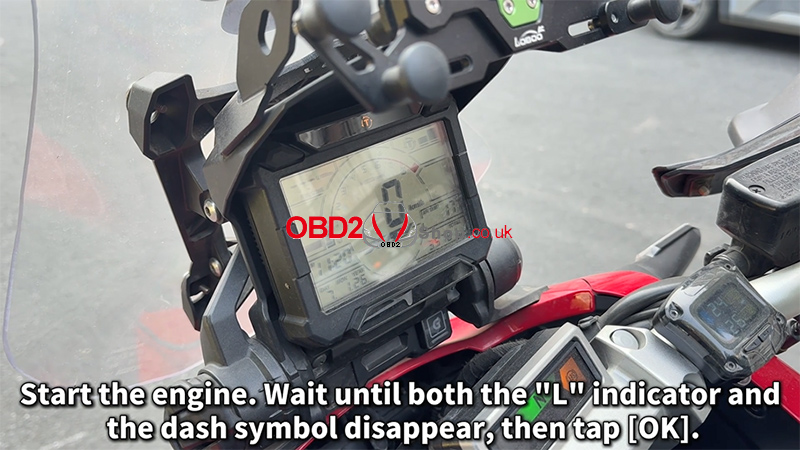
2. Start the engine.
3. Wait until both the “L” indicator and the dashboard symbol disappear.
4. Tap [OK] to continue.
Completion Steps
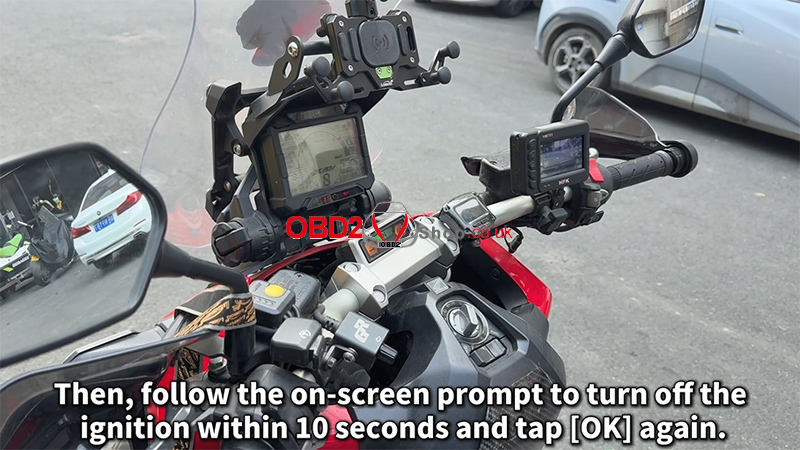
1. Once the clutch initialization completes successfully, tap [OK].
2. Follow the on-screen prompt to turn OFF the ignition within 10 seconds, then tap [OK] again.
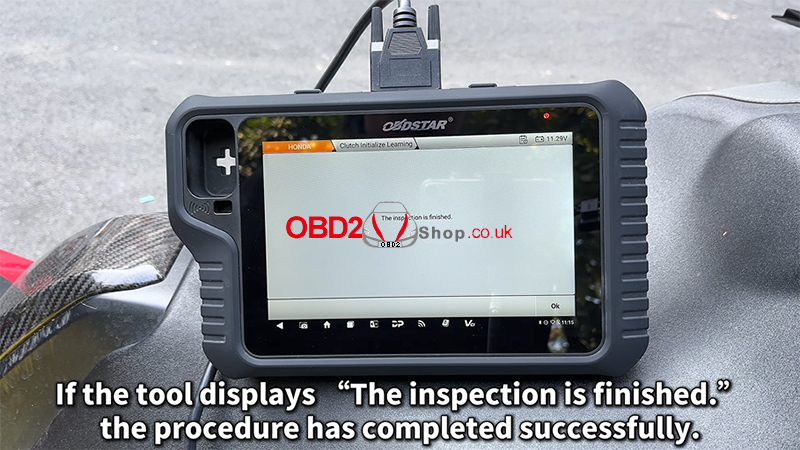
3. If the tool displays: “The inspection is finished,” the clutch initialization procedure has been completed successfully.

Video Tutorial
For a visual walkthrough of the entire process, watch the video guide below:
https://youtu.be/Tro-ux7Pwt8
For more motorcycle diagnostic guides and professional tools, visit: www.obd2shop.co.uk.
Oznake: obdstar motomaster
petak, 16.01.2026.
Topdon ArtiDiag500 vs. UltraDiag vs. ArtiDiag EU
The ArtiDiag500, UltraDiag, and ArtiDiag EU are professional automotive diagnostic tools designed for different user needs. Below is a clear comparison covering hardware, software functions, and application scenarios to help you choose the right device.
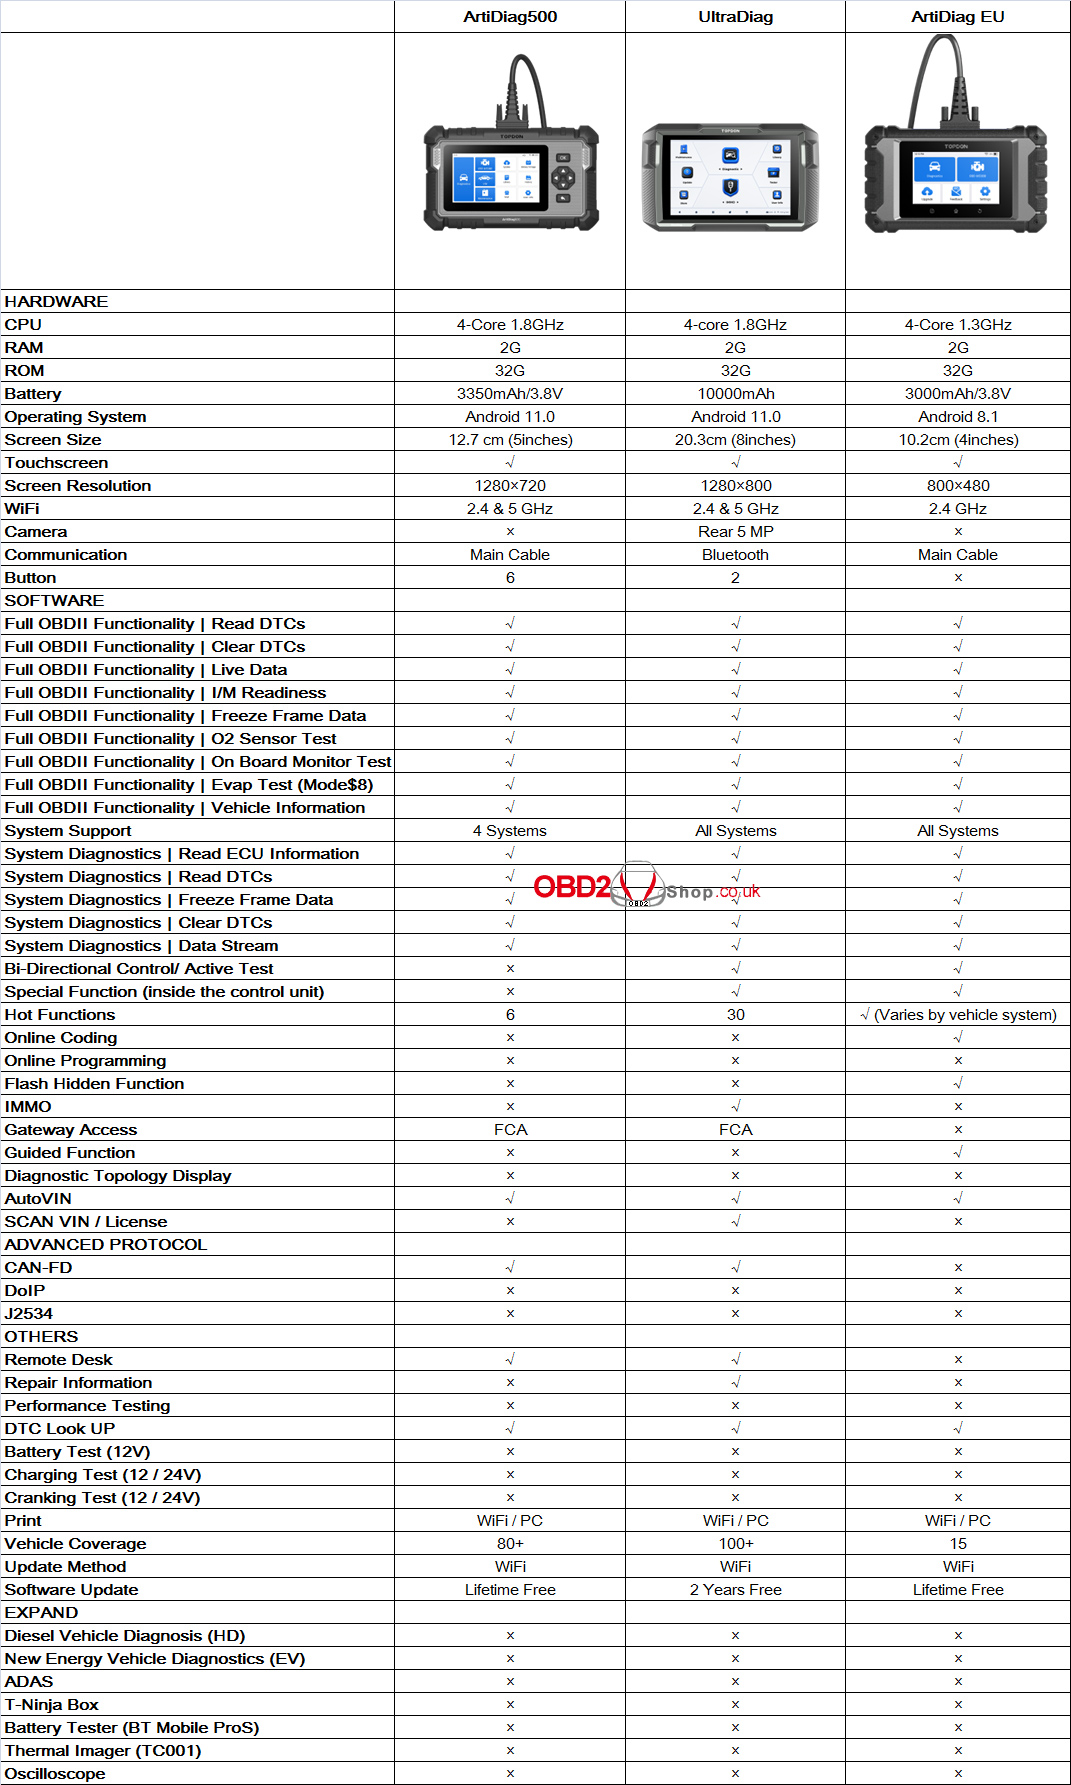
Summary of Key Differences
ArtiDiag500 is an entry-level diagnostic tool focused on essential OBD2 and basic system diagnostics. It supports full OBDII functions, CAN-FD protocol, FCA gateway access, and lifetime free updates. However, it is limited to four systems and does not support bi-directional control, special functions, IMMO, or online coding. This model is best suited for users who need a cost-effective and reliable diagnostic scanner for daily fault reading and clearing.
UltraDiag is the most powerful and feature-rich model among the three. It offers all-system diagnostics, bi-directional control, IMMO functions, 30 hot functions, Bluetooth communication, a large 8-inch screen, and extended battery life. With support for CAN-FD, FCA gateway access, repair information, and over 100 vehicle brands, UltraDiag is ideal for professional workshops and technicians who require advanced diagnostic capabilities. It includes two years of free software updates.
ArtiDiag EU is tailored specifically for European vehicle diagnostics. While it does not support CAN-FD or IMMO, it provides advanced OEM-style functions such as online coding, guided functions, and flash hidden features, along with all-system diagnostics. It also includes lifetime free software updates, making it a strong choice for users focused on EU vehicles who need coding and guided diagnostic support.
In conclusion, ArtiDiag500 offers simplicity and affordability, UltraDiag delivers maximum functionality and coverage, and ArtiDiag EU excels in European vehicle coding and guided diagnostics. Selecting the right tool depends on your vehicle coverage requirements, diagnostic depth, and budget.
www.obd2shop.co.uk
Oznake: topdon diagnostic tool
srijeda, 14.01.2026.
KEYDIY Free Lifetime Upgrade: MQB & BMW-G Key Programming
We're excited to announce powerful new upgrades for the KEYDIY KD-X4 Key Programmer! With our latest enhancements, programming and cloning keys for European vehicles has never been easier—or more affordable.
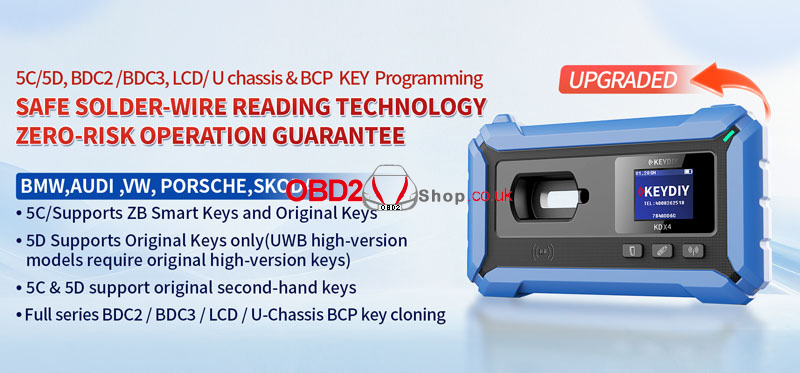
Newly Supported Vehicles & Keys
The KEYDIY KD X4 now fully supports:
l BMW, Audi, Volkswagen, Porsche, Skoda
l 5C keys: ZB Smart Keys + Original Keys
l 5D keys: Original Keys only
(Note: UWB high-version models require original high-version keys)
l Original second-hand keys are now supported for both 5C & 5D
l Full series cloning for:
` BDC2 / BDC3
a LCD / U-Chassis
b BCP Keys
Permanent FREE Functions
Once activated, the MQB & BMW-G functions are now permanently FREE—meaning you can add keys for supported models anytime at no extra cost.
Safe & Risk-Free Operation
KEYDIY uses Safe Solder-Wire Reading Technology, ensuring zero-risk operation during key reading and programming. You can work with confidence, knowing your vehicle’s systems are protected.
Future-Proof Support
Our system is validated and supported up to 2026, keeping you ahead with the latest vehicle security technology.
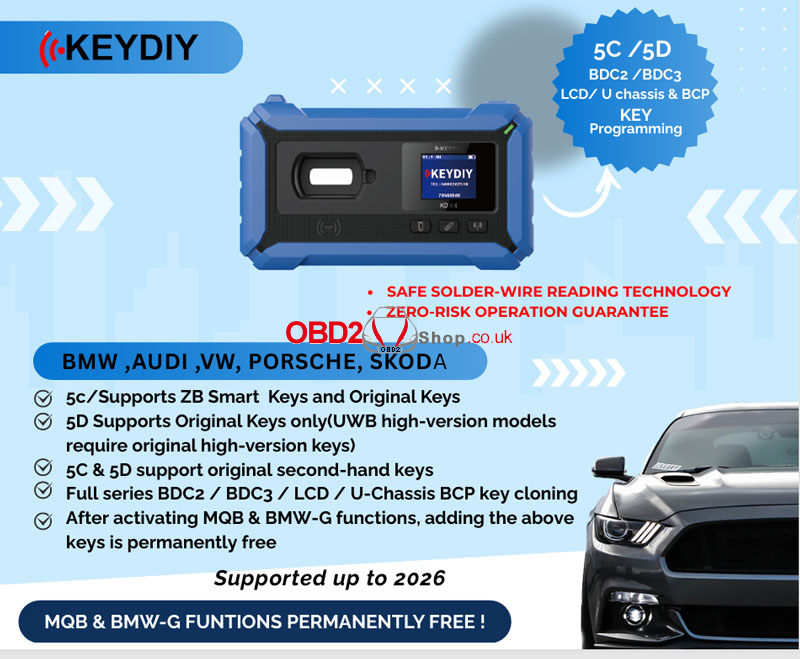
Upgrade your KEYDIY KD-X4 today and enjoy expanded key programming capabilities—risk-free and future-ready!
Read also
How to Add a BMW BDC3 Key with KEYDIY KD-X4 & FGB?
http://blog.obd2shop.co.uk/how-to-add-a-bmw-bdc3-key-with-keydiy-kd-x4-fgb/
www.obd2shop.co.uk
Oznake: keydiy kd x4
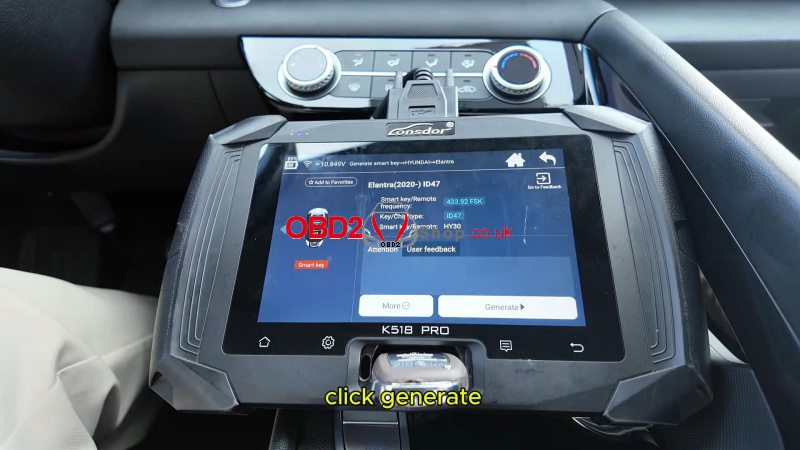
Lonsdor K518 PRO Adds 2020+ Hyundai Elantra Smart Key Success
This guide provides clear step-by-step instructions on how to program a smart key for a 2020 Hyundai Elantra using the Lonsdor K518 PRO tool.
Required Equipment
Lonsdor K518 PRO Key Programmer
OBD communication cable
One original car key
A new Lonsdor smart key
Step-by-Step Programming Instructions
1. Generate New Key
` Connect & Select Vehicle, plug the OBD cable into the vehicle.
a On the K518 PRO, go to:Generation Smart ’ HYUNDAI ’ Elantra ’ Elantra (2020-) ID47
b Insert the new smart key into the card slot.
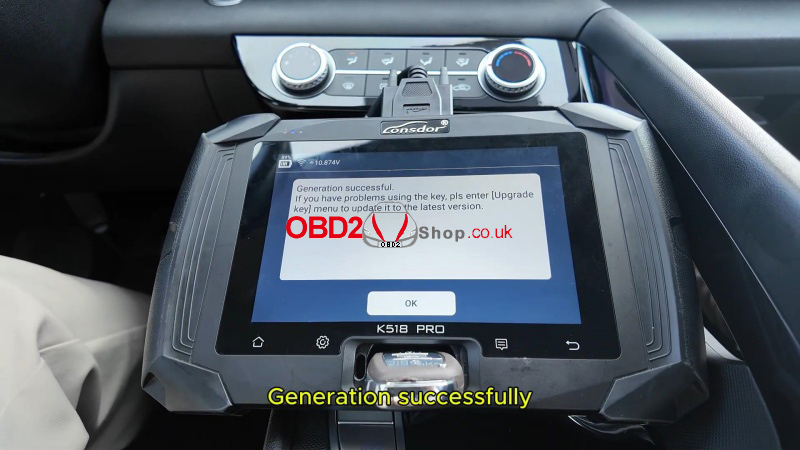
c Tap "Generate" and wait for success.
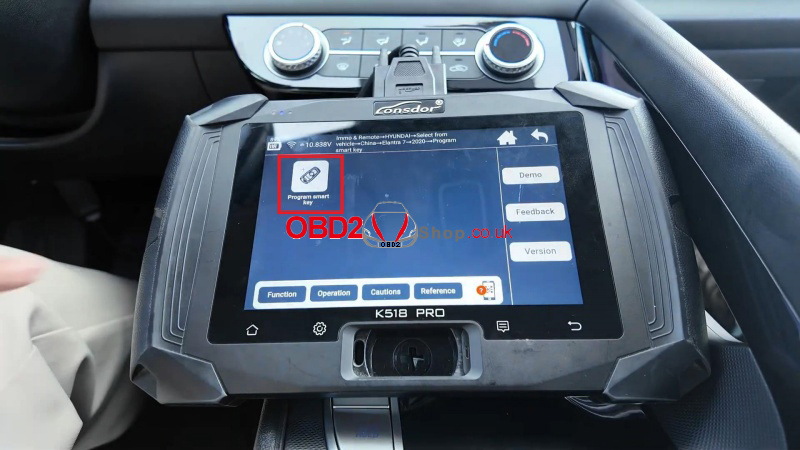
2. Program Smart Key
` Return to the main menu and select:Immo & Remote ’ HYUNDAI ’ Select from Vehicle ’ China ’ Elantra 7 ’ 2020- ’ Program Smart Key
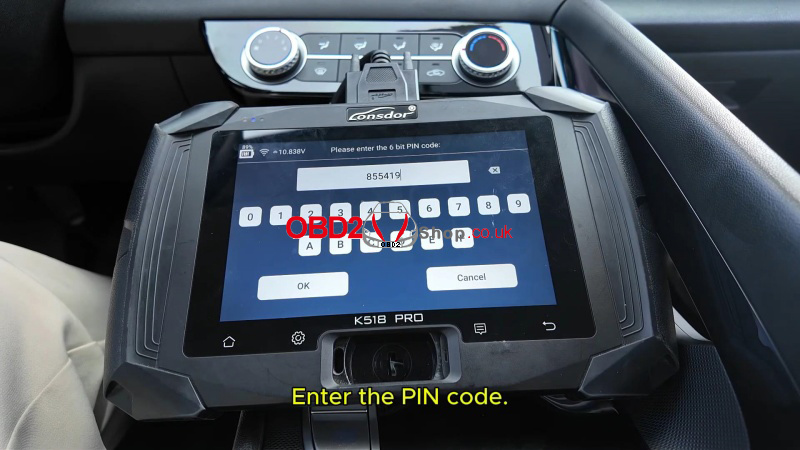
a Ensure Wi-Fi is connected. Turn the ignition OFF. Open and close the driver's door once.
b The PIN cannot be read directly—obtain it from a verified source. Enter PIN: 855419 (example used in guide).
c Within 5 seconds, hold the smart key head against the start button until the immobilizer light turns on. Confirm programming when prompted.
d Follow the same steps for each additional key. All keys must be programmed to start the vehicle.

3. Complete Process
Press Cancel when finished. The tool will display the number of keys successfully programmed.
Verification
1. Test all programmed keys to ensure they start the vehicle.
2. Confirm remote functions operate normally.

Important Notes
lIncorrect PIN entry 3 times will lock the function.
lAlways program all keys in one session.
lKeep the original key accessible during the process.
This guide is intended for professional automotive locksmiths and technicians. Always follow vehicle-specific procedures and use secure PIN sources.
www.obd2shop.co.uk
Oznake: lonsdor k518 pro
petak, 09.01.2026.
ECU Data Read and Write Using Launch X431 ECU & TCU Programmer
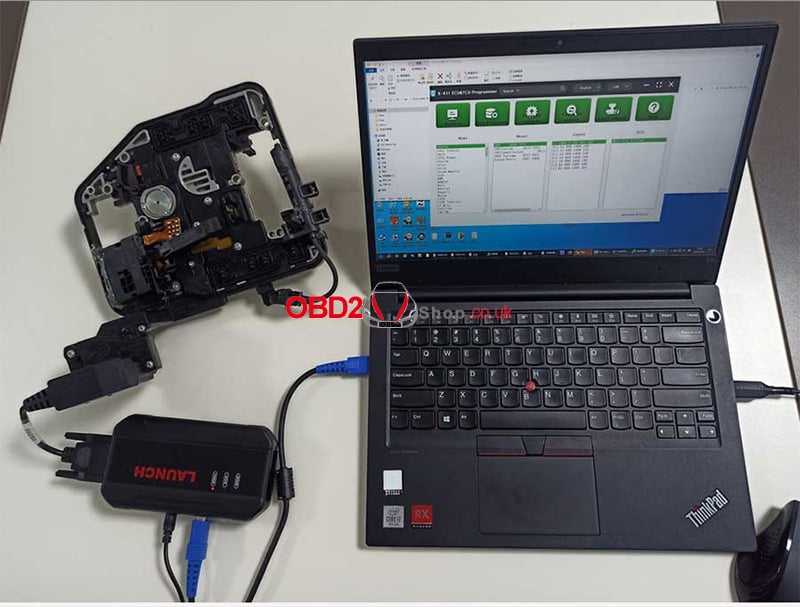
This article explains how to use the Launch X431 ECU & TCU Programmer to read and write ECU data step by step. By following this guide, you can safely back up and restore ECU EEPROM and Flash data using bench mode.
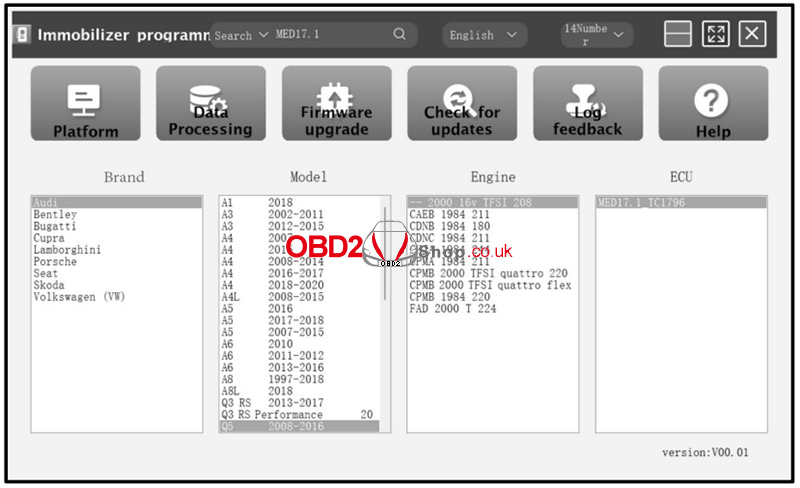
Step 1: Get Related ECU Information
1. As shown in Figure 1, select the target ECU by navigating through:
Brand ’ Model ’ Engine ’ ECU.
Select the corresponding ECU type based on the vehicle information.
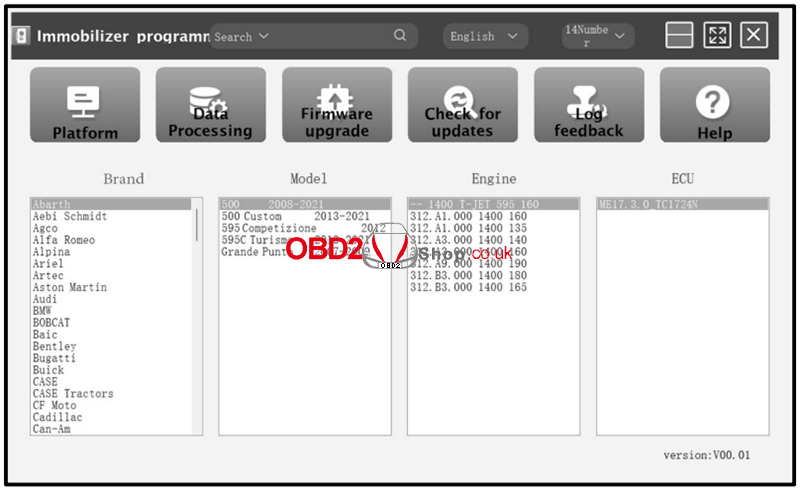
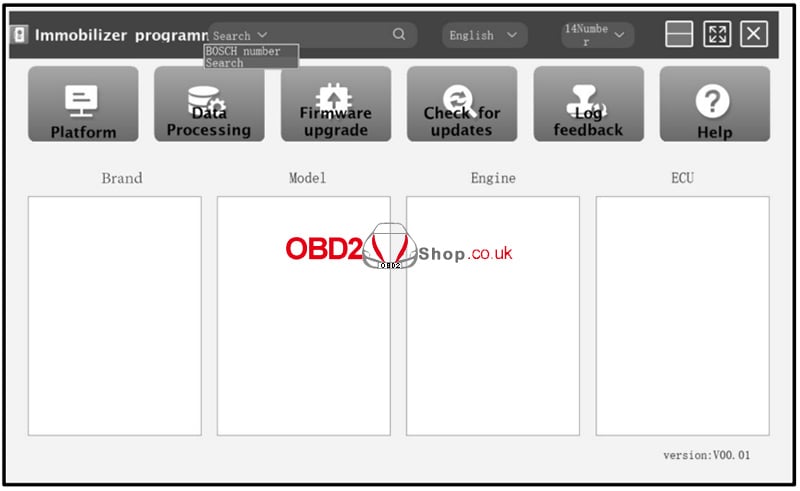
2. Alternatively, you can search directly using the search box. Enter relevant information such as Brand, Bosch ID, or ECU type.
For example, search for the MED17.1 ECU to quickly locate the engine model, as shown in Figures 2 and 3.
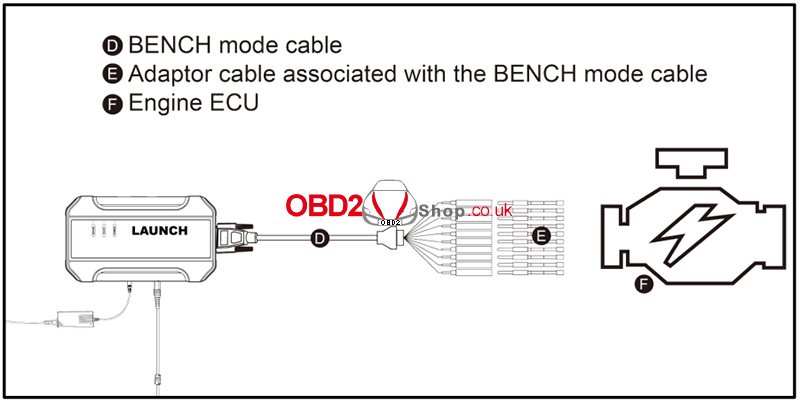
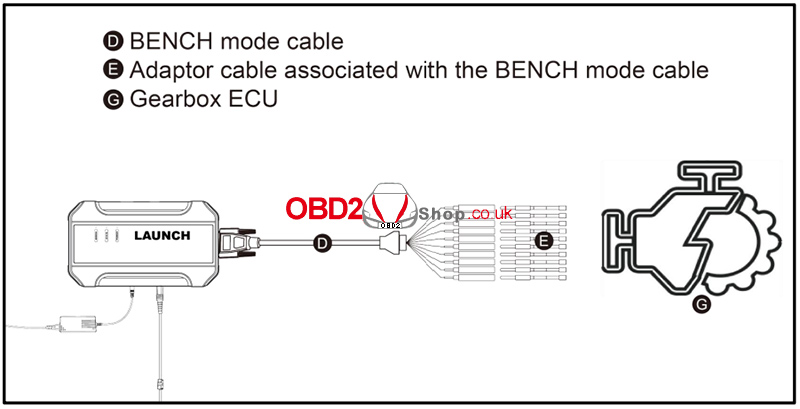
3. Click the Direct Connection Diagram to view the ECU wiring diagram.

4. Refer to the wiring diagram and use the BENCH mode cable together with the appropriate adapter cable to connect the ECU to the Launch X431 ECU & TCU Programmer.
5. Once the connection is completed, click Read Chip ID to identify the ECU and confirm communication.
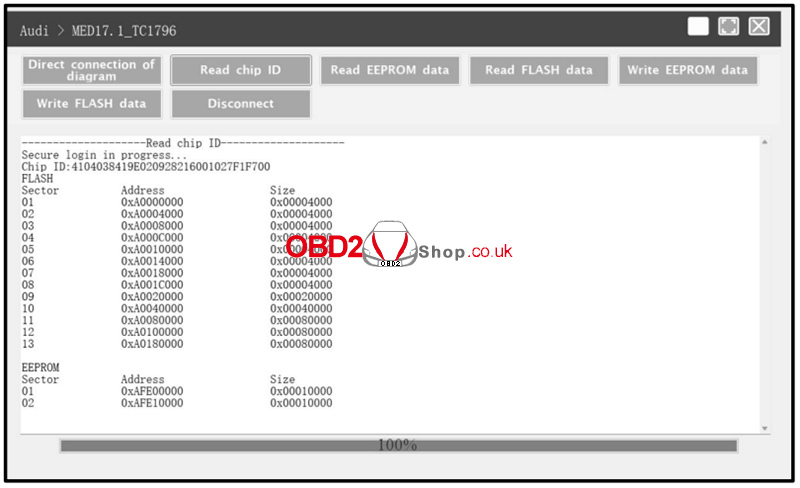
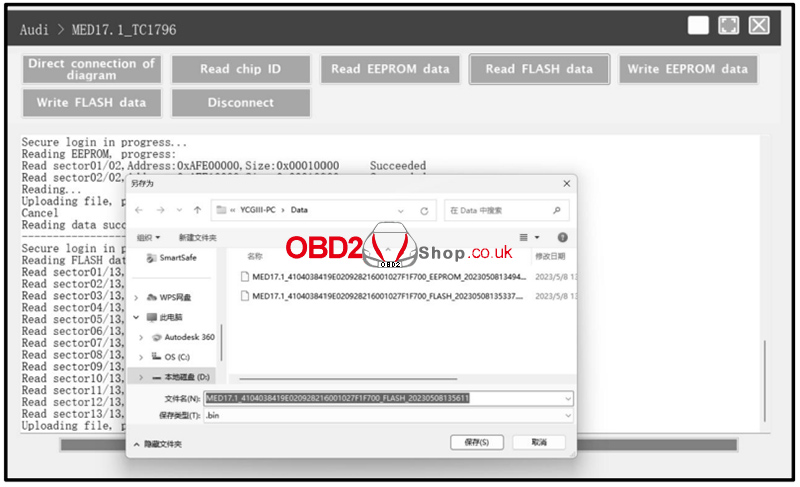
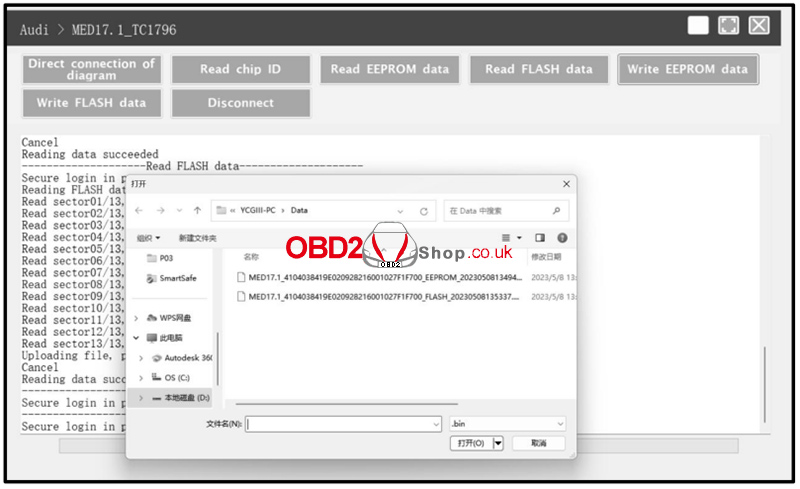
Step 2: ECU Data Read and Write Operations
1. Click Read EEPROM Data to back up the EEPROM data and save the file to your device.
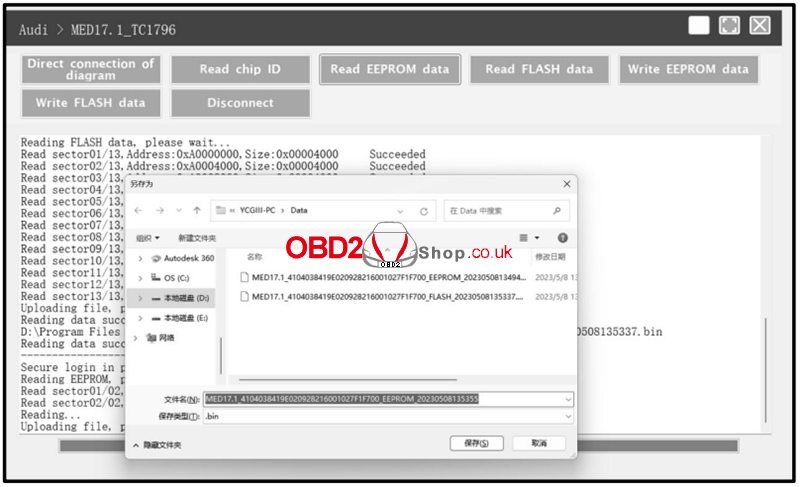
2. Click Read Flash Data to back up the Flash data and save it securely.
3. To restore data, click Write EEPROM Data and select the corresponding EEPROM backup file.

4. Click Write Flash Data and choose the appropriate Flash backup file to complete the data restoration process.
Conclusion
Using the Launch X431 ECU & TCU Programmer, you can efficiently perform ECU data reading and writing through bench mode. Always ensure correct wiring based on the connection diagram and back up all original data before writing to the ECU to avoid potential risks.
For more professional automotive diagnostic tools and guides, visit:
www.obd2shop.co.uk
Oznake: launch x431 ecu tcu tool
četvrtak, 08.01.2026.
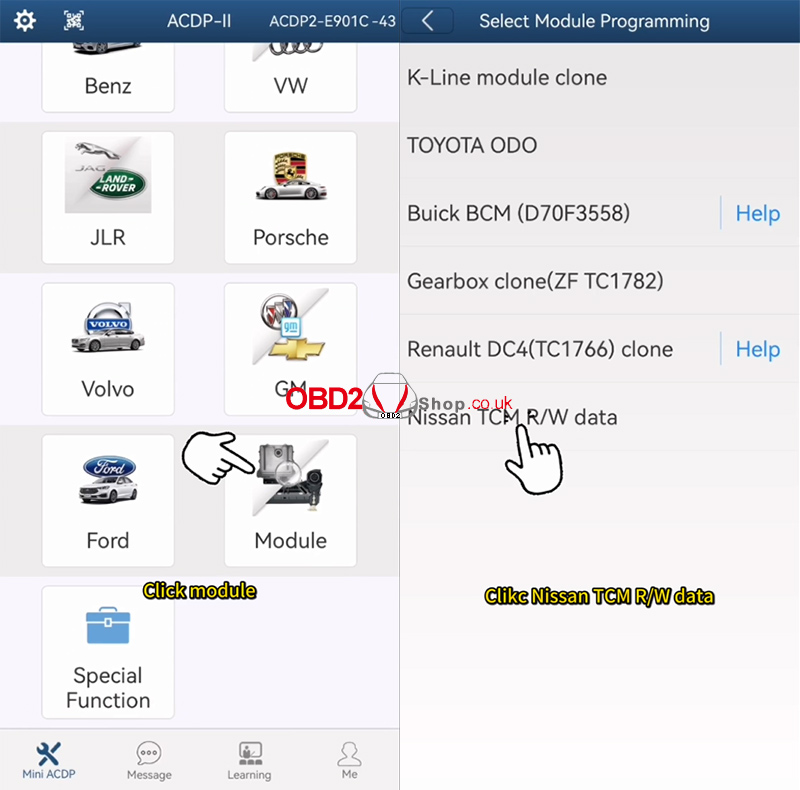
Nissan 07A Gearbox Replacement Using Yanhua ACDP2 and Module 43
This guide explains how to replace a Nissan 07A (RE7R01A) gearbox using Yanhua Mini ACDP2 with Module 43.
The procedure is also compatible with ACDP (first generation).
Operation Steps
1. Preparation
` Open the ACDP APP
a Confirm in the top-right corner that the ACDP programmer is successfully bound
2. Connect to the Original Gearbox
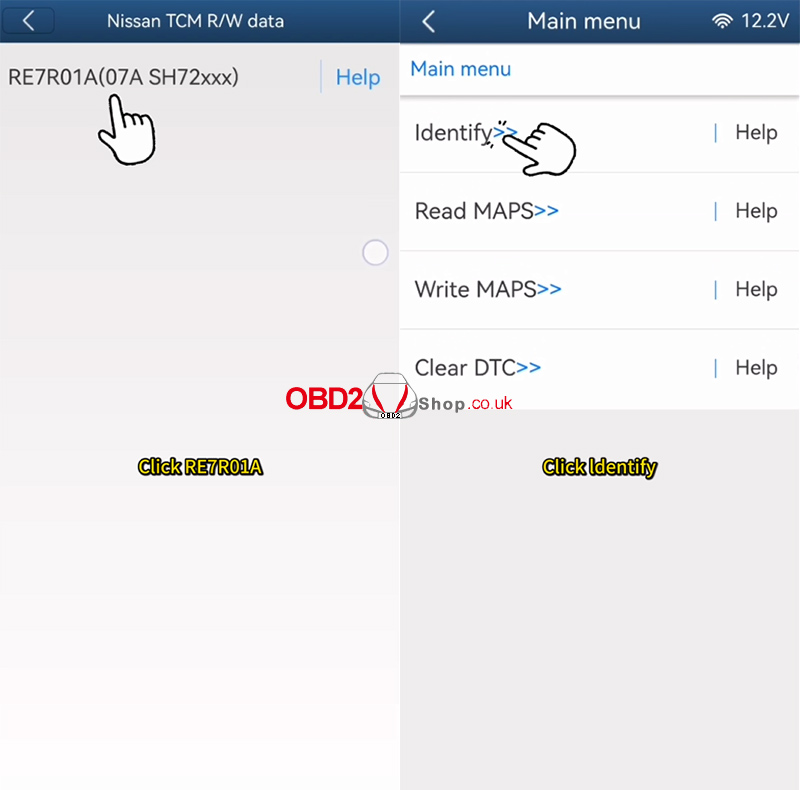
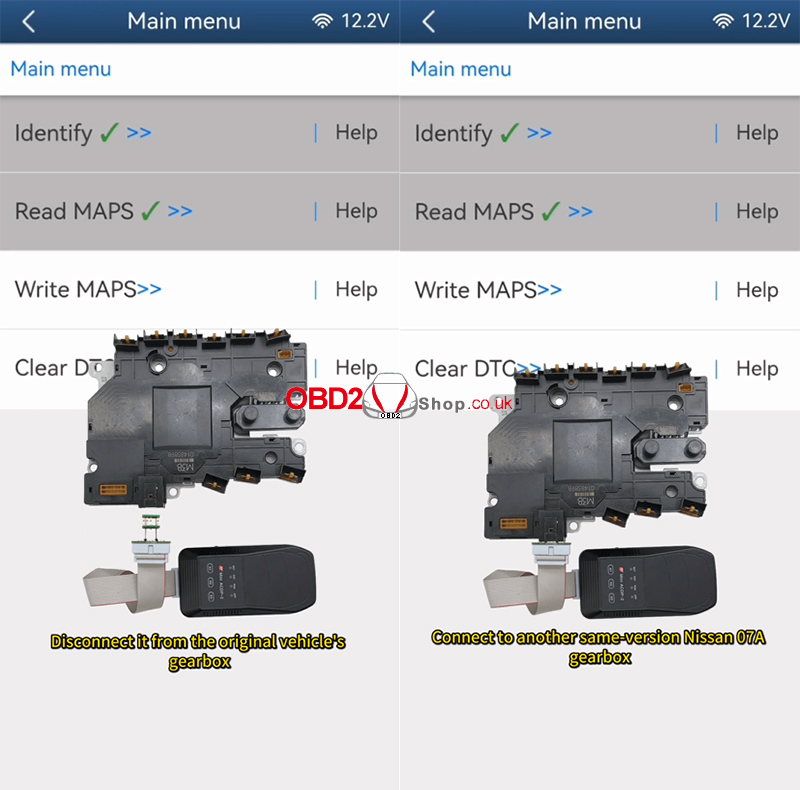
` Tap [Module] ’ [Nissan TCM R/W Data]
a Select RE7R01A Help
b Carefully read the help documentation
c Connect the ACDP to the original vehicle’s gearbox according to the wiring diagram

3. Identify Gearbox Information
` Tap [RE7R01A] ’ [Identify]
a Use the ACDP standard power adapter
Voltage: 12V
Current: e 2.5A
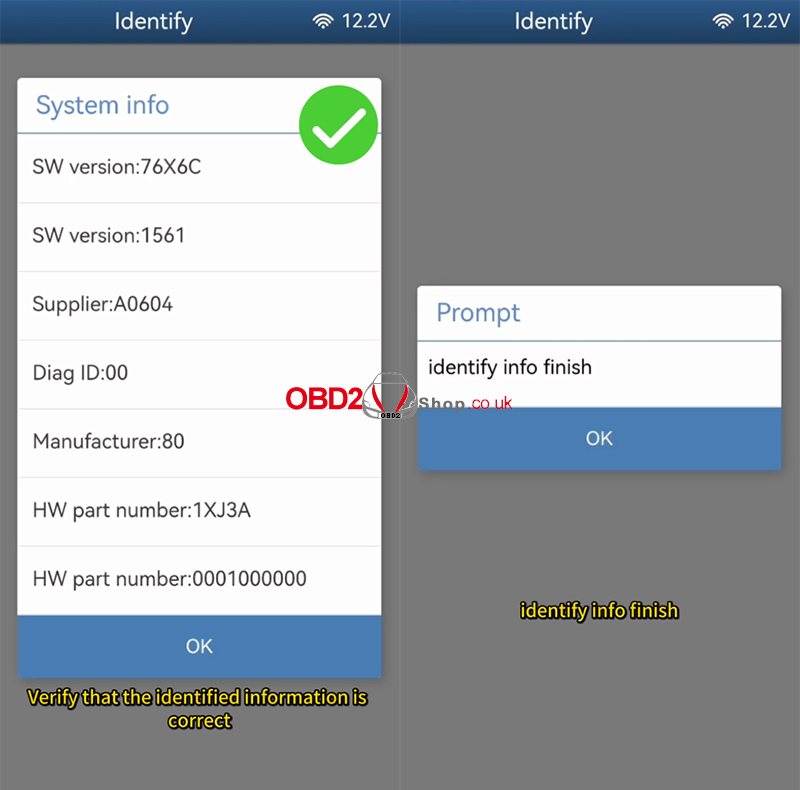
b Click [Continue]
c Verify the identified information
d Take a screenshot and save it
Identification completed successfully
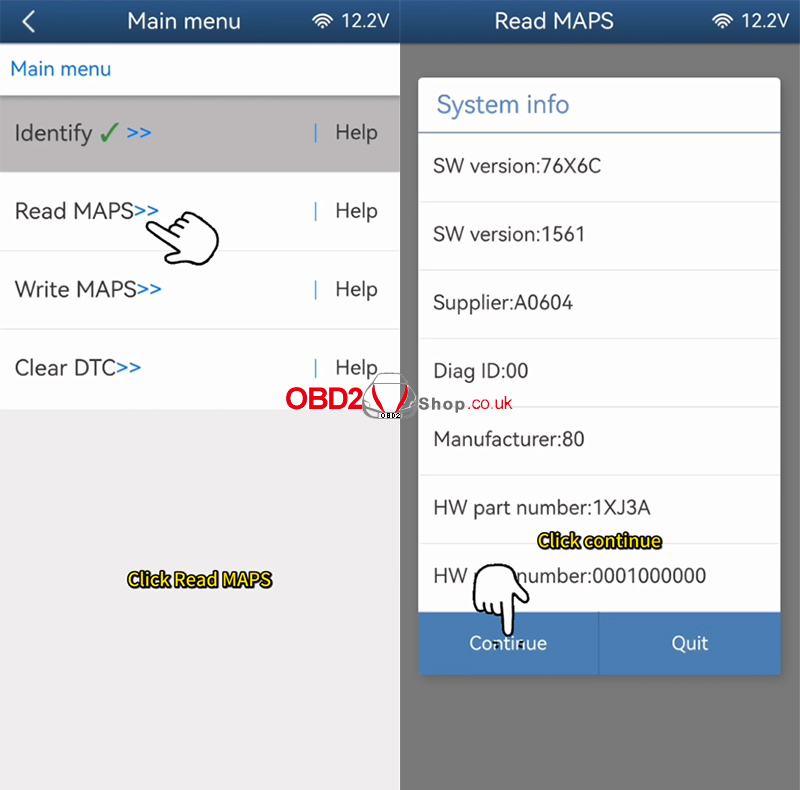
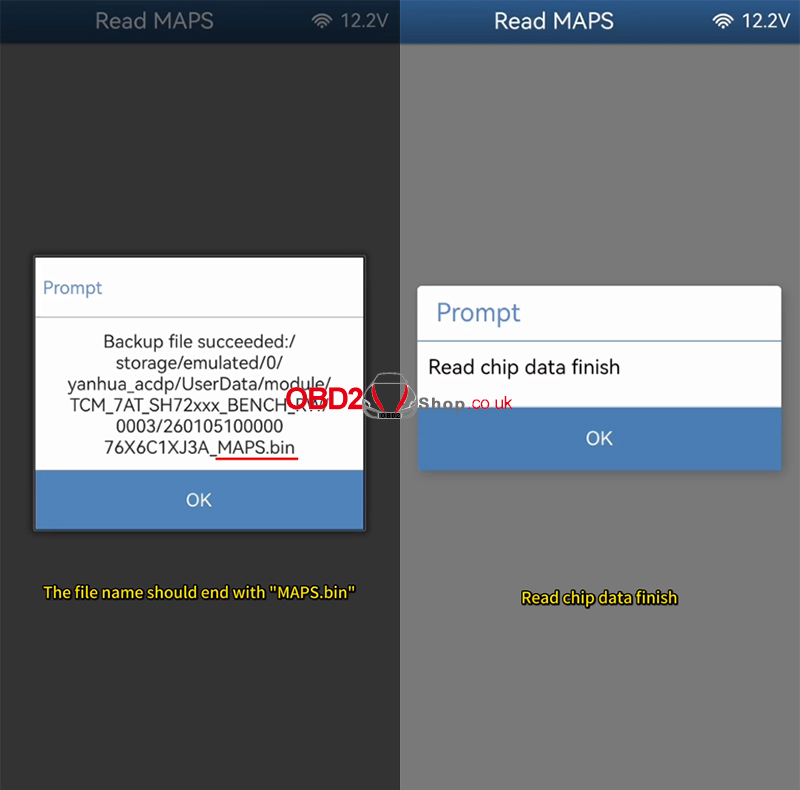
4. Read MAPS Data
` Tap [Read MAPS]
a Ensure the standard power adapter is connected (12V / e2.5A)
b Click [Continue]
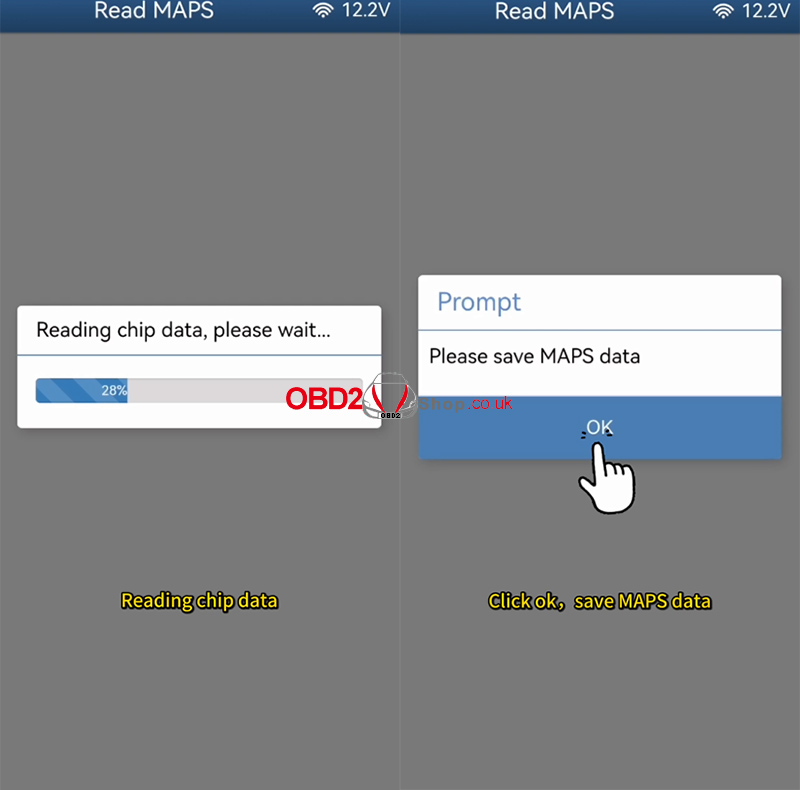
c Do NOT power off or disconnect during the process
d Wait for data reading to complete
e Click OK and save the MAPS file
Important Notes:
Back up the file path, date, time, and version number
The file name must end with MAPS.bin
Reading completed successfully
5. Connect Replacement Gearbox
` Disconnect the ACDP from the original gearbox
a Connect it to another same-version Nissan 07A gearbox
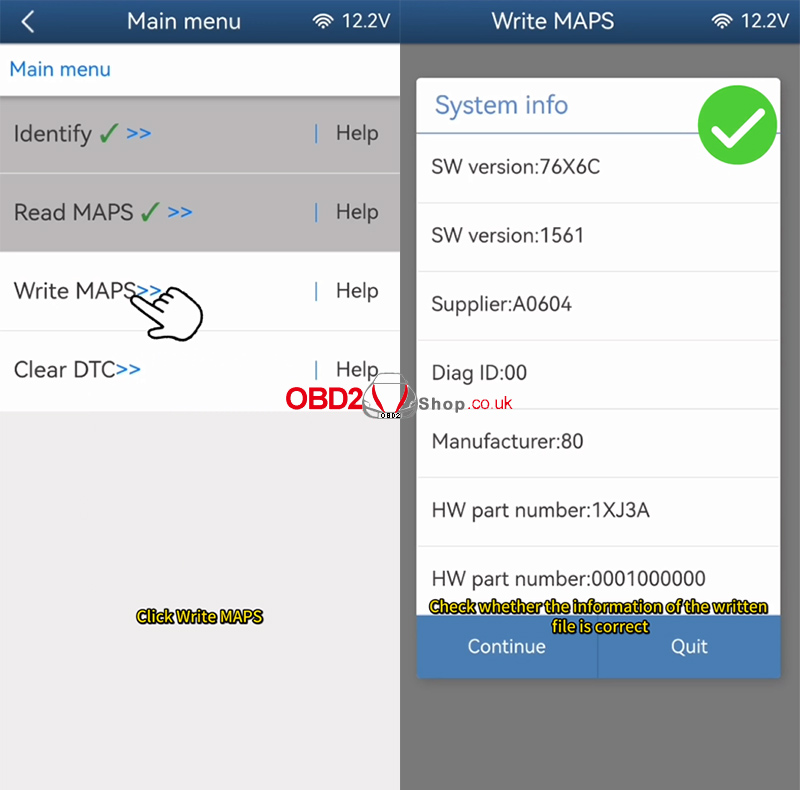
6. Write MAPS Data to Replacement Gearbox
` Tap [Write MAPS]
a Select the original vehicle’s file ending with MAPS.bin
b Verify file information (date, time, version)
c Click OK to continue
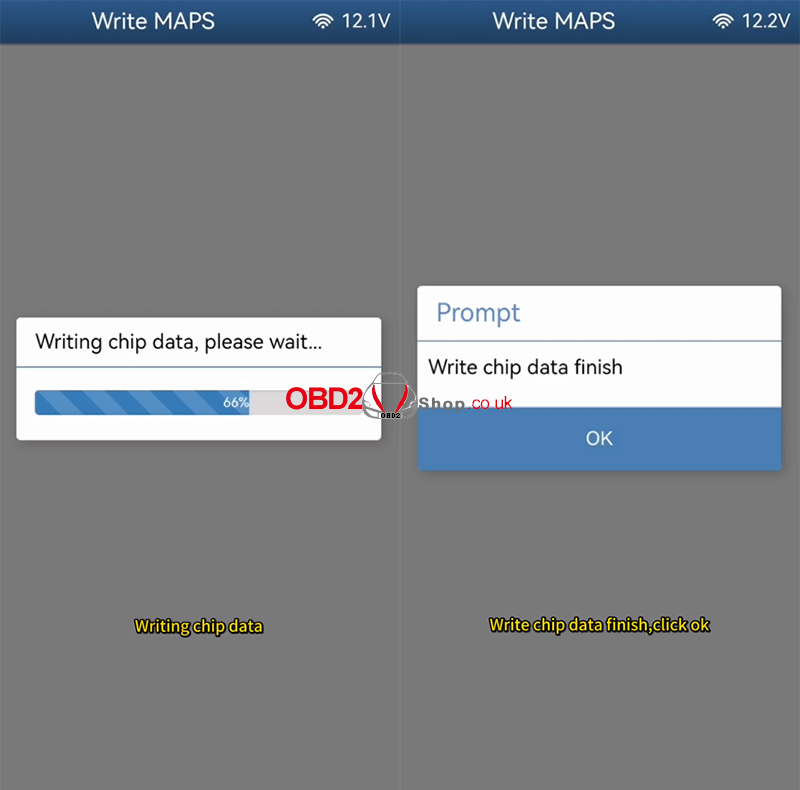
System process:
Connecting system…
Erasing chip data…
Writing chip data…
d Once completed, click OK
Writing completed successfully

Video Guide
YouTube Short:
https://www.youtube.com/shorts/y9WiLPtMe9k?feature=share
More Tools & Information: www.obd2shop.co.uk
Oznake: yanhua acdp 2
srijeda, 07.01.2026.
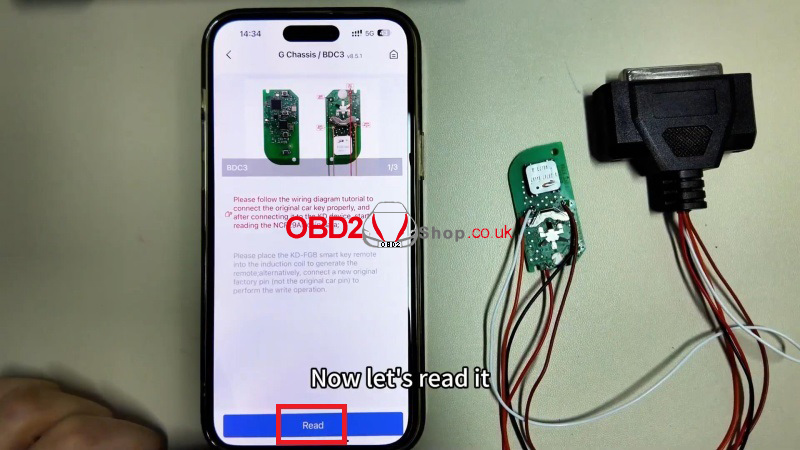
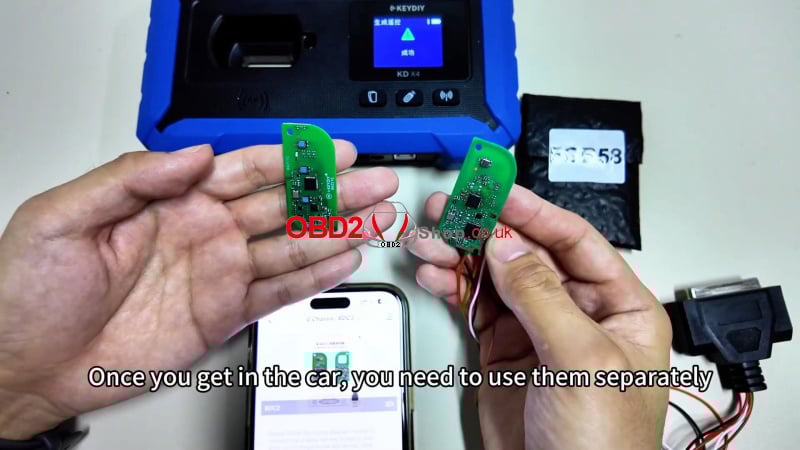
How to Add a BMW BDC3 Key with KEYDIY KD-X4& FGB?
This guide explains how to use the KEYDIY KD-X4 to read encrypted key data from a BMW BDC03 module and generate a new FGB Key.
Prerequisites
KEYDIY KD-X4 Key Programmer
BMW BDC03 wiring harness
An Encrypted BMW BDC3 Key
KD FGB58 PCB Key

Step-by-Step Instructions
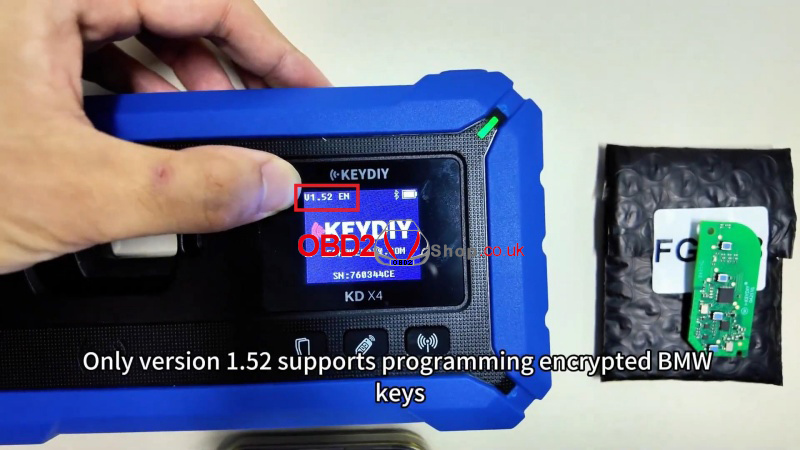
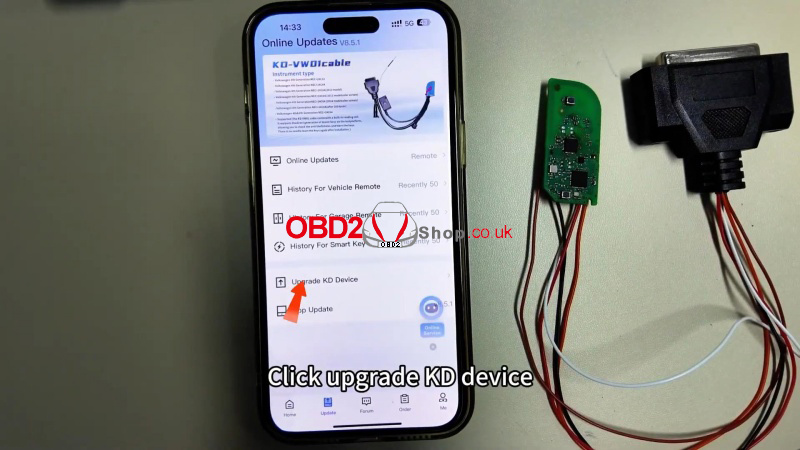
1. Update Your KD-X4
` Turn on the device and connect via the home screen.
a Ensure your device is running version 1.52.
b If not, go to: Update > Upgrade KD Device to install the latest version.
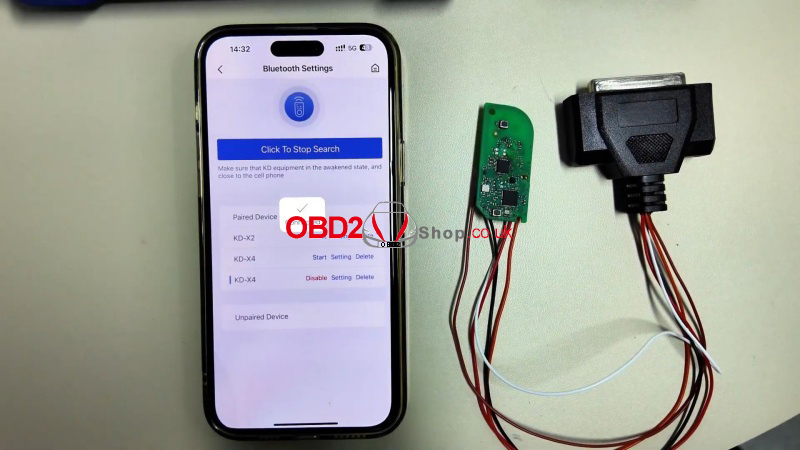
2. Connect the Wiring Harness
Use the dedicated BMW wiring harness to connect the KD-X4 to the BDC03 module.
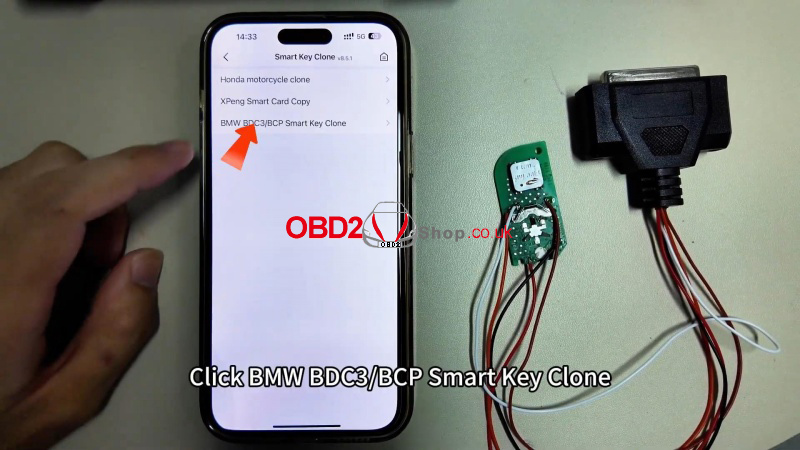
3. Read Encrypted Key Data
` Go to: Remote Function > Smart Key Clone>BMW BDC3/BCP Smart Key Clone> G Chassis/BDC3 Clone >View the wiring diagram for reference.
a Click Read and save the data once complete.

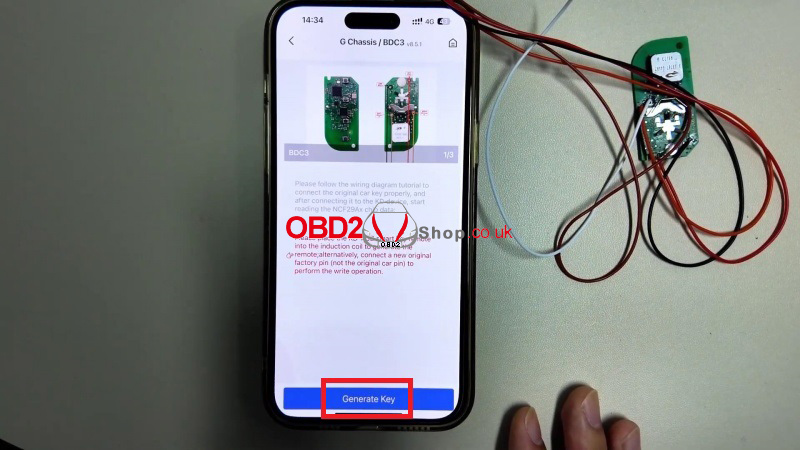
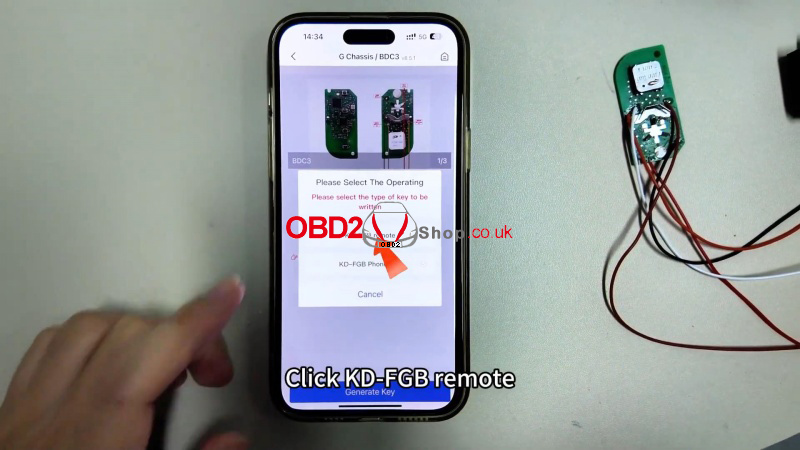
4. Generate the New Key
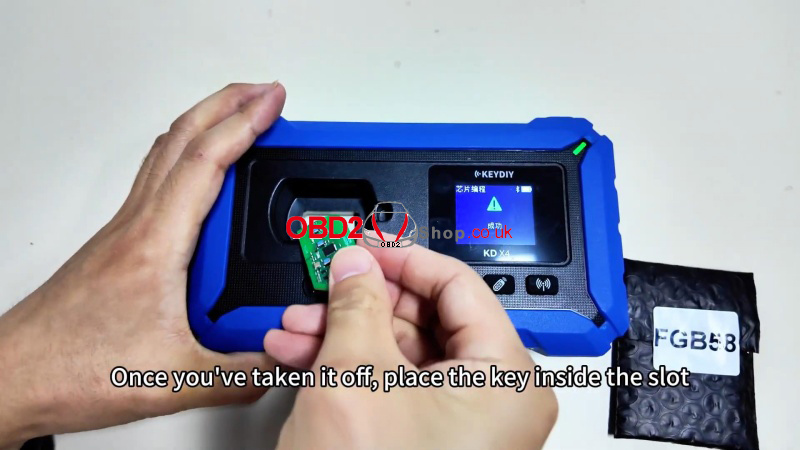
` Remove the key circuit board and place it in the KD-X4 programming slot.
a Select: Generate Key >KD-FGB Remote and start wireless generation.
b Once successful, install the board into an original BMW key shell.
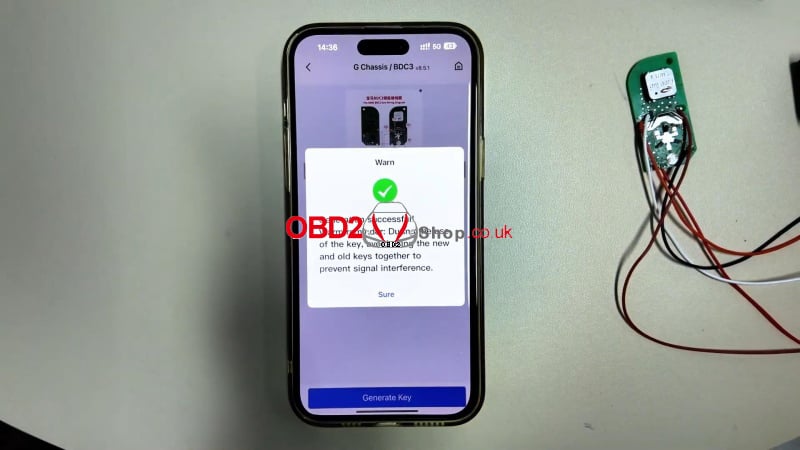
Final Notes
After programming, use the keys separately in the vehicle. Otherwise, the keyless start won't work.
This tutorial supports locksmiths and automotive programmers in adding encrypted BMW BDC3 keys using the KEYDIY system. Always verify compatibility and follow wiring diagrams carefully.
www.obd2shop.co.uk
Oznake: keydiy kd x4
utorak, 06.01.2026.
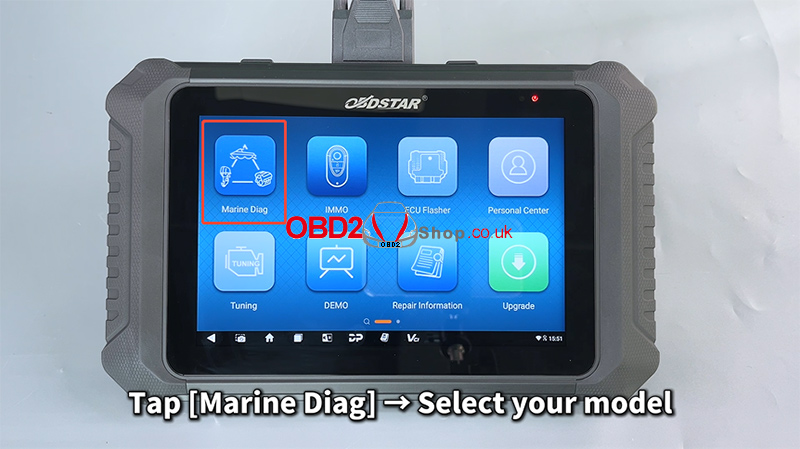
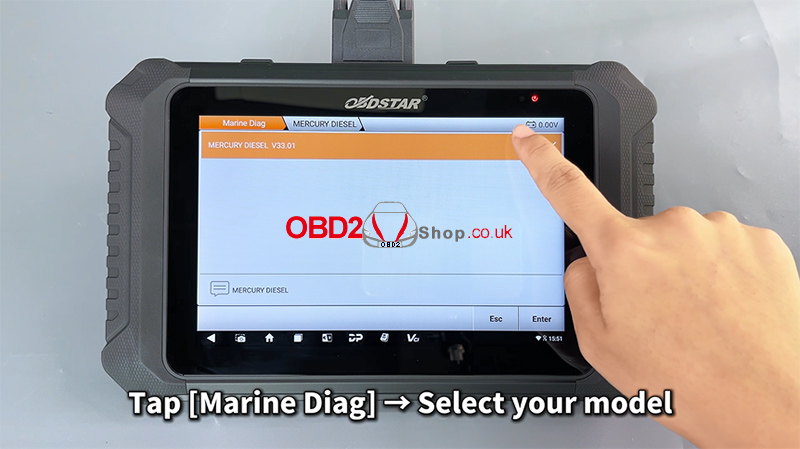
Mercury Diesel Engine Maintenance Reset Using OBDSTAR MarineMaster
This article demonstrates how to perform a maintenance reset on a Mercury Diesel engine using the OBDSTAR MarineMaster. The procedure is straightforward and can be completed in just a few steps with proper preparation.
Note:
Before starting, make sure the MarineMaster device is properly connected to the boat using the dedicated diagnostic cable.
Step-by-Step Maintenance Reset Procedure
Step 1: Enter Marine Diagnosis
Power on the OBDSTAR MarineMaster and tap [Marine Diag].
Use the search box in the upper-right corner to quickly locate the corresponding engine model.
Follow the menu path below:
[MERCURY / DIESEL] ’ [MERCURY DIESEL V33.01] ’ [Diagnosis] ’ [Injection System Integration Module] ’ [(2018–) Diagnosis on CAN Node (JUNCTION BOX)] ’ [Outboard – Avator – Tiler – GEN21B_AAQ]
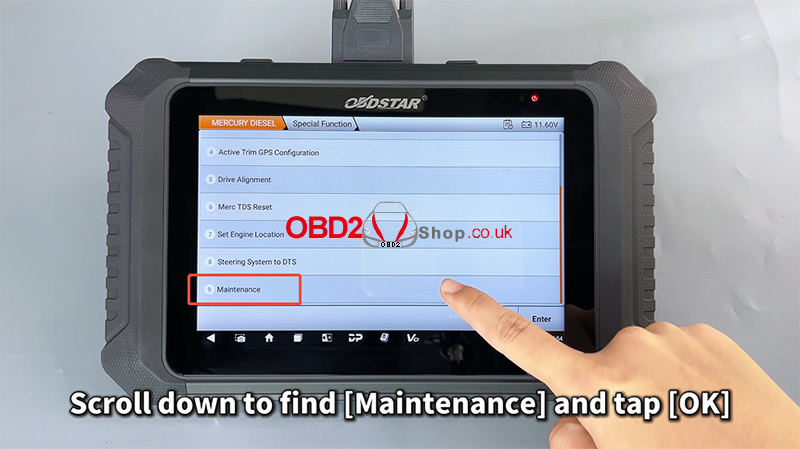
Step 2: Access Maintenance Function
Enter the [Special Function] menu
Scroll down and select [Maintenance]
Tap [OK] to continue

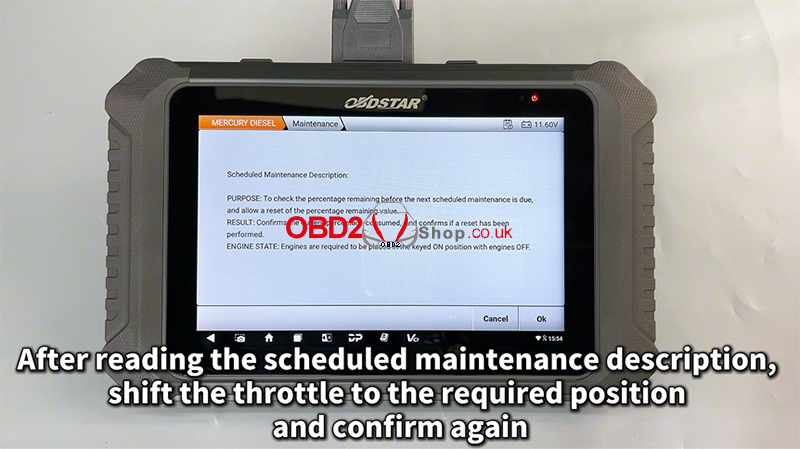
Step 3: Confirm Maintenance Conditions
Read the scheduled maintenance description carefully
Shift the throttle to the required position as instructed on the screen
Confirm again to proceed
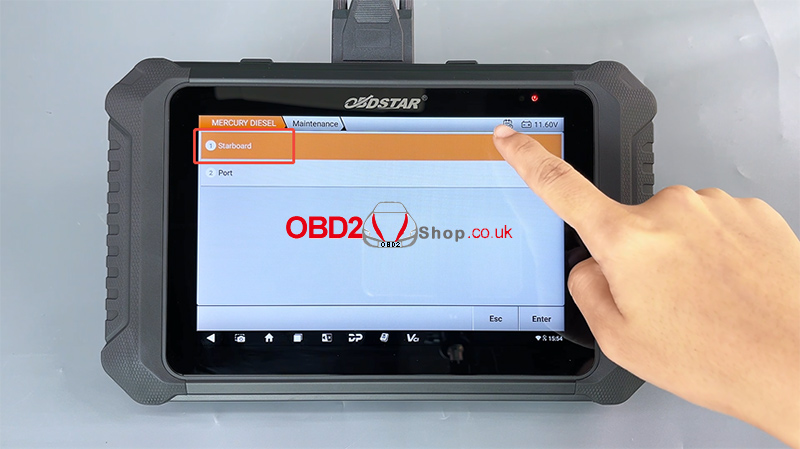
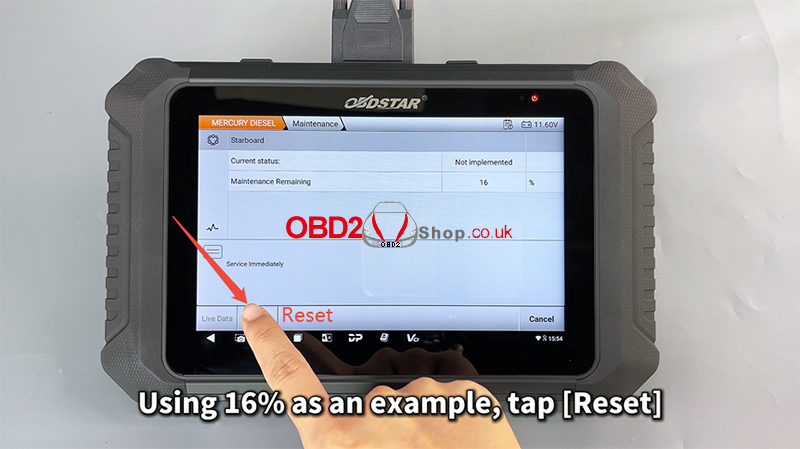
Step 4: Check Maintenance Remaining Percentage
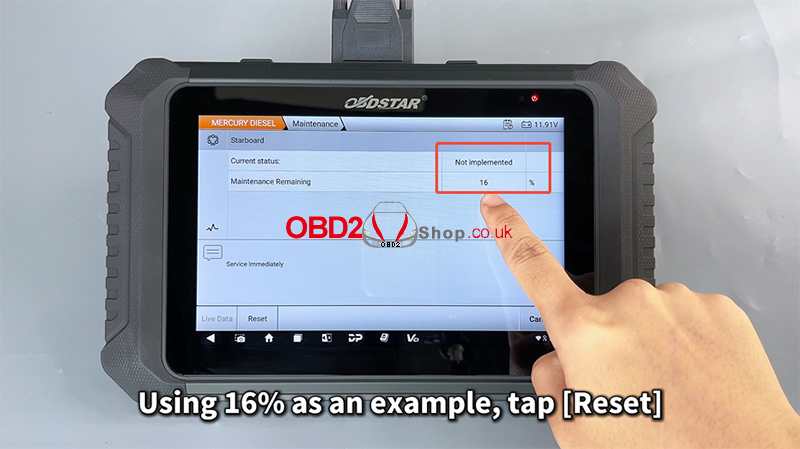
Select any engine to view its maintenance remaining percentage:
100% – 16%: Normal condition
15% or below: Oil and oil filter replacement required
0%: Maintenance overdue
Stop the engine immediately and perform maintenance
In this example, 16% is shown.
Tap [Reset] to perform the maintenance reset.
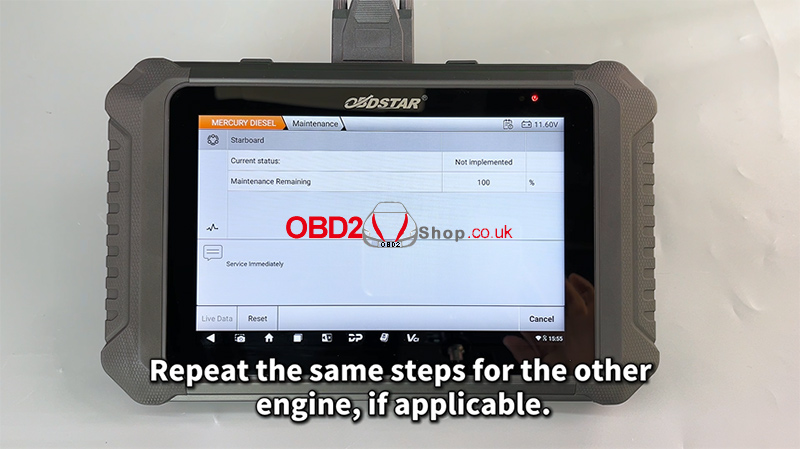
Step 5: Reset Completed
When the message “Reset Complete” appears, the maintenance reset has been completed.
If the boat has multiple engines, repeat the same steps for the other engine(s).
For a visual walkthrough, watch the video guide here:
https://youtu.be/jTk2SBYmtUg
Conclusion
With the OBDSTAR MarineMaster, resetting the maintenance reminder on a Mercury Diesel engine is quick, accurate, and user-friendly. This tool provides clear on-screen instructions and supports professional marine diagnostics and service tasks.
For more marine diagnostic tools and guides, visit: www.obd2shop.co.uk
Oznake: obdstar marinemaster
ponedjeljak, 05.01.2026.
DIAGXT T80 Universal Oscilloscope: User Manual Guide
The DIAGXT T80 Universal Oscilloscope combines powerful waveform acquisition with integrated CAN analysis, making it an essential tool for automotive diagnostics and general signal testing. Here's a quick overview of its main functions.
Main Features
lUniversal Oscilloscope: Capture and analyze electrical waveforms.
lCAN Analysis: Decode and record CAN bus data in real time.
lWaveform & CAN Data Storage: Save, name, and review captures easily.
lUser-Friendly Interface: Intuitive controls for quick setup and operation.

How to Use DIAGXT T80Universal Oscilloscope?
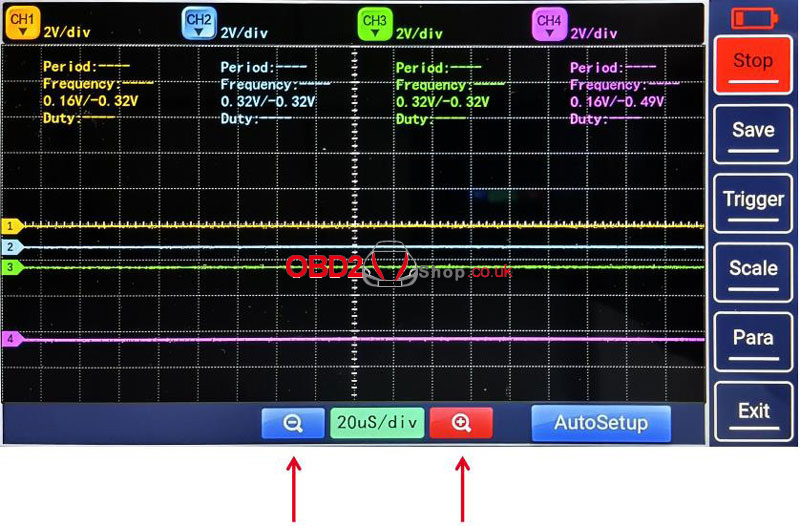
` Tap "Universal Oscilloscope" to enter the waveform capture interface.
a Stop/Start: Tap to pause or resume signal capture.
b Save: Save waveforms with custom file names (letters, numbers, and symbols supported).
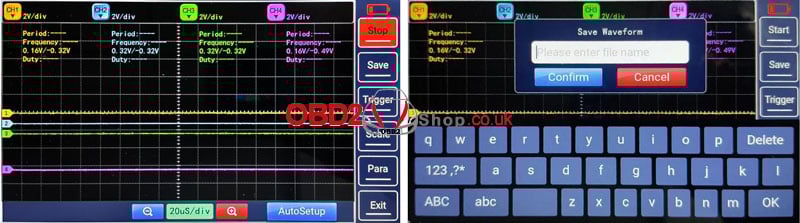
1. Core Functions
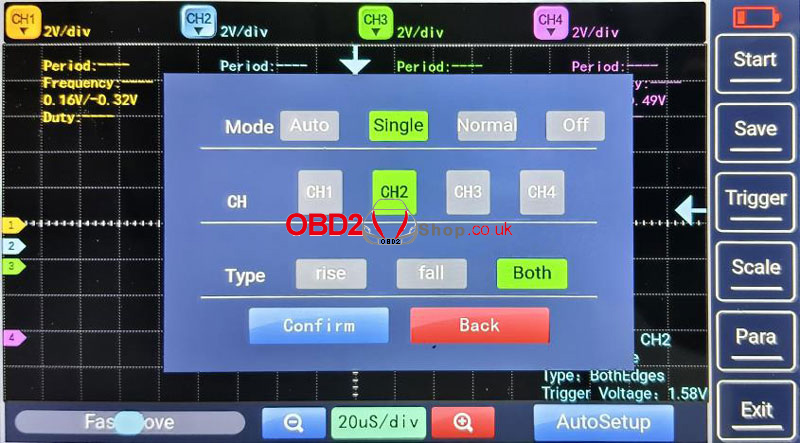
lTrigger
Adjust the trigger level to stabilize the waveform display. Choose from:
Auto: Automatic triggering for general use.
Normal: Captures only when trigger conditions are met.
Single: Captures a single sweep for one-time events.
lScaling
Time Scale: Measure period, frequency, pulse width, and rise/fall time.
Voltage Scale: Measure amplitude, peak-to-peak, RMS, and DC offset.
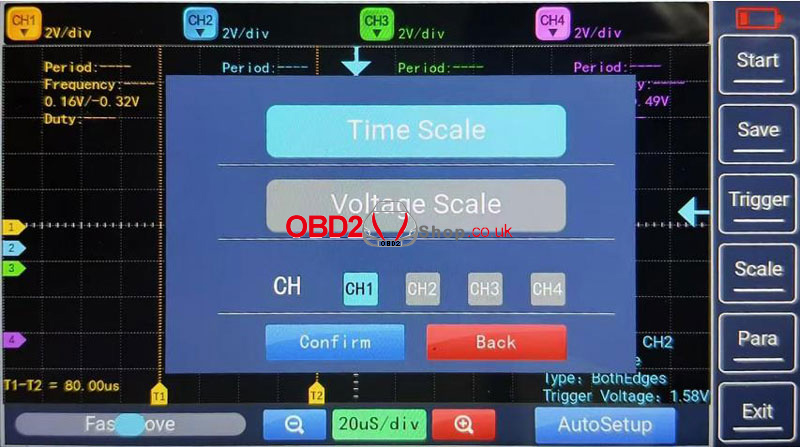
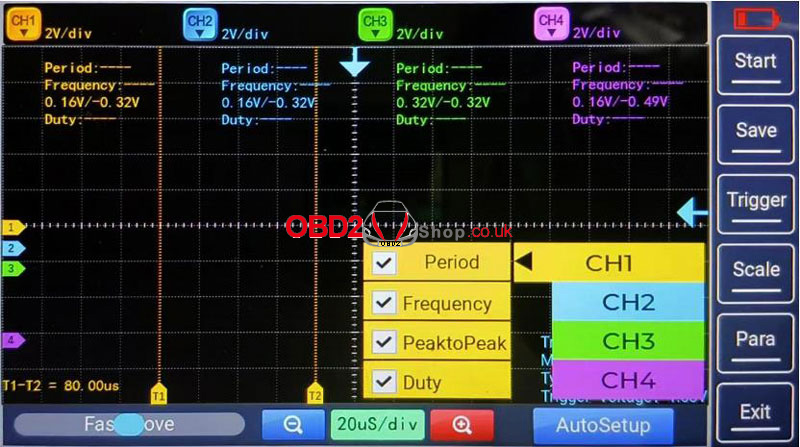
lParameter Measurement
View key metrics for each channel:
Period & Frequency
Peak-to-Peak Voltage
Duty Cycle
lAuto Setup
Tap AutoSet for automatic vertical/horizontal scaling—ideal for quick signal viewing. Manual tuning may be needed for low-frequency or noisy signals.
lTime Base Adjustment
Adjust the horizontal time scale (e.g., from 1 ms/div to 10 ms/div) for detailed signal inspection.
2. Waveform Adjustments
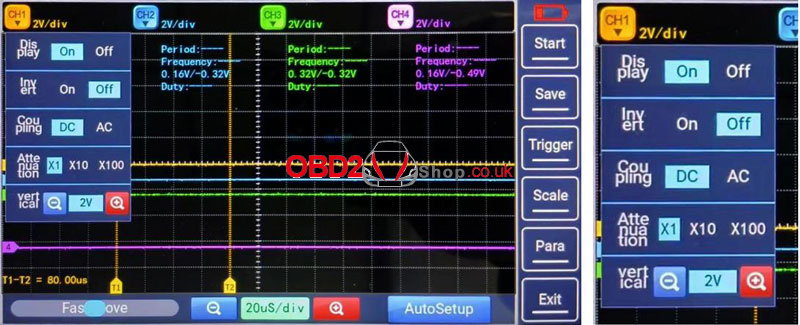
` Display: Show or hide selected channels.
a Invert: Flip the waveform 180° vertically.
b Coupling:
DC Coupling: Shows both AC and DC components.
AC Coupling: Blocks DC to focus on AC signals.
c Probe Attenuation: Set attenuation ratio (e.g., 10:1, 100:1) to match your probe.
d Vertical Scale: Adjust volts per division for optimal waveform height.
3. Navigation & Exit
Fast Move: Use the progress bar to quickly scroll through captured waveforms.
Exit: Stops acquisition and returns to the main menu.
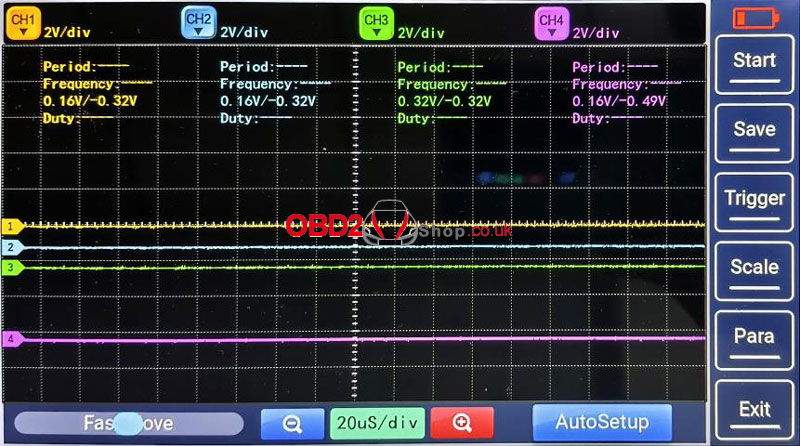
The DIAGXT T80 Automotive Oscilloscope offers a reliable, all-in-one solution for waveform analysis and CAN diagnostics. Its blend of automatic setup, flexible triggering, and easy file management makes it suitable for both beginners and experienced technicians.
www.obd2shop.co.uk
Oznake: diagxt t80
nedjelja, 04.01.2026.
Launch X-431 ECU & TCU Programmer Software Setup Guide
This article will guide you step by step through downloading, installing, connecting, and activating the Launch X-431 ECU & TCU Programmer software on your computer.
Step 1: Download and Install the Software
Begin by visiting the official website and clicking the download link for the X-431 ECU & TCU Programmer. Follow the on-screen instructions to complete the installation on your computer.
Download Link:
https://en.cnlaunch.com/products-detail/i-243.html#pro_download


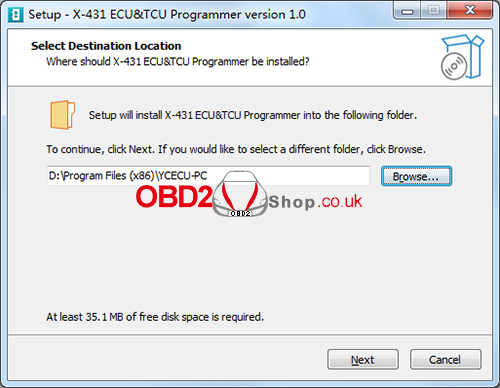
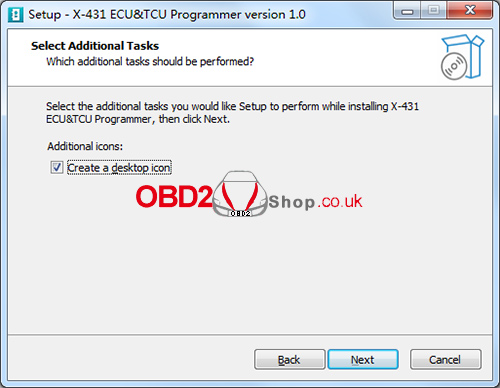
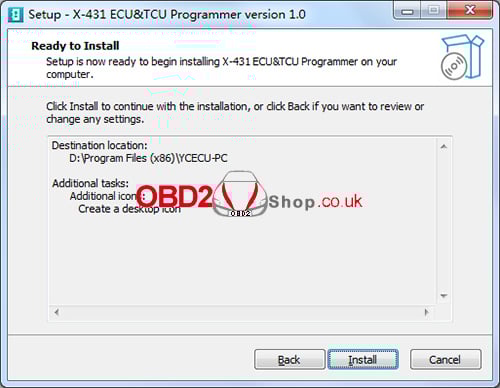
Step 2: Connect the ECU & TCU Programmer to the Computer
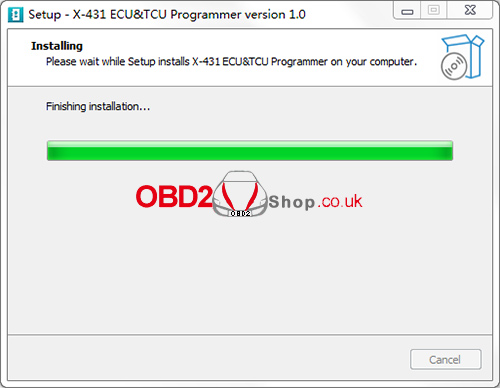
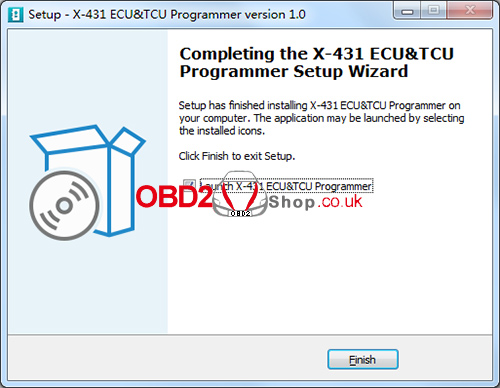
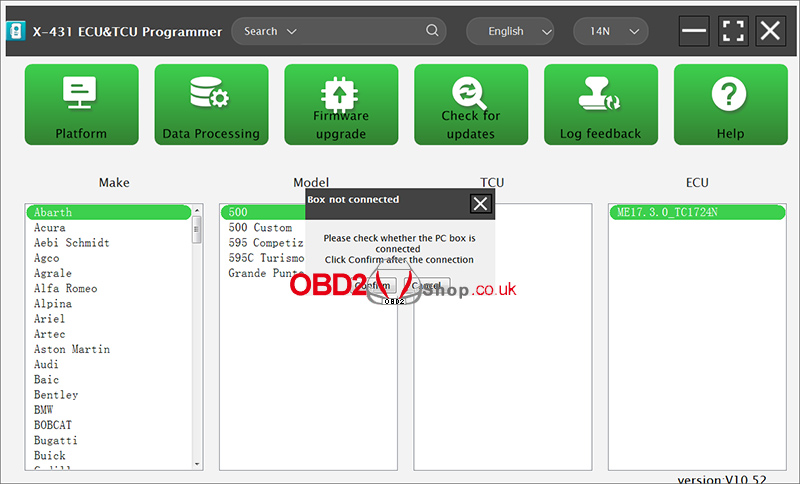
After installation, launch the software. If the device is not connected, the software will display a message saying [Box not connected].
Use a USB cable (Type-A to Type-B) to connect the X-431 ECU & TCU Programmer to your computer. Once connected properly, the software should recognize the device automatically.
Step 3: Software Activation
When using the software for the first time, it will automatically enter the activation interface.
After the X-431 ECU & TCU Programmer is connected, the system will detect and display the device serial number. To complete activation, enter the activation code, which can be found on the envelope included with the X-431 ECU & TCU Programmer, and scrape the coating area to obtain the activation code.
Once the activation is successful, the device and software will be ready for use.
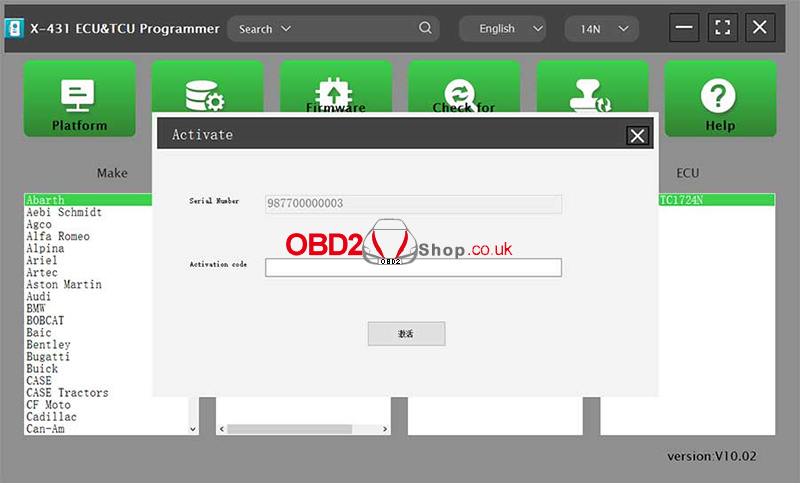
Conclusion:
By following the steps above—downloading the software, connecting the programmer, and completing activation—you can quickly set up the Launch X-431 ECU & TCU Programmer and begin ECU and TCU programming tasks efficiently.
For more diagnostic tools, programming devices, and technical guides, visit www.obd2shop.co.uk.
Oznake: launch x431 ecu tcu tool
četvrtak, 01.01.2026.
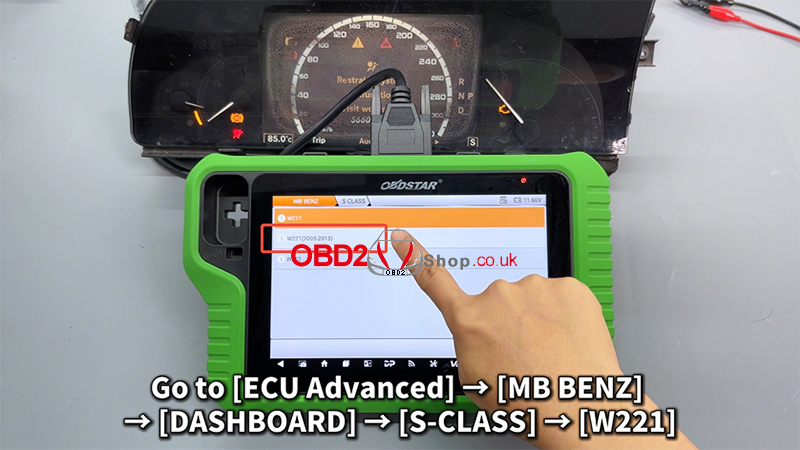
Mercedes-Benz W221 Dashboard Programming with OBDSTAR X300 Classic G3
In this article, we demonstrate the advanced ECU programming function of the OBDSTAR X300 Classic G3 (Keymaster G3), illustrating how to quickly program a used instrument cluster from a Mercedes-Benz S-Class W221 model. This function allows you to restore a used instrument cluster to factory settings and complete its programming.
Important: Before starting any operation, make sure the main cable is properly connected to the vehicle to avoid communication errors.
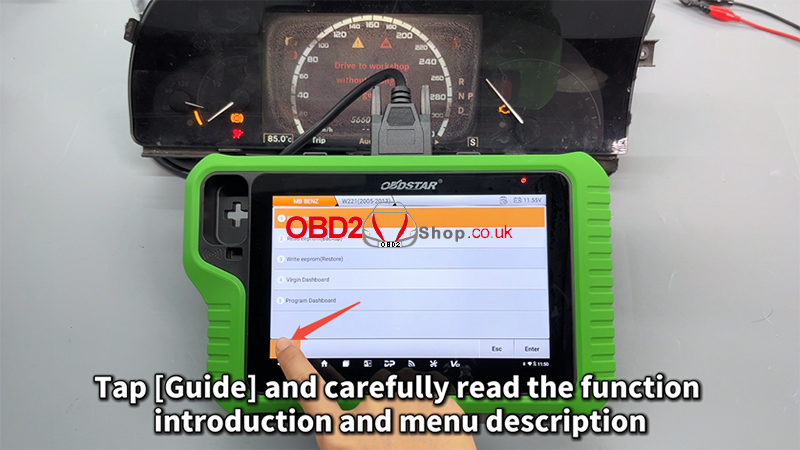
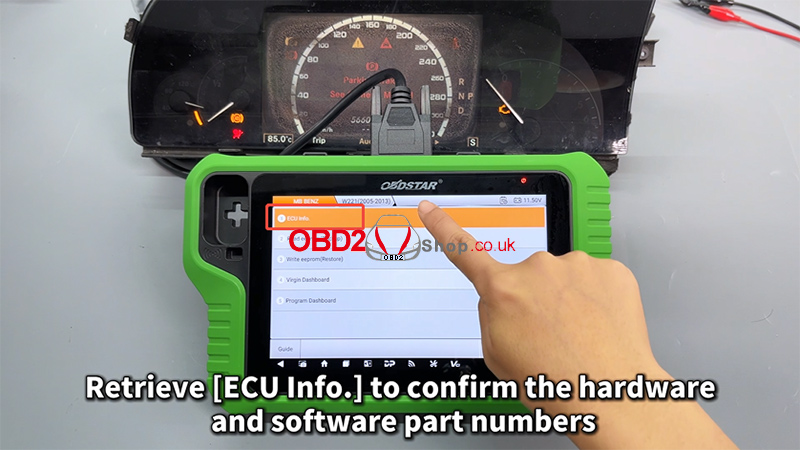
Step 1: Enter the Dashboard Programming Menu
1. On the KeyMaster G3 device, navigate through the following path:
[ECU Advanced] ’ [MB BENZ] ’ [DASHBOARD] ’ [S-CLASS] ’ [W221]
2. Tap [Guide] and carefully read the function introduction and menu descriptions to understand the operation process and precautions.
3. Next, retrieve [ECU Info.] to confirm the hardware and software part numbers of the dashboard, ensuring compatibility before proceeding.

Step 2: Back Up the EEPROM Data
Before performing any modifications, it is strongly recommended to back up the original data.
1. Select [EEPROM Backup]
2. Tap [Start] to begin backing up the data
3. You can customize the filename of the saved backup file for easier identification later
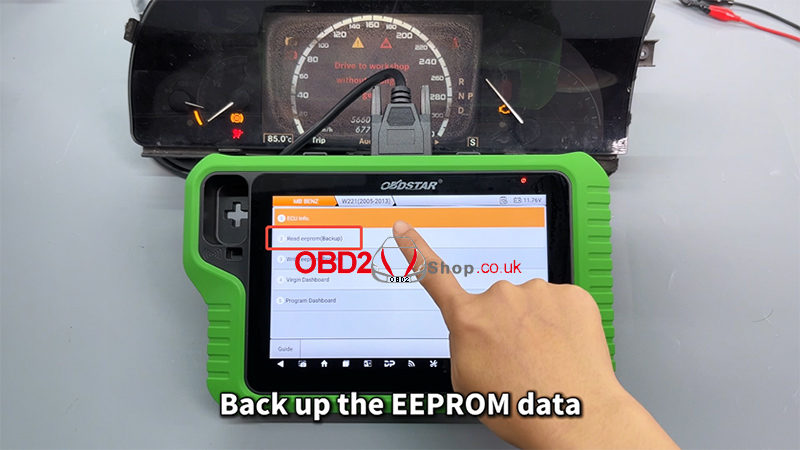
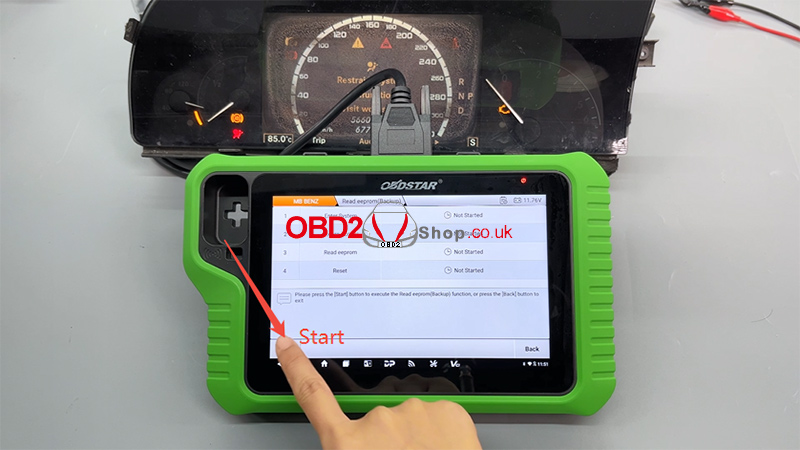
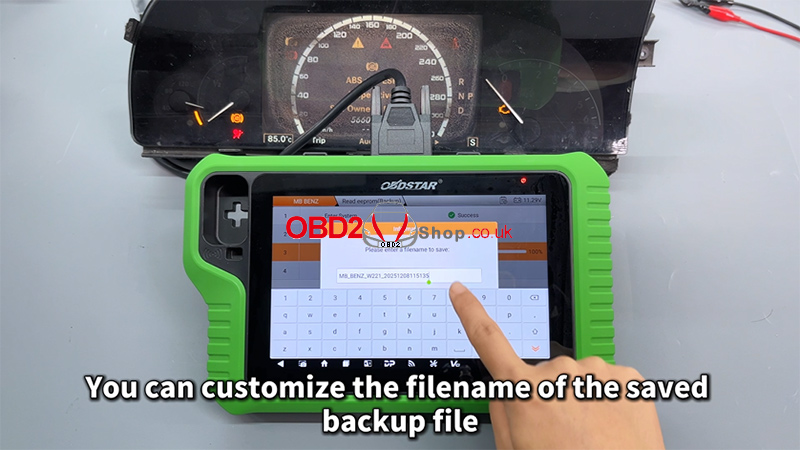
This backup file is critical and will be used in the following steps, so make sure it is saved correctly.
Step 3: Virginize the Used Dashboard
Now, execute the [Virgin Dashboard] function.
1. Carefully select the correct backup file
2. Double-check the file before confirming
3. Tap [OK] to proceed
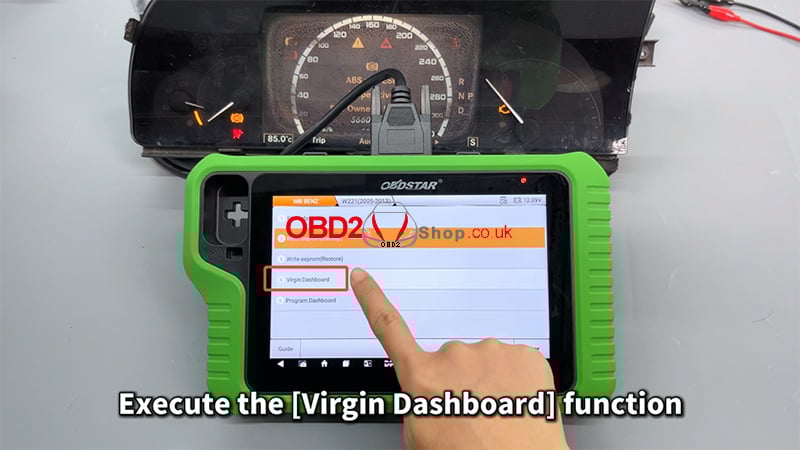

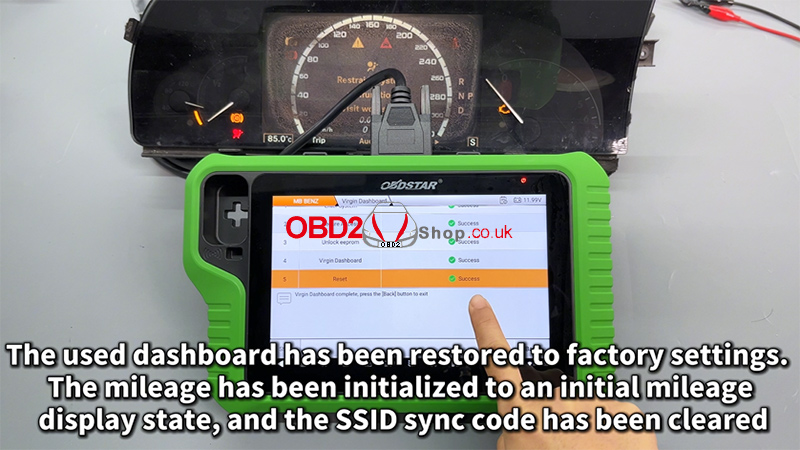
Once completed, the used dashboard will be restored to factory (virgin) status:
1. The mileage will be initialized to its initial display state
2. The SSID synchronization code will be cleared
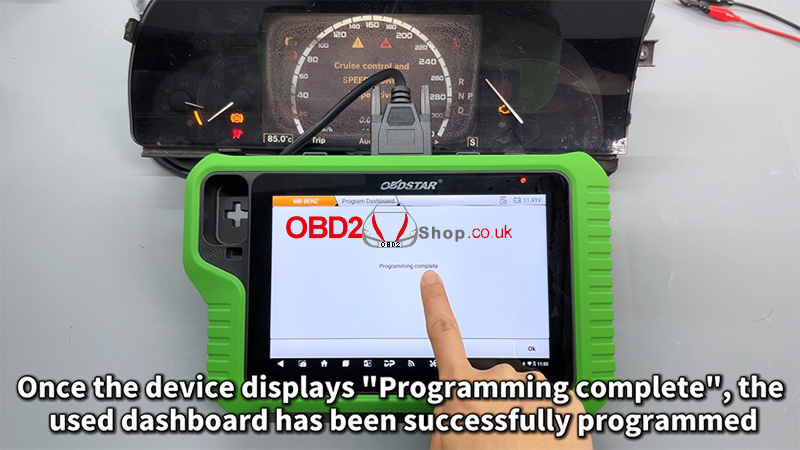
Step 4: Program the Dashboard
After virginizing the dashboard, proceed with the dashboard programming function.
When the device displays [Programming complete], it means the used Mercedes-Benz W221 dashboard has been successfully programmed and is ready for use.

For a full step-by-step visual demonstration, please watch the video guide:
https://youtu.be/iPN2KPHBZ0E
Visit our website for more professional automotive diagnostic tools and tutorials: www.obd2shop.co.uk
Oznake: obdstar x300 classic g3

| < | siječanj, 2026 | |||||
| P | U | S | Č | P | S | N |
| 1 | 2 | 3 | 4 | |||
| 5 | 6 | 7 | 8 | 9 | 10 | 11 |
| 12 | 13 | 14 | 15 | 16 | 17 | 18 |
| 19 | 20 | 21 | 22 | 23 | 24 | 25 |
| 26 | 27 | 28 | 29 | 30 | 31 | |
Svibanj 2026 (1)
Siječanj 2026 (19)
Prosinac 2025 (22)
Studeni 2025 (21)
Listopad 2025 (20)
Rujan 2025 (21)
Kolovoz 2025 (8)
Srpanj 2025 (13)
Lipanj 2025 (9)
Svibanj 2025 (12)
Travanj 2025 (10)
Ožujak 2025 (12)
Veljača 2025 (14)
Siječanj 2025 (8)
Prosinac 2024 (6)
Studeni 2024 (6)
Listopad 2024 (4)
Rujan 2024 (7)
Kolovoz 2024 (14)
Srpanj 2024 (12)
Lipanj 2024 (10)
Svibanj 2024 (13)
Travanj 2024 (12)
Ožujak 2024 (11)
Veljača 2024 (2)
Siječanj 2024 (10)
Prosinac 2023 (8)
Studeni 2023 (6)
Listopad 2023 (7)
Rujan 2023 (9)
Kolovoz 2023 (6)
Srpanj 2023 (10)
Lipanj 2023 (4)
Veljača 2023 (8)
Siječanj 2023 (14)
Prosinac 2022 (13)
Studeni 2022 (14)
Listopad 2022 (18)
Rujan 2022 (9)
Kolovoz 2022 (16)
Srpanj 2022 (11)
Lipanj 2022 (14)
Svibanj 2022 (13)
Travanj 2022 (12)
Ožujak 2022 (12)
Veljača 2022 (13)
Siječanj 2022 (10)
Srpanj 2021 (1)
Dnevnik.hr
Gol.hr
Zadovoljna.hr
Novaplus.hr
NovaTV.hr
DomaTV.hr
Mojamini.tv