OBD2 tools on OBD2shop.co.uk https://blog.dnevnik.hr/obd2shop
ponedjeljak, 23.09.2024.
Yanhua Mini ACDP Module 34 VW MQB49 1404 5C Mileage Correction
This is a tutorial on how to use Yanhua Mini ACDP 2 + Module 34 to do VW MQB system 1404 5C chip model instrument mileage correction.
Step1. Identify Odometer
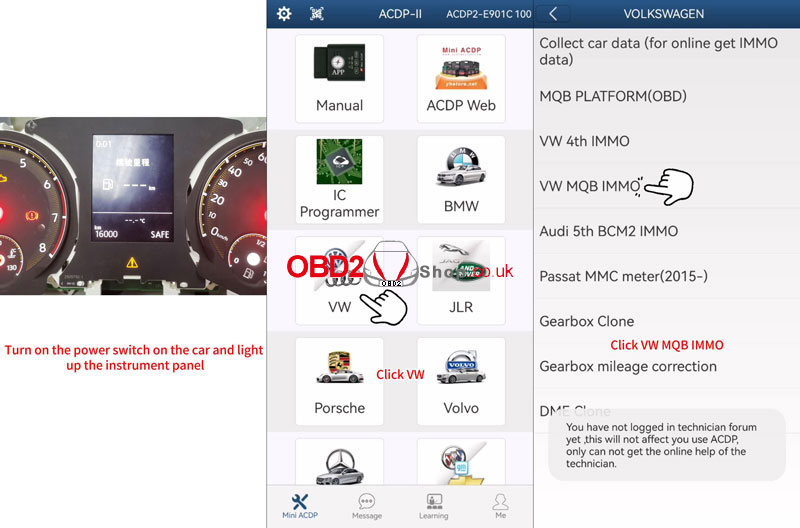
1) Turn on the power switch and light up the instrument panel to record the original mileage: 16000km.
2) Connect the Mini ACDP programmer to OBD.
3) Open Mini ACDP APP:
* Make sure the ACDP device has been bound.
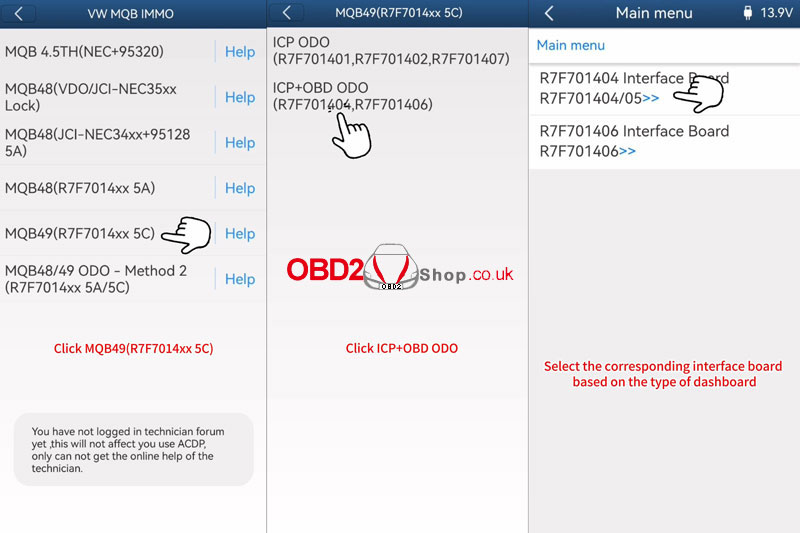
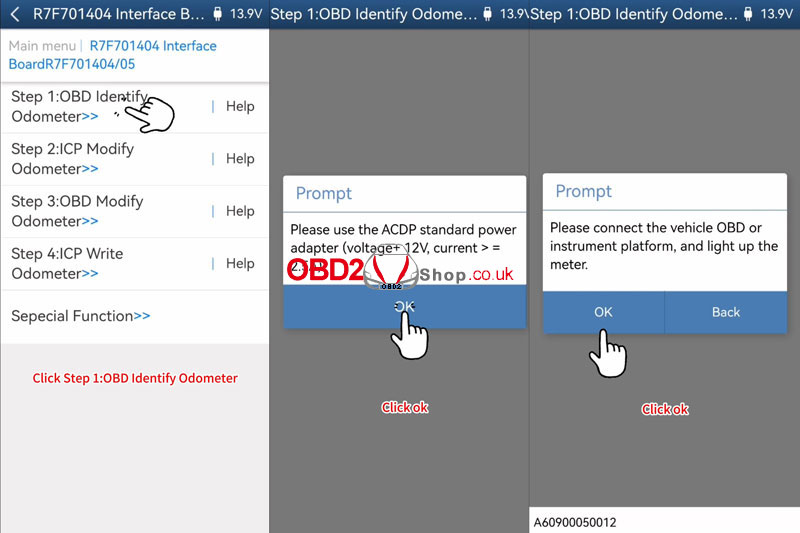
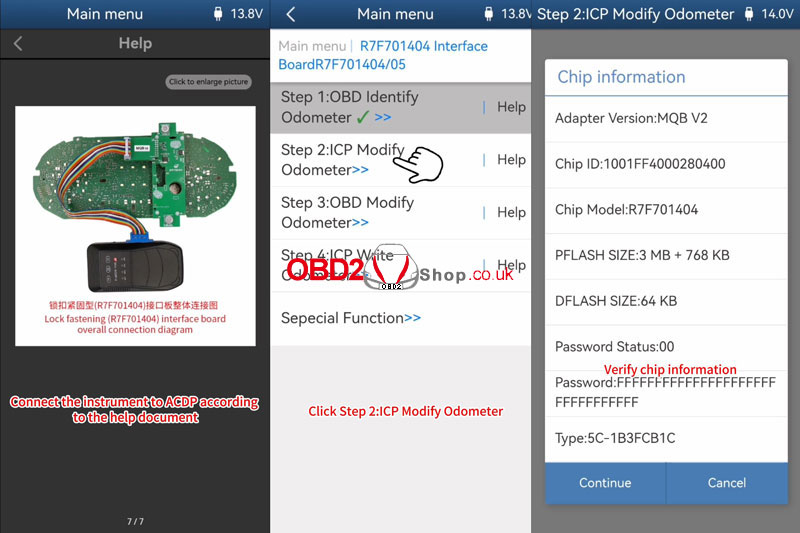
VW >> VW MQB IMMO >> MQB49(R7F7014xx 5C) >> ICP+OBD ODO(R7F701404, R7F701406) >> R7F701404 Interface Board R7F701404/05 >> OBD Identify Odometer
Please use the ACDP standard power adapter(voltage+ 12V, current > = 2.5A)
Please connect the vehicle OBD or instrument platform, and light up the meter.
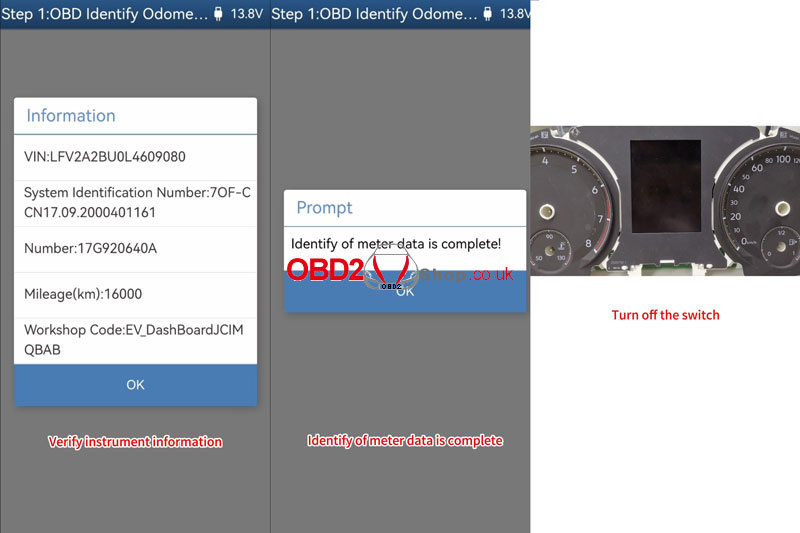
Verify the instrument information.
The identification of meter data is complete!
Step2. ICP Modify Odometer
Turn off the switch. Remove the instrument panel.
Click the help of Step 2, connect the instrument to ACDP according to the diagram.
Make sure the ACDP programmer is connected to the APP.
ICP Modify Odometer >> OK
Please connect the ACDP and the meter.
Verify chip information.
Reading DFLASH...
Reading PFLASH...
Reading BOOT...
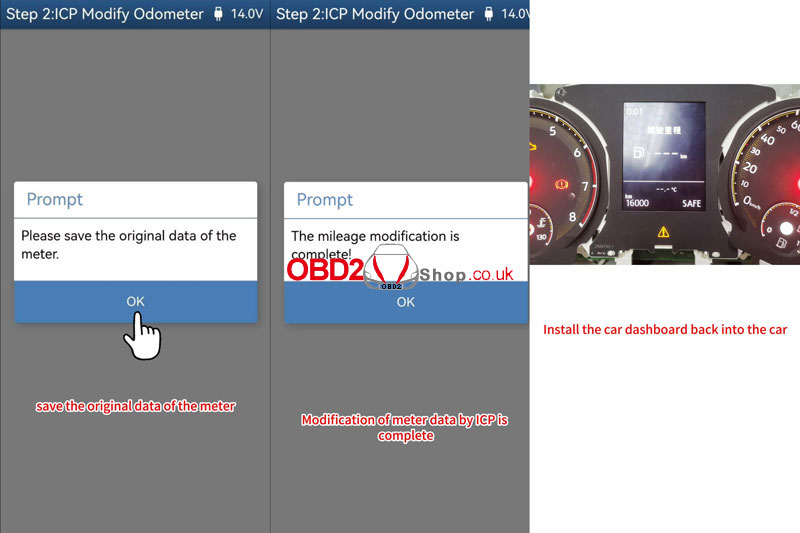
Please save the original data of the meter.
Data will be written, please make sure that the ACDP and meter are connected.
The chip is being erased, please wait...
The mileage modification is complete!
Step3. OBD Modify Odometer
Install the car dashboard back into the car.
Connect the ACDP programmer to the car OBD or dashboard test platform.
Make sure the ACDP programmer is connected to the APP.
OBD Modify Odometer >> OK >> OK
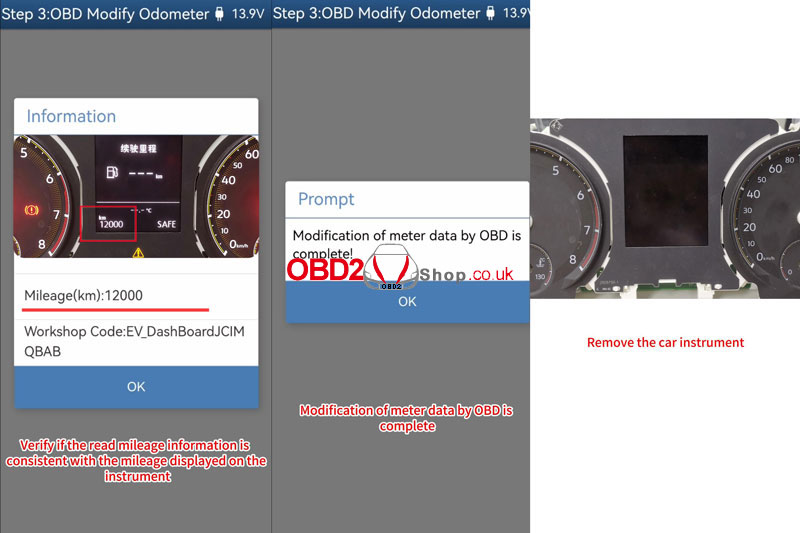
Verify instrument information.
Click on the mileage to modify the target mileage: 12000km
Please confirm if the mileage information is consistent, click OK.
Modification of meter data by OBD is complete!
Remove the car instrument.
Connect the instrument to ACDP properly.
Make sure the ACDP programmer is connected to the APP.
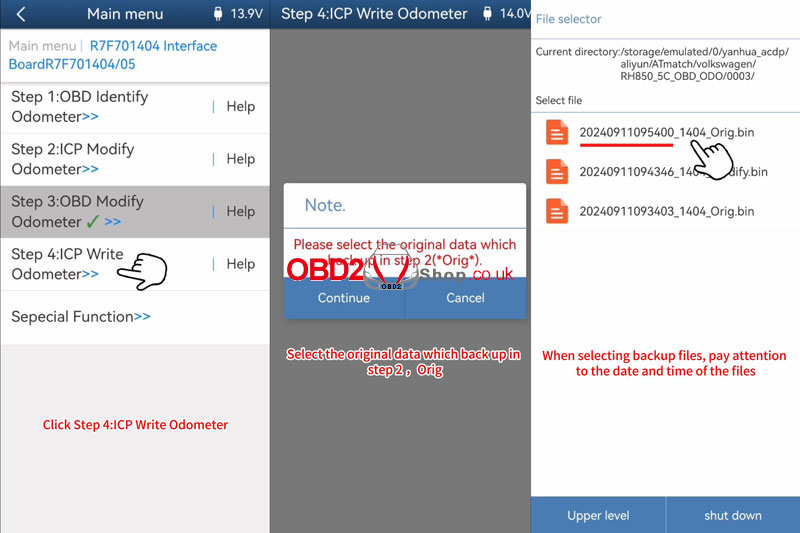
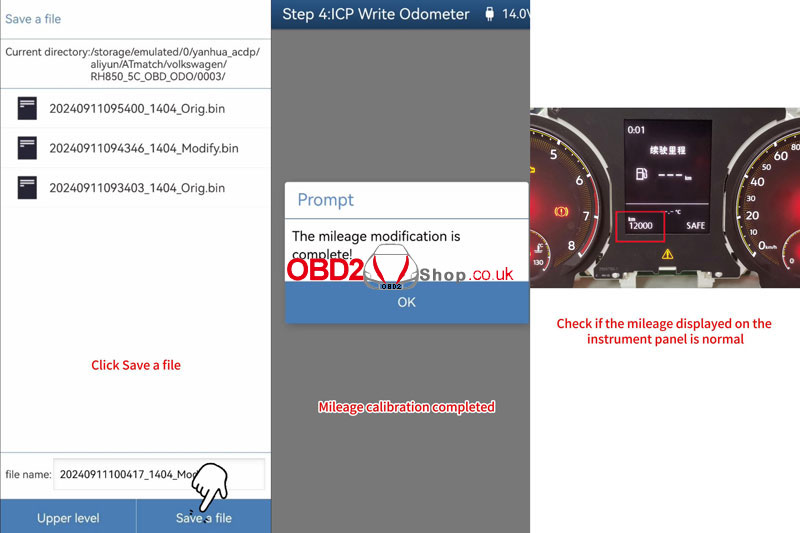
ICP Write Odometer >> OK >> OK
Verify chip information.
Please select the original data that is backed up in step 2.
Please save the revised mileage data.
Data will be written, please make sure that the ACDP and meter are connected.
Writing DFLASH, please wait...
The mileage modification is complete!
Install the instrument panel into the car, and turn it on the instrument panel.

www.obd2shop.co.uk
Oznake: yanhua acdp moudle 34
srijeda, 24.07.2024.
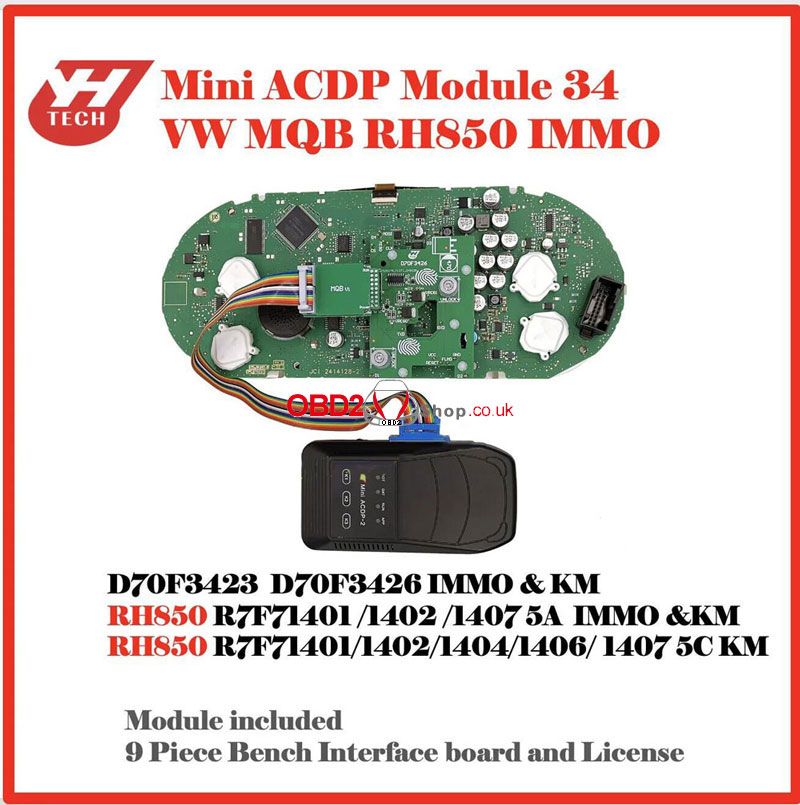
Yanhua Mini ACDP Module 34 VW MQB RH850 Installation Tutorial
This is a tutorial on how to install Yanhua Mini ACDP Module 34 for VW MQB RH850 IMMO programming. Need to work with Mini ACDP-2 or Mini ACDP-1. It included a 9-piece bench interface board and license.
Features
Support D70F3423, D70F3426 IMMO & KM;
Support RH850 R7F71401/1402/1407 5A IMMO & KM;
Support RH850 R7F71401/ 1402/ 1404/ 1406/ 1407 5C KM.
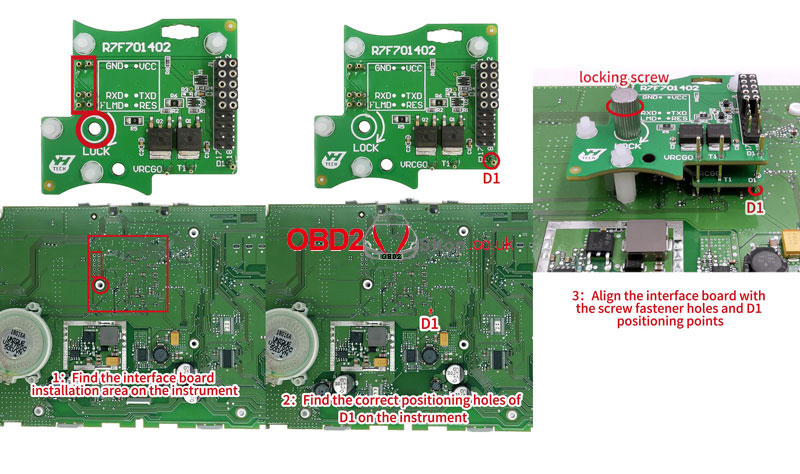
Thumb Screw-Fastened R7F701402 Interface Board
1. Follow the visual positioning mark on the Module 34 Interface Board to find the installation area on the instrument.
2. Find the correct positioning holes of D1 on the instrument.
3. Align the interface board with the screw fastener holes and D1 positioning points.
4. Press the interface board down and tighten the locking screw.
5. Confirm again that the interface board D1 positioning pins are completely aligned with the D1 positioning holes of the instrument.
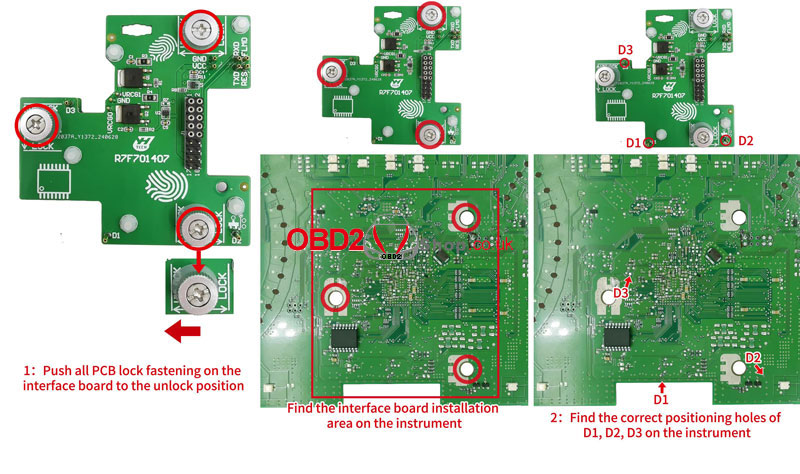
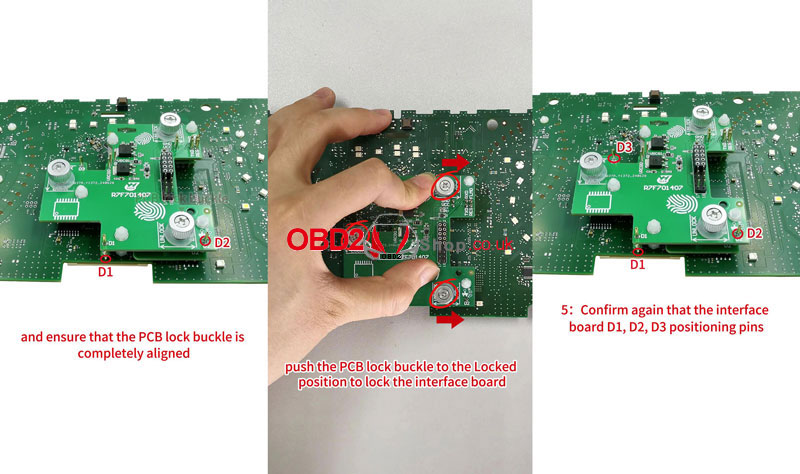
Lock Fastening R7F701407 Interface Board
1. Push all PCB lock fastening on the interface board to the unlock position. Follow the visual positioning mark to find the installation area on the instrument.
2. Find the correct positioning holes of D1, D2, D3 on the instrument.
3. Check that the D1 and D2 positioning pins are completely aligned with the positioning holes of the instrument. Ensure that the PCB lock buckle is completely aligned.
4. Finger down the pressure interface board, and push the PCB buckle to the locked position to lock the interface board.
5. Confirm again that the interface board D1, D2, and D3 positioning pins are completely aligned with the positioning holes of the instrument.
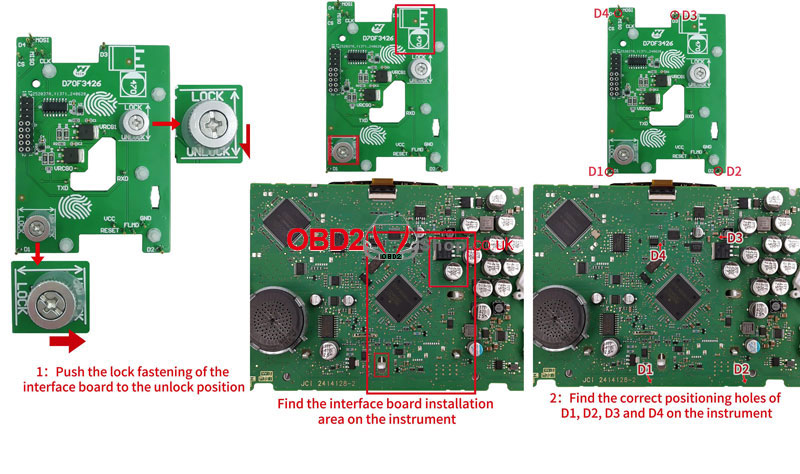
Lock Fastening D70F3426 Interface Board
1. Push the lock fastening of the interface board to the unlock position. Find the interface board installation area on the instrument according to the visual positioning mark on the interface board.
2. Find the correct positioning holes of D1, D2, D3 on the instrument.
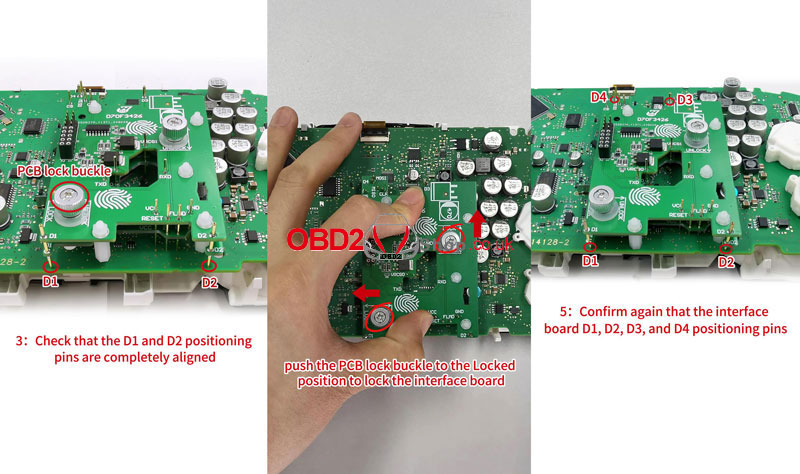
3. Check that the D1 and D2 positioning pins are completely aligned with the positioning holes of the instrument. Ensure that the PCB lock buckle is completely aligned.
4. Push the PCB lock buckle to the locked position to lock the interface board.
5. Confirm again that the interface board D1, D2, D3, and D4 positioning pins are completely aligned with the positioning holes of the instrument.
www.obd2shop.co.uk
Oznake: yanhua acdp moudle 34

| < | siječanj, 2026 | |||||
| P | U | S | Č | P | S | N |
| 1 | 2 | 3 | 4 | |||
| 5 | 6 | 7 | 8 | 9 | 10 | 11 |
| 12 | 13 | 14 | 15 | 16 | 17 | 18 |
| 19 | 20 | 21 | 22 | 23 | 24 | 25 |
| 26 | 27 | 28 | 29 | 30 | 31 | |
Svibanj 2026 (1)
Siječanj 2026 (19)
Prosinac 2025 (22)
Studeni 2025 (21)
Listopad 2025 (20)
Rujan 2025 (21)
Kolovoz 2025 (8)
Srpanj 2025 (13)
Lipanj 2025 (9)
Svibanj 2025 (12)
Travanj 2025 (10)
Ožujak 2025 (12)
Veljača 2025 (14)
Siječanj 2025 (8)
Prosinac 2024 (6)
Studeni 2024 (6)
Listopad 2024 (4)
Rujan 2024 (7)
Kolovoz 2024 (14)
Srpanj 2024 (12)
Lipanj 2024 (10)
Svibanj 2024 (13)
Travanj 2024 (12)
Ožujak 2024 (11)
Veljača 2024 (2)
Siječanj 2024 (10)
Prosinac 2023 (8)
Studeni 2023 (6)
Listopad 2023 (7)
Rujan 2023 (9)
Kolovoz 2023 (6)
Srpanj 2023 (10)
Lipanj 2023 (4)
Veljača 2023 (8)
Siječanj 2023 (14)
Prosinac 2022 (13)
Studeni 2022 (14)
Listopad 2022 (18)
Rujan 2022 (9)
Kolovoz 2022 (16)
Srpanj 2022 (11)
Lipanj 2022 (14)
Svibanj 2022 (13)
Travanj 2022 (12)
Ožujak 2022 (12)
Veljača 2022 (13)
Siječanj 2022 (10)
Srpanj 2021 (1)
Dnevnik.hr
Gol.hr
Zadovoljna.hr
Novaplus.hr
NovaTV.hr
DomaTV.hr
Mojamini.tv