Xhorse Dolphin XP005 Cut Toyota TOY40 Emergency Key No Shim
27.03.2024.Xhorse Dolphin XP-005 has released an upgrade to fix a common problem. That's when cutting the single-sided Toyota emergency key on the M2 clamp with a shim, it'll pop the key out no matter how hard you tighten it. It's super frustrating. Now I'll show how to do it with the M1 clamp, which is mainly used on side cut keys.
Connect VVDI Key Tool Max Pro to the Dolphin machine.
Cut by bitting >> TOY40 >> TOY40 4-4 Bitting
Install the key on the M1 clamp, tip align 3 position.
* Remember to tighten the set screw, make sure it goes no more movement. Otherwise, the key can't be cut right.
Press "OK".
Since I knew the bitting codes, just entered it: 2213, 2421
Cut key >> Continue
Dolphin XP005 will start cutting...
After cutting finish, let's go back to learn the key bitting again.
Find bitting >> Toyota >> TOY40 4-4 Bitting >> OK >> Decode key >> Continue
Learn key success.
Bitting codes are all correct and the same.
Success.
This way saved a lot of time and frustration, especially with breaking bits and ruining emergency valet keys.
Hope this can help.
www.xhorse.co.uk
Oznake: vvdi key tool max, dolphin xp005
komentiraj (0) * ispiši * #
How to use Xhorse Multi-prog to read and write EEPROM
18.03.2024.This post will guide you on how to use Xhorse Multi-prog Programmer to read and write EEPROM.
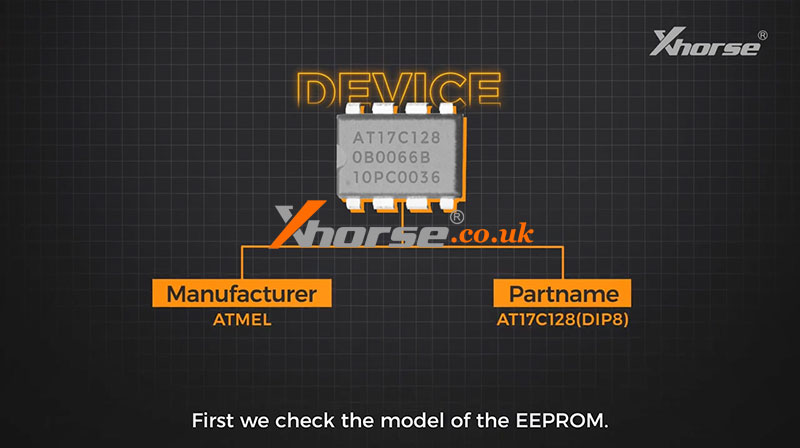
First, we check the model of the EEPROM.
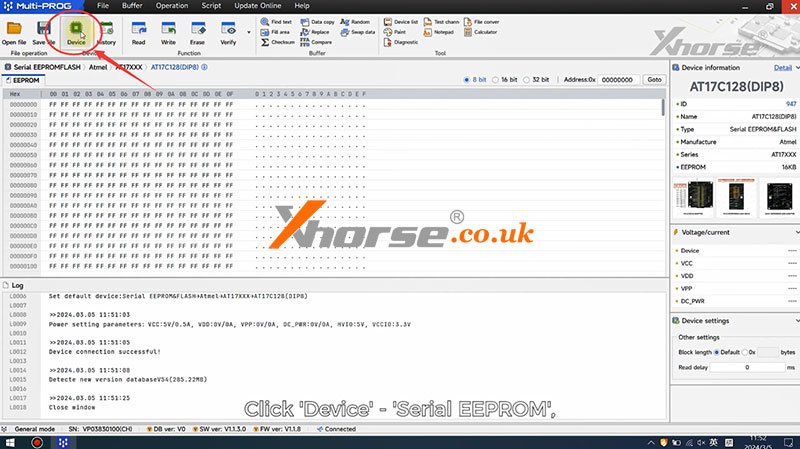
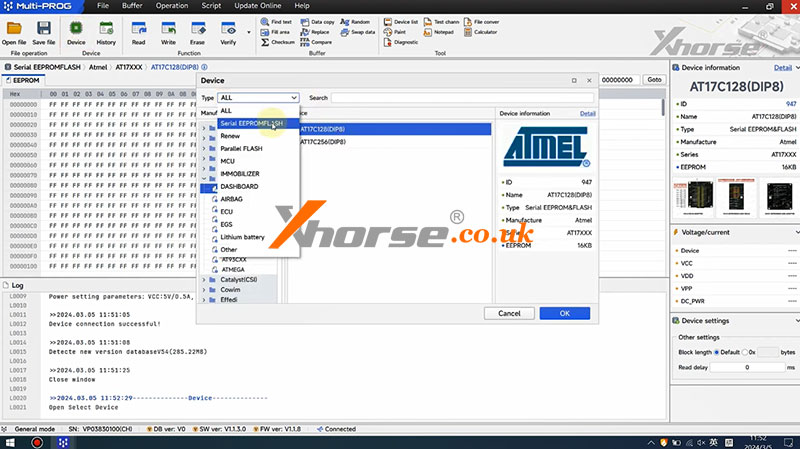
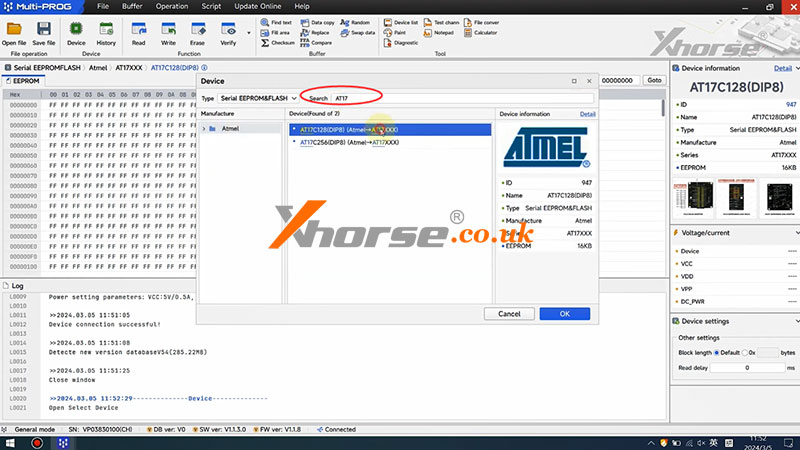
Then we open the Multi-prog software.
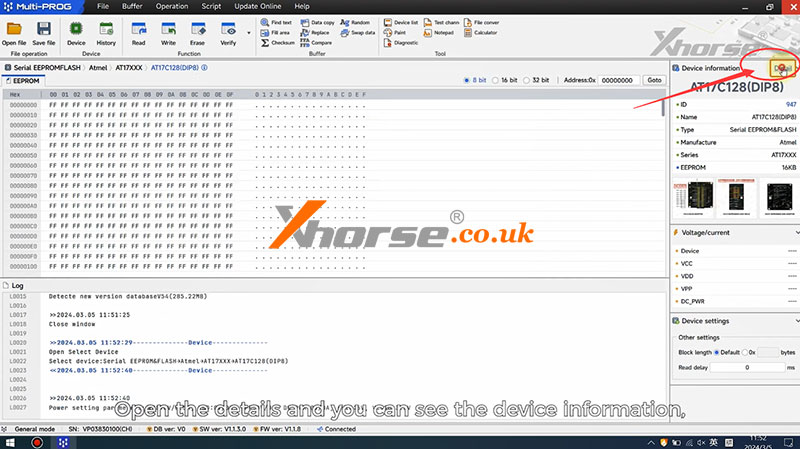
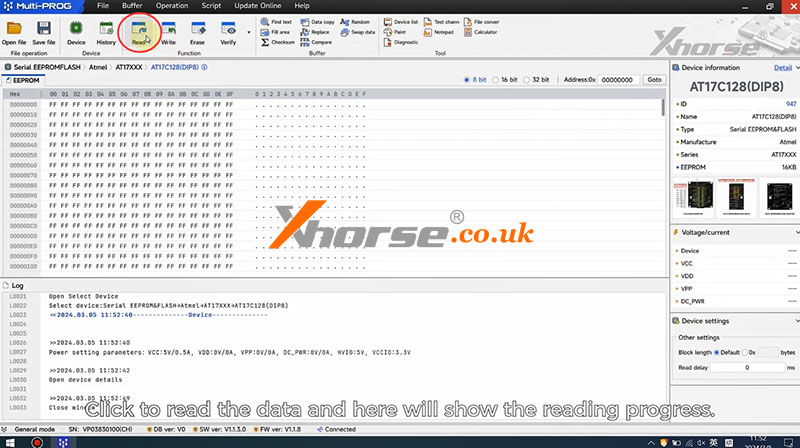
Click "Device">>"Serial EEPROM&FLASH", and enter the model number.
Open the "Details" and you can see the device information, important prompt, and adapter information.
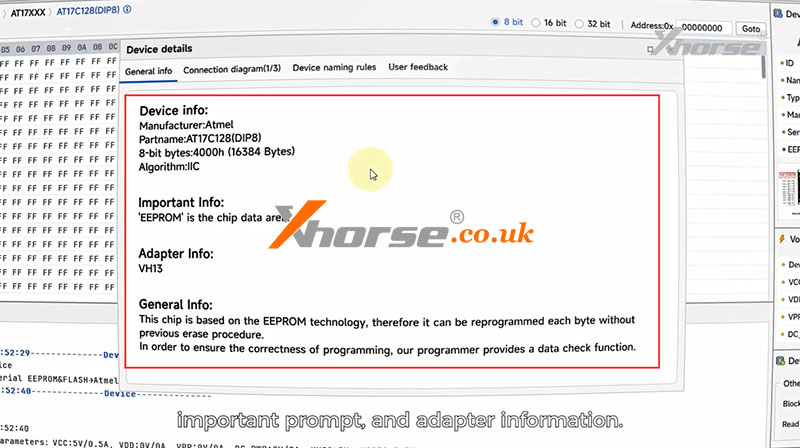
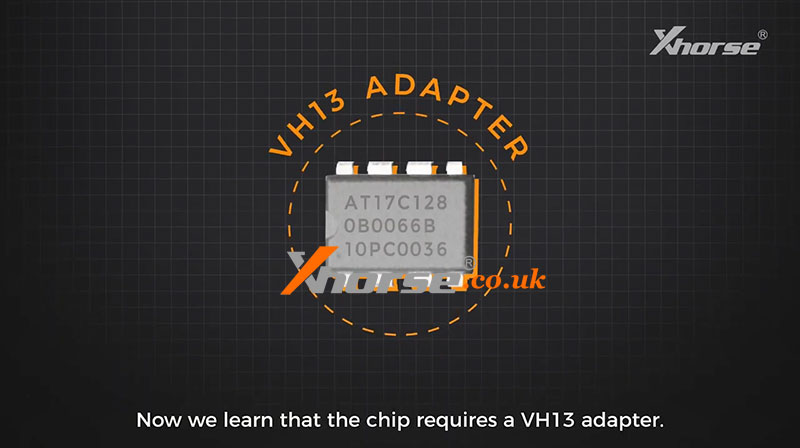
Now we learn that the chip requires a VH13 adapter.
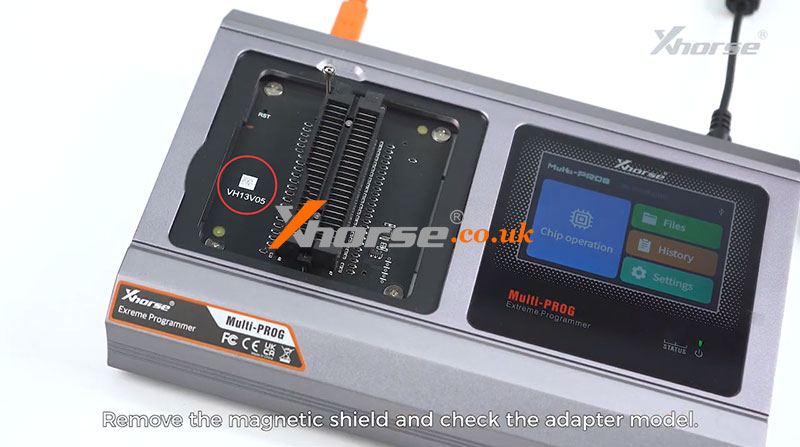
Remove the magnetic shield and check the adapter model.
Confirm that it is a VH13 adapter and put the shield back.
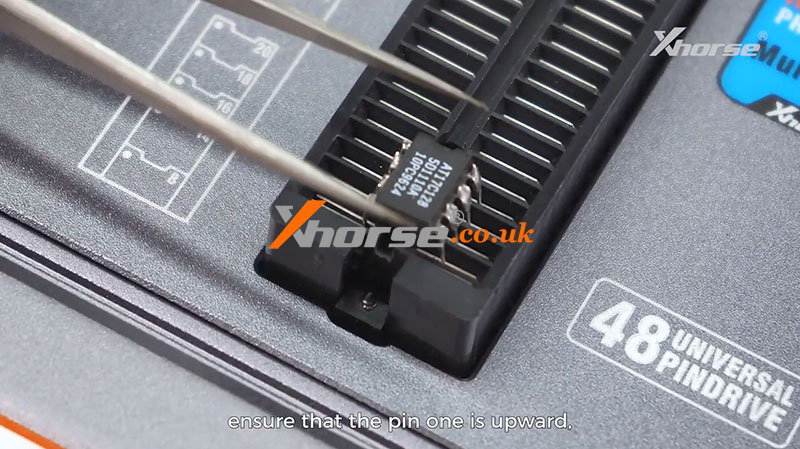
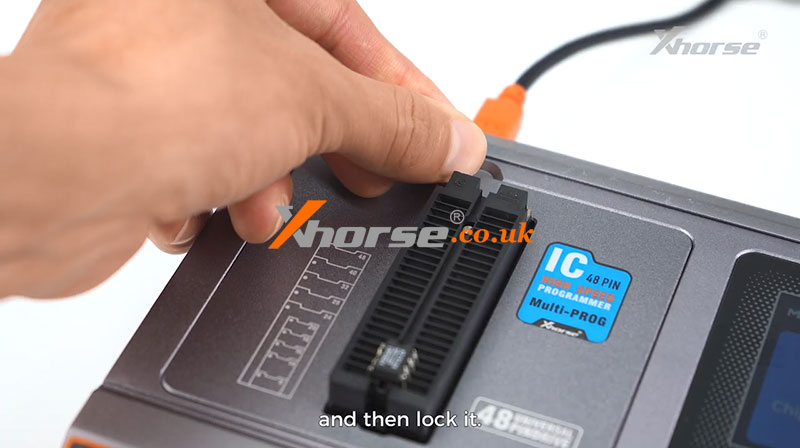
Place the chip aligned at the bottom, ensure that the pin one is upward, and then lock it.
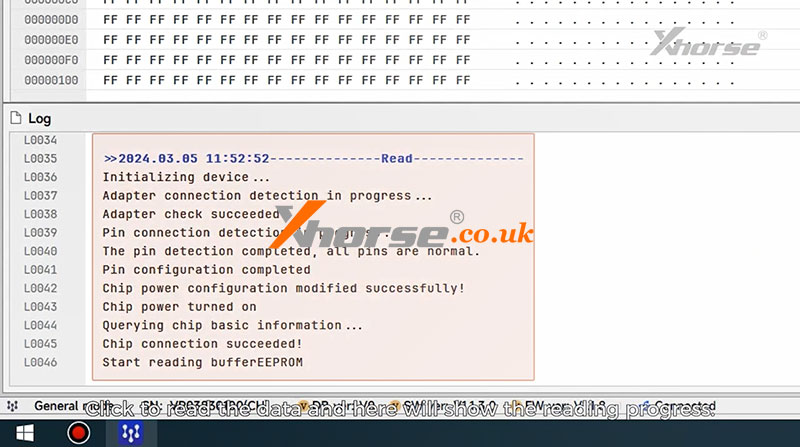
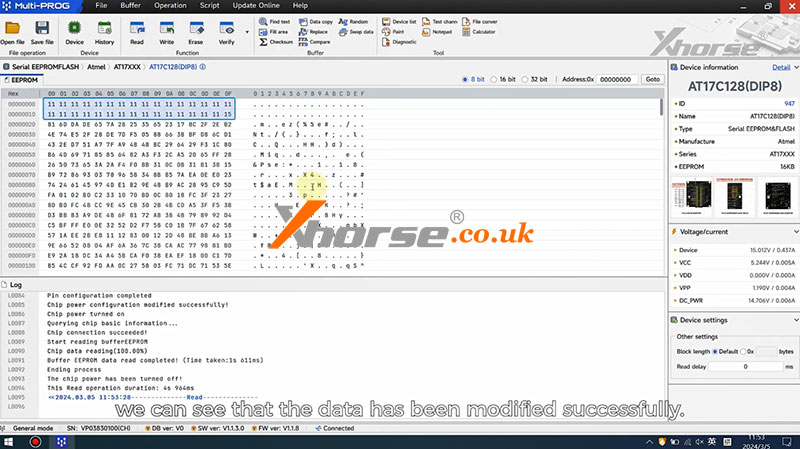
Click to read the data and here will show the reading progress.
It's successful.
We can modify the data just like this and click here to write it in.
When we read the data again, we can see that the data has been modified successfully.

For more details, please refer to the video below:
https://youtu.be/_CiGx94dqTs
www.xhorse.co.uk
Oznake: xhorse multi prog
komentiraj (0) * ispiši * #
Solved: VVDI MB Tool "EIS is not synchronized with current key"
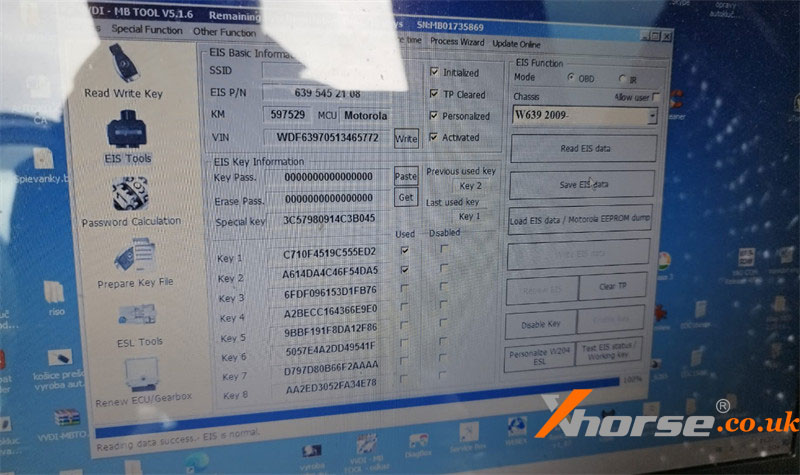
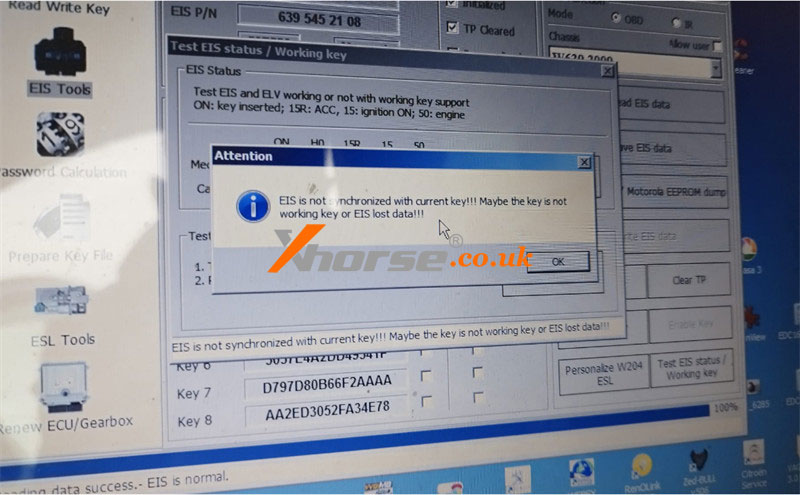
13.03.2024.Problem: Hello, I have a situation with a Mercedes Vito W639 2008. Only 1 key stopped starting, remote is still working. I checked with VVDI MB BGA Tool, see screens. Can I program a new key on bench or do more diagnostics? Very thanks.
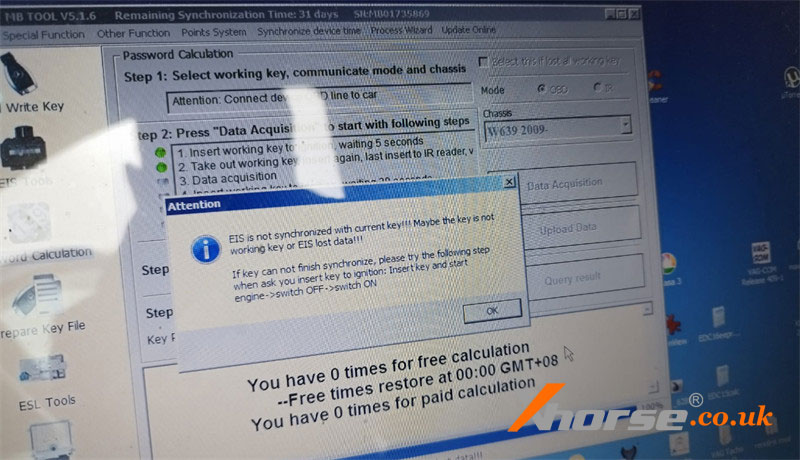
VVDI MB Tool gave the attention:
"EIS is not synchronized with the current key!!! Maybe the key is not working key or EIS lost data!!!
If the key can not finish synchronizing, please try the following step when asked you insert the key to the ignition: Insert key and start engine -> switch OFF -> switch ON"
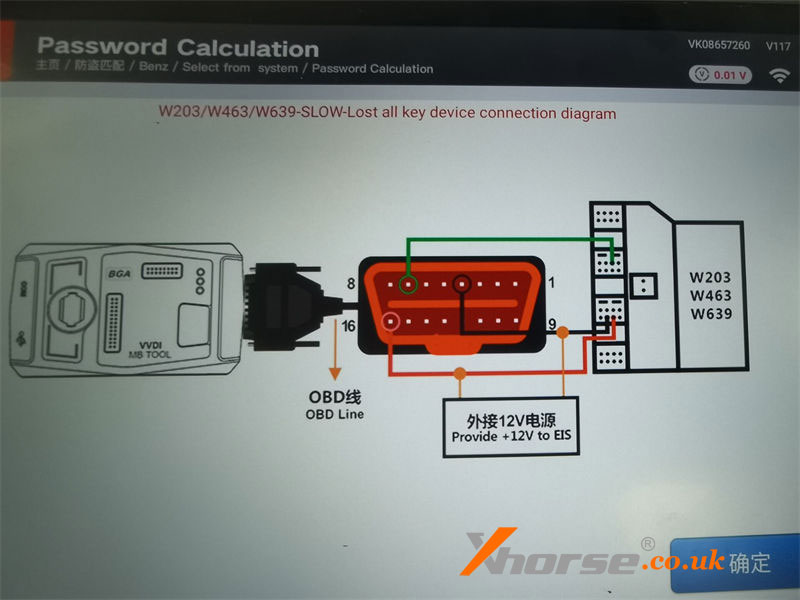
Solution
Yes. It can support adding keys on bench in the situation.
1. Disassemble the EIS module from the vehicle.
2. Connect EIS, 12V power supply & MB Tool according to the connection diagram.
3. Do key-adding procedure in MB Tool software.
www.xhorse.co.uk
Oznake: vvdi mb tool
komentiraj (0) * ispiši * #
Fixed: Xhorse MVCI PRO J2534 Cable "Command timeout!"
12.03.2024.Problem: The Xhorse MVCI PRO J2534 Cable is connected to the car. But when starting the Audi diagnostics, it will immediately shut down and start flashing red and green even though all the firmware has been updated. The option to test the cable in software doesn't even work.
It prompted:" Command timeout! Close other J2534 software, plug the device, upgrade firmware, and retry!"
What's the problem? Please help.
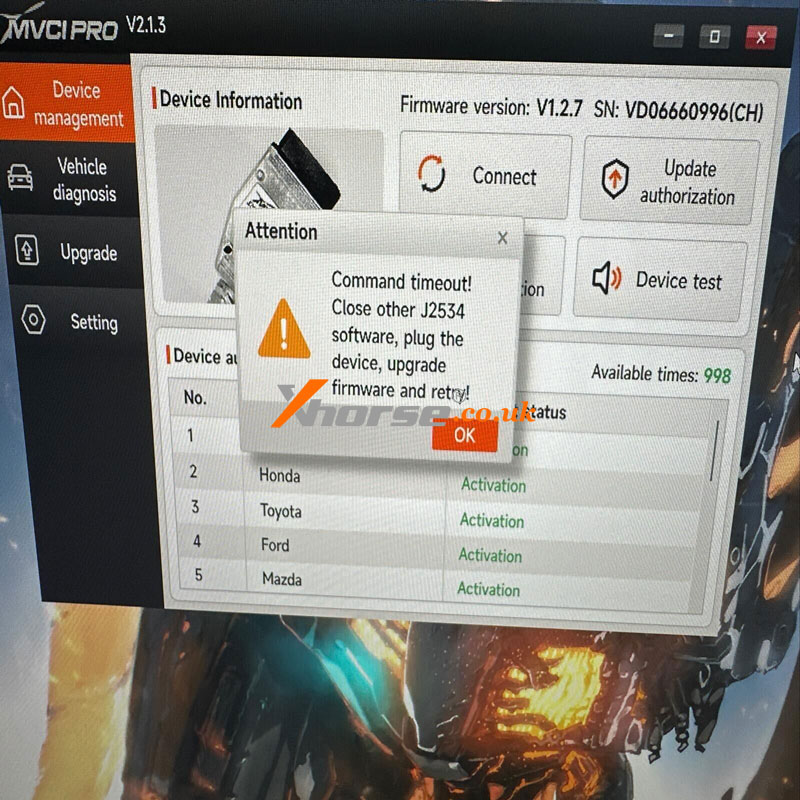
Solution
It's suggested to install ONE original software in the same system. Only the driver of the software used is installed.
1. Close or uninstall other software;
2. Plug the J2534 Diagnostic Cable to upgrade firmware, then try again.
www.xhorse.co.uk
Oznake: xhorse mvci pro j2534
komentiraj (0) * ispiši * #
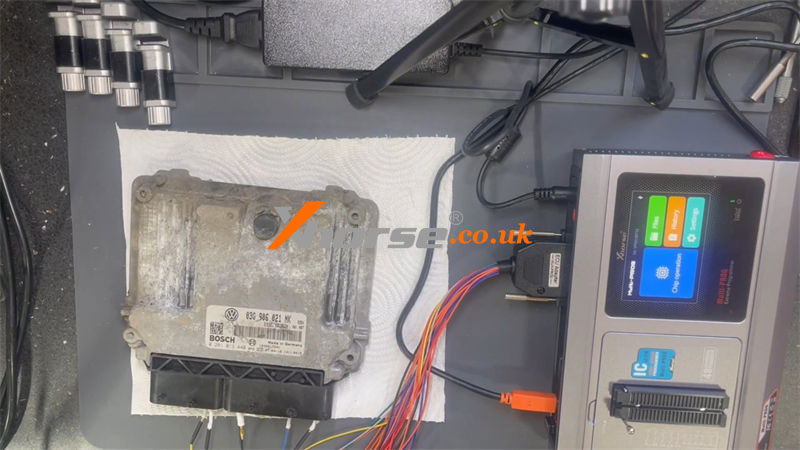
Xhorse Multi-Prog Read & Write VW EDC16/EDC17 on Bench
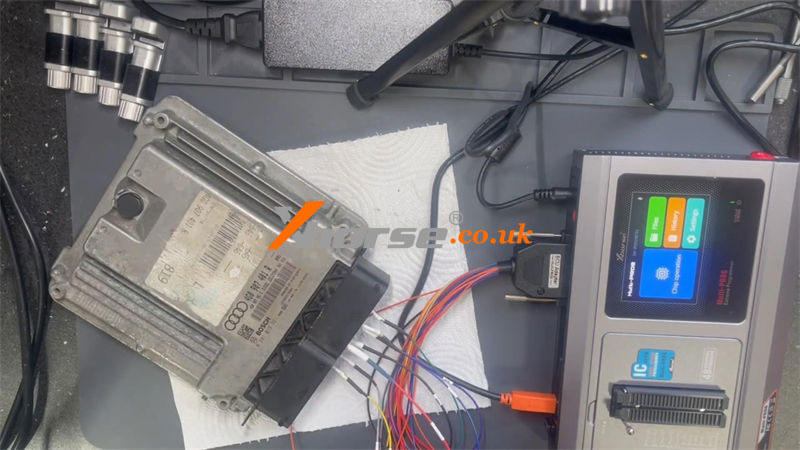
06.03.2024.Today I'll show how to use Xhorse Multi-Prog Programmer to read & write VW Bosch EDC16/EDC17 on bench.
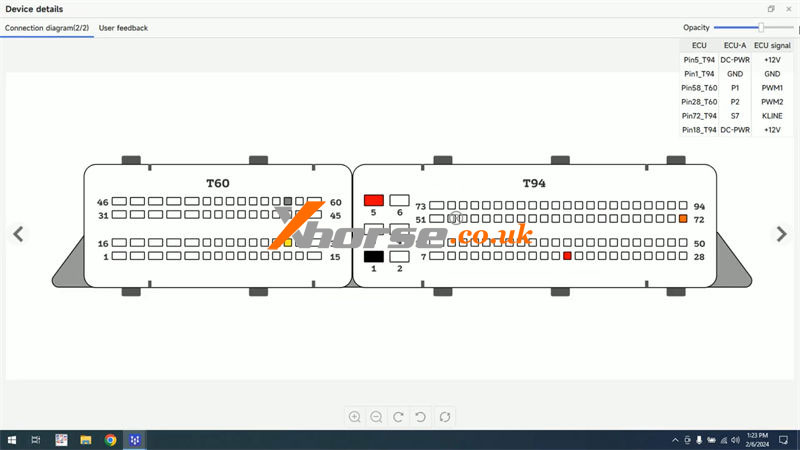
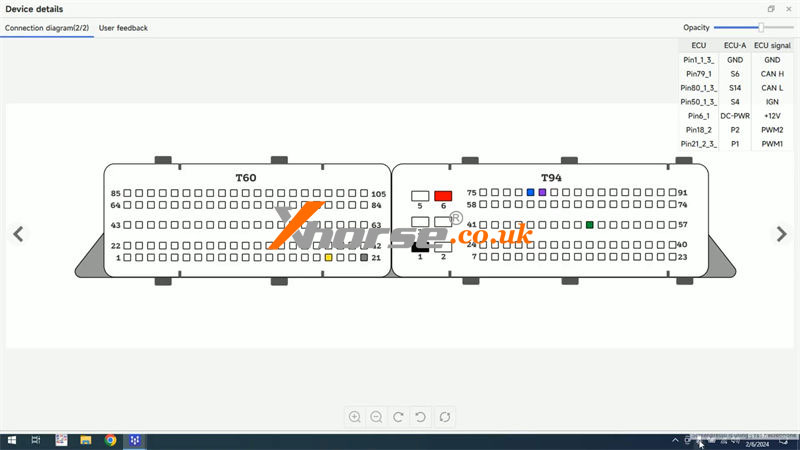
Connect Bosch EDC16 to Xhorse Multi-Prog according to the wiring diagram.
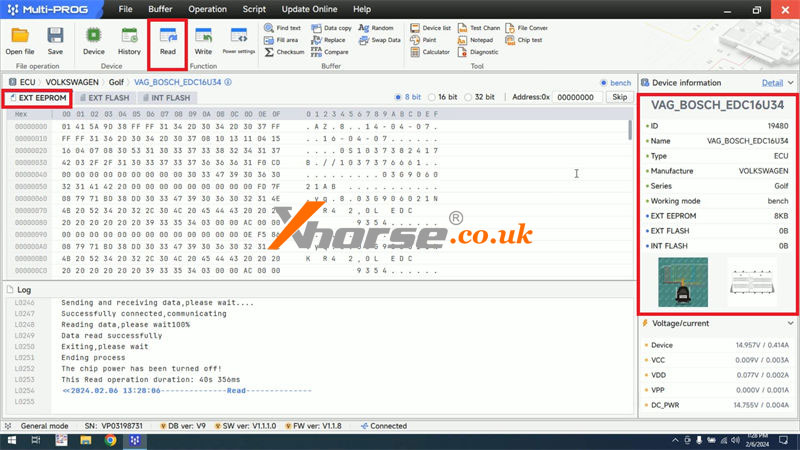
EXT EEPROM >> Read
It took the 40s to read the EEPROM...
Read success.
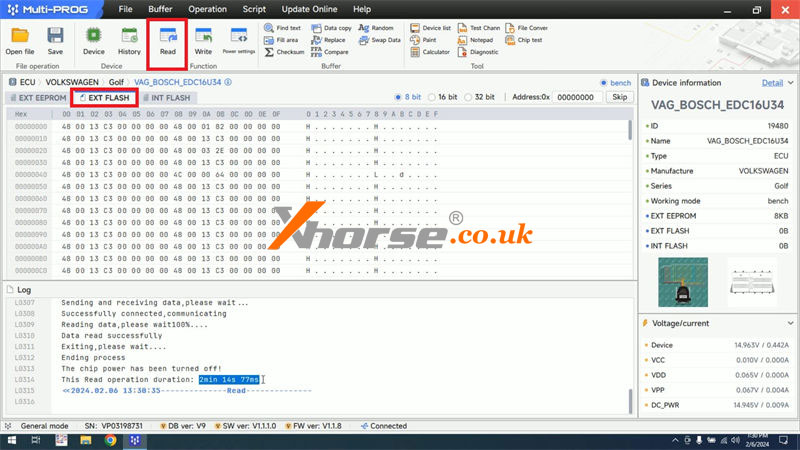
EXT FLASH >> Read
It took 2 minutes and 14s to read the external flash.
Read success.
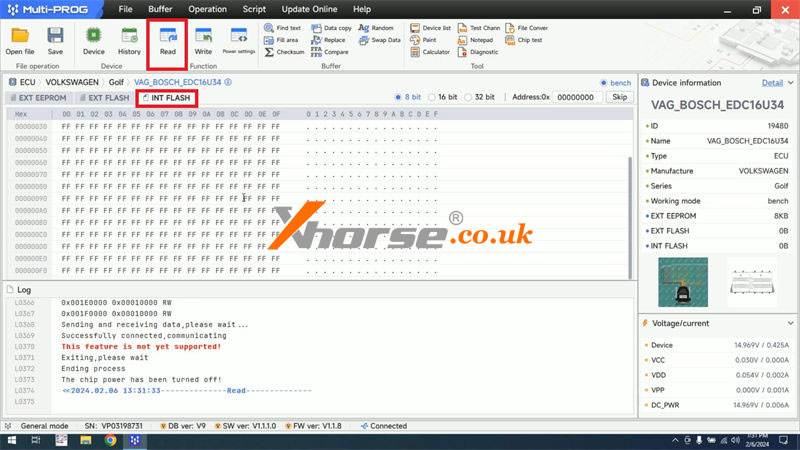
INT FLASH >> Read
It says "This feature is not yet supported!"
Maybe the type of ECU doesn't have an internal flash.
Click "Save" to save all reading files.
Let's hit "Write" the same file and see how long it will take.
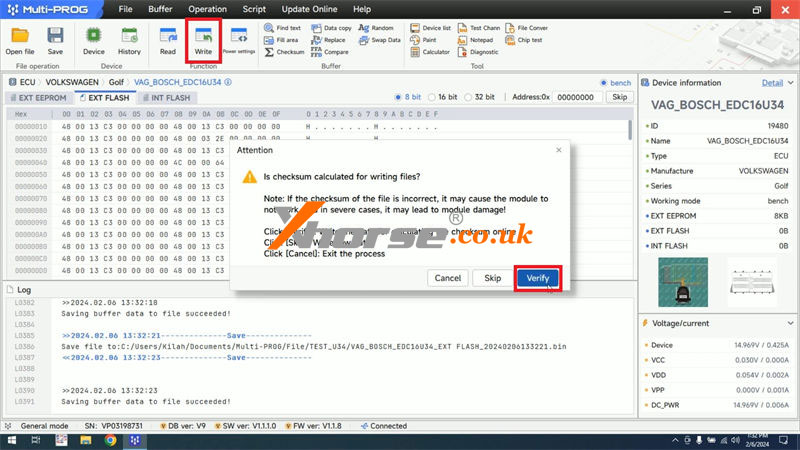
Is checksum calculated for writing files?
Note: If the checksum of the file is incorrect, it may cause the module to not work, and in severe cases, it may lead to module damage!
Click "Verify": Write the data for calculating the checksum online.
Click "Skip": Write raw data
Click "Cancel": Exit the process.
Here I'll click "Verify".
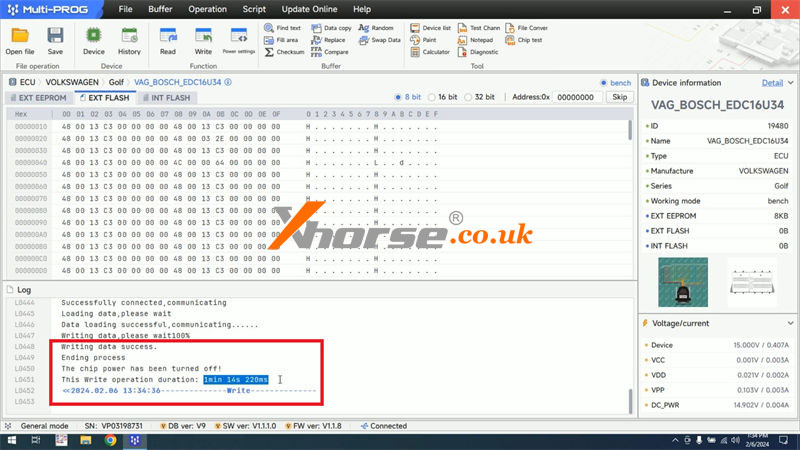
Checksum calculation successful!
It took 1 minute and 14s to finish the writing.
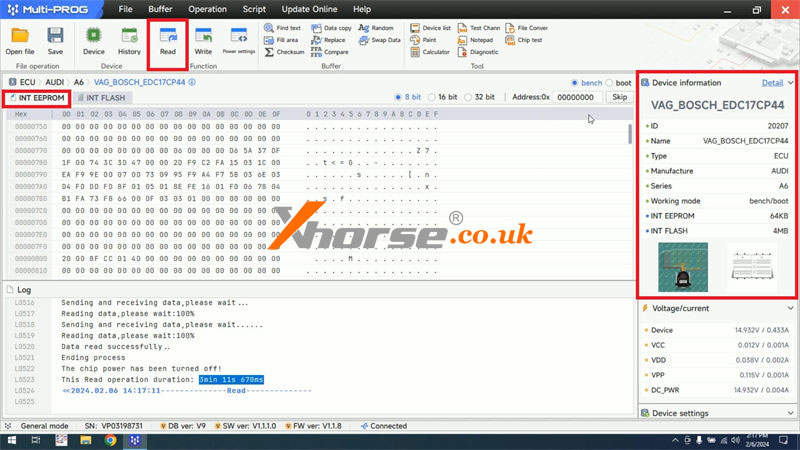
Connect to a new Bosch EDC17 ECU.
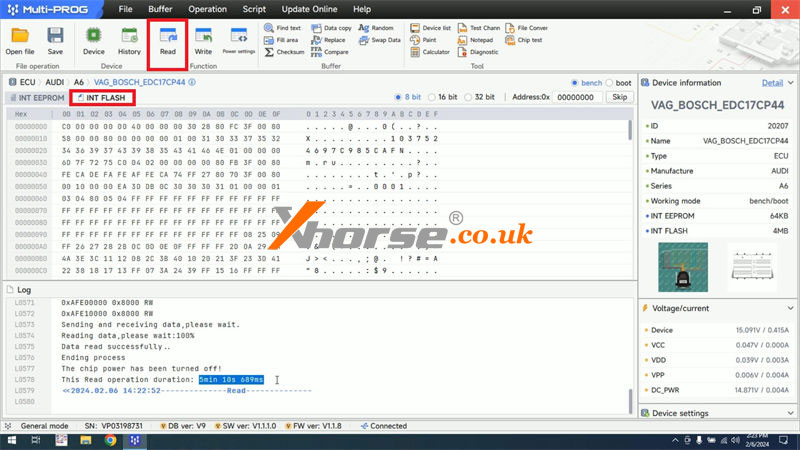
Here are INT EEPROM & INT FLASH options.
Let's proceed with reading...
Read internal EEPROM success, it took 3 minutes and 11s to finish.
Read internal flash success, it took 5 minutes and 10s to finish.
Continue to write the same file.
It took 3 minutes and 25s to finish writing.

www.xhorse.co.uk
Oznake: xhorse multi-prog programmer
komentiraj (0) * ispiši * #
