Key Tool Max Pro + TOY-BA cable Add a 2022 Alphard Key
29.02.2024.This post will guide you on how to use Xhorse VVDI Key Tool Max PRO and TOY-BA cable to read the immo date and add a new key for the 2022 Alphard.
Here comes the procedure:
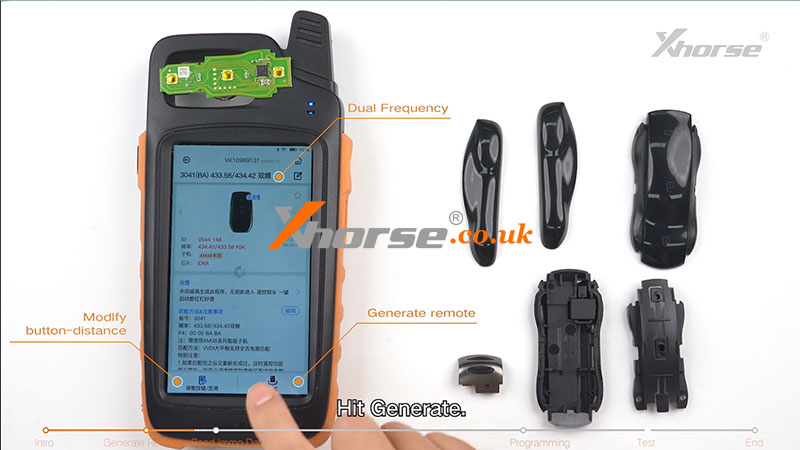
1. Generate Remote
Take out the PCB board of the XM38 smart key, pop in the battery, and place the PCB board on the coil of the device.
Click on [Remote Program], select the desired option, and hit [Generate] to generate the remote.
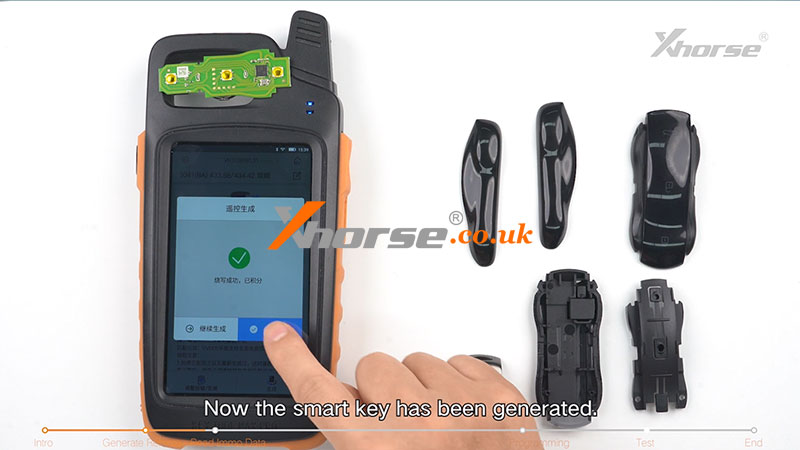
Now the smart key has been generated.

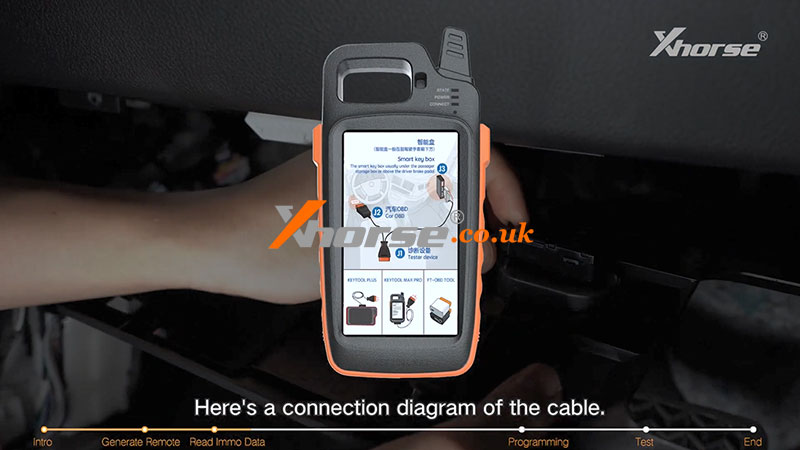
2. Read IMMO Data
Then we need to read the immo data of the smart key box of the vehicle.
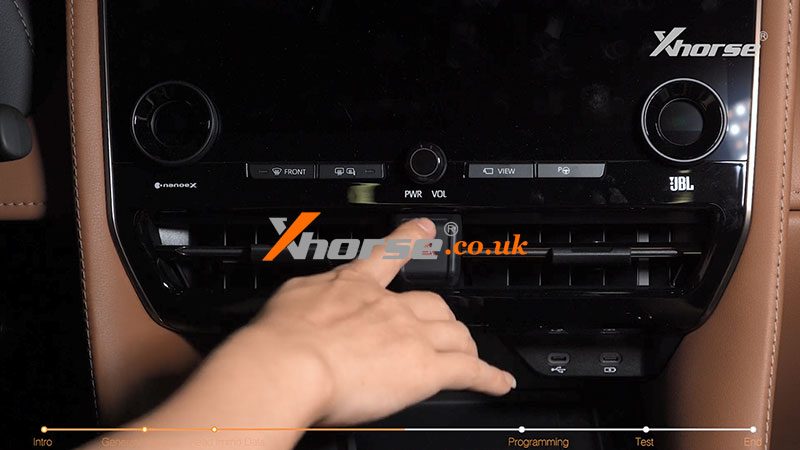
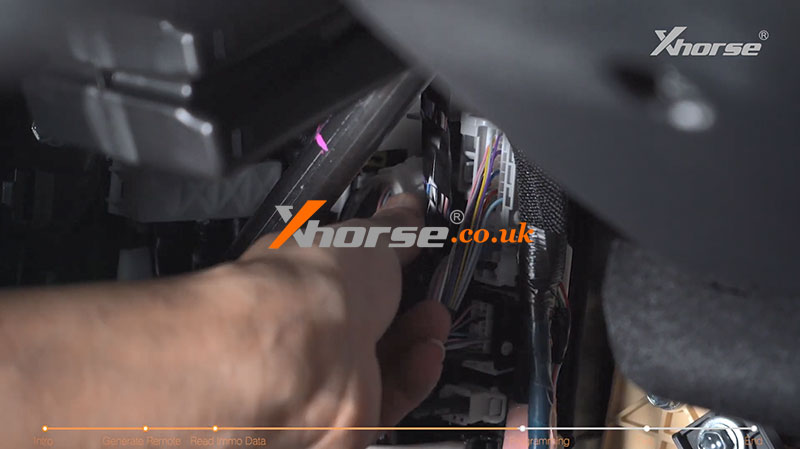
The smart key box of the 2022 Alphard is above the driver's brake pedal.
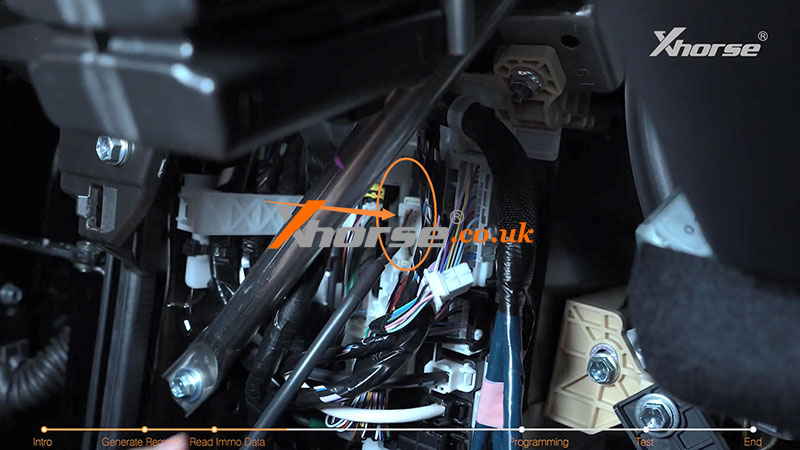
Remove these 3 trim panels in a proper order.
Then you'll need to locate the smart key box.
Here's a connection diagram of the cable.
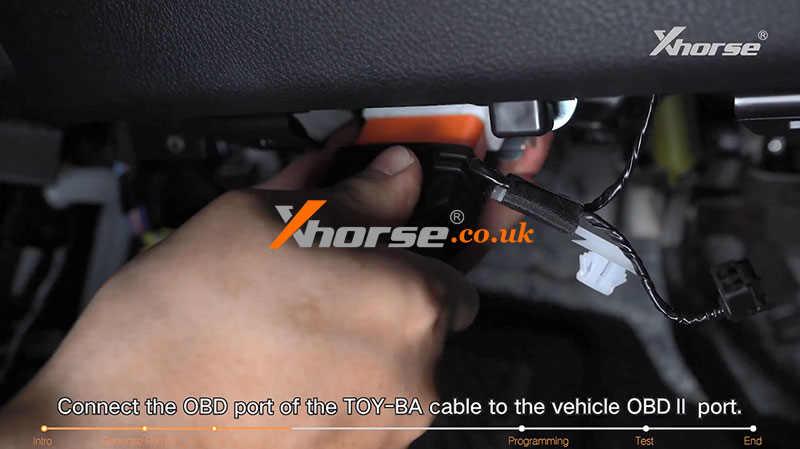
First of all, remove the 30-pin plug of the smart key box of the vehicle.
Note: Do not unplug the other two connectors.
Plug the TOY-BA cable into the smart key box.
Connect the OBD port of the TOY-BA cable to the vehicle OBD II port.
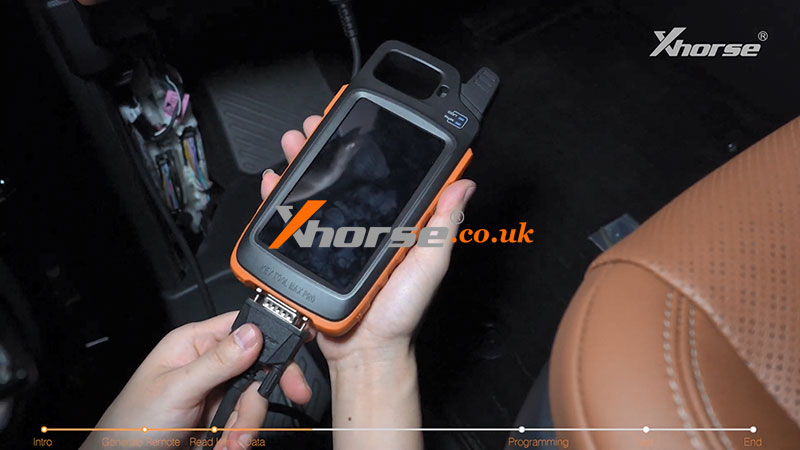
Then connect the TOY-BA cable to Key Tool Max Pro using the OBD cable.
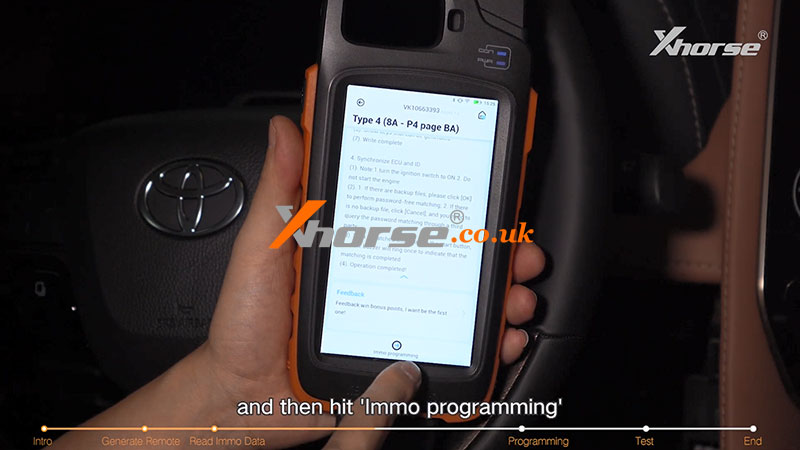
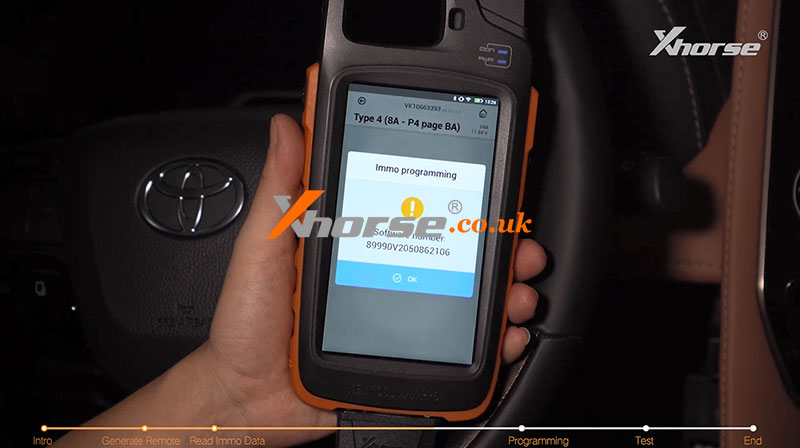
Take out your Key Tool Max Pro and click on [IMMO Programming], select [Toyota]>>[Classified by type]>>[Smart key after 2016]>>[Type 4(8A-P4 page BA)]
You can read the function introduction and then hit [Immo programming] to continue.
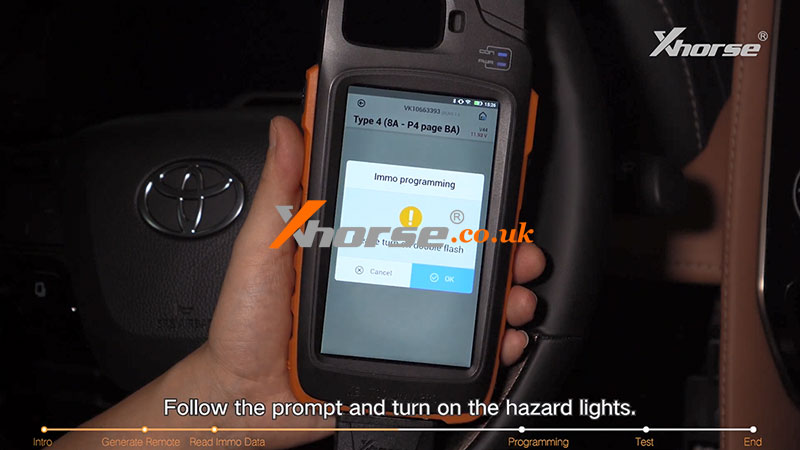
Select [Backup smart box EEPROM data]>>[30 PIN cable reading]
Follow the prompt and turn on the hazard lights.
Make sure it's connected to the Internet and hit "OK".
It tells you how to connect the cables.
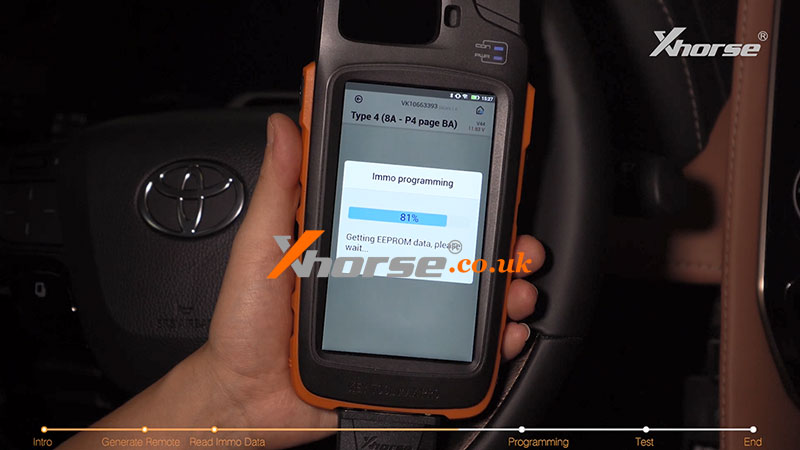
Now, we go ahead and hit "OK".
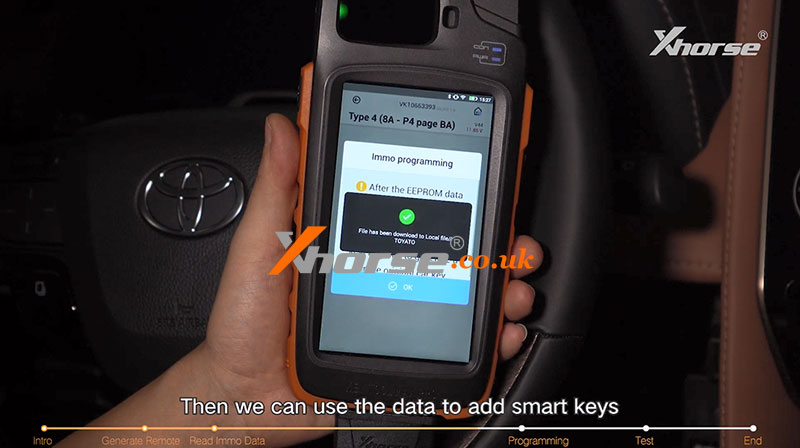
Waiting for the calculation.
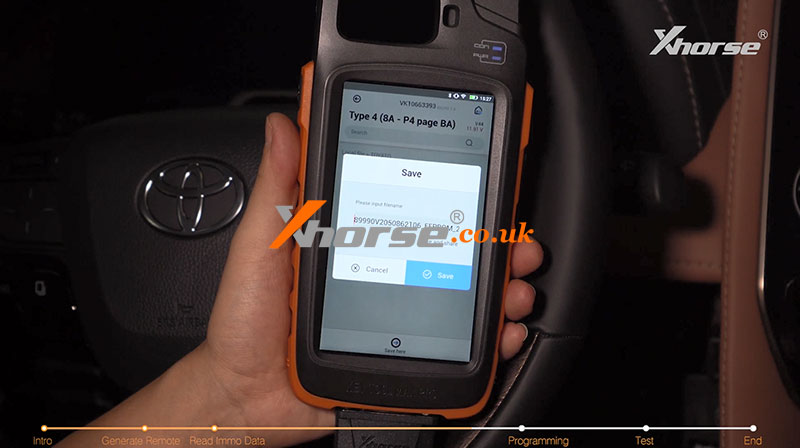
Calculating success and we save the file.
Then we can use the data to add smart keys or generate keys in all key lost situations.
Note: Before going into the add smart keys or key generation of all lost menu, unplug the TOY-BA cable and restore the original 30-pin plug of the vehicle.
Note: Before going into the add smart keys or key generation of all lost menu, unplug the TOY-BA cable and restore the original 30-pin plug of the vehicle.
3. Programming
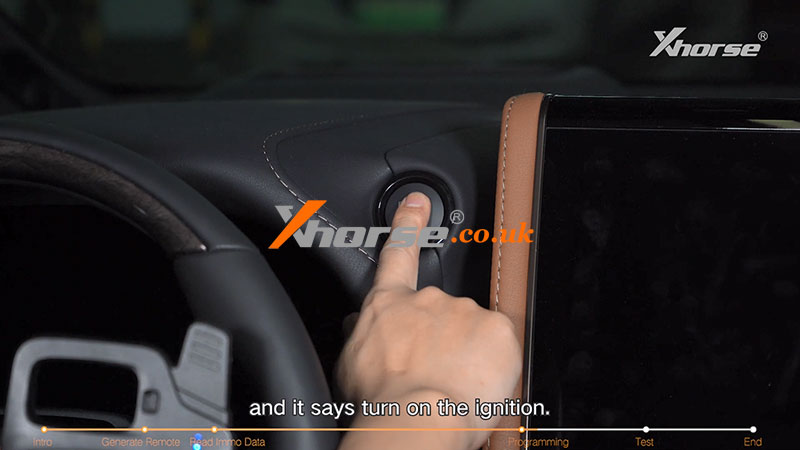
Now we can start programming the smart key.
Click on [Add smart keys] and it says to turn on the ignition.
Prompt:
1. If you have the backup file, please click on [Yes]
2. If you don't have the backup file, please click [Cancel], and you will need to query the PIN code from the 3rd party.
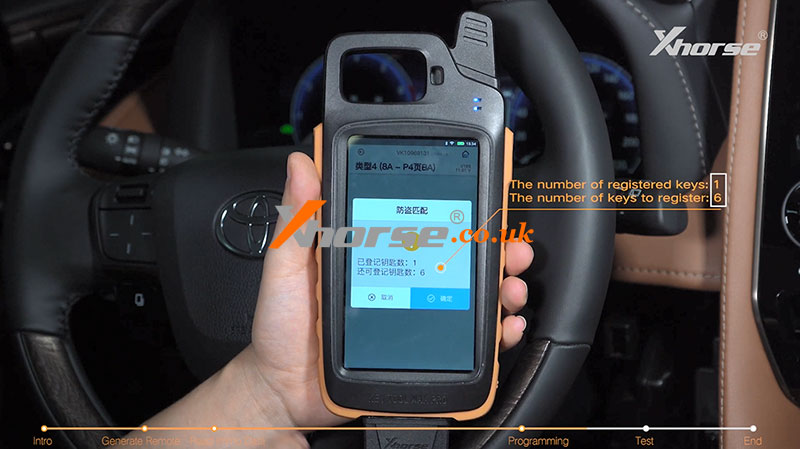
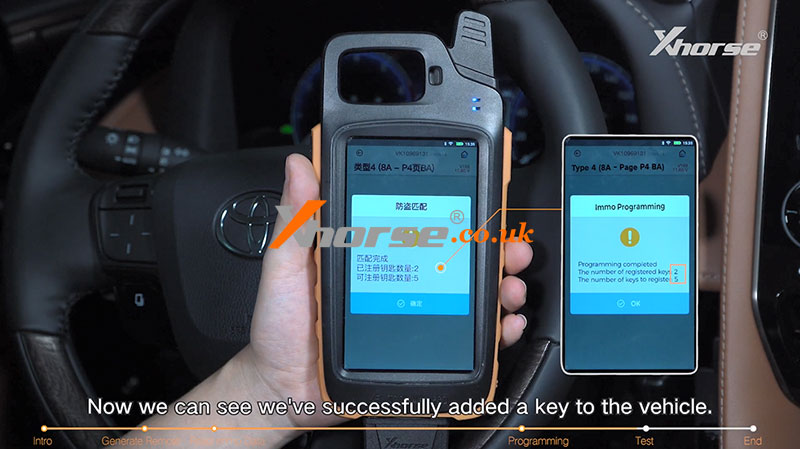
We've obtained the backup file, so press "OK".
Select the file and now we know we can add up to 6 keys to this car.
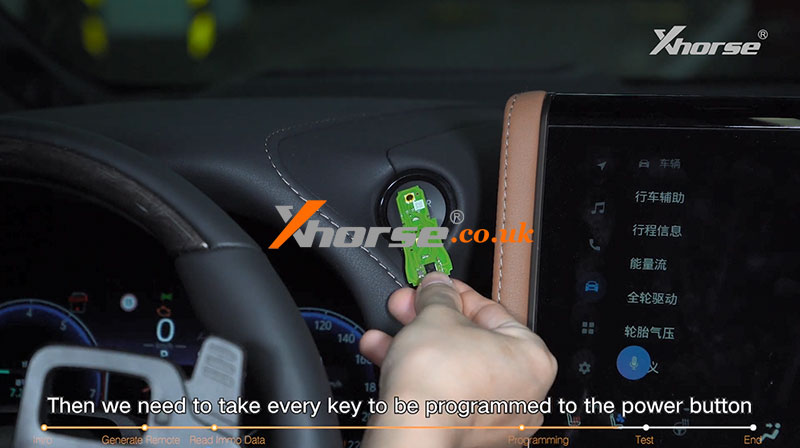
Place the registered key near the power button and take it away after we hear the beep sound.
Then we need to take every key to be programmed to the power button and take it away after it beeps twice.
Now we can see we've successfully added a key to the vehicle.


4. Test
Then we can test the remote and smart function of this new key.
All functions work perfectly.
Please refer to the video below for more details:
https://youtu.be/_HVZP9RM4Ow
www.xhorse.co.uk
Oznake: vvdi key tool max pro
komentiraj (0) * ispiši * #
How to use MVCI PRO J2534 Diagnosis Programming Cable
28.02.2024.If you need vehicle diagnostics, don't miss this product: MVCI PRO J2534 Vehicle Diagnosis Programming cable, it supports multi-vehicle and multi-protocol, is powerful and cost-effective, it is a perfect substitute for original hardware.
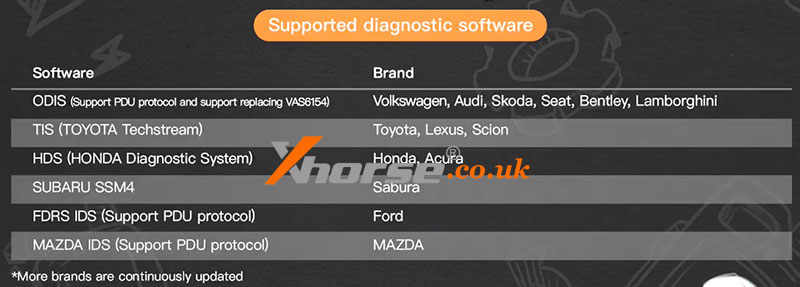
It's designed to meet mainstream automotive industry standards, compatible with D-PDU and J2534 diagnostic standards. It supports multiple automotive manufacturers, such as Audi, Lamborghini, Bentley, Volkswagen, Toyota, Honda, Ford, Subaru, Mazda, etc.
And it supports various communication protocols, such as CAN, CAN_PS, ISO15765, etc.
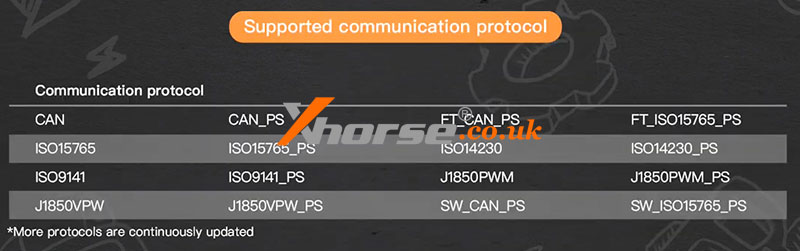
These original diagnostic software are currently compatible, and more supported types will continue to be updated.
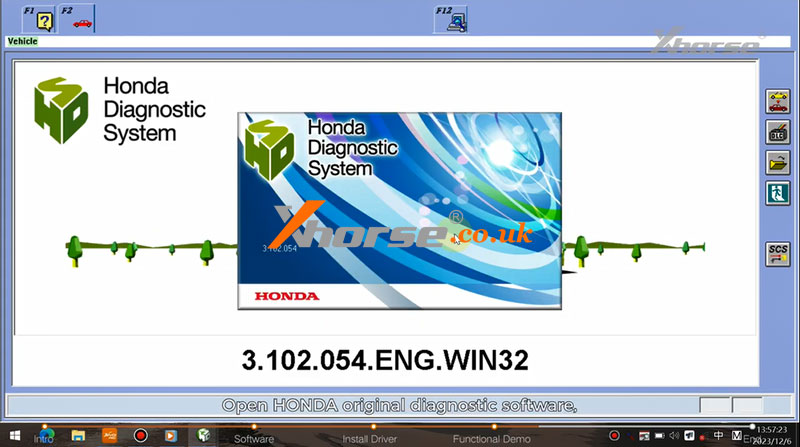
Now, we take HONDA as an example to show you how to use this MVCI PRO J2534 Diagnosis Programming cable to view and clear diagnostic trouble codes.
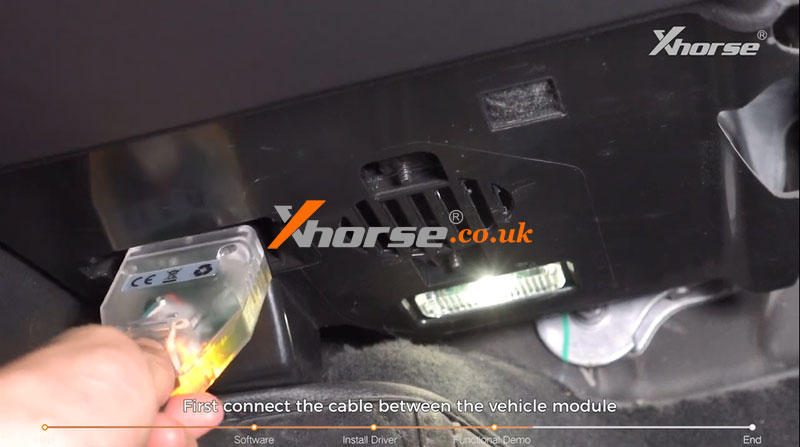
First, connect the cable between the vehicle module and the computer.
Open HONDA's original diagnostic software and it will automatically read the VIN. If the VIN number hasn't automatically filled in, we should check whether the cable connection is successful.
If the OBD voltage is detected, the signal light will be solid green.
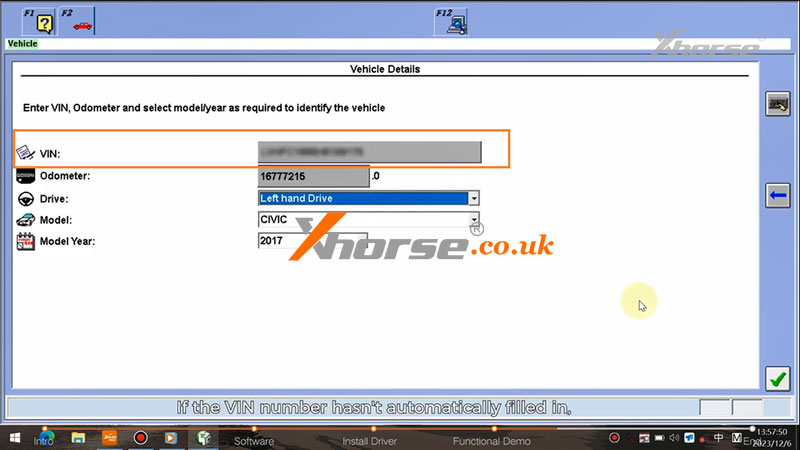

Complete the info and continue to the next step.
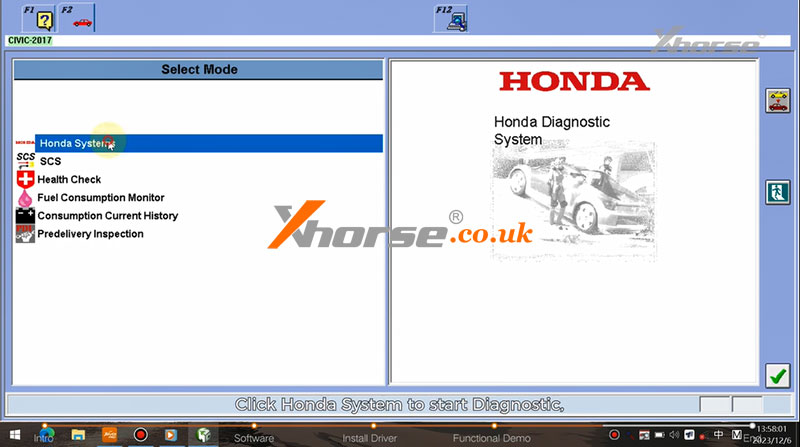
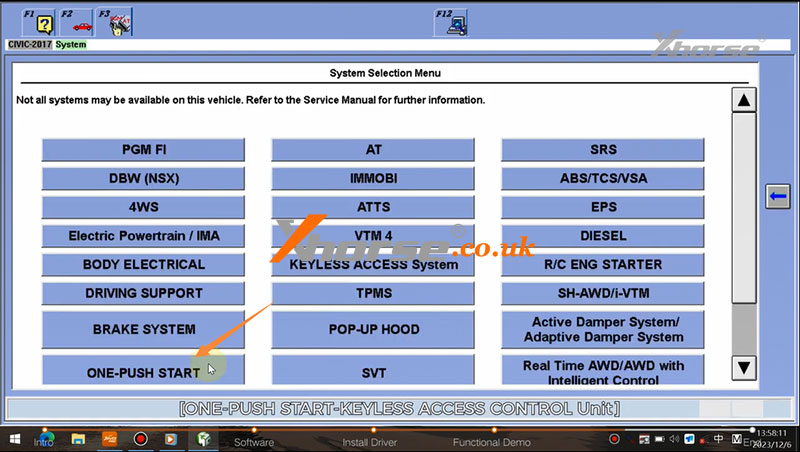
Click Honda System to start Diagnostic, and here will provide a list of systems.
For example, we click [ONE-PUSH START-KEYLESS ACCESS CONTROl Unit] and open [DTCs].
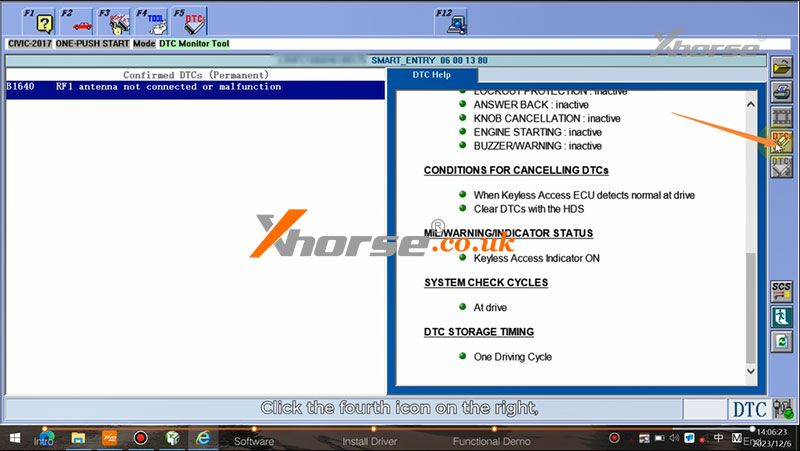
Then there will display the diagnostic trouble code and related description.
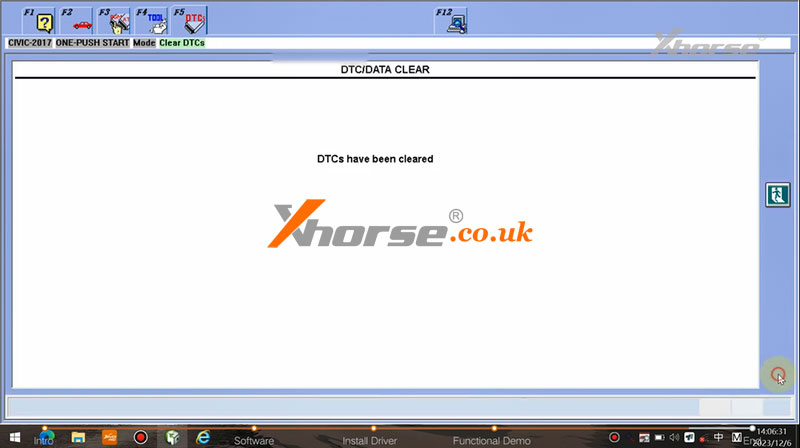
Now it's time to clear the code.
Click the fourth icon on the right, then Press ENTER Button to clear DTCs.
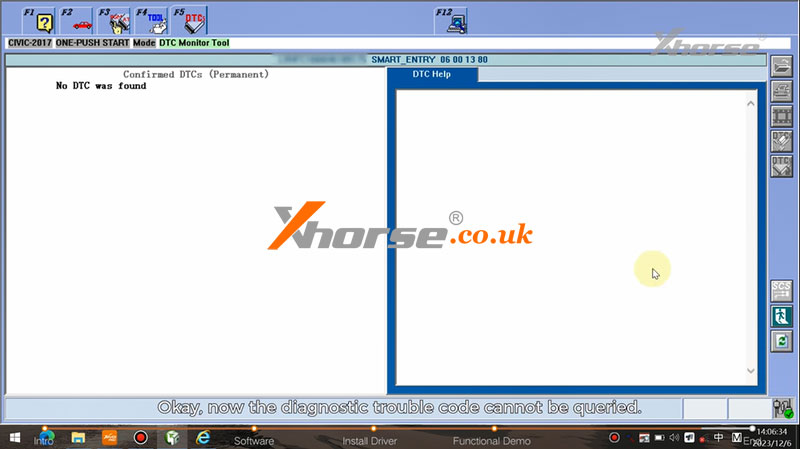
Now the diagnostic trouble code cannot be queried.
Next, we can use the same method to diagnose other systems.

Please refer to the following video for more details:
https://youtu.be/EWs2evWt89Y
www.xhorse.co.uk
komentiraj (0) * ispiši * #
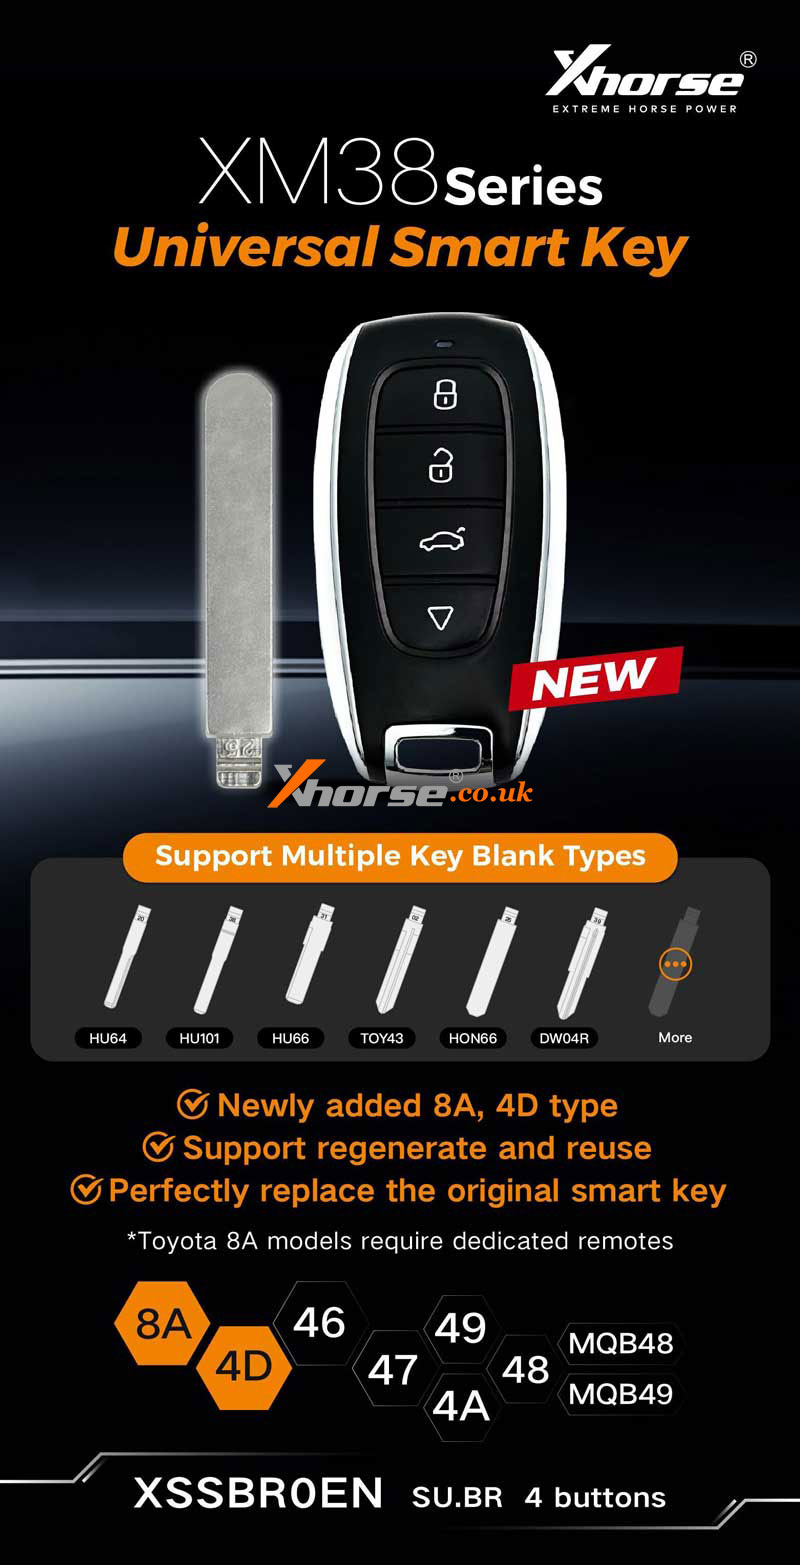
Xhorse XZ/XS/XM38 Series Smart Key New Released
27.02.2024.Xhorse has released a new XZ Series PCB Board, XS Series XSDFX2EN Smart Key, and XSSBR0EN XM38 Smart Key recently. Below we'll introduce the application range of these keys.
XZ series K.A Special PCB Board
PN. XZKA81EN
It's exclusively designed for Hyundai & Kia models and supports all Hyundai & Kia smart keys to regenerate and reuse.
NOTE
K.A. special PCB board can only be generated for Hyundai and Kia models and cannot be generated for any other vehicle brands.

XS Series Universal Smart Key
PN. XSDFX2EN
It's designed in the same 4-button knife style but with a smaller size. Supports MQB48, MQB49, 4A, 46, 47, 48, 49 key type.

XM38 Series Universal Smart Key
PN.XSSBR0EN, SU.BR 4-buttons.
It's a newly added 8A, 4D type to support regeneration and reuse. It can perfectly replace the original smart key.
Support multiple key blank types: HU64, HU101, HU66, TOY43, HON66, DW04R, etc.
Support MQB48, MQB49, 8A, 4D, 46, 47, 48, 49, 4A key type.
www.xhorse.co.uk
Oznake: xhorse remote key
komentiraj (0) * ispiši * #
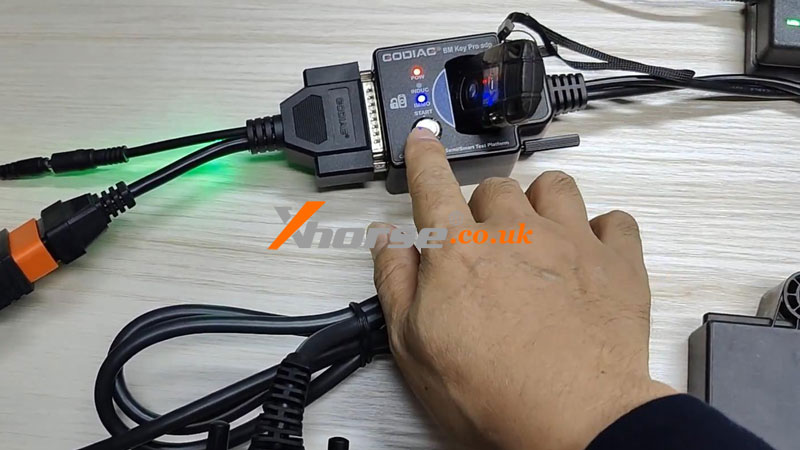
Xhorse VVDI2 + GODIAG Test Platform Add BMW CAS2 Key
21.02.2024.This is a demonstration of how to add the BMW CAS2 key with Xhorse VVDI2 + GODIAG CAS1/CAS2 Mech-Key Test Platform on bench.
Preparation
1. Connect GODIAG CAS1/CAS2 Test Platform & VVDI2, turn on power supply.
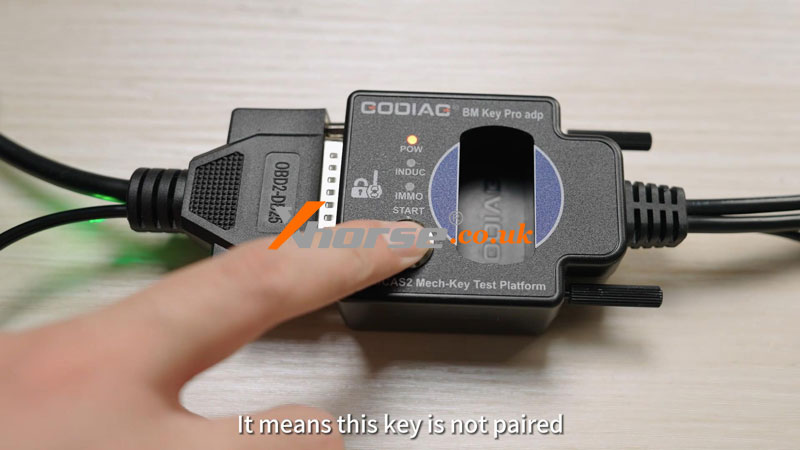
2. Take out a blank key and insert it into the ECU key port for test. The key pops out, which means this key is not paired.
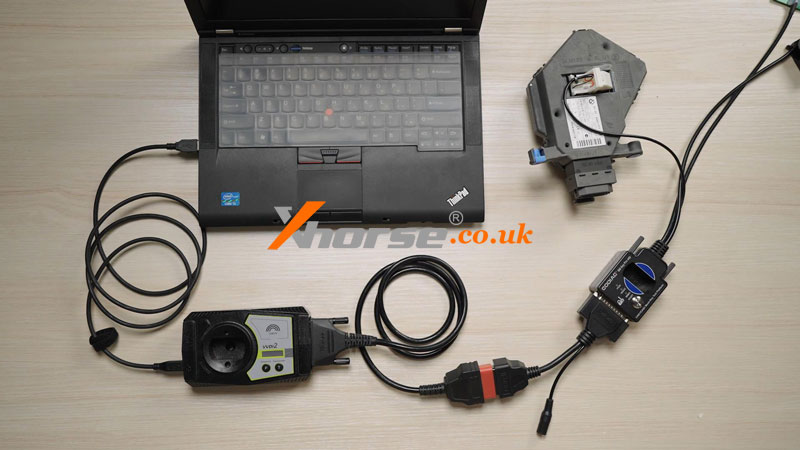
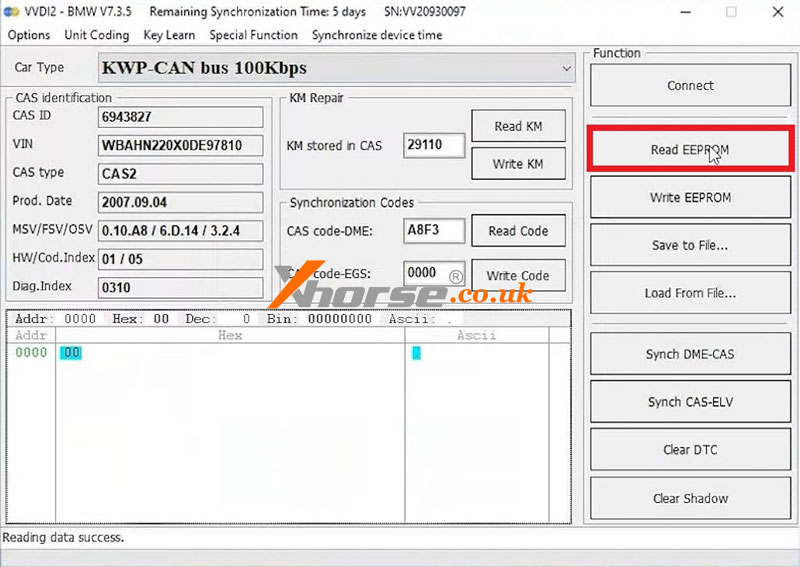
Open VVDI2 Software,
BMW >> Key learn >> CAS/EWS information >> Connect
Click "Read KM" to read the mileage.
Click "Read Code" to read the code data.
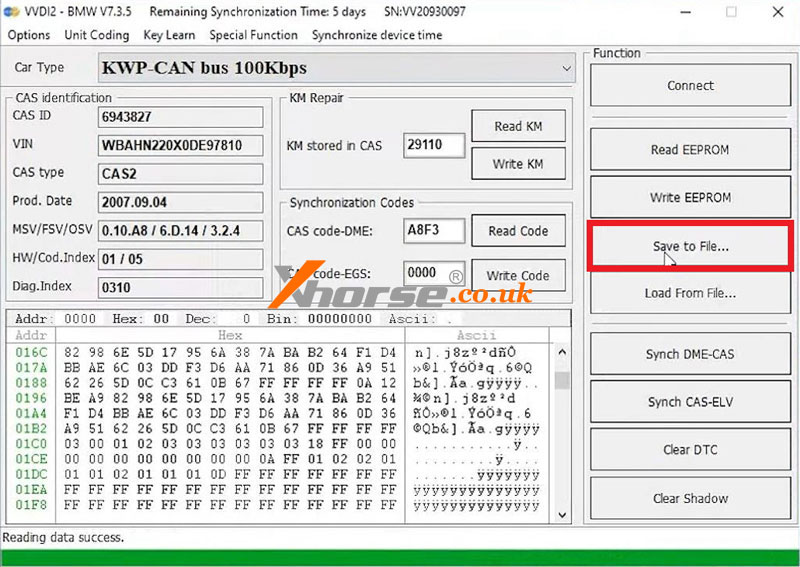
Click "Read EEPROM" to read EEPROM data.
Click "Save to file" to save the EEPROM data to the desktop.
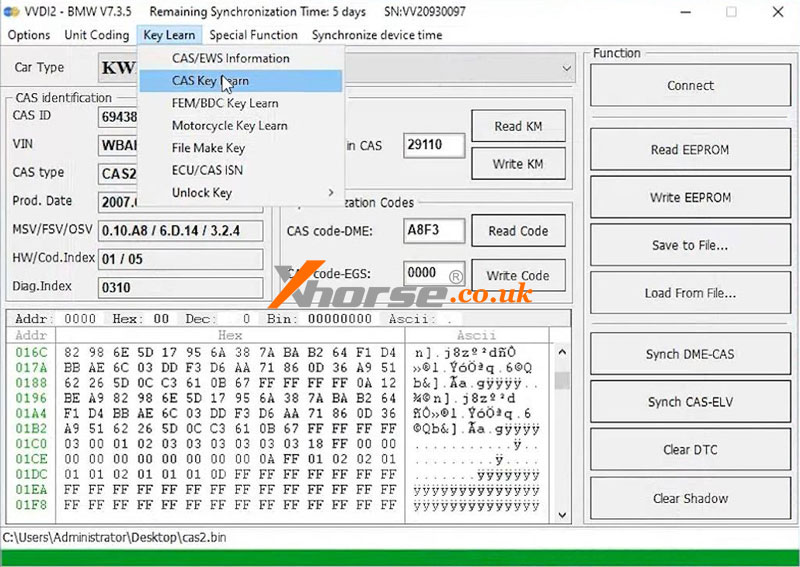
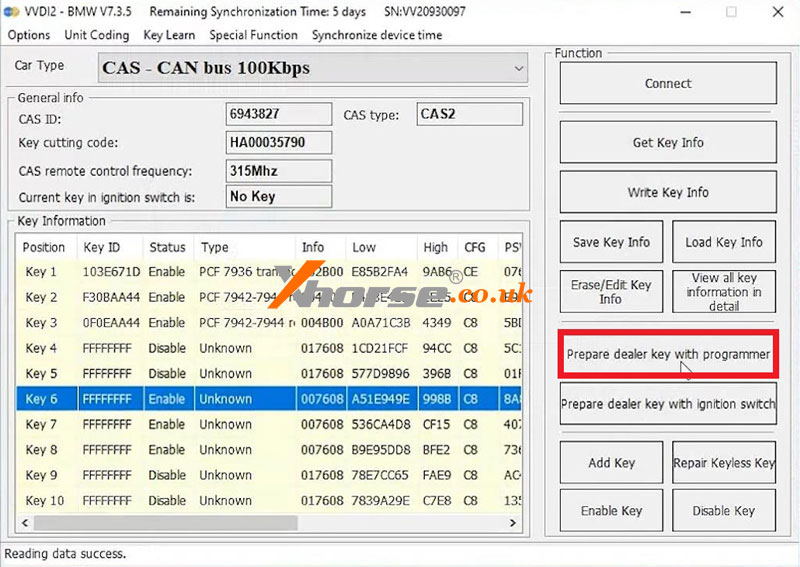
Key learn >> CAS key learn >> Connect >> Get key info >> Choose a blank key >> Prepare dealer key with programmer
Follow the prompts to put the key into VVDI2 when prompted to successfully generate the key. Click "OK".
Finally, test whether the key is generated successfully.
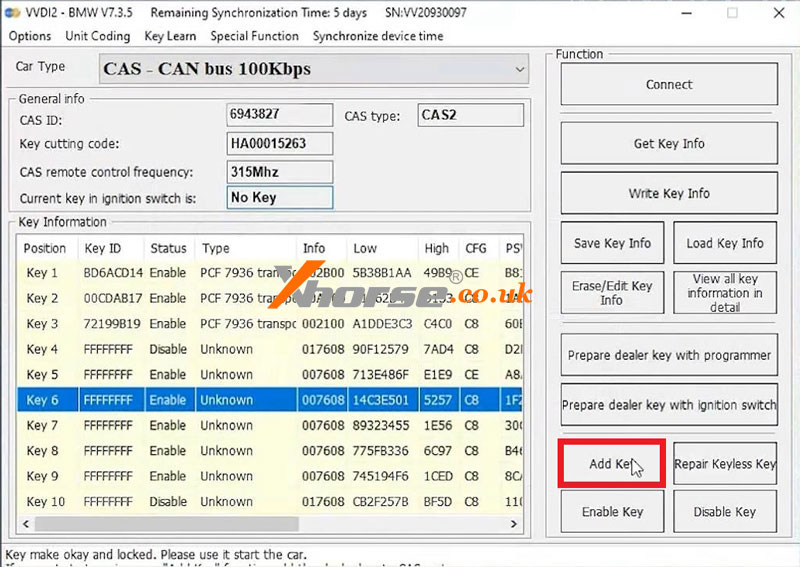
Click "Add key".
After writing the key to CAS, start testing whether the key is generated successfully.
Insert the generated key into the ECU key port.
The key does not pop up, which means it's generated successfully.
Done.


www.xhorse.co.uk
Oznake: xhorse vvd2
komentiraj (0) * ispiši * #
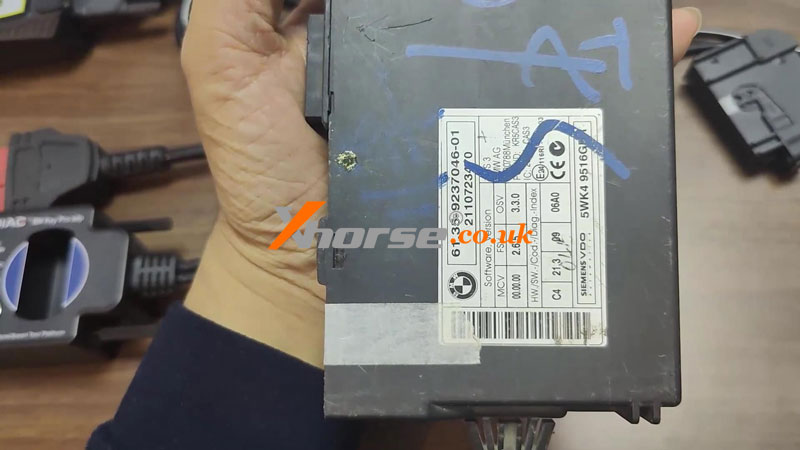
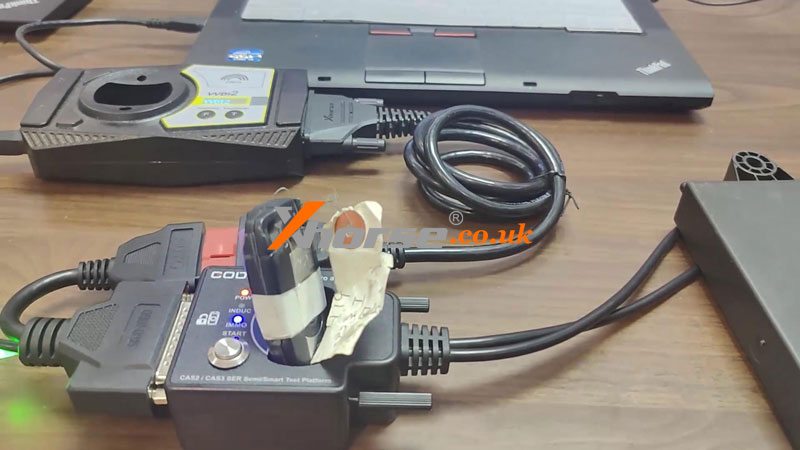
Xhorse VVDI2 + GODIAG Test Platform Read BMW CAS3++
19.02.2024.Today I'm gonna show how to read BMW CAS3++ IMMO data with Xhorse VVDI2 + GODIAG CAS2/CAS3 Test Platform. With GODIAG, we can better know if the key has been programmed.
Connect VVDI2, GODIAG Test Platform & CAS3++ module to the computer, we don't have to press the STAT button in this case.
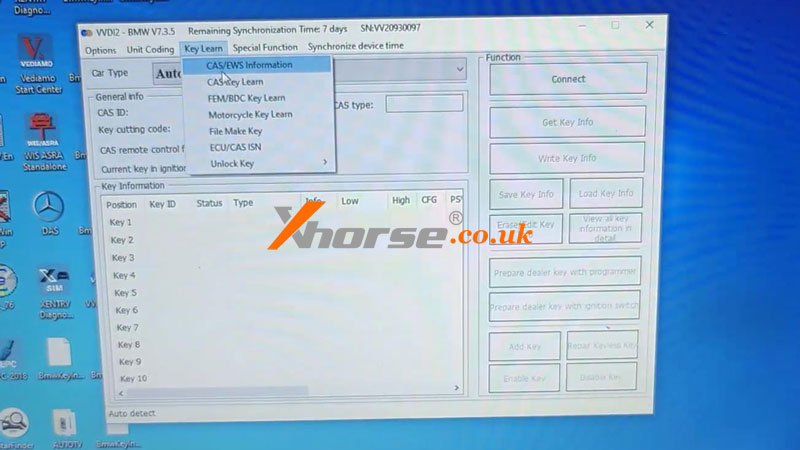
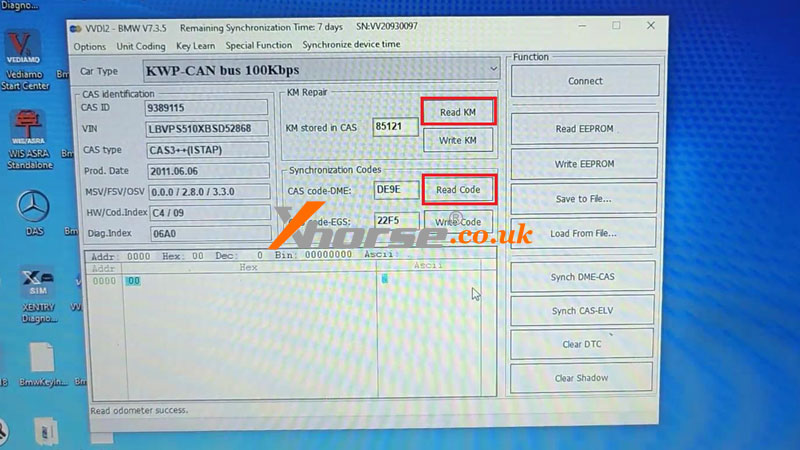
Open VVDI2 Software,
Key learn >> CAS/EWS information >> Connect >> Read Code
The dealer key should be taken away from the ignition switch.
If the key is keyless, please move it out of the car.
If there's no key in the ignition, continue anyway.
Press "OK" to continue.
Read KM >> OK
If the mileage can't be read out successfully, just turn on GODIAG ignition.
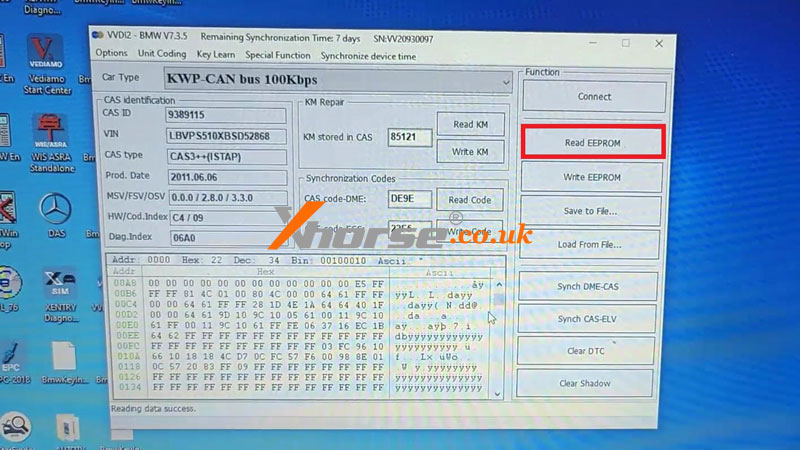
Read EEPROM >> OK
Current EEPROM is not the whole EEPROM. Please read and save it then continue with other functions.
Reading data success.
Save to file.
Press the START button on GODIAG.
Key learn >> CAS Key Learn >> Connect >> Get key info
Add key: You should insert a working key into the ignition and connect the device to the car before continuing.
Press OK to continue.
It tells us the key has been programmed.
Please use "Save Key Info" to save the original key information.
Save key info.
If adding a new key, put the key into the VVDI2 key slot.
Select a blank key position >> Prepare dealer key with programmer
After programming is completed, we can put the key into GODIAG for a test.
Just press the START button, if the IMMO light flashes with beeps, it means the key has been successfully programmed.

www.xhorse.co.uk
Oznake: Xhorse VVDI2
komentiraj (0) * ispiši * #
Xhorse VVDI Key Tool Plus + GODIAG Add BMW CAS3++ ISTAP Key
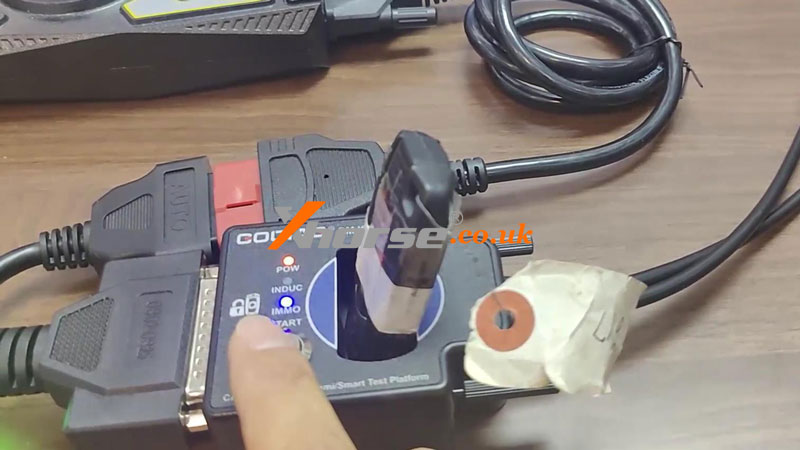
06.02.2024.This is a tutorial on how to add the BMW CAS3++ ISTAP key with Xhorse VVDI Key Tool Plus + GODIAG CAS3++ Test Platform. With the GODIAG test platform, we can detect if the key is programmed or not.
Step 1. Backup Immo Data
Connect Key Tool Plus, GODIAG test platform & CAS3++ module.
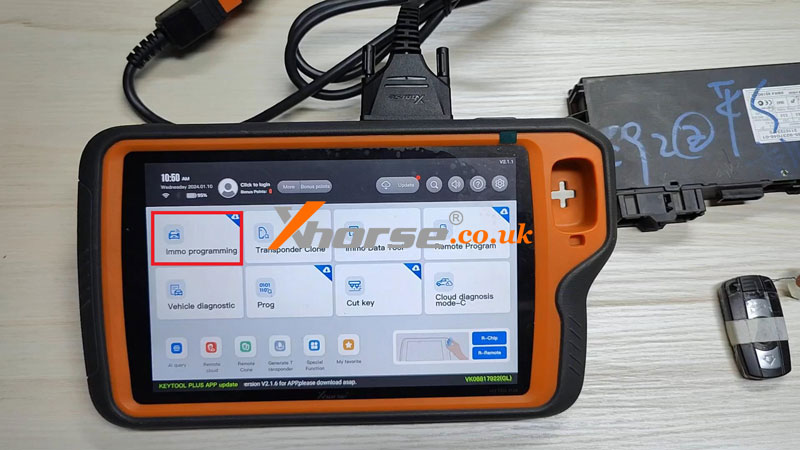
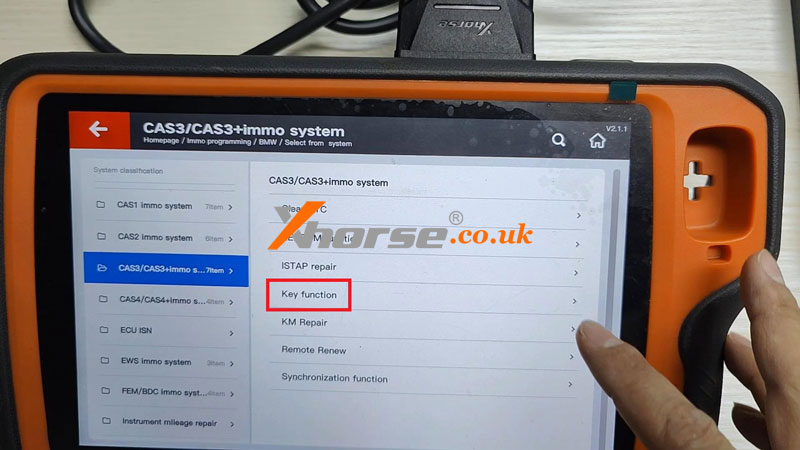
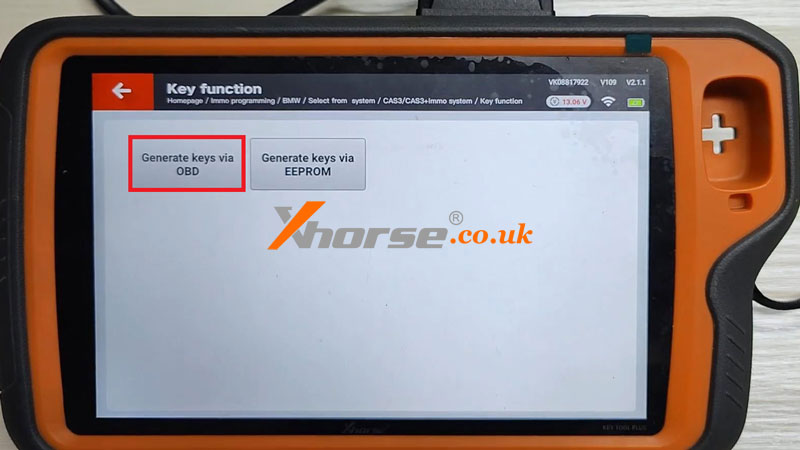
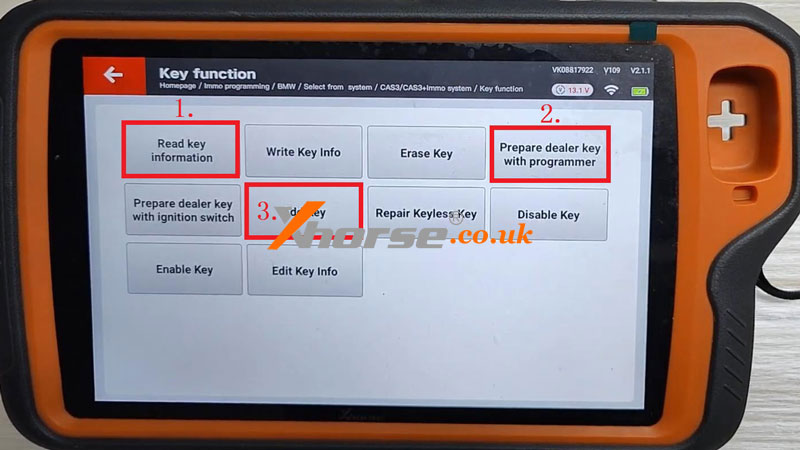
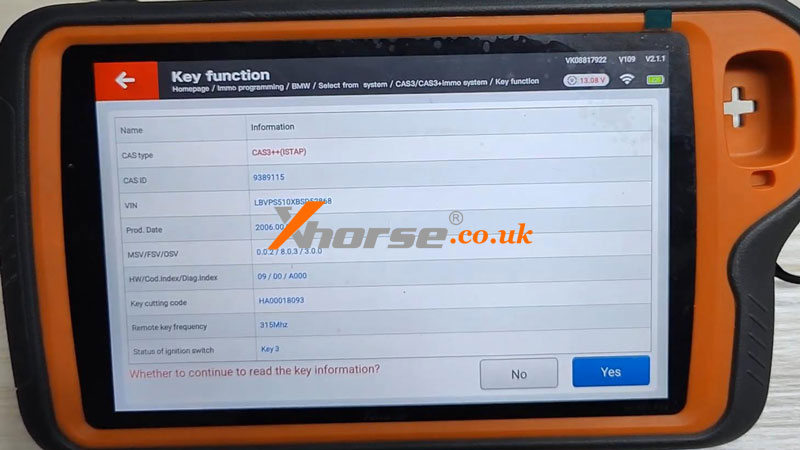
Immo programming >> Europe >> BMW >> Select form system >> CAS3/CAS3+ immo system >> Key function >> Start programming >> Generate keys via OBD >> Read key information
Add key: please insert the ignition key into the ignition switch and connect the vehicle and device well.
All keys lost: please insert a blank key into the ignition switch and connect the vehicle and device.
Click "Yes".
Confirm key information, and click "Yes".
The dealer key should be taken away from the ignition switch.
If the key is keyless, please move it out of the car.
If there's no key in the ignition, continue anyway.
Press "OK" to continue.
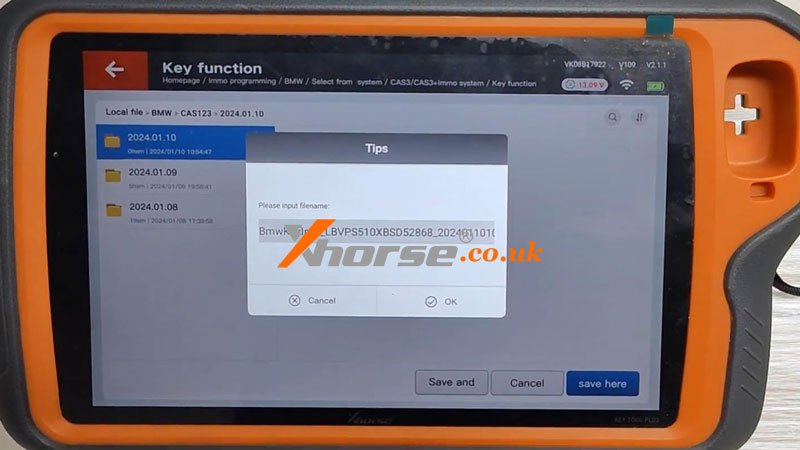
Save data file.
Step 2. Make Dealer Key
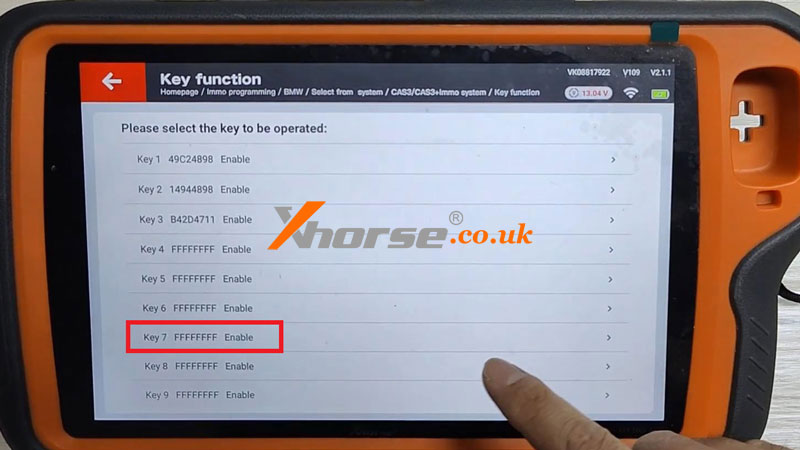
Prepare dealer key with programmer >> Select a blank key position: Key 7
CAS key data is encrypted, and support makes dealer key for it. Once failed, please contact the dealer!
Please put a new key into the Key Tool Plus programmer.
Is the current key the smart key? No
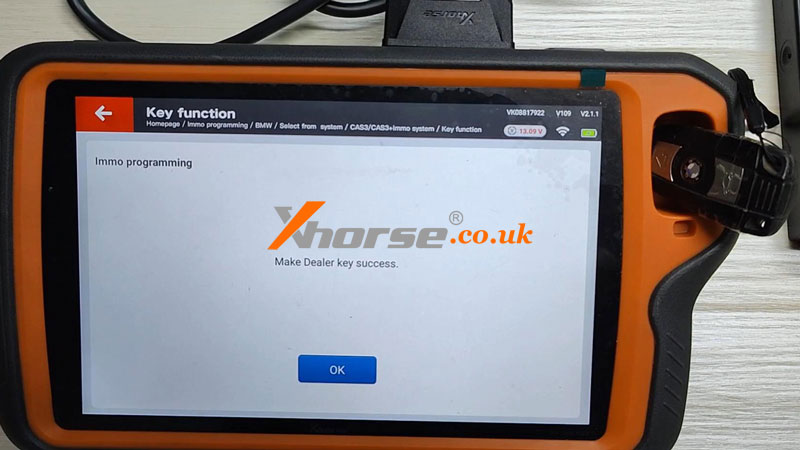
Make dealer key success.
Step 3. Add Key
Press "Add key".
This function adds the newly generated key to the IMMO system. Need to be executed "Generate dealer key", use programmer function to generate the key.
Press "Yes" to continue.
Please put a new key into the Key Tool Plus programmer.
Is the current key the smart key? No
The dealer key should be taken away from the ignition switch.
If the key is keyless, please move it out of the car.
If there's no key in the ignition, continue anyway.
Press "OK" to continue.
The dealer key should be taken away from the ignition switch.
If the key is keyless, please move it out of the car.
If there's no key in the ignition, continue anyway.
Press "OK" to continue.
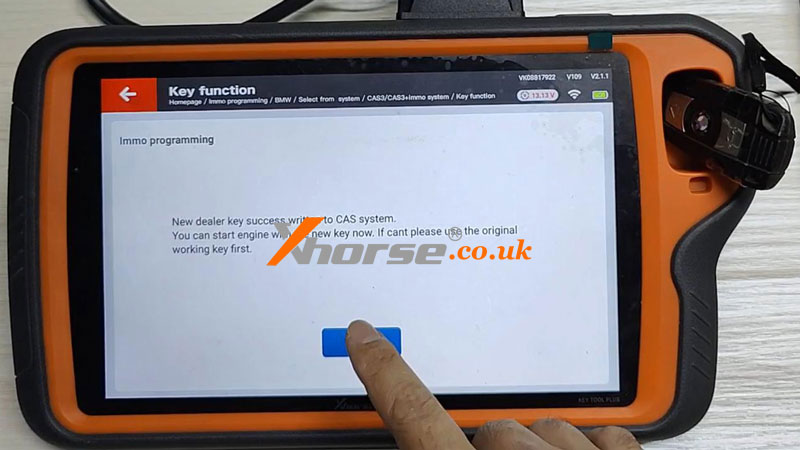
New dealer key success is written to the CAS system.
You can start the engine with the new key now. If can't please use the original working key first.
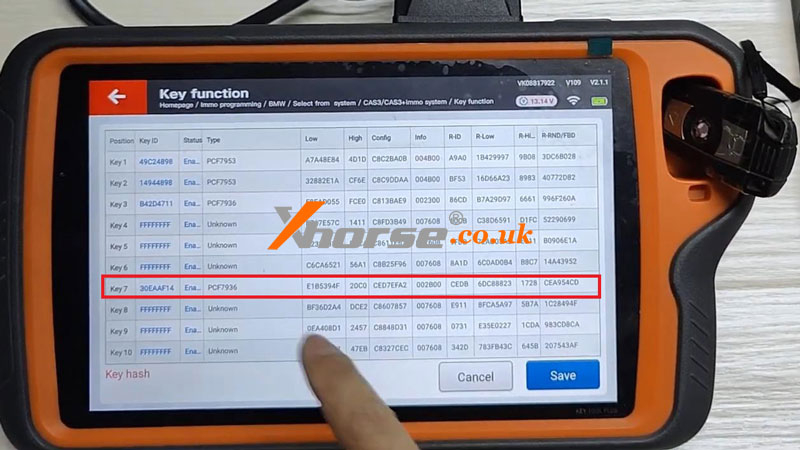
Go back to read key information.
We can see the Key7 has been successfully written.
Put the new key into GODIAG, and press the START button. The IMMO light flashed, which means the key was programmed.
www.xhorse.co.uk
Oznake: vvdi key tool plus
komentiraj (0) * ispiši * #
