Seven Tips for the Cable Installation
četvrtak , 18.08.2016.Cable installation can be a finicky thing. People without appropriate knowledge and training can not be capable of running cables, otherwise they will end up with network failure. End users might have the experience of running telephone cables, so that they want to take the risk of wiring network cables. In fact, telephone cables can tolerate quite a lot of errors, but that is not the case of the data cabling as it is quite sensitive to cable errors. Therefore, to avoid potential network error and reduce your risks of costly mistakes, here are several things you should know before the cable installation.
Using Cable Management
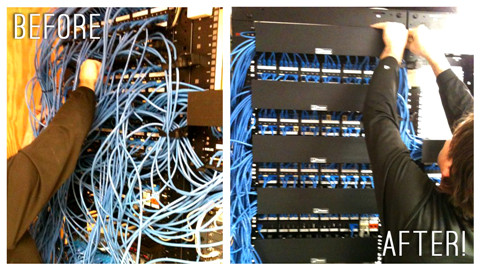
The first thing you should bear in your mind is that the cabling work won’t stop with the initial installation. More cables and optical devices will be added. Thus to make sure that you label appropriate cables, color-code cables, or implement some other kind of process to make it easier to identify cables later on. What’s more, adding ladder rack, rack-based cable management makes ongoing maintenance much, much easier. The following image can easily illustrate the importance of fiber cable management.

Running Cable in Parallel With Electrical Cables
Data cabling used UTP (unshielded twisted pairs) to achieve its goals. The magnetic field generated by the low voltage running through the cable is a critical component of the communications chain. When you run this unshielded cabling in parallel with electrical cables, that magnetic field is disrupted and the communication becomes noisy and garbled. In many cases, transmissions will simply not make it from Point A to Point B. In other cases, transmission rates will slow to a crawl as communications are constantly retried. If you have to go near electrical power lines, cross them in perpendicular instead. From a personal experience, a newly installed coaxial cable can be easily out of work if they are twisted around the overhead electrical cabling that ran between the two buildings.
Minding Distance Limitations of Your Cabling
It is known that the typical distance limitations for UTP cabling with up to 1 Gbps is 100 meters. However, if you're running cabling for some other purposes, such as 10 Gbps or 40 Gbps, be mindful of the distance limitations associated with the type of cabling you intend to use. For example, if you intend to run 10 Gbps for up to 100 meters over twisted pair cabling, you need to use Category 6A or better cabling. Or if you are running 10 Gbqs for up to 10 km, you need to use 10GBASE-LR SFP+with patch cord LC-LC.
Planning for Future Proofing
Maybe your network only provision 100 Mbps network connections to the desktop for now, even though the 1G Ethernet has become a ubiquitous standard. But suppose you are going to move to a new location and you need to install new cabling. Are you going to go with yesterday's best cabling technology or are you going to install something that will meet today's needs and your needs for the next few years?
Remember, the labor is the most expensive part of your project. While top-of-the-line cable won't be the least expensive option, you should consider reasonably high-end cable for your installation. Maybe you don't go with the absolute best, after all, many organizations won't need 10 Gbps to the desktop for quite some time but don't go for cheap, either.
Following the Cabling Standards
Many users might have the fallacy that there are only eight individual wires inside a cabling jacket, so why not terminate them at random as long as you use the same scheme at both ends? Of course, that is the bad ideas.

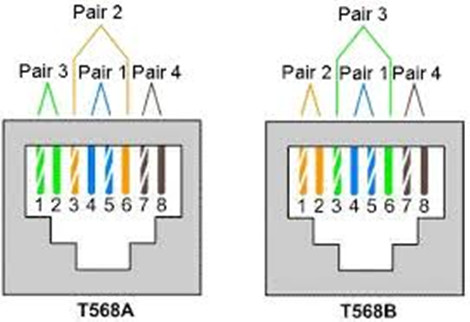
The cabling standard known as EAI/TIA-568-A and B are existed for a reason. This standard defines how the cables are twisted and placed in the jacket. If you deviate from those standards, you risk introducing noise and inefficiency into your cable plant that can have a negative impact on overall network performance. The following image shows UTP Cable Termination Standards EIA/TIA 568A and EIA/TIA 568B, and the only difference is that the green and orange pairs are terminated to different pins.
Testing the Cabling Results to Ensure Cabling System Properly Functioned
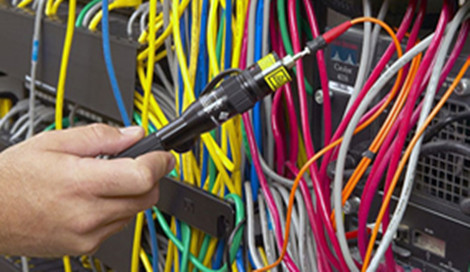
Once the cabling is installed, you should test every cable using appropriate tools to make sure that it will be suitable for its intended use. Fiber optic testing of newly installed systems not only verifies that the system meets its design requirements, but also creates a performance baseline for all future testing and troubleshooting of that system to support the evaluation of warranty claims. The following image shows a Visual fault locator (VFL), designed with a visible laser and universal adapter like FC, SC and ST etc., which can help user easily locate faults on the fiber link.

This testing typically includes verifying length and cable specifications matched to needs. If you need 1 Gbps transmission speeds, verify that the cable's properties will support that need. This testing result will ensure that the data necessary to properly evaluate any future system malfunctions will be available.
Ensure a Quality Installation With Quality Fiber Optics
The amount of information carried in two strands of optical fiber would require a copper cable four inches in diameter. When considering the space constraints, required bandwidth, and long distance transmission needs in today’s applications, fiber optic products are the only viable choice. Easy installation and upgrades allow you to meet future growth needs and install spare fiber today for a more economical choice than installing additional cables later. FS.COM gives you quality products for all your fiber optic needs to reduce your risk of network failure.
Conclusion
To sum up, improperly installed cabling can cripple network performance, create maintenance headaches, and lead to hidden costs. Besides the above tips, you are supposed to increase error-free work with trained technicians. Because the best practice in cable installation is a professional with the proper tools and certifications to ensure the proper installation of the network cabling. Note that a beginner who has little experience in cable installation should be instructed under a professional technician to proceed the cable installation.
Oznake: cable installation, cable management
komentiraj (0) * ispiši * #
Considerations About Fiber Optic Cable Installation
petak , 15.07.2016.It’s true that fiber optic cable, based on optical technology to carry information between two points, have become increasingly important in fiber optic systems. This cable is often attached with the same or different connectors on the ends to connect devices, for example, LC LC multimode patch cord (LCs on both ends). When used in premises, fiber optic cables can be used as backbone cabling in a standard structured cabling network, connecting network hardware in the computer room. And when applied in optimized fiber optic networks, they go directly to the work area with only passive connections in the links. They can be installed indoors or outdoors using several different installation processes. One of my recent blogs has talked about safety issues about fiber optic cable installation. Today, this article still focuses on its installation, but from other aspects, including the general guidelines, its pulling tension, bend radius, and so on.
When deployed outside, fiber optic cables may be direct buried, pulled or blown into conduit or innerduct, or installed aerially between poles. When used outside, they can be e installed in raceways, cable trays, placed in hangers, pulled into conduit or innerduct or blown though special ducts with compressed gas. The installation process depends on the nature of the installation and the type of cables being used.
Installation General Guidelines
First point to mention is that fiber optic cable is often custom-designed for the installation and the manufacturer may have specific instructions on its installation. So, it’s highly recommended to follow the cable manufacturer’s suggestions. Often, it’s necessary to check the cable length to make sure the cable being pulled is long enough for the run, so as to prevent having to splice fiber and provide special protection for the splices. Of course, it’s better to try to complete the installation in one pull. Prior to any installation, one should assess the route carefully to determine the methods of installation and obstacles that are likely to be encountered.
Pulling Tension
Fiber optic cable is designed to be pulled with much greater force than copper wire if pulled correctly, but excess stress may harm the fibers, potentially causing eventual failure. Cable manufacturers install special strength members, usually aramid yarn, for pulling. Fiber optic cable should only be pulled by these strength members. Any other method may put stress on the fibers and harm them. During installation, swivel pulling eyes should be used to attach the pulling rope or tape to the cable to prevent cable twisting during the pull.
Besides, cables should not be pulled by the jacket unless it is specifically approved by the cable manufacturers and an approved cable grip is used. Tight buffer cable can be pulled by the jacket in premises applications if a large (~40 cm, 8 in.) spool is used as a pulling mandrel. It’s right to wrap the cable around the spool 5 times and hold gently when pulling.
It’s ill-advised to exceed the maximum pulling tension rating. It’s suggested to consult the cable manufacturer and suppliers of conduit, innerduct, and cable lubricants for guidelines on tension ratings and lubricant use.
On long runs (up to approximately 3 miles or 5 kilometers), one should use proper lubricants and make sure they are compatible with the cable jacket. If possible, an automated puller can be used with tension control and/or a breakaway pulling eye. On very long runs (farther than approximately 2.5 miles or 4 kilometers), one should pull from the middle out to both ends or use an automated fiber puller at intermediate point(s) for a continuous pull.
Bend Radius
When there are no specific recommendations from the cable manufacturer, the cable should not be pulled over a bend radius smaller than twenty (20) times the cable diameter. And after completion of the pull, the cable should not have any bend radius smaller than ten times the cable diameter.
Twisting cable
It’s known that twisting the cable can stress the fibers, thus in no case should one twist the cable. (Tension on the cable and pulling ropes can cause twisting.)
Use a swivel pulling eye to connect the pull rope to the cable to prevent pulling tension causing twisting forces on the cable.
Roll the cable off the spool instead of spinning it off the spool end to prevent putting a twist in the cable for every turn on the spool.
When laying cable out for a long pull, use a “figure 8” on the ground to prevent twisting. The figure 8 puts a half twist in on one side of the 8 and takes it out on the other, preventing twists.
Conclusion
Fiber optic cables have been widely deployed for computer net- works (LANs), closed circuit TV (video), voice links (telephone, intercom, audio), building management, security or fire alarm systems, or any other communications link. With its installation in large scale, it’s of great importance to know some basic points on cable installation discussed in this text. As for the fiber optic cables chosen for project, you can try Fiberstore, whose cables are available in many types, like SC fiber optic cable, LC SC cable, MTP cable. All are test- and quality-assured, suitable for both indoor and outdoor installation.
Oznake: fiber optic cable, connectors, LCs, LC LC multimode patch cord, SC fiber optic cable, cable installation
komentiraj (0) * ispiši * #


