Decoding the Process: How to Unclog a Septic Tank Drain Pipe
petak , 24.11.2023.A septic tank is a critical component of a home's wastewater management system, and when its drain pipe becomes clogged, it can lead to unpleasant issues such as slow drains, foul odors, and potential backups. Unclogging a septic tank drain pipe is a task that, when done correctly, helps maintain the proper functioning of the entire septic system. In this article, we'll walk you through a step-by-step guide on how to unclog a septic tank drain pipe effectively.
Identifying Signs of a Clogged Septic Tank Drain Pipe: Before delving into the unclogging process, it's essential to recognize the signs of a clogged septic tank drain pipe. These may include slow drains, gurgling sounds in plumbing fixtures, foul odors around drains, or standing water around the septic tank area.
Materials and Tools You'll Need:
1. Protective Gear: Wear gloves and safety goggles to protect yourself from potential exposure to contaminants.
2. A Garden Hose: A garden hose long enough to reach the septic tank.
3. A Plumbing Snake or Auger: An auger or plumbing snake designed for septic systems is useful for dislodging clogs.
4. A Pipe Wrench: In case you need to disconnect pipes for a more thorough inspection.
5. A Bucket: To catch any water that may drain when pipes are disconnected.
Step-by-Step Guide to Unclog a Septic Tank Drain Pipe:
1. Identify the Location of the Clog: Determine which drain or drains in your home are affected. This will help you pinpoint the location of the clog and assess whether it is localized to a specific area.
2. Access the Septic Tank: Locate the access point to your septic tank. This is typically a capped pipe extending from the ground. If your tank has multiple access points, choose the one closest to the affected drain.
3. Open the Septic Tank Access: Carefully remove the cap from the septic tank access point. Use caution, as the gases released can be unpleasant. Allow the tank to vent for a few minutes before proceeding.
4. Inspect the Baffle: The baffle is a device inside the tank that prevents solids from flowing into the drain field. Inspect the baffle for any visible signs of clogs or blockages. If you notice debris, use a rake or similar tool to remove it.
5. Use a Garden Hose: With the septic tank access open, insert a garden hose into the drain pipe. Turn the hose on and direct the water flow into the pipe. The force of the water can help dislodge and flush away minor clogs.
6. Employ a Plumbing Snake or Auger: If the clog persists, use a plumbing snake or auger. Insert the tool into the drain pipe and rotate it to break up and remove the obstruction. Follow the manufacturer's instructions for proper usage.
7. Check Drainage: Turn on water fixtures inside your home to check if water drains freely. This step ensures that the clog has been successfully cleared.
8. Reassemble and Secure: Once you're confident that the clog is cleared, reassemble the septic tank access, ensuring the cap is tightly secured. If you disconnected any pipes during the process, reconnect and secure them using a pipe wrench.
9. Monitor and Maintain: Keep an eye on the performance of your drains in the following days. If issues persist, or if you notice a recurrence of clogs, it may be advisable to seek professional assistance for a more in-depth inspection.
Preventive Measures: To minimize the risk of future clogs, consider implementing these preventive measures:
• Regular Pumping: Schedule regular septic tank pumping to remove accumulated solids and prevent them from reaching the drain pipe.
• Limit Grease Disposal: Avoid disposing of grease down drains, as it can solidify and contribute to clogs.
• Use Septic-Safe Products: Choose cleaning and personal care products labeled as septic-safe to reduce the impact on your septic system.
In conclusion, how to unclog a septic tank drain pipe requires a systematic approach and a combination of tools. While the steps outlined above offer a comprehensive guide, it's crucial to prioritize safety and, if needed, consult with a professional for more complex issues. Regular maintenance and responsible usage of your septic system can contribute to its longevity and efficient operation.
komentiraj (0) * ispiši * #
Unraveling the Mystery: Why Does My Faucet Drip After I Turn It Off?
petak , 10.11.2023.Introduction:
A dripping faucet can be an irksome household woe, especially when it persists after you've turned off the water. This enigma often leaves homeowners wondering about the root cause and the necessary solutions. In this article, we delve into the reasons behind a faucet that continues to why does my faucet drip after i turn it off, providing insights into the common culprits and practical remedies.
Possible Causes:
1. Worn-Out Washer: The washer is a small but crucial component within the faucet that forms a seal to prevent water from flowing when the tap is turned off. Over time, wear and tear on the washer can compromise this seal, allowing water to seep through and create that persistent drip.
2. Faulty Valve Seat: The valve seat is the area where the faucet and spout connect. If this connection becomes loose or damaged, it can lead to water leakage after shutting off the faucet. Tightening or replacing the valve seat may be necessary to eliminate the post-use dripping.
3. Damaged O-Ring: O-rings are rubber seals that provide watertight connections in various parts of the faucet. When these rings become damaged or corroded, they can no longer effectively seal, leading to leaks even after the water is turned off. Replacing the O-ring is a typical remedy for this issue.
4. High Water Pressure: Excessive water pressure can strain the internal components of the faucet, causing wear and tear that leads to leaks. Installing a pressure regulator can help control the water flow, preventing undue stress on the faucet and reducing the likelihood of dripping.
5. Malfunctioning Faucet Cartridge: Faucets equipped with cartridges control the water flow. If this cartridge is damaged or faulty, it can result in continuous dripping after use. Replacing the cartridge is often necessary to restore the faucet's proper functioning.
Solutions:
1. Replace the Worn Washer: Turn off the water supply, disassemble the faucet, and locate the worn washer. Swap it out with a new one and ensure a snug fit. Reassemble the faucet, turn the water supply back on, and check for any remaining leaks.
2. Tighten or Replace the Valve Seat: If the valve seat is loose, use a wrench to tighten it. For a damaged seat, replacement may be required. Turn off the water supply, disassemble the faucet, and make the necessary adjustments. Reassemble the faucet and test for leaks.
3. Swap out the O-Ring: Turn off the water supply, remove the faucet handle, and access the O-ring. Replace the damaged or corroded O-ring with a new one. Reassemble the faucet and turn the water supply back on to check for leaks.
4. Install a Pressure Regulator: If high water pressure is suspected, install a pressure regulator to maintain a consistent and safe water pressure level. This can prevent stress on the faucet components and reduce the chances of post-use dripping.
5. Replace the Faucet Cartridge: Turn off the water supply, disassemble the faucet, and locate the cartridge. Remove the old, damaged cartridge and replace it with a new one. Reassemble the faucet and turn the water supply back on to ensure that the dripping issue has been resolved.
Conclusion:
Understanding why does my faucet drip after i turn it off is crucial for effective resolution. By identifying the specific cause and applying the appropriate solution, homeowners can eliminate the annoyance of post-use leaks, conserve water, and ensure the longevity of their plumbing fixtures. Regular maintenance and prompt attention to dripping faucets contribute to a more efficient and sustainable household.
komentiraj (0) * ispiši * #
Cutting PVC Pipe: A Comprehensive Guide
petak , 20.10.2023.Polyvinyl chloride (PVC) pipes are a versatile and commonly used material in plumbing, construction, and DIY projects due to their durability, affordability, and ease of handling. Whether you're a professional plumber or a DIY enthusiast, knowing how to cut PVC pipe accurately and safely is an essential skill. In this comprehensive guide, we'll explore various methods and tools to ensure you can cut PVC pipe with precision.
Safety First
Before delving into the cutting methods, it's vital to prioritize safety. When working with PVC pipes, be sure to wear safety goggles to protect your eyes from flying debris and gloves to prevent any accidents or injuries. Adequate ventilation in your workspace is also important to avoid inhaling fumes or dust created during the cutting process.
1. Using a Handsaw
One of the most accessible methods for cutting PVC pipes is using a handsaw. Follow these steps to cut PVC pipes with a handsaw:
1. Measure and Mark: Measure the desired length on the PVC pipe and mark it using a pencil or marker. Ensure the mark is straight and clear.
2. Secure the Pipe: To keep the pipe steady during cutting, use a bench vise or secure it in place with clamps. This ensures a straight and even cut.
3. Cut with a Handsaw: Position the handsaw blade on the mark, ensuring that the teeth of the saw blade touch the PVC pipe. Apply gentle, even pressure, and make slow, steady strokes. Allow the saw to do the work as you cut through the pipe.
4. Deburring: After cutting, you may notice rough or sharp edges. Use a deburring tool or sandpaper to smooth and round the edges, making the cut safe to handle and connect.
2. Using a PVC Pipe Cutter
A PVC pipe cutter is a specialized tool designed for cutting PVC pipes efficiently, providing clean and burr-free cuts. Here's how to use it:
1. Measure and Mark: Measure the pipe length you need and mark it clearly on the PVC pipe.
2. Position the Cutter: Open the jaws of the PVC pipe cutter and place it on the marked line, ensuring it is perpendicular to the pipe.
3. Close the Cutter: Apply steady pressure to the cutter's handles to close the jaws around the pipe. Continue to apply pressure while rotating the cutter around the pipe. The blade inside the cutter will smoothly cut through the PVC pipe.
4. Deburring: Just like with the handsaw method, use a deburring tool or sandpaper to smooth any rough edges for a clean finish.
3. Using a Hacksaw
If you don't have access to a PVC pipe cutter, a hacksaw can also be an effective tool for cutting PVC pipes. Here's how:
1. Measure and Mark: Measure the desired length on the PVC pipe and mark it.
2. Secure the Pipe: Secure the PVC pipe using a bench vise or clamps to prevent movement during the cutting process.
3. Cut with a Hacksaw: Position the hacksaw blade on the mark, ensuring it is perpendicular to the pipe. Apply even, gentle pressure and use slow, controlled strokes to achieve a straight cut.
4. Deburring: After cutting, use a deburring tool or sandpaper to smooth out any rough edges.
4. Using Power Tools
For larger PVC pipes or when numerous cuts are required, power tools like a circular saw or miter saw can be efficient:
1. Mark and Secure: Measure the PVC pipe and mark it as needed. Secure the pipe in place using clamps or a bench vise.
2. Circular Saw: For a circular saw, adjust the blade depth to ensure it only cuts through the PVC pipe. Position the saw blade along the marked line and make a clean, quick cut.
3. Miter Saw: A miter saw is ideal for precise, angled cuts on PVC pipes. Set the desired angle, align the marked line with the saw blade, and cut.
4. Deburring: After using power tools, deburr the edges with a deburring tool or sandpaper to ensure a smooth, safe finish.
Conclusion
Having the knowledge and skills to cut PVC pipes accurately is essential for a variety of projects. Whether you're using a handsaw, PVC pipe cutter, hacksaw, or power tools, precision and safety should be your top priorities. By following the appropriate technique and taking safety precautions, you can achieve clean, accurate cuts on PVC pipes, ensuring the success of your plumbing, construction, or DIY projects.
komentiraj (0) * ispiši * #
Understanding the Cost of Repiping Your Home: What You Need to Know
subota , 02.09.2023.Introduction
Repiping your home can be a significant and necessary investment to ensure the reliability and safety of your plumbing system. Over time, pipes can deteriorate, leading to leaks, low water pressure, and other plumbing issues. Understanding the cost associated with repiping is essential for homeowners considering this important renovation. In this article, we will explore the factors that influence the cost of repiping your home and provide insights into what you can expect.
Factors Affecting Repipe Cost
1. Size of Your Home: The size of your home is a primary factor that influences the cost of repiping. Larger homes typically have more plumbing fixtures and require more piping materials, which can increase the overall cost.
2. Type of Material: The type of piping material you choose plays a crucial role in determining the cost. Common materials for repiping include copper, PEX, CPVC, and galvanized steel. Copper is often more expensive than PEX or CPVC, while galvanized steel may require more labor due to its weight and complexity to work with.
3. Accessibility: The ease of access to your plumbing system can impact the cost. If your pipes are located in hard-to-reach areas, such as within walls or under a concrete slab, the labor costs may be higher.
4. Number of Bathrooms and Fixtures: Homes with multiple bathrooms and fixtures like sinks, showers, and toilets will require more piping and connections, which can increase the overall cost.
5. Local Labor Rates: Labor rates can vary significantly depending on your location. Areas with higher living costs tend to have higher labor rates, which will influence the total repipe cost.
6. Additional Upgrades: If you plan to upgrade your plumbing fixtures or add extra features during the repiping process, such as water softeners or filtration systems, these additions will contribute to the overall cost.
Estimating Repipe Costs
While the specific cost of repiping your home can vary widely based on the factors mentioned above, it's possible to provide a rough estimate. On average, repiping a smaller home with basic materials like PEX or CPVC can cost between $2,000 to $4,000. For larger homes or those requiring more expensive materials like copper, the cost can range from $5,000 to $10,000 or more.
It's crucial to obtain multiple quotes from reputable plumbing professionals to get an accurate estimate tailored to your home's unique needs.
Benefits of Repiping
While repiping your home can be a significant expense, it offers several benefits that make it a worthwhile investment:
1. Improved Water Quality: New pipes reduce the risk of rusty water and contaminants, ensuring cleaner and safer drinking water.
2. Enhanced Water Pressure: Repiping can significantly improve water pressure, providing efficient water flow throughout your home.
3. Reduced Maintenance: Modern materials are less prone to corrosion and leaks, reducing the need for frequent repairs.
4. Increased Home Value: Repiping can increase the value of your home, making it more appealing to potential buyers.
Conclusion
Understanding the repipe cost your home is essential for homeowners considering this important renovation. The total cost depends on various factors, including the size of your home, the type of material used, accessibility, and local labor rates. While it can be a significant investment, the benefits of repiping, such as improved water quality, enhanced water pressure, reduced maintenance, and increased home value, make it a valuable long-term investment in your property and your family's well-being.
komentiraj (0) * ispiši * #
Rerouting Water Lines: Enhancing Plumbing Efficiency and Functionality
petak , 18.08.2023.Rerouting a water line is a strategic plumbing solution often undertaken to optimize water distribution, address issues, or accommodate changes in property layout. Whether you're renovating your home, expanding your living space, or encountering plumbing challenges, understanding the process and benefits of reroute water lines is essential. In this comprehensive guide, we explore the reasons for rerouting water lines, the steps involved, and key considerations to ensure a successful and effective plumbing transformation.
Reasons for Rerouting Water Lines
1. Property Renovation: When renovating, adding rooms, or altering layouts, rerouting water lines may be necessary to align with new configurations.
2. Addressing Issues: Rerouting water lines can resolve problems like low water pressure, frequent leaks, or inadequate water distribution.
3. Fixture Upgrades: Upgrading fixtures such as sinks, showers, or appliances may require rerouting water lines to accommodate new connections.
4. Preventing Contamination: Rerouting water lines can help avoid cross-contamination by separating potable and non-potable water sources.
The Rerouting Process
1. Assessment and Planning: A professional plumber assesses the existing water line layout, identifies the rerouting needs, and devises a comprehensive plan.
2. Shut Off and Drain: The water supply is shut off, and the water lines are drained to prepare for rerouting.
3. Pipe Installation: New pipes are installed along the desired path, ensuring proper sizing and connection points.
4. Connection and Testing: The new water lines are connected to the existing system, and the entire network is thoroughly tested for leaks and functionality.
5. Insulation and Restoration: Insulation is added to protect the new water lines, and any areas that were opened are restored to their original condition.
Key Considerations
1. Professional Expertise: Rerouting water lines requires specialized plumbing knowledge. Consult a licensed plumber to ensure accurate and safe installation.
2. Budget and Timeline: Plan for expenses related to materials, labor, and potential modifications. Also, consider how the rerouting fits into your overall project timeline.
3. Permits and Codes: Depending on your location, rerouting water lines may require permits. Compliance with local building codes is essential.
4. Material Selection: Choose appropriate piping materials based on water quality, intended use, and budget. Common choices include copper, PEX, and CPVC.
5. Future Needs: Anticipate potential changes in water usage and plan for future needs when rerouting water lines.
Benefits of Professional Rerouting
1. Precision and Safety: Professional plumbers have the expertise to reroute water lines accurately and safely, minimizing risks and ensuring proper connections.
2. Code Compliance: Licensed plumbers are well-versed in building codes and regulations, ensuring your rerouting project adheres to legal standards.
3. Minimized Disruptions: Professional rerouting reduces potential disruptions, ensuring a smoother transition and minimal inconvenience.
4. Long-Term Reliability: Proper installation by professionals reduces the likelihood of leaks and ensures the longevity of your plumbing system.
Conclusion
Rerouting water lines is a significant undertaking that requires careful planning, execution, and attention to detail. Whether you're seeking to enhance plumbing efficiency, address issues, or accommodate changes, professional guidance is crucial. By understanding the reasons for rerouting water lines, the process involved, and the advantages of enlisting expert help, you can ensure a successful plumbing transformation that enhances your property's functionality, efficiency, and value. Remember, when it comes to rerouting water lines, investing in expertise today can lead to a more reliable and efficient plumbing system for years to come.
komentiraj (1) * ispiši * #
How to Repipe a House: A Step-by-Step Guide to Upgrading Your Plumbing System
petak , 04.08.2023.Repiping a house is a significant home improvement project that involves replacing the existing plumbing pipes with new ones. Whether you're facing recurring plumbing issues or have an older home with outdated pipes, repiping can be the solution to improve the functionality and efficiency of your water supply. While this task may seem daunting, with proper planning and the right approach, you can know how to repipe a house. In this step-by-step guide, we'll walk you through the process of repiping a house, from assessment to completion, ensuring a smooth and successful project.
Step 1: Assess Your Plumbing System
Start by assessing your current plumbing system to determine if repiping is necessary. Look for signs of aging pipes, such as rust, leaks, low water pressure, or discolored water. If you encounter these issues frequently, it's likely time to repipe your house. Consider hiring a professional plumber to conduct a thorough inspection and provide expert advice on the best course of action.
Step 2: Plan and Choose Materials
Once you've decided to repipe, it's essential to plan the project carefully. Decide on the type of pipes you'll use for the repiping. Common options include copper, PEX (cross-linked polyethylene), and CPVC (chlorinated polyvinyl chloride). Each material has its advantages, so consider factors such as cost, durability, and compatibility with your local building codes.
Step 3: Gather Tools and Materials
Before you begin repiping, gather all the necessary tools and materials. Some typical tools you may need include pipe cutters, soldering equipment (for copper pipes), pipe wrenches, and a tubing cutter (for PEX or CPVC pipes). Additionally, purchase the appropriate fittings, connectors, and other materials required for the project.
Step 4: Shut Off Water Supply and Drain Pipes
Before starting the repiping work, shut off the main water supply to your house. It's crucial to drain the existing pipes to prevent water leakage during the repiping process. Open all faucets and flush toilets to remove water from the plumbing system.
Step 5: Remove Old Pipes
Carefully remove the old pipes from your house. If you're working with copper pipes, use a pipe cutter to make clean cuts and remove sections of the pipe. For PEX or CPVC pipes, carefully detach fittings and connectors to free the pipes from the plumbing system.
Step 6: Install New Pipes
With the old pipes removed, begin installing the new pipes. Depending on the material you've chosen, you may use different installation methods. For copper pipes, soldering is often used to connect joints. PEX and CPVC pipes typically use push-fit or solvent cement fittings for secure connections.
Step 7: Route Pipes through Walls and Ceilings
As you install the new pipes, ensure they are routed properly through walls, ceilings, and floors. This requires careful planning to minimize damage to your home's structure. Make sure the new pipe runs are efficient and logical, allowing for easy access and maintenance.
Step 8: Test the Plumbing System
Once the new pipes are installed, it's time to test the plumbing system. Turn on the main water supply and check for any leaks or water pressure issues. Address any problems promptly to ensure a properly functioning system.
Step 9: Patch and Restore
After successful testing, patch any holes or openings made during the repiping process. Repair and restore the affected areas to their original condition, ensuring your home looks as good as new.
Step 10: Clean Up and Inspect
Finally, clean up the work area and inspect the entire plumbing system one last time. Ensure that everything is in proper working order and that there are no visible signs of damage or leaks.
Conclusion
Repiping a house is a significant undertaking, but with proper planning and execution, it can greatly improve the functionality and efficiency of your plumbing system. By following this step-by-step guide, you can successfully complete the repiping project and enjoy a reliable and hassle-free water supply for your home. However, if you're not confident in your DIY skills or if the project seems too complex, don't hesitate to seek professional help from a licensed plumber. A professional can ensure that the repiping a house process is done correctly, giving you peace of mind and a plumbing system that serves you well for many years to come.
komentiraj (0) * ispiši * #
Repiping a House with PEX: Enhancing Plumbing Efficiency and Reliability
petak , 21.07.2023.Over time, the plumbing system in a house can deteriorate, leading to issues such as leaks, reduced water pressure, and even water damage. If your home's plumbing is aging, corroded, or experiencing frequent problems, repiping with PEX (cross-linked polyethylene) can be an effective solution to improve plumbing efficiency and reliability. This article explores the benefits of repipe a house with pex and the steps involved in the process.
Why Repipe with PEX?
PEX is a flexible and durable material that has gained popularity as a reliable plumbing option in recent years. Its cross-linked molecular structure makes it resistant to corrosion, scaling, and freezing, ensuring a longer lifespan compared to traditional materials like copper or galvanized steel. Repiping a house with PEX offers several significant benefits:
1. Improved Water Quality: PEX does not corrode or leach harmful chemicals into the water supply, resulting in improved water quality and taste.
2. Reduced Leaks: PEX is less likely to develop leaks and is not susceptible to the pinhole leaks that can occur in copper pipes.
3. Enhanced Durability: PEX is highly resistant to common plumbing issues, such as freezing and bursting, making it a more reliable option for both hot and cold water lines.
4. Faster Installation: PEX is lightweight and flexible, making it easier and quicker to install than rigid materials like copper.
5. Cost-Effectiveness: Repiping with PEX can be more cost-effective than traditional materials, both in terms of material costs and labor.
The Repiping Process
Repiping a house with PEX is a significant project that requires careful planning and execution. It is recommended to hire a licensed and experienced plumber to ensure the job is done correctly. The process generally involves the following steps:
1. Inspection and Planning: A qualified plumber will inspect the existing plumbing system to assess its condition and determine the scope of the repiping project. The plumber will create a detailed plan, including identifying the locations of new PEX pipes and any necessary modifications to the existing plumbing.
2. Shutting Off Water Supply: Before any work begins, the water supply to the house will be shut off. This is a critical safety measure to prevent flooding and ensure a smooth repiping process.
3. Removal of Existing Pipes: The old pipes, such as copper or galvanized steel, will be removed from the plumbing system. The removal process may involve cutting and detaching the pipes from fittings.
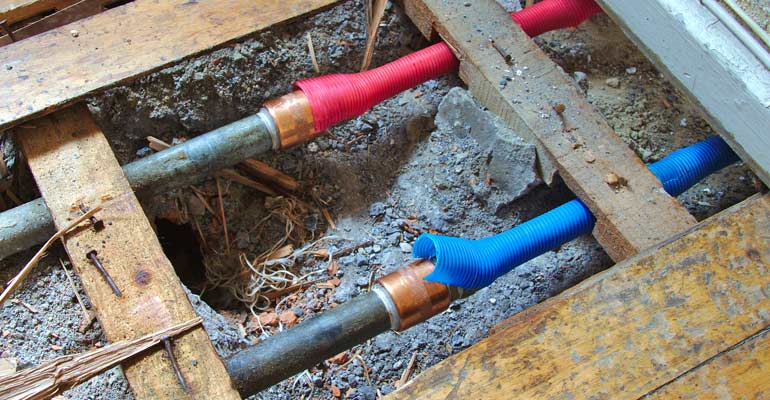
4. Installation of PEX Pipes: Once the old pipes are removed, the plumber will begin installing the new PEX pipes. PEX is available in different colors, with red typically used for hot water lines and blue for cold water lines. The flexible nature of PEX allows for easier maneuverability and installation in tight spaces.
5. Fittings and Connections: PEX pipes are connected using various methods, including crimping, compression, and push-fit fittings. The plumber will carefully secure all connections to prevent any potential leaks.
6. Pressure Testing: After the installation is complete, the plumbing system will undergo pressure testing to ensure there are no leaks. This step is crucial for verifying the integrity of the newly installed PEX pipes.
7. Insulation and Restoration: Once the pressure testing is successful, the plumber will insulate any exposed PEX pipes to protect them from freezing temperatures. Finally, any areas that were opened up during the repiping process, such as walls or floors, will be restored to their original condition.
Conclusion
Repipe a house with PEX is a significant investment in the long-term health and efficiency of your plumbing system. The benefits of improved water quality, reduced leaks, and enhanced durability make PEX a compelling choice for homeowners seeking a reliable and cost-effective plumbing solution. If you're experiencing frequent plumbing issues or have an aging plumbing system, consult with a licensed plumber to assess your needs and determine whether repiping with PEX is the right solution for your home. With the proper planning and professional installation, PEX repiping can provide peace of mind and years of trouble-free plumbing performance.
komentiraj (0) * ispiši * #
Understanding the Cost of Home Repiping: Factors to Consider
četvrtak , 29.06.2023.Introduction
Repiping a home is a significant undertaking that involves replacing the plumbing pipes throughout the entire property. This process becomes necessary when the existing pipes are old, corroded, leaking, or causing water pressure issues. The home repipe cost can vary depending on several factors. In this article, we will explore the key factors that influence the cost of repiping a home and provide a general overview of the expenses involved.
Size of the Home
The size of the home is a primary factor in determining the cost of repiping. Larger homes typically have more plumbing fixtures, bathrooms, kitchens, and additional plumbing connections. Consequently, they require more materials and labor, leading to a higher repiping cost compared to smaller residences.
Type of Pipes
The choice of pipes for repiping can significantly impact the cost. Different pipe materials, such as copper, PEX (cross-linked polyethylene), and CPVC (chlorinated polyvinyl chloride), have varying costs. Copper pipes are known for their durability and longevity but tend to be more expensive. PEX pipes offer flexibility and cost-effectiveness, while CPVC pipes are a budget-friendly option. The selection of pipe material depends on factors such as budget, specific needs, and local building codes.
Complexity of the Plumbing System
The complexity of the plumbing system within the home can affect the cost of repiping. If the existing pipes are easily accessible, such as being located in basements or crawl spaces, the labor costs may be lower. However, if the pipes are concealed within walls, under concrete slabs, or in hard-to-reach areas, additional labor and time will be required, leading to increased costs.
Local Labor and Material Costs
The cost of repiping a home can vary based on regional factors, including local labor and material costs. Factors such as the cost of living, supply and demand, and local regulations can influence pricing. It is advisable to obtain multiple quotes from reputable plumbing contractors in your area to understand the average cost and make informed decisions.
Additional Factors
There are additional factors that may impact the cost of home repiping. These factors include the need for permits and inspections, removal and disposal of old pipes, repair or restoration of walls and surfaces after repiping, and any unforeseen complications that may arise during the process. These factors should be discussed with the plumbing contractor to understand their potential impact on the overall cost.
Conclusion
Repiping a home is a significant investment that ensures the reliability and functionality of the plumbing system. The home repipe cost depends on various factors, including the size of the home, the type of pipes chosen, the complexity of the plumbing system, local labor and material costs, and additional project-specific factors. It is essential to consider these factors and consult with professional plumbers to understand the scope of the project and make informed decisions. While the cost of repiping a home can be substantial, it is a worthwhile investment that can prevent future plumbing issues, improve water pressure and quality, and increase the value of the property.
komentiraj (0) * ispiši * #
Repipe Specialist Tucson: Ensuring Reliable Plumbing Solutions
četvrtak , 15.06.2023.Introduction
When it comes to the plumbing system in your Tucson home or business, it is crucial to prioritize its functionality and reliability. Over time, pipes can deteriorate, leading to leaks, reduced water pressure, and other plumbing issues. Hiring a repipe specialist in Tucson becomes essential to address these concerns effectively. In this article, we will explore the significance of repipe specialists in Tucson, their expertise, and why their services are vital for maintaining a reliable plumbing system.
Understanding Repipe Specialists in Tucson
Repipe specialists in Tucson are highly skilled professionals with extensive experience in replacing and upgrading plumbing pipes. They possess in-depth knowledge of the local plumbing infrastructure, building codes, and regulations specific to the region. These specialists specialize in assessing the condition of existing pipes, determining the need for repiping, and executing repiping projects efficiently.
The Importance of Repipe Specialists in Tucson
Expert Assessment: Repipe specialists have the expertise to accurately assess the condition of your plumbing system. They can identify issues such as corrosion, leaks, or outdated pipes that may require repiping. Their knowledge allows them to provide informed analyses and recommend the most suitable repiping solutions for your specific needs.
Knowledge of Local Plumbing Systems: Tucson repipe specialists are familiar with the unique plumbing challenges faced in the region. They understand the impact of factors such as hard water, mineral deposits, and desert climate on plumbing systems. This specialized knowledge ensures that they can provide tailored solutions that are specific to Tucson's plumbing requirements.
Compliance with Building Codes: Repipe specialists in Tucson are well-versed in local building codes and regulations. They ensure that all repiping projects adhere to these standards, ensuring the safety and legality of the installation. Compliance with building codes also helps to avoid potential issues or complications that may arise in the future.
High-Quality Materials and Workmanship: Repipe specialists prioritize the use of high-quality materials and employ industry-standard techniques during the repiping process. They have access to the latest advancements in plumbing technology and ensure that the new pipes meet durability and performance standards. This attention to quality ensures a reliable and long-lasting plumbing system.
Efficient and Timely Service: Repiping can be a complex and time-consuming task. Repipe specialists in Tucson have the necessary skills, experience, and tools to complete the repiping process efficiently and within the designated timeframe. Their expertise minimizes disruptions to your daily routine and ensures that you can resume normal activities as quickly as possible.
Long-Term Cost Savings: While repiping may involve an initial investment, it can lead to long-term cost savings. By replacing outdated or damaged pipes, you reduce the risk of leaks and water damage that could result in expensive repairs. Repipe specialists can help you choose cost-effective solutions that provide long-lasting benefits for your plumbing system.
Conclusion
Maintaining a reliable plumbing system is essential for the comfort and functionality of your Tucson property. Hiring a repipe specialist ensures that your plumbing needs are addressed with professionalism, expertise, and attention to detail. With their knowledge of local plumbing systems and adherence to building codes, repipe specialists in Tucson provide efficient and reliable solutions. By investing in their services, you can trust in the durability and performance of your plumbing system for years to come. Don't hesitate to reach out to a repipe specialist in Tucson to ensure the optimal functioning of your plumbing system and the peace of mind you deserve.
komentiraj (0) * ispiši * #
Repipe Specialists of Arizona: Your Trusted Partner for All Repiping Needs
petak , 14.04.2023.If you're a homeowner in Arizona, you know the importance of maintaining your plumbing system. With the harsh desert climate and hard water, your pipes are susceptible to wear and tear, and eventually, you may need to consider repiping your home. When that time comes, you need a trusted partner who can handle the job efficiently, professionally, and affordably. That's where Repipe Specialists of Arizona comes in.
Who Are We?
At Repipe Specialists of Arizona, we are a team of licensed, bonded, and insured plumbing professionals who specialize in repiping homes. We understand that repiping is a significant investment and can be stressful for homeowners. That's why we take the time to explain the process, answer your questions, and ensure that you feel comfortable every step of the way.
What Services Do We Offer?
Our team of experts offers a wide range of repiping services, including whole-house repiping, PEX repiping, copper repiping, and galvanized pipe replacement. We use only the highest quality materials, and our work is backed by a lifetime warranty. We also offer free in-home consultations, so you can have an accurate estimate of the cost and scope of your project.
Why Choose Us?
When it comes to repiping your home, you want to choose a company that you can trust. At Repipe Specialists of Arizona, we pride ourselves on our professionalism, expertise, and customer service. Here are just a few reasons why you should choose us for your repiping needs:
• Experience: With over 20 years of experience in the plumbing industry, we have the knowledge and expertise to handle any repiping job.
• Quality: We use only the highest quality materials and equipment, and our work is backed by a lifetime warranty.
• Customer Service: We understand that repiping your home can be stressful. That's why we take the time to answer your questions and ensure that you feel comfortable every step of the way.
• Affordability: We offer competitive pricing and financing options to make repiping your home affordable and accessible.
• Efficiency: We work quickly and efficiently to minimize disruption to your daily life and get your plumbing system back up and running as soon as possible.
Conclusion
At Repipe Specialists of Arizona, we understand that repiping your home is a significant investment. That's why we are committed to providing the highest quality repiping services at an affordable price. With over 20 years of experience, a lifetime warranty, and a commitment to customer service, we are your trusted partner for all your repiping needs. Contact us today for a free in-home consultation and see why we are the best choice for repiping your home
komentiraj (0) * ispiši * #
